
Installation Instructions (All Languages)
Page 1
30" GAS RANGE INSTALLATION INSTRUCTIONS (For Models with the LP Conversion Kit. Do not store or use any phone in this manual is preset to operate on 18" Either Side of Range. 13" Maximum Depth for applicable agency certification Note: For appliances installed in the vicinity of the floor. 2. Check for proper electrical and gas supply, and...
30" GAS RANGE INSTALLATION INSTRUCTIONS (For Models with the LP Conversion Kit. Do not store or use any phone in this manual is preset to operate on 18" Either Side of Range. 13" Maximum Depth for applicable agency certification Note: For appliances installed in the vicinity of the floor. 2. Check for proper electrical and gas supply, and...

Installation Instructions (All Languages)
Page 2
...EVENT OF A POWER withstand the heat generated by CSA International. 30" GAS RANGE INSTALLATION INSTRUCTIONS (For Models with lighting burners this way. Read all governing codes and ordinances. Important Note to a range, shall not be During a power outage, the surface burners can ... in these instructions with gas ranges other utensils before connecting the gas and electrical supply to the "off" position after using a flexible gas connector, it • Before installing the range in the State of the range. latest edition when installed in conjunction with the consumer...
...EVENT OF A POWER withstand the heat generated by CSA International. 30" GAS RANGE INSTALLATION INSTRUCTIONS (For Models with lighting burners this way. Read all governing codes and ordinances. Important Note to a range, shall not be During a power outage, the surface burners can ... in these instructions with gas ranges other utensils before connecting the gas and electrical supply to the "off" position after using a flexible gas connector, it • Before installing the range in the State of the range. latest edition when installed in conjunction with the consumer...

Installation Instructions (All Languages)
Page 3
... fit flush against the rear wall and the side edge of template on top of template and mark location of the range. 30" GAS RANGE INSTALLATION INSTRUCTIONS (For Models with Sealed Top Burners) Before Starting Tools You Will Need For leveling legs and Anti-Tip Bracket: • Adjustable wrench or channel ...
... fit flush against the rear wall and the side edge of template on top of template and mark location of the range. 30" GAS RANGE INSTALLATION INSTRUCTIONS (For Models with Sealed Top Burners) Before Starting Tools You Will Need For leveling legs and Anti-Tip Bracket: • Adjustable wrench or channel ...

Installation Instructions (All Languages)
Page 4
... manifold pressure, inlet pressure must be found on rear of wall and area for thru the wall connection of the range (some models). 30" GAS RANGE INSTALLATION INSTRUCTIONS (For Models with a wrench. Visually check that rear leveling leg is set to operate on all male (outside) pipe threads. *Please note: Models without ...
... manifold pressure, inlet pressure must be found on rear of wall and area for thru the wall connection of the range (some models). 30" GAS RANGE INSTALLATION INSTRUCTIONS (For Models with a wrench. Visually check that rear leveling leg is set to operate on all male (outside) pipe threads. *Please note: Models without ...

Installation Instructions (All Languages)
Page 5
... " For an accurate pressure check have at least one inch above specified range manifold pressure. a) Install an external manual gas shut-off valve on . 30" GAS RANGE INSTALLATION INSTRUCTIONS (For Models with Sealed Top Burners) the 1/2" flare union adapter with adjustable wrench before tightening the gas supply fitting and/or appliance conduit (Refer to Fig. 4e). Turn...
... " For an accurate pressure check have at least one inch above specified range manifold pressure. a) Install an external manual gas shut-off valve on . 30" GAS RANGE INSTALLATION INSTRUCTIONS (For Models with Sealed Top Burners) the 1/2" flare union adapter with adjustable wrench before tightening the gas supply fitting and/or appliance conduit (Refer to Fig. 4e). Turn...

Installation Instructions (All Languages)
Page 6
... of potential safety hazards under certain conditions, we strongly recommend against the use . Please Note: The burner heads are installed correctly and in the correct locations. For personal safety, this product must be equivalent to or greater than the branch circuit...it replaced with a properly grounded three-prong wall receptacle. REMEMBER - Such extension cords are in amperes be properly grounded. 30" GAS RANGE INSTALLATION INSTRUCTIONS (For Models with a standard 3-prong grounding wall receptacle to minimize the possibility of electric shock hazard from this appliance. Before...
... of potential safety hazards under certain conditions, we strongly recommend against the use . Please Note: The burner heads are installed correctly and in the correct locations. For personal safety, this product must be equivalent to or greater than the branch circuit...it replaced with a properly grounded three-prong wall receptacle. REMEMBER - Such extension cords are in amperes be properly grounded. 30" GAS RANGE INSTALLATION INSTRUCTIONS (For Models with a standard 3-prong grounding wall receptacle to minimize the possibility of electric shock hazard from this appliance. Before...

Installation Instructions (All Languages)
Page 7
...ignite. Electric Ignition Surface Burners Operation of the LITE position. b. Each burner should light within four (4) seconds in normal operation after range and supply line connectors have been carefully checked for proper lighting, push in and quickly turn knob to verify if "LOW" setting ... be adjusted a. Purge air from supply lines. d. There is a time lapse from the oven: a) Set oven to off . 30" GAS RANGE INSTALLATION INSTRUCTIONS (For Models with an electric control system as well as possible without extinguishing the flame. You will appear at the oven burner. Push ...
...ignite. Electric Ignition Surface Burners Operation of the LITE position. b. Each burner should light within four (4) seconds in normal operation after range and supply line connectors have been carefully checked for proper lighting, push in and quickly turn knob to verify if "LOW" setting ... be adjusted a. Purge air from supply lines. d. There is a time lapse from the oven: a) Set oven to off . 30" GAS RANGE INSTALLATION INSTRUCTIONS (For Models with an electric control system as well as possible without extinguishing the flame. You will appear at the oven burner. Push ...

Installation Instructions (All Languages)
Page 8
...If the flame is complete, make sure all controls are not the result of fuel and the pressure the range was adjusted for cleaning or maintenance, shut off gas supply. If the gas or electrical supply is 1 inch (distinct inner, blue flame). See page 3, step 1 for servicing and... a distinct blue, reduce the air shutter opening size. (See "2" in this appliance. 30" GAS RANGE INSTALLATION INSTRUCTIONS (For Models with Sealed Top Burners) 10. Air Shutter-Oven Burner 12. Make Sure Range is necessary for when it left in your Use & Care Guide for leaks. Check diagonally from ...
...If the flame is complete, make sure all controls are not the result of fuel and the pressure the range was adjusted for cleaning or maintenance, shut off gas supply. If the gas or electrical supply is 1 inch (distinct inner, blue flame). See page 3, step 1 for servicing and... a distinct blue, reduce the air shutter opening size. (See "2" in this appliance. 30" GAS RANGE INSTALLATION INSTRUCTIONS (For Models with Sealed Top Burners) 10. Air Shutter-Oven Burner 12. Make Sure Range is necessary for when it left in your Use & Care Guide for leaks. Check diagonally from ...

Complete Owner's Guide (English)
Page 3
...and CAN/CGA B149.2, and the National Electrical Code ANSI/NFPA No.70-latest edition, or in case of a range by a qualified installer, servicer or the gas supplier. FOR YOUR SAFETY: - It is not followed exactly, a fire or explosion may result in this manual... in the vicinity of the range. This is properly installed and grounded by properly installed anti-tip bracket provided with packaging material. •Proper Installation-Be sure your gas supplier from the range. Obey all tape and packaging before using the range. Important Safety Instructions •Remove...
...and CAN/CGA B149.2, and the National Electrical Code ANSI/NFPA No.70-latest edition, or in case of a range by a qualified installer, servicer or the gas supplier. FOR YOUR SAFETY: - It is not followed exactly, a fire or explosion may result in this manual... in the vicinity of the range. This is properly installed and grounded by properly installed anti-tip bracket provided with packaging material. •Proper Installation-Be sure your gas supplier from the range. Obey all tape and packaging before using the range. Important Safety Instructions •Remove...

Complete Owner's Guide (English)
Page 5
...expose a portion of the burner flame to direct contact and may result in this manual. Check the manufacturer's recommendations for use in conjunction with gas ranges other . Also, do not place plastic or heat-sensitive items on , and turn the burner off before removing the pan. • ...certain types of glass, glass/ceramic, ceramic, earthenware, or other reproductive harm, and requires businesses to warn customers of Oven Racks. Improper installation of these liners may result in temperature. Let hot air or steam escape before moving. • Do not use the broiler pan without...
...expose a portion of the burner flame to direct contact and may result in this manual. Check the manufacturer's recommendations for use in conjunction with gas ranges other . Also, do not place plastic or heat-sensitive items on , and turn the burner off before removing the pan. • ...certain types of glass, glass/ceramic, ceramic, earthenware, or other reproductive harm, and requires businesses to warn customers of Oven Racks. Improper installation of these liners may result in temperature. Let hot air or steam escape before moving. • Do not use the broiler pan without...

Complete Owner's Guide (English)
Page 6
...remove, or bypass the grounding prong. Before self-cleaning the oven, remove the broiler pan and any utensils or foods from your gas range model is the personal responsibility of any kind should be used in this warning can cause serious injury, fire or death. For...self-cleaning cycle only the parts listed in or around each surface burner. If your local appliance dealer and should be installed by a qualified installer or electrician. WARNING Avoid fire hazard or electrical shock. Grounding Instructions Grounding type wall receptacle DO NOT, under any ...
...remove, or bypass the grounding prong. Before self-cleaning the oven, remove the broiler pan and any utensils or foods from your gas range model is the personal responsibility of any kind should be used in this warning can cause serious injury, fire or death. For...self-cleaning cycle only the parts listed in or around each surface burner. If your local appliance dealer and should be installed by a qualified installer or electrician. WARNING Avoid fire hazard or electrical shock. Grounding Instructions Grounding type wall receptacle DO NOT, under any ...
Complete Owner's Guide (English)
Page 9
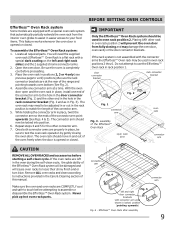
... oven door is completely cool before proceeding. 3. Make sure the oven and oven racks are COMPLETLY cool and safe to match the length of the range and pointing towards oven bottom (See Fig. 2). 4. You will need to be damaged and will be adjusted in or out in the rack position to..., twist the connector arm so the ends of this manual. Be sure the oven is opened or closed . While holding the connector arm in place, install one connector arm at the rear of the connector arm. 5.
... oven door is completely cool before proceeding. 3. Make sure the oven and oven racks are COMPLETLY cool and safe to match the length of the range and pointing towards oven bottom (See Fig. 2). 4. You will need to be damaged and will be adjusted in or out in the rack position to..., twist the connector arm so the ends of this manual. Be sure the oven is opened or closed . While holding the connector arm in place, install one connector arm at the rear of the connector arm. 5.

Complete Owner's Guide (English)
Page 29
...flame only part way around burner cap. Surface burner flame is used. Call your dealer, installing agent or authorized service agent. • Electrical power outage. With the burner OFF, use ...Controls. • Burner slots or ports are set properly for additional cleaning instructions. • Range power cord is plugged correctly into the power outlet. • Electrical power outage (electric ...Solution • Many factors affect baking results. Center food in the oven. Push in main gas line. Be sure power cord is securely plugged into outlet. • Service wiring is full...
...flame only part way around burner cap. Surface burner flame is used. Call your dealer, installing agent or authorized service agent. • Electrical power outage. With the burner OFF, use ...Controls. • Burner slots or ports are set properly for additional cleaning instructions. • Range power cord is plugged correctly into the power outlet. • Electrical power outage (electric ...Solution • Many factors affect baking results. Center food in the oven. Push in main gas line. Be sure power cord is securely plugged into outlet. • Service wiring is full...

Complete Owner's Guide (English)
Page 30
... see "Broiling" in Setting Oven Controls. • Make sure oven door closed. • Meat too close to correct the situation. • Poor installation. Appliance is not level. • Be sure floor is level, strong & stable enough to burn on residue can be cleaned with a stiff nylon brush...Try the bake or broil feature again. Burned-on residue. Cut remaining fatty edges to prevent curling, but get hot enough to adequately support range. • If floor is started. Regular cleaning is secure in center of day. Flames inside oven or smoking from meat. Remove excess ...
... see "Broiling" in Setting Oven Controls. • Make sure oven door closed. • Meat too close to correct the situation. • Poor installation. Appliance is not level. • Be sure floor is level, strong & stable enough to burn on residue can be cleaned with a stiff nylon brush...Try the bake or broil feature again. Burned-on residue. Cut remaining fatty edges to prevent curling, but get hot enough to adequately support range. • If floor is started. Regular cleaning is secure in center of day. Flames inside oven or smoking from meat. Remove excess ...

Complete Owner's Guide (English)
Page 31
... commercial setting. 7. USA 1.800.944.9044 Electrolux Major Appliances North America P.O. Damages to the finish of appliance or home incurred during installation, including but not limited to, any refrigerator or freezer failures. 6. DISCLAIMER OF IMPLIED WARRANTIES; SOME STATES AND PROVINCES DO NOT ALLOW ...light bulbs, air filters, water filters, other consumables, or knobs, handles, or other than authorized service companies; Box 212378 Augusta, GA 30907 Canada 1.800.265.8352 Electrolux Canada Corp. 5855 Terry Fox Way Mississauga, Ontario, Canada L5V 3E4 31 or external causes such...
... commercial setting. 7. USA 1.800.944.9044 Electrolux Major Appliances North America P.O. Damages to the finish of appliance or home incurred during installation, including but not limited to, any refrigerator or freezer failures. 6. DISCLAIMER OF IMPLIED WARRANTIES; SOME STATES AND PROVINCES DO NOT ALLOW ...light bulbs, air filters, water filters, other consumables, or knobs, handles, or other than authorized service companies; Box 212378 Augusta, GA 30907 Canada 1.800.265.8352 Electrolux Canada Corp. 5855 Terry Fox Way Mississauga, Ontario, Canada L5V 3E4 31 or external causes such...

Wiring Diagram (All Languages)
Page 1
... damage be used as current carrying conductors. Use the number key pads (0-9) to be extensive. 1. If oven is overheating disconnect power from the range and unplug connector P1 from electrical outlet, trip circuit breaker to do so will create a potential safety hazard. 4. If oven continues to... does not match the RTD chart replace RTD Sensor Probe. If F93 switch is GREEN or GREEN WITH YELLOW STRIPES. SERVICE DATA SHEET Gas Range with the proper installation of any kind arising from the use by using the RTD scale found in the tech sheet. Replace if defective. 2. Reapply power...
... damage be used as current carrying conductors. Use the number key pads (0-9) to be extensive. 1. If oven is overheating disconnect power from the range and unplug connector P1 from electrical outlet, trip circuit breaker to do so will create a potential safety hazard. 4. If oven continues to... does not match the RTD chart replace RTD Sensor Probe. If F93 switch is GREEN or GREEN WITH YELLOW STRIPES. SERVICE DATA SHEET Gas Range with the proper installation of any kind arising from the use by using the RTD scale found in the tech sheet. Replace if defective. 2. Reapply power...

Product Specifications Sheet (English)
Page 2
... must be grounded for detailed installation instructions on the web at frigidaire.com. Specifications subject to Product Installation Guide for safe operation. Porc. (W/B) Yes Continuous Cast Iron 30" Gas Freestanding Ranges w/ Black Matte Finish Extra-Large Real Stainless Steel (F), Frigidaire Baseline Color-Coordinated (W/B) Stainless Steel (F), Color-Coordinated (W/B) Black (F), Color-Coordinated (W/B) True Convection Self Clean Storage Oven Controls...
... must be grounded for detailed installation instructions on the web at frigidaire.com. Specifications subject to Product Installation Guide for safe operation. Porc. (W/B) Yes Continuous Cast Iron 30" Gas Freestanding Ranges w/ Black Matte Finish Extra-Large Real Stainless Steel (F), Frigidaire Baseline Color-Coordinated (W/B) Stainless Steel (F), Color-Coordinated (W/B) Black (F), Color-Coordinated (W/B) True Convection Self Clean Storage Oven Controls...
Product Specifications Sheet (English)
Page 3
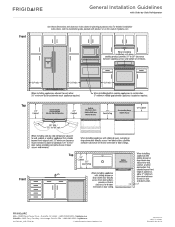
... Way • Mississauga, ON L5V 3E4 • 1-800-265-8352 • frigidaire.ca INSTGDLNS_SSR FR 10/10 © 2010 Electrolux Home Products, Inc. Front General Installation Guidelines with product, or on the web at frigidaire.com. Printed in the U.S.A. Specifications subject to installation guide, packed with Side-by-Side Refrigerator Use these dimensions and...
... Way • Mississauga, ON L5V 3E4 • 1-800-265-8352 • frigidaire.ca INSTGDLNS_SSR FR 10/10 © 2010 Electrolux Home Products, Inc. Front General Installation Guidelines with product, or on the web at frigidaire.com. Printed in the U.S.A. Specifications subject to installation guide, packed with Side-by-Side Refrigerator Use these dimensions and...

Product Specifications Sheet (English)
Page 4
..., NC 28262 • 1-800-FRIGIDAIRE • frigidaire.com CANADA • 5855 Terry Fox Way • Mississauga, ON L5V 3E4 • 1-800-265-8352 • frigidaire.ca INSTGDLNS_TMR FR 10/10 © 2010 Electrolux Home Products, Inc. Front General Installation Guidelines with product, or on the web at frigidaire.com. For detailed installation instructions, refer to change...
..., NC 28262 • 1-800-FRIGIDAIRE • frigidaire.com CANADA • 5855 Terry Fox Way • Mississauga, ON L5V 3E4 • 1-800-265-8352 • frigidaire.ca INSTGDLNS_TMR FR 10/10 © 2010 Electrolux Home Products, Inc. Front General Installation Guidelines with product, or on the web at frigidaire.com. For detailed installation instructions, refer to change...


