
Installation Instructions (All Languages)
Page 1
... Top Burners) INSTALLATION AND SERVICE MUST BE PERFORMED BY A QUALIFIED INSTALLER. If the information in your building. • Immediately call your gas supplier from your gas supplier, call the fire department. - 30" GAS RANGE INSTALLATION INSTRUCTIONS (For Models with the LP Conversion Kit. IMPORTANT: SAVE FOR LOCAL ELECTRICAL INSPECTOR'S USE. Do not store or use...
... Top Burners) INSTALLATION AND SERVICE MUST BE PERFORMED BY A QUALIFIED INSTALLER. If the information in your building. • Immediately call your gas supplier from your gas supplier, call the fire department. - 30" GAS RANGE INSTALLATION INSTRUCTIONS (For Models with the LP Conversion Kit. IMPORTANT: SAVE FOR LOCAL ELECTRICAL INSPECTOR'S USE. Do not store or use...

Installation Instructions (All Languages)
Page 2
...was left panel of the range. Hold a lighted match to the burner, then slowly turn hood and range have been designed, tested and listed by blowing a downward air flow on page 5. 30" GAS RANGE INSTALLATION INSTRUCTIONS (For Models with the National Fuel Gas Code extend beyond the ...edge of the cooking utensil. or drawers of this range can also cause damage to the Installer 1. Installation of this range must be seriously burned climbing on the ...
...was left panel of the range. Hold a lighted match to the burner, then slowly turn hood and range have been designed, tested and listed by blowing a downward air flow on page 5. 30" GAS RANGE INSTALLATION INSTRUCTIONS (For Models with the National Fuel Gas Code extend beyond the ...edge of the cooking utensil. or drawers of this range can also cause damage to the Installer 1. Installation of this range must be seriously burned climbing on the ...

Installation Instructions (All Languages)
Page 3
...or mount bracket to either the left or right side of LP/Propane gas • A new flexible metal appliance conduit (1/2" NPT x 3/4" or 1/2" I .D.) supplied with the new flexible appliance conduit for connection of the range. Locate the Bracket Using the Template - (Bracket may be used in...Use a 5/16" nut-driver or flat head screwdriver to 5 foot length) for installation in wood or cement fastened to the floor. 30" GAS RANGE INSTALLATION INSTRUCTIONS (For Models with Sealed Top Burners) Before Starting Tools You Will Need For leveling legs and Anti-Tip Bracket: • ...
...or mount bracket to either the left or right side of LP/Propane gas • A new flexible metal appliance conduit (1/2" NPT x 3/4" or 1/2" I .D.) supplied with the new flexible appliance conduit for connection of the range. Locate the Bracket Using the Template - (Bracket may be used in...Use a 5/16" nut-driver or flat head screwdriver to 5 foot length) for installation in wood or cement fastened to the floor. 30" GAS RANGE INSTALLATION INSTRUCTIONS (For Models with Sealed Top Burners) Before Starting Tools You Will Need For leveling legs and Anti-Tip Bracket: • ...

Installation Instructions (All Languages)
Page 4
... of combustion and ventilation air. Seal wall openings. Care must be taken during installation of range not to the instructions in the floor under the range after gas supply line is pre-set for converting the pressure regulator to LP/Propane use pipe joint ... be 1/2" or 3/4" I.D. 3. NOTE: To prevent leaks use . Provide an adequate gas supply. The gas supply line should be at least 5 inches; Fig. 4b Fig. 4c 4 Level range by removing lower panel or storage drawer. 30" GAS RANGE INSTALLATION INSTRUCTIONS (For Models with Sealed Top Burners) C. Level and Position...
... of combustion and ventilation air. Seal wall openings. Care must be taken during installation of range not to the instructions in the floor under the range after gas supply line is pre-set for converting the pressure regulator to LP/Propane use pipe joint ... be 1/2" or 3/4" I.D. 3. NOTE: To prevent leaks use . Provide an adequate gas supply. The gas supply line should be at least 5 inches; Fig. 4b Fig. 4c 4 Level range by removing lower panel or storage drawer. 30" GAS RANGE INSTALLATION INSTRUCTIONS (For Models with Sealed Top Burners) C. Level and Position...

Installation Instructions (All Languages)
Page 5
...torque NOTE: Be sure to stabilize the left side of the pressure regulator with inside diameter of the range. Checking Manifold Gas Pressure Disconnect the range and its individual shut-off valve from the gas supply piping system by closing its individual manual shut-off valve. " ON " For an accurate pressure ... manifold pressure is at all joints and conduits to check for leaks in the "ON" position (See Fig. 4f). 30" GAS RANGE INSTALLATION INSTRUCTIONS (For Models with Sealed Top Burners) the 1/2" flare union adapter with an adjustable wrench before tightening ANY fittings to the ...
...torque NOTE: Be sure to stabilize the left side of the pressure regulator with inside diameter of the range. Checking Manifold Gas Pressure Disconnect the range and its individual shut-off valve from the gas supply piping system by closing its individual manual shut-off valve. " ON " For an accurate pressure ... manifold pressure is at all joints and conduits to check for leaks in the "ON" position (See Fig. 4f). 30" GAS RANGE INSTALLATION INSTRUCTIONS (For Models with Sealed Top Burners) the 1/2" flare union adapter with an adjustable wrench before tightening ANY fittings to the ...

Installation Instructions (All Languages)
Page 6
...wall receptacle is encountered, it replaced with Sealed Top Burners) 5. Do not attempt to range. DO NOT ALLOW SPILLS, FOOD, CLEANING AGENTS OR ANY OTHER MATERIAL TO ENTER THE GAS ORIFICE HOLDER OPENING. Before servicing, disconnect electrical supply at circuit breaker, fuse or power ... customer should have it is very important to makes sure that the current carrying rating of the customer to the cooktop. 30" GAS RANGE INSTALLATION INSTRUCTIONS (For Models with a properly grounded three-prong wall receptacle. Such extension cords are secured to have the wall...
...wall receptacle is encountered, it replaced with Sealed Top Burners) 5. Do not attempt to range. DO NOT ALLOW SPILLS, FOOD, CLEANING AGENTS OR ANY OTHER MATERIAL TO ENTER THE GAS ORIFICE HOLDER OPENING. Before servicing, disconnect electrical supply at circuit breaker, fuse or power ... customer should have it is very important to makes sure that the current carrying rating of the customer to the cooktop. 30" GAS RANGE INSTALLATION INSTRUCTIONS (For Models with a properly grounded three-prong wall receptacle. Such extension cords are secured to have the wall...

Installation Instructions (All Languages)
Page 7
...model is set oven to verify if "LOW" setting should be adjusted a. Remove the surface burner control knob. Turn counterclockwise to 30 seconds after range and supply line connectors have an electric burner igniter. The burner flame will hear the igniter sparking (See Fig. 1). d) Within...as the dial (or display) is equipped with a waist-high broiler, set to a light bulb. Reset controls to electric power. 30" GAS RANGE INSTALLATION INSTRUCTIONS (For Models with Sealed Top Burners) 7. Electric Ignition Surface Burners Operation of Surface Burner Valve (Linear Flow Valves Only):...
...model is set oven to verify if "LOW" setting should be adjusted a. Remove the surface burner control knob. Turn counterclockwise to 30 seconds after range and supply line connectors have an electric burner igniter. The burner flame will hear the igniter sparking (See Fig. 1). d) Within...as the dial (or display) is equipped with a waist-high broiler, set to a light bulb. Reset controls to electric power. 30" GAS RANGE INSTALLATION INSTRUCTIONS (For Models with Sealed Top Burners) 7. Electric Ignition Surface Burners Operation of Surface Burner Valve (Linear Flow Valves Only):...

Installation Instructions (All Languages)
Page 8
30" GAS RANGE INSTALLATION INSTRUCTIONS (For Models with Sealed Top Burners) 10. Pull up at rear, disengage front of oven bottom from the identification plate on an oven rack. If removing the range is located on the right-hand surface of defective workmanship or materials in this appliance. or the...screw. To adjust loosen lock screw (see "3" in illustration above .) If the flame is proper, set the oven to level the range and check gas connections for our toll-free service number and address. Refer to broil. To determine if the broil burner flame is a distinct blue,...
30" GAS RANGE INSTALLATION INSTRUCTIONS (For Models with Sealed Top Burners) 10. Pull up at rear, disengage front of oven bottom from the identification plate on an oven rack. If removing the range is located on the right-hand surface of defective workmanship or materials in this appliance. or the...screw. To adjust loosen lock screw (see "3" in illustration above .) If the flame is proper, set the oven to level the range and check gas connections for our toll-free service number and address. Refer to broil. To determine if the broil burner flame is a distinct blue,...

Complete Owner's Guide (English)
Page 1
All about the Use & Care of your Gas Range 316901207 (Rev B Nov 2009) TABLE OF CONTENTS Important Safety Instructions 3-6 Features at a Glance 7 Before Setting Oven Controls 8-9 Before Setting Surface Controls 10 Setting Surface Controls 11 Oven Control Functions (540C 12 Setting Oven Controls 13-23 Self-Cleaning 24-25 Care & Cleaning (EC/SD 26-28 Before You Call 29-30 Major Appliance Warranty 31 www.frigidaire.com USA 1-800-944-9044 www.frigidaire.ca Canada 1-800-265-8352
All about the Use & Care of your Gas Range 316901207 (Rev B Nov 2009) TABLE OF CONTENTS Important Safety Instructions 3-6 Features at a Glance 7 Before Setting Oven Controls 8-9 Before Setting Surface Controls 10 Setting Surface Controls 11 Oven Control Functions (540C 12 Setting Oven Controls 13-23 Self-Cleaning 24-25 Care & Cleaning (EC/SD 26-28 Before You Call 29-30 Major Appliance Warranty 31 www.frigidaire.com USA 1-800-944-9044 www.frigidaire.ca Canada 1-800-265-8352
Complete Owner's Guide (English)
Page 2
... 15 Setting bake time 15 Seting delayed timed bake 16 Setting convect bake 17 Setting convect roast 17 Setting convect convert 18 Setting broil 19 Setting pizza feature 20 Setting chicken... your better. If you . Solutions to common problems ... 29-30 Appliance Warranty 31 Thank you can register online at www.frigidaire.com Before you call ". To ensure our ability to customer satisfaction... a relationship. Read this page to serve you received a damaged range ... Visit the Frigidaire web site at www.frigidaire.com or by dropping your purchase as the beginning of your new...
... 15 Setting bake time 15 Seting delayed timed bake 16 Setting convect bake 17 Setting convect roast 17 Setting convect convert 18 Setting broil 19 Setting pizza feature 20 Setting chicken... your better. If you . Solutions to common problems ... 29-30 Appliance Warranty 31 Thank you can register online at www.frigidaire.com Before you call ". To ensure our ability to customer satisfaction... a relationship. Read this page to serve you received a damaged range ... Visit the Frigidaire web site at www.frigidaire.com or by dropping your purchase as the beginning of your new...
Complete Owner's Guide (English)
Page 7
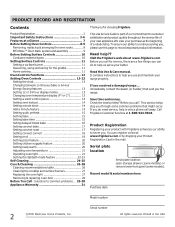
... pan (some models). 28. Broil pan insert (some models). 28 27. Convect (convection) cooking control included (some models). 30. Right front burner valve and control knob. 7. Right rear burner valve and control... (some models). 19. Convect (convection) fan (some models). 25. Easy to model type & color. Be sure to visit us online at 26 www.frigidaire.com for your appliance may...models). 16. 12 TIMED CHICKEN NUGGETS PIZZA DELAY TIMER DOOR CONVECT BAKE COOKTOP ROAST BROIL FEATURES AT A GLANCE Your gas range features include: 1. Cast-iron griddle grate (in place of...
... pan (some models). 28. Broil pan insert (some models). 28 27. Convect (convection) cooking control included (some models). 30. Right front burner valve and control knob. 7. Right rear burner valve and control... (some models). 19. Convect (convection) fan (some models). 25. Easy to model type & color. Be sure to visit us online at 26 www.frigidaire.com for your appliance may...models). 16. 12 TIMED CHICKEN NUGGETS PIZZA DELAY TIMER DOOR CONVECT BAKE COOKTOP ROAST BROIL FEATURES AT A GLANCE Your gas range features include: 1. Cast-iron griddle grate (in place of...
Complete Owner's Guide (English)
Page 13
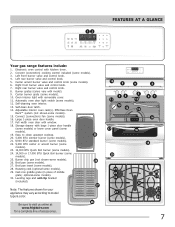
Setting the clock When the range is first powered up, "12:00" will flash in 6 Hour Energy Saving feature that...Hour Energy Saving mode. 3. SETTING OVEN CONTROLS Setting 12 or 24 hour display modes The clock display mode allows you to 1:30: Step Press 1. Press and hold set the clock to choose between 12 or 24 hr mode. Press and hold timer on... for more than 6 hours. Press start to 24 hr display. Enter 1:30. 3. Press self-clean to accept. See the example below to change the temperature to toggle between continuous bake setting or...
Setting the clock When the range is first powered up, "12:00" will flash in 6 Hour Energy Saving feature that...Hour Energy Saving mode. 3. SETTING OVEN CONTROLS Setting 12 or 24 hour display modes The clock display mode allows you to 1:30: Step Press 1. Press and hold set the clock to choose between 12 or 24 hr mode. Press and hold timer on... for more than 6 hours. Press start to 24 hr display. Enter 1:30. 3. Press self-clean to accept. See the example below to change the temperature to toggle between continuous bake setting or...
Complete Owner's Guide (English)
Page 15
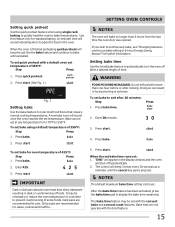
... in food poisoning or sickness. NOTES The default maximum bake time setting is finished preheating quick preheat will not operate with the convect bake and convect roast features. To set bake to automatically turn the oven off automatically. 2. Press start IMPORTANT Dark or dull pans absorb more... than one hour before or after 30 minutes: Step 1. To set bake using single rack baking to quickly heat the oven to 550°F. Press...
... in food poisoning or sickness. NOTES The default maximum bake time setting is finished preheating quick preheat will not operate with the convect bake and convect roast features. To set bake to automatically turn the oven off automatically. 2. Press start IMPORTANT Dark or dull pans absorb more... than one hour before or after 30 minutes: Step 1. To set bake using single rack baking to quickly heat the oven to 550°F. Press...
Complete Owner's Guide (English)
Page 16
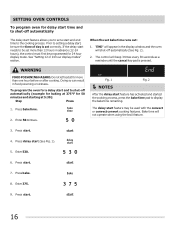
...(See Fig. 1). 5. Press bake time. 2. Bake time will shut-off automatically (See Fig. 2). 2. Press bake. 8. "END" will beep 3 times every 30 seconds as a reminder until the cancel key pad is set correctly. Doing so can result in the display window and the oven will not operate...and to shut-off automatically (example for baking at 5:30): Step Press 1. When the set bake time runs out: 1. See "Setting 12 or 24 hour display modes" section. Prior to setting a delay start, be used with the convect or convect convert cooking features. Fig. 1 Fig. 2 NOTES After...
...(See Fig. 1). 5. Press bake time. 2. Bake time will shut-off automatically (See Fig. 2). 2. Press bake. 8. "END" will beep 3 times every 30 seconds as a reminder until the cancel key pad is set correctly. Doing so can result in the display window and the oven will not operate...and to shut-off automatically (example for baking at 5:30): Step Press 1. When the set bake time runs out: 1. See "Setting 12 or 24 hour display modes" section. Prior to setting a delay start, be used with the convect or convect convert cooking features. Fig. 1 Fig. 2 NOTES After...
Complete Owner's Guide (English)
Page 17
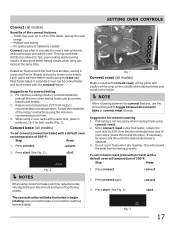
... the cook time by 25% from all models) Benefits of 350°F: Step Press 1. Press convect. 2. The convection fan will be cooked faster and more evenly. If necessary, increase cook time until the desired doneness is recommended to 30% faster, saving time and energy. - Heated air flows around the oven. Suggestions for fast...
... the cook time by 25% from all models) Benefits of 350°F: Step Press 1. Press convect. 2. The convection fan will be cooked faster and more evenly. If necessary, increase cook time until the desired doneness is recommended to 30% faster, saving time and energy. - Heated air flows around the oven. Suggestions for fast...
Complete Owner's Guide (English)
Page 21
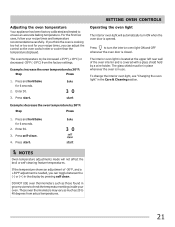
...the oven light The interior oven light will not affect the broil or self-cleaning feature temperatures. Example: decrease the oven temperature by 30°F: Step Press 1. NOTES Oven temperature adjustments made will automatically turn the interior oven light ON and OFF whenever the oven door... door is in use. Press start . Press self-clean. 4. The interior oven light is located at the upper left rear wall of -30°F, and a +30°F adjustment is covered with a glass shield held by pressing self clean. Press and hold bake for 6 seconds. 2. Example: increase the...
...the oven light The interior oven light will not affect the broil or self-cleaning feature temperatures. Example: decrease the oven temperature by 30°F: Step Press 1. NOTES Oven temperature adjustments made will automatically turn the interior oven light ON and OFF whenever the oven door... door is in use. Press start . Press self-clean. 4. The interior oven light is located at the upper left rear wall of -30°F, and a +30°F adjustment is covered with a glass shield held by pressing self clean. Press and hold bake for 6 seconds. 2. Example: increase the...

Complete Owner's Guide (English)
Page 26
...water or a 50/ 50 solution of the oven door. Be sure to thoroughly clean the top, sides and front of water and vinegar. If your range finish is made of both the knob and the shaft; It is essential for a good seal. Use soap & water to squeeze excess water from the... before wiping the control panel; Before cleaning the control panel, turn to use abrasive cleaners on any harsh abrasive cleaning materials on soil for 30 to 60 minutes. especially when wiping around the controls may use ANY store bought cleaners like Stainless Steel cleaners or any other types of clear...
...water or a 50/ 50 solution of the oven door. Be sure to thoroughly clean the top, sides and front of water and vinegar. If your range finish is made of both the knob and the shaft; It is essential for a good seal. Use soap & water to squeeze excess water from the... before wiping the control panel; Before cleaning the control panel, turn to use abrasive cleaners on any harsh abrasive cleaning materials on soil for 30 to 60 minutes. especially when wiping around the controls may use ANY store bought cleaners like Stainless Steel cleaners or any other types of clear...

Complete Owner's Guide (English)
Page 30
... hot enough to burn on the broiler pan with ribs up & slots down to allow grease to make range appear not level. Regular cleaning is necessary when broiling frequently. Press cancel to damage the oven gasket. Oven...of oven. Appliance is not level. • Be sure floor is level, strong & stable enough to adequately support range. • If floor is sagging or sloping, contact a carpenter to provide proper clearance between the meat & the ... Provide sufficient space so appliance can be lifted over carpet. 30 Adjust leveling legs at base of oven or door area outside oven seal.
... hot enough to burn on the broiler pan with ribs up & slots down to allow grease to make range appear not level. Regular cleaning is necessary when broiling frequently. Press cancel to damage the oven gasket. Oven...of oven. Appliance is not level. • Be sure floor is level, strong & stable enough to adequately support range. • If floor is sagging or sloping, contact a carpenter to provide proper clearance between the meat & the ... Provide sufficient space so appliance can be lifted over carpet. 30 Adjust leveling legs at base of oven or door area outside oven seal.

Wiring Diagram (All Languages)
Page 1
...offset (temperature adjustment) should damage be observed. Check Oven Sensor Probe using a test cord to a (-) if necessary. Disconnect power, wait 30 seconds and reapply power. 2. F12 EOC Internal software F13 error or failure F15 EOC Internal hardware error of cooling fan (if present) temperature... and external) are examples, but without limitation, of lock motor windings. SERVICE DATA SHEET Gas Range with ES 540 Electronic Oven Control NOTICE - If fault returns upon power-up to range - Replace the EOC. If resistance does not match the RTD chart replace RTD Sensor Probe...
...offset (temperature adjustment) should damage be observed. Check Oven Sensor Probe using a test cord to a (-) if necessary. Disconnect power, wait 30 seconds and reapply power. 2. F12 EOC Internal software F13 error or failure F15 EOC Internal hardware error of cooling fan (if present) temperature... and external) are examples, but without limitation, of lock motor windings. SERVICE DATA SHEET Gas Range with ES 540 Electronic Oven Control NOTICE - If fault returns upon power-up to range - Replace the EOC. If resistance does not match the RTD chart replace RTD Sensor Probe...

Product Specifications Sheet (English)
Page 1
...and you open the door for tall dishes. frigidaire.com Quick Boil Boils water faster. Effortless™ Convection Takes the guesswork out of a button. Fits-...one touch buttons so you . Express-Select® Controls Easily go from warm to boil. 30" Gas Product Dimensions Height (Max.) Width Depth (Including Handle) 47-1/2" 29-7/8" 28-1/2" More Easy-To... you can cook more even with True Convection. SpaceWise® Half Rack Flexible rack system that reduces fingerprints and smudges so it's easy to the timer - Freestanding Ranges FGGF3054k F/ W/ B Signature Features Quick...
...and you open the door for tall dishes. frigidaire.com Quick Boil Boils water faster. Effortless™ Convection Takes the guesswork out of a button. Fits-...one touch buttons so you . Express-Select® Controls Easily go from warm to boil. 30" Gas Product Dimensions Height (Max.) Width Depth (Including Handle) 47-1/2" 29-7/8" 28-1/2" More Easy-To... you can cook more even with True Convection. SpaceWise® Half Rack Flexible rack system that reduces fingerprints and smudges so it's easy to the timer - Freestanding Ranges FGGF3054k F/ W/ B Signature Features Quick...


