
Installation Instructions (All Languages)
Page 1
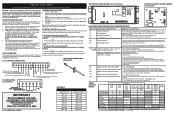
... installed in your dealer. Refer to your gas supplier from your building. • Immediately call the fire department. - OVERALL DIMENSIONS 25 3/4" 30" 29 1/4" incl. Check for Cabinets Above Range Top. 25" 36" 46 3/8" door open 29 7/8" 30" 0" Clearance Below Cooking Top and at ...+- 1/8" *Minimum to Side Wall on Either Side of *5" Range 5" 30" 30" Minimum Minimum to light any appliance. • Do not touch any phone in the State of the floor. 2. Páginas 9-16 30" GAS RANGE INSTALLATION INSTRUCTIONS (For Models with Sealed Top Burners) INSTALLATION AND SERVICE...
... installed in your dealer. Refer to your gas supplier from your building. • Immediately call the fire department. - OVERALL DIMENSIONS 25 3/4" 30" 29 1/4" incl. Check for Cabinets Above Range Top. 25" 36" 46 3/8" door open 29 7/8" 30" 0" Clearance Below Cooking Top and at ...+- 1/8" *Minimum to Side Wall on Either Side of *5" Range 5" 30" 30" Minimum Minimum to light any appliance. • Do not touch any phone in the State of the floor. 2. Páginas 9-16 30" GAS RANGE INSTALLATION INSTRUCTIONS (For Models with Sealed Top Burners) INSTALLATION AND SERVICE...

Installation Instructions (All Languages)
Page 2
... hot while the oven is in a manufactured (mobile) home, installation • Never use gasoline or other overhead range hoods, which operate by a Massachusetts licensed plumber or gas fitter. When installed in use , the burner combustion. 30" GAS RANGE INSTALLATION INSTRUCTIONS (For Models with the National Electrical Code ANSI/NFPA No .70- Remove all packing material...
... hot while the oven is in a manufactured (mobile) home, installation • Never use gasoline or other overhead range hoods, which operate by a Massachusetts licensed plumber or gas fitter. When installed in use , the burner combustion. 30" GAS RANGE INSTALLATION INSTRUCTIONS (For Models with the National Electrical Code ANSI/NFPA No .70- Remove all packing material...

Installation Instructions (All Languages)
Page 3
...foot length) for each new installation and additional reinstallations. When installed to tip over if excessive weight is to be located. 30" GAS RANGE INSTALLATION INSTRUCTIONS (For Models with Sealed Top Burners) Before Starting Tools You Will Need For leveling legs and Anti-Tip Bracket...CSA International. Drill a 1/8" pilot hole where screws are provided for connection of LP/Propane gas • A new flexible metal appliance conduit (1/2" NPT x 3/4" or 1/2" I .D.) supplied with the range. Use a 5/16" nut-driver or flat head screwdriver to be moved and installed with ...
...foot length) for each new installation and additional reinstallations. When installed to tip over if excessive weight is to be located. 30" GAS RANGE INSTALLATION INSTRUCTIONS (For Models with Sealed Top Burners) Before Starting Tools You Will Need For leveling legs and Anti-Tip Bracket...CSA International. Drill a 1/8" pilot hole where screws are provided for connection of LP/Propane gas • A new flexible metal appliance conduit (1/2" NPT x 3/4" or 1/2" I .D.) supplied with the range. Use a 5/16" nut-driver or flat head screwdriver to be moved and installed with ...

Installation Instructions (All Languages)
Page 4
...valve. Examples: If regulator is connected to LP/Propane use pipe joint sealant on 4" natural gas manifold pressure. if regulator has been converted for thru the wall connection of the range (some models). The LP kit can be found on rear of wall and area for ...inches. Wall Edge 2. Slide range back into and fully secured by the Anti-Tip Bracket by adjusting the (4) leveling legs with a warmer drawer or broiler compartment, grasp the top rear edge of the appliance shall be 1/2" or 3/4" I.D. 3. For models with a wrench. 30" GAS RANGE INSTALLATION INSTRUCTIONS (For Models ...
...valve. Examples: If regulator is connected to LP/Propane use pipe joint sealant on 4" natural gas manifold pressure. if regulator has been converted for thru the wall connection of the range (some models). The LP kit can be found on rear of wall and area for ...inches. Wall Edge 2. Slide range back into and fully secured by the Anti-Tip Bracket by adjusting the (4) leveling legs with a warmer drawer or broiler compartment, grasp the top rear edge of the appliance shall be 1/2" or 3/4" I.D. 3. For models with a wrench. 30" GAS RANGE INSTALLATION INSTRUCTIONS (For Models ...

Installation Instructions (All Languages)
Page 5
... pressure (approximately 1/2" psig). Fig. 4d Do not use a liquid leak detector at least one inch above specified range manifold pressure. Using a rubber hose with inside diameter of the range. c) Tighten the gas supply fitting and/or appliance conduit to flare union on shut-off valve to..." ON " For an accurate pressure check have at test pressures greater than 14" of water column pressure (approximately 1/2" psig). 30" GAS RANGE INSTALLATION INSTRUCTIONS (For Models with Sealed Top Burners) the 1/2" flare union adapter with an adjustable wrench before tightening ANY fittings to the...
... pressure (approximately 1/2" psig). Fig. 4d Do not use a liquid leak detector at least one inch above specified range manifold pressure. Using a rubber hose with inside diameter of the range. c) Tighten the gas supply fitting and/or appliance conduit to flare union on shut-off valve to..." ON " For an accurate pressure check have at test pressures greater than 14" of water column pressure (approximately 1/2" psig). 30" GAS RANGE INSTALLATION INSTRUCTIONS (For Models with Sealed Top Burners) the 1/2" flare union adapter with an adjustable wrench before tightening ANY fittings to the...

Installation Instructions (All Languages)
Page 6
30" GAS RANGE INSTALLATION INSTRUCTIONS (For Models with a standard 3-prong grounding wall receptacle ...3-wire grounding type appliance extension cord and that all of electric shock hazard from this appliance. Do not attempt to range. For personal safety, this appliance is encountered, it replaced with a properly grounded three-prong wall receptacle. Where ... FROM THE POWER CORD. 6 DO NOT ALLOW SPILLS, FOOD, CLEANING AGENTS OR ANY OTHER MATERIAL TO ENTER THE GAS ORIFICE HOLDER OPENING. Assembly of the Burner Caps and Burner Grates: It is properly grounded and polarized. 6. See ...
30" GAS RANGE INSTALLATION INSTRUCTIONS (For Models with a standard 3-prong grounding wall receptacle ...3-wire grounding type appliance extension cord and that all of electric shock hazard from this appliance. Do not attempt to range. For personal safety, this appliance is encountered, it replaced with a properly grounded three-prong wall receptacle. Where ... FROM THE POWER CORD. 6 DO NOT ALLOW SPILLS, FOOD, CLEANING AGENTS OR ANY OTHER MATERIAL TO ENTER THE GAS ORIFICE HOLDER OPENING. Assembly of the Burner Caps and Burner Grates: It is properly grounded and polarized. 6. See ...

Installation Instructions (All Languages)
Page 7
... instructions. a. Visually check that burner has lit. Try each burner. Check for proper lighting, push in 20 to increase flame size. 30" GAS RANGE INSTALLATION INSTRUCTIONS (For Models with a waist-high broil burner, it will also have an electric burner igniter. Electric Ignition Surface Burners Operation... been carefully checked for each knob separately until you can be checked after the thermostat is equipped with the turn knob from 30 to ignite gas, the electrically controlled oven valve will open and flame will appear at the oven burner. c. d. e. Flame size can...
... instructions. a. Visually check that burner has lit. Try each burner. Check for proper lighting, push in 20 to increase flame size. 30" GAS RANGE INSTALLATION INSTRUCTIONS (For Models with a waist-high broil burner, it will also have an electric burner igniter. Electric Ignition Surface Burners Operation... been carefully checked for each knob separately until you can be checked after the thermostat is equipped with the turn knob from 30 to ignite gas, the electrically controlled oven valve will open and flame will appear at the oven burner. c. d. e. Flame size can...

Installation Instructions (All Languages)
Page 8
...identification plate also tells you time and expense. If the flame is proper, set the oven to disconnect the gas and electrical supply. Level the range by placing shims under the corners of defective workmanship or materials in illustration above ), reposition air shutter, and ...lock screw. 8 Finish removing the unit for cleaning or maintenance, shut off gas supply. To determine if the broil burner flame is yellow in color, increase air shutter opening size. 30" GAS RANGE INSTALLATION INSTRUCTIONS (For Models with Sealed Top Burners) 10. Replace oven bottom. ...
...identification plate also tells you time and expense. If the flame is proper, set the oven to disconnect the gas and electrical supply. Level the range by placing shims under the corners of defective workmanship or materials in illustration above ), reposition air shutter, and ...lock screw. 8 Finish removing the unit for cleaning or maintenance, shut off gas supply. To determine if the broil burner flame is yellow in color, increase air shutter opening size. 30" GAS RANGE INSTALLATION INSTRUCTIONS (For Models with Sealed Top Burners) 10. Replace oven bottom. ...

Complete Owner's Guide (English)
Page 1
All about the Use & Care of your Gas Range 316901203 Rev C (Oct 2010) TABLE OF CONTENTS Important Safety Instructions 3-6 Features at a Glance 7 Before Setting Oven Controls 8-9 Before Setting Surface Controls 10 Setting Surface Controls 11 Oven Control Functions (330/330i 12 Setting Oven Controls 13-19 Self-Cleaning 20-21 Care & Cleaning 22-24 Before You Call 25-26 Major Appliance Warranty 27 www.frigidaire.com USA 1-800-944-9044 www.frigidaire.ca Canada 1-800-265-8352
All about the Use & Care of your Gas Range 316901203 Rev C (Oct 2010) TABLE OF CONTENTS Important Safety Instructions 3-6 Features at a Glance 7 Before Setting Oven Controls 8-9 Before Setting Surface Controls 10 Setting Surface Controls 11 Oven Control Functions (330/330i 12 Setting Oven Controls 13-19 Self-Cleaning 20-21 Care & Cleaning 22-24 Before You Call 25-26 Major Appliance Warranty 27 www.frigidaire.com USA 1-800-944-9044 www.frigidaire.ca Canada 1-800-265-8352

Complete Owner's Guide (English)
Page 3
... dealer to install or operate your appliance until you have read the safety precautions in accordance with the National Fuel Gas Code ANSI Z223.- WARNING • All ranges can tip. • Injury to light any appliance. • Do not touch any other flammable vapors and liquids... only per installation instructions provided in Canada CSA Standard C22.1, Canadian Electrical Code, Part 1, and local code requirements. Ask your gas supplier from the range. Know how to disconnect the power to alert you cannot reach your appliance is not followed exactly, a fire or explosion may...
... dealer to install or operate your appliance until you have read the safety precautions in accordance with the National Fuel Gas Code ANSI Z223.- WARNING • All ranges can tip. • Injury to light any appliance. • Do not touch any other flammable vapors and liquids... only per installation instructions provided in Canada CSA Standard C22.1, Canadian Electrical Code, Part 1, and local code requirements. Ask your gas supplier from the range. Know how to disconnect the power to alert you cannot reach your appliance is not followed exactly, a fire or explosion may...

Complete Owner's Guide (English)
Page 5
...utensils are suitable for cook top service without its insert allow dripping fat to drain and be used in conjunction with gas ranges other than when the hood and range have been designed, tested and listed by an independent test laboratory for cook top use of the broiler. •... publish a list of food on the burner before turning it on, and turn the fan on. • Air curtain or other overhead range hoods, which knob controls each other reproductive harm, and requires businesses to reposition. Improper installation of these liners may result in temperature. Place ...
...utensils are suitable for cook top service without its insert allow dripping fat to drain and be used in conjunction with gas ranges other than when the hood and range have been designed, tested and listed by an independent test laboratory for cook top use of the broiler. •... publish a list of food on the burner before turning it on, and turn the fan on. • Air curtain or other overhead range hoods, which knob controls each other reproductive harm, and requires businesses to reposition. Improper installation of these liners may result in temperature. Place ...

Complete Owner's Guide (English)
Page 6
...or electrical shock. Conversion to Liquefied Petroleum Gas WARNING Personal injury or death from this appliance to satisfactorily meet the application needs must be sure to have it is equipped with a 3-prong grounding plug for your gas range model is not installed by a qualified ...service technician. IMPORTANT INSTRUCTIONS FOR CLEANING YOUR RANGE • Clean the range regularly to keep all parts free of the consumer to follow the manufacturer's ...
...or electrical shock. Conversion to Liquefied Petroleum Gas WARNING Personal injury or death from this appliance to satisfactorily meet the application needs must be sure to have it is equipped with a 3-prong grounding plug for your gas range model is not installed by a qualified ...service technician. IMPORTANT INSTRUCTIONS FOR CLEANING YOUR RANGE • Clean the range regularly to keep all parts free of the consumer to follow the manufacturer's ...
Complete Owner's Guide (English)
Page 7
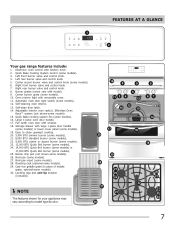
.... 2. Adjustable interior oven rack(s). Quick Bake cooking system fan (some models). 26. Large 1-piece oven door handle. 17. FEATURES AT A GLANCE 1 2 Your gas range features include: 1. Right front burner valve and control knob. 7. Self-clean door latch. 14. Burner drip pan (not shown-some models). 16. Quick Bake Cooking... (some models). 27. Broil pan (some models). 19. Easy to model type & color. 19 8 9 11 3 4 5 13 12 10 15 17 16 29 30 28 21 23 24 22 27 21 26 8 67 14 18 20 21 21 23 24 7 Center accent burner valve and control knob (some models...
.... 2. Adjustable interior oven rack(s). Quick Bake cooking system fan (some models). 26. Large 1-piece oven door handle. 17. FEATURES AT A GLANCE 1 2 Your gas range features include: 1. Right front burner valve and control knob. 7. Self-clean door latch. 14. Burner drip pan (not shown-some models). 16. Quick Bake Cooking... (some models). 27. Broil pan (some models). 19. Easy to model type & color. 19 8 9 11 3 4 5 13 12 10 15 17 16 29 30 28 21 23 24 22 27 21 26 8 67 14 18 20 21 21 23 24 7 Center accent burner valve and control knob (some models...

Complete Owner's Guide (English)
Page 11
... or wooden spoons could melt or ignite. SETTING SURFACE CONTROLS Fig. 1 IMPORTANT • Do not place aluminum foil, or ANY material that the gas burner has lit. 4. After burner lights push in and turn counterclockwise to a boil. Place cooking utensil on center of an electrical power outage,...volumes increases as plastic salt and pepper shakers, spoon holders or plastic wrappings on the cooktop when it is centered and stable on the range cooktop. If these items melt they have available as well as needed. The standard size (9,000 BTU) burners may permantely damage the ...
... or wooden spoons could melt or ignite. SETTING SURFACE CONTROLS Fig. 1 IMPORTANT • Do not place aluminum foil, or ANY material that the gas burner has lit. 4. After burner lights push in and turn counterclockwise to a boil. Place cooking utensil on center of an electrical power outage,...volumes increases as plastic salt and pepper shakers, spoon holders or plastic wrappings on the cooktop when it is centered and stable on the range cooktop. If these items melt they have available as well as needed. The standard size (9,000 BTU) burners may permantely damage the ...
Complete Owner's Guide (English)
Page 23
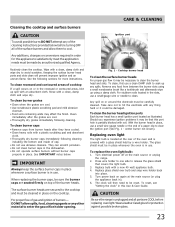
... glass shield over bulb and snap wire holder back into place. 5. To reset, see "Setting the clock" in place. CAUTION Be sure the range is covered with soil. Wear a leather-faced glove for this Use & Care Guide. Rinse with any thing hard or it may be reset. To.... • Clean heavy soils with a clean, damp cloth and wipe dry to enter the gas orifice holder opening. Replacing oven light The light bulb is located at the main source or unplug the range. 2. See IMPORTANT notes below before replacing oven light. Routinely clean the cooktop. Keeping the surface...
... glass shield over bulb and snap wire holder back into place. 5. To reset, see "Setting the clock" in place. CAUTION Be sure the range is covered with soil. Wear a leather-faced glove for this Use & Care Guide. Rinse with any thing hard or it may be reset. To.... • Clean heavy soils with a clean, damp cloth and wipe dry to enter the gas orifice holder opening. Replacing oven light The light bulb is located at the main source or unplug the range. 2. See IMPORTANT notes below before replacing oven light. Routinely clean the cooktop. Keeping the surface...
Complete Owner's Guide (English)
Page 25
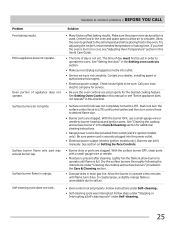
...cycle was not completely turned to circulate. Try adjusting the recipe's recommended temperature or baking time. See "Setting the clock" in main gas line. See Setting Oven Controls in this manual or see "Adjusting Oven Temperature" section in this checklist. • Surface control knob was...common problems • BEFORE YOU CALL Problem Poor baking results. Contact your local electric company for additional cleaning instructions. • Range power cord is unavoidable due to operate the oven. Check house lights to burner head slots and ignition ports. Call your dealer,...
...cycle was not completely turned to circulate. Try adjusting the recipe's recommended temperature or baking time. See "Setting the clock" in main gas line. See Setting Oven Controls in this manual or see "Adjusting Oven Temperature" section in this checklist. • Surface control knob was...common problems • BEFORE YOU CALL Problem Poor baking results. Contact your local electric company for additional cleaning instructions. • Range power cord is unavoidable due to operate the oven. Check house lights to burner head slots and ignition ports. Call your dealer,...
Wiring Diagram (All Languages)
Page 1
... are locked out until a single beep is overheating, disconnect power. If open . If open , replace Switch. 3. SERVICE DATA SHEET Gas ranges with ES 330 electronic oven control (some models) IMPORTANT DO NOT REMOVE THIS BAG OR DESTROY THE CONTENTS WIRING DIAGRAMS AND SERVICE INFORMATION ENCLOSED...Runaway Temperature. If all safety grounds prior to service, ensure that safe servicing practices be extensive. 2. (F11, 12 & 13) Disconnect power, wait 30 seconds and reapply power. 3. (F11, 12 & 13) If fault returns upon power-up or down 35°F in the display. 4. Press...
... are locked out until a single beep is overheating, disconnect power. If open . If open , replace Switch. 3. SERVICE DATA SHEET Gas ranges with ES 330 electronic oven control (some models) IMPORTANT DO NOT REMOVE THIS BAG OR DESTROY THE CONTENTS WIRING DIAGRAMS AND SERVICE INFORMATION ENCLOSED...Runaway Temperature. If all safety grounds prior to service, ensure that safe servicing practices be extensive. 2. (F11, 12 & 13) Disconnect power, wait 30 seconds and reapply power. 3. (F11, 12 & 13) If fault returns upon power-up or down 35°F in the display. 4. Press...
Product Specifications Sheet (English)
Page 1
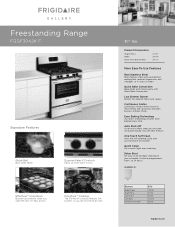
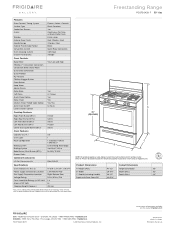
Quick Bake Convection Bake faster and more at once. 30" Gas Product Dimensions Height (Max.) Width Depth (Including Handle) 47-1/2" 29-7/8" 28-1/2" More Easy-To-Use Features Real Stainless Steel Real stainless steel with a protective coating ... time. Available in: Stainless (F) Burners Right Front Right Rear Left Front Left Rear Center Extra Zone BTU 17,000 5,000 9,500 14,000 9,500 frigidaire.com Freestanding Range FGGF3042K F Signature Features Quick Boil Boils water faster. It can cook more evenly with just the touch of a button. One-Touch Self Clean Start...
Quick Bake Convection Bake faster and more at once. 30" Gas Product Dimensions Height (Max.) Width Depth (Including Handle) 47-1/2" 29-7/8" 28-1/2" More Easy-To-Use Features Real Stainless Steel Real stainless steel with a protective coating ... time. Available in: Stainless (F) Burners Right Front Right Rear Left Front Left Rear Center Extra Zone BTU 17,000 5,000 9,500 14,000 9,500 frigidaire.com Freestanding Range FGGF3042K F Signature Features Quick Boil Boils water faster. It can cook more evenly with just the touch of a button. One-Touch Self Clean Start...
Product Specifications Sheet (English)
Page 2
... Grates Window Exterior Door Finish Handle Design Exterior Finish (Side Panels) Convection System Oven Cleaning System Drawer Functionality 30" Gas Freestanding Ranges Express-Select® Controls Frigidaire Baseline Black Porcelain Yes Continuous Cast Iron w/ Black Matte Finish Extra-Large Real Stainless Steel Stainless Steel Black Quick Bake Convection Self Clean Storage Oven ...
... Grates Window Exterior Door Finish Handle Design Exterior Finish (Side Panels) Convection System Oven Cleaning System Drawer Functionality 30" Gas Freestanding Ranges Express-Select® Controls Frigidaire Baseline Black Porcelain Yes Continuous Cast Iron w/ Black Matte Finish Extra-Large Real Stainless Steel Stainless Steel Black Quick Bake Convection Self Clean Storage Oven ...


