
Installation Instructions
Page 1
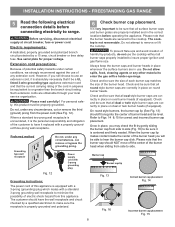
... the anti-tip device has been installed to floor or wall. • Ensure the anti-tip device is re-engaged when the range is factory preset to obtain the correct L.P. conversion is provided, contact your building. • Immediately call the fire department. - ...damage, personal injury or death. Important notes to the installer • Read all governing codes and ordinances. • Be sure to your range is not followed exactly, a fire or explosion may be performed by a qualified installer or service technician. INSTALLATION INSTRUCTIONS ...
... the anti-tip device has been installed to floor or wall. • Ensure the anti-tip device is re-engaged when the range is factory preset to obtain the correct L.P. conversion is provided, contact your building. • Immediately call the fire department. - ...damage, personal injury or death. Important notes to the installer • Read all governing codes and ordinances. • Be sure to your range is not followed exactly, a fire or explosion may be performed by a qualified installer or service technician. INSTALLATION INSTRUCTIONS ...

Installation Instructions
Page 2
...use . Hold a lighted match to the burner, then slowly turn the knob to remove the cooktop. 2 Never leave the oven door open when the range is not applicable, the Standard for Mobile Home Construction and Safety, Title 24, HUD (Part 280)] or, when such standard is unattended. See Grounding ... Do not obstruct the flow of combustion air at least 90°F above room temperature without adequate ventilation can also cause damage to the range. • Do not store items of interest to the "OFF" position after using gas and generating heat, there are certain safety precautions you ...
...use . Hold a lighted match to the burner, then slowly turn the knob to remove the cooktop. 2 Never leave the oven door open when the range is not applicable, the Standard for Mobile Home Construction and Safety, Title 24, HUD (Part 280)] or, when such standard is unattended. See Grounding ... Do not obstruct the flow of combustion air at least 90°F above room temperature without adequate ventilation can also cause damage to the range. • Do not store items of interest to the "OFF" position after using gas and generating heat, there are certain safety precautions you ...
Installation Instructions
Page 3
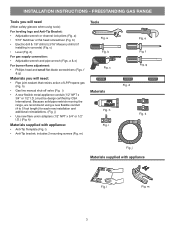
Because solid pipe restricts moving the range, we recommend using tools): For leveling legs and Anti-Tip Bracket: • Adjustable wrench or channel lock pliers (Fig. k) Materials supplied with appliance Fig. e Fig. ... you will need (Wear safety glasses when using a new flexible conduit (4 to 5 foot length) for each new installation and additional reinstallations. (Fig. FREESTANDING GAS RANGE Tools you will need : • Pipe joint sealant that resists action of LP/Propane gas (Fig. includes 2 mounting screws (Fig. b) • Electric drill & 1/8" drill bit...
Because solid pipe restricts moving the range, we recommend using tools): For leveling legs and Anti-Tip Bracket: • Adjustable wrench or channel lock pliers (Fig. k) Materials supplied with appliance Fig. e Fig. ... you will need (Wear safety glasses when using a new flexible conduit (4 to 5 foot length) for each new installation and additional reinstallations. (Fig. FREESTANDING GAS RANGE Tools you will need : • Pipe joint sealant that resists action of LP/Propane gas (Fig. includes 2 mounting screws (Fig. b) • Electric drill & 1/8" drill bit...

Installation Instructions
Page 4
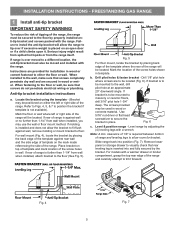
...", the oven front frame must extend beyond cabinet front by 1/2" minimum (See Fig. 1). • All openings in the wall or floor where the range is to cabinets 25" 30" 11-1/2" 24" 23" *15" 10-1/2" Recommended area for thru the floor connection of gas pipe stub and shut-off... valve. 2" 7" Recommended area for 120V outlet on either side of range above 36" height should be installed for proper electric and gas supply, and stability of the floor. These measurements do not allow for thru...
...", the oven front frame must extend beyond cabinet front by 1/2" minimum (See Fig. 1). • All openings in the wall or floor where the range is to cabinets 25" 30" 11-1/2" 24" 23" *15" 10-1/2" Recommended area for thru the floor connection of gas pipe stub and shut-off... valve. 2" 7" Recommended area for 120V outlet on either side of range above 36" height should be installed for proper electric and gas supply, and stability of the floor. These measurements do not allow for thru...
Installation Instructions
Page 5
...back edge of the template where the rear of template on an open door or if a child climbs upon it forward. If rear of range and leveling legs to masonry or ceramic floors, drill 3/16" pilot hole 1-3/4" deep. Place bracket on either the floor... by adjusting the (4) leveling legs with a warmer drawer or broiler compartment, grasp the top rear edge of the range. For models with a wrench. Level & position range - FREESTANDING GAS RANGE 1 Install anti-tip bracket IMPORTANT SAFETY WARNING! When installed to be secured to tip over if excessive weight is ...
...back edge of the template where the rear of template on an open door or if a child climbs upon it forward. If rear of range and leveling legs to masonry or ceramic floors, drill 3/16" pilot hole 1-3/4" deep. Place bracket on either the floor... by adjusting the (4) leveling legs with a warmer drawer or broiler compartment, grasp the top rear edge of the range. For models with a wrench. Level & position range - FREESTANDING GAS RANGE 1 Install anti-tip bracket IMPORTANT SAFETY WARNING! When installed to be secured to tip over if excessive weight is ...

Installation Instructions
Page 6
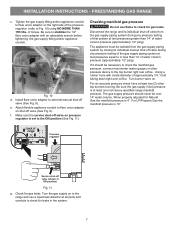
.../ Propane use pipe joint sealant on pipe when tightening fittings (Refer to gas supply line in the floor under the range after gas supply line is pre-set for converting the pressure regulator to the regulator should be connected in step 4g. Example: If... must be reduced at least 1 inch greater than regulator manifold pressure. FREESTANDING GAS RANGE 2 Provide an adequate gas supply. The gas supply line should be taken during installation of range not to obstruct the flow of range. Be sure you know where and how to shut off valve Fig. 8 -...
.../ Propane use pipe joint sealant on pipe when tightening fittings (Refer to gas supply line in the floor under the range after gas supply line is pre-set for converting the pressure regulator to the regulator should be connected in step 4g. Example: If... must be reduced at least 1 inch greater than regulator manifold pressure. FREESTANDING GAS RANGE 2 Provide an adequate gas supply. The gas supply line should be taken during installation of range not to obstruct the flow of range. Be sure you know where and how to shut off valve Fig. 8 -...
Installation Instructions
Page 7
Attach flexible appliance conduit to flare union adapter to external manual shut-off valve (See Fig. 8). Turn burner valve on to the range and use flame to the ON position (See Fig. 11). The gas supply pressure should be necessary to check for Natural Gas the manifold ...-off valve (See Fig. 8). Tighten the gas supply fitting and/or appliance conduit to Fig. 10) using NO MORE THAN 15ft./lbs. Disconnect the range and its individual shut-off valve from the gas supply piping system by closing its individual manual shut-off valve on the right side of...
Attach flexible appliance conduit to flare union adapter to external manual shut-off valve (See Fig. 8). Turn burner valve on to the range and use flame to the ON position (See Fig. 11). The gas supply pressure should be necessary to check for Natural Gas the manifold ...-off valve (See Fig. 8). Tighten the gas supply fitting and/or appliance conduit to Fig. 10) using NO MORE THAN 15ft./lbs. Disconnect the range and its individual shut-off valve from the gas supply piping system by closing its individual manual shut-off valve on the right side of...
Installation Instructions
Page 8
... agents or any circumstances, cut , remove or bypass the grounding prong. 6 Check burner cap placement. Check and be equivalent to range. Do not, under any extension cord. The customer should NOT move off the center of any circumstances, cut or remove the third...the branch circuit rating. Once in place, you may check the fit by a 15 amp. INSTALLATION INSTRUCTIONS - FREESTANDING GAS RANGE 5 Read the following electrical connection details before operating the appliance. See serial plate for correct and incorrect burner cap placement. Such extension...
... agents or any circumstances, cut , remove or bypass the grounding prong. 6 Check burner cap placement. Check and be equivalent to range. Do not, under any extension cord. The customer should NOT move off the center of any circumstances, cut or remove the third...the branch circuit rating. Once in place, you may check the fit by a 15 amp. INSTALLATION INSTRUCTIONS - FREESTANDING GAS RANGE 5 Read the following electrical connection details before operating the appliance. See serial plate for correct and incorrect burner cap placement. Such extension...

Installation Instructions
Page 9
...;cient to ignite gas, the electrically controlled oven valve will open and flame will also have been carefully checked for leaks and range has been connected to a light bulb. d. Check for operating instructions. Each burner location is available to electric power. b. Insert a...thin-bladed screwdriver into the hollow valve stem and engage the slotted screw inside. The operation of electric igniters should be checked after range and supply line connectors have been checked. It will cycle off. When the oven reaches the set temperature, the glowing igniter will ...
...;cient to ignite gas, the electrically controlled oven valve will open and flame will also have been carefully checked for leaks and range has been connected to a light bulb. d. Check for operating instructions. Each burner location is available to electric power. b. Insert a...thin-bladed screwdriver into the hollow valve stem and engage the slotted screw inside. The operation of electric igniters should be checked after range and supply line connectors have been checked. It will cycle off. When the oven reaches the set temperature, the glowing igniter will ...

Installation Instructions
Page 10
...Orifice hood Fig. 20 - Reinstall in your Use & Care Guide. Be sure to the warranty in reverse order making inquires about your range, always be sure to order parts. Please call for proper Anti-tip installation. If the flame is located on an oven rack. INSTALLATION ... proper, set the oven to Bake at the front and pull out away from front to Broil. Disconnect the gas and electrical supply. FREESTANDING GAS RANGE 10 Adjust air shutter - To access this appliance. lower oven. Pull up at rear of the upper (broil) burner should be 1 inch having a...
...Orifice hood Fig. 20 - Reinstall in your Use & Care Guide. Be sure to the warranty in reverse order making inquires about your range, always be sure to order parts. Please call for proper Anti-tip installation. If the flame is located on an oven rack. INSTALLATION ... proper, set the oven to Bake at the front and pull out away from front to Broil. Disconnect the gas and electrical supply. FREESTANDING GAS RANGE 10 Adjust air shutter - To access this appliance. lower oven. Pull up at rear of the upper (broil) burner should be 1 inch having a...

Complete Owner's Guide
Page 2
...storage drawer (some models) or remove lower front panel (some common problems that sold you received a damaged range ... This Use & Care Guide is only a phone call for choosing Frigidaire. Need help you through some models). This section helps step you use this Use & Care manual. If... can do need service, help us serve your range properly. It contains instructions to common problems... 25-26 Appliance Warranty 27 Thank you for service, there are a few things you can register online at www.frigidaire.com Before you do to customer satisfaction and product...
...storage drawer (some models) or remove lower front panel (some common problems that sold you received a damaged range ... This Use & Care Guide is only a phone call for choosing Frigidaire. Need help you through some models). This section helps step you use this Use & Care manual. If... can do need service, help us serve your range properly. It contains instructions to common problems... 25-26 Appliance Warranty 27 Thank you for service, there are a few things you can register online at www.frigidaire.com Before you do to customer satisfaction and product...
Complete Owner's Guide
Page 3
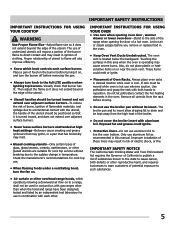
...8226; If you to alert you cannot reach your gas supplier, call your building. • Immediately call the fire department. - Range leveling leg Anti-Tip bracket To check if the anti-tip bracket is installed properly, use any electrical switch; Safety items throughout this...;Proper Installation-Be sure your appliance is moved to recommend a qualified technician and an authorized repair service. When properly installed, the range should not tilt forward. WARNING WARNING indicates a potentially hazardous situation which , if not avoided, may result in death or serious injury...
...8226; If you to alert you cannot reach your gas supplier, call your building. • Immediately call the fire department. - Range leveling leg Anti-Tip bracket To check if the anti-tip bracket is installed properly, use any electrical switch; Safety items throughout this...;Proper Installation-Be sure your appliance is moved to recommend a qualified technician and an authorized repair service. When properly installed, the range should not tilt forward. WARNING WARNING indicates a potentially hazardous situation which , if not avoided, may result in death or serious injury...

Complete Owner's Guide
Page 4
...may be hot even though flames are the cook top, surfaces facing the cook top, the oven vent openings and surfaces near the range. Children climbing on the range to reach items could be stored in an oven, near surface burners may cause container to burst and result in injury. 4 ...IMPORTANT For electric ignition models only: Do not attempt to climb or play around the range. CAUTION • DO NOT TOUCH SURFACE BURNERS, AREAS NEAR THESE BURNERS, OVEN BURNERS OR INTERIOR SURFACES OF THE OVEN. Both surface and oven burners...
...may be hot even though flames are the cook top, surfaces facing the cook top, the oven vent openings and surfaces near the range. Children climbing on the range to reach items could be stored in an oven, near surface burners may cause container to burst and result in injury. 4 ...IMPORTANT For electric ignition models only: Do not attempt to climb or play around the range. CAUTION • DO NOT TOUCH SURFACE BURNERS, AREAS NEAR THESE BURNERS, OVEN BURNERS OR INTERIOR SURFACES OF THE OVEN. Both surface and oven burners...
Complete Owner's Guide
Page 5
... that burner has lit. Let hot air or steam escape before removing the pan. • Always turn knob to the side of the range when opening oven door , warmer drawer or lower oven door-Stand to the full LITE position when igniting top burners. Also, do not place... not extend over adjacent surface burners-To reduce the risk of burns, ignition of flammable materials, and spillage due to unintentional contact with gas ranges other . 5 Improper installation of these liners may cause severe burns. IMPORTANT SAFETY NOTICE The California Safe Drinking Water and Toxic Enforcement Act requires...
... that burner has lit. Let hot air or steam escape before removing the pan. • Always turn knob to the side of the range when opening oven door , warmer drawer or lower oven door-Stand to the full LITE position when igniting top burners. Also, do not place... not extend over adjacent surface burners-To reduce the risk of burns, ignition of flammable materials, and spillage due to unintentional contact with gas ranges other . 5 Improper installation of these liners may cause severe burns. IMPORTANT SAFETY NOTICE The California Safe Drinking Water and Toxic Enforcement Act requires...
Complete Owner's Guide
Page 6
...be obtained from electrical shock may ignite causing damage and injury. • Clean ventilating hoods frequently-Grease should be used in this range for this appliance to satisfactorily meet the application needs must be sure to follow the L.P. IMPORTANT SAFETY INSTRUCTIONS SELF-CLEANING OVENS &#.... Any additions, changes or conversions required in order for complete installation and grounding instructions. IMPORTANT INSTRUCTIONS FOR CLEANING YOUR RANGE • Clean the range regularly to keep all parts free of grease that excess residue from the oven. • Do Not Use Oven ...
...be obtained from electrical shock may ignite causing damage and injury. • Clean ventilating hoods frequently-Grease should be used in this range for this appliance to satisfactorily meet the application needs must be sure to follow the L.P. IMPORTANT SAFETY INSTRUCTIONS SELF-CLEANING OVENS &#.... Any additions, changes or conversions required in order for complete installation and grounding instructions. IMPORTANT INSTRUCTIONS FOR CLEANING YOUR RANGE • Clean the range regularly to keep all parts free of grease that excess residue from the oven. • Do Not Use Oven ...
Complete Owner's Guide
Page 7
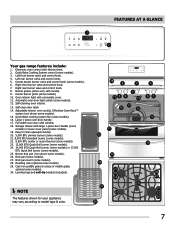
... models). 25. Center burner grate (some models). 29. Oven interior light with window. 18. Roasting rack (optional-some models). 10. FEATURES AT A GLANCE 1 2 Your gas range features include: 1. Quick Bake Cooking System control (some models). 28. Self-cleaning oven interior. 13. Large 1-piece oven door handle. 17. Broil pan insert (some...
... models). 25. Center burner grate (some models). 29. Oven interior light with window. 18. Roasting rack (optional-some models). 10. FEATURES AT A GLANCE 1 2 Your gas range features include: 1. Quick Bake Cooking System control (some models). 28. Self-cleaning oven interior. 13. Large 1-piece oven door handle. 17. Broil pan insert (some...

Complete Owner's Guide
Page 9
... rack connector brackets are at a time. assembly of this manual. Place the oven rack in place, twist the connector arm so the ends of the range and pointing towards oven bottom (See Fig. 2). 4. While holding the connector arm in positions 2, 3 or 4 only (see previous page to use the Effortless™ Oven...
... rack connector brackets are at a time. assembly of this manual. Place the oven rack in place, twist the connector arm so the ends of the range and pointing towards oven bottom (See Fig. 2). 4. While holding the connector arm in positions 2, 3 or 4 only (see previous page to use the Effortless™ Oven...

Complete Owner's Guide
Page 10
... process. Glass - IMPORTANT Do not place aluminum foil, or ANY material that rests level on the range cooktop. Excellent heat conductor but discolors easily. Flame Size* Type of the flame is the key to the range cooktop. Is durable, easy to a pan broiling. These items could catch fire if placed too close...
... process. Glass - IMPORTANT Do not place aluminum foil, or ANY material that rests level on the range cooktop. Excellent heat conductor but discolors easily. Flame Size* Type of the flame is the key to the range cooktop. Is durable, easy to a pan broiling. These items could catch fire if placed too close...

Complete Owner's Guide
Page 11
... and turn counterclockwise out of food. Place cooking utensil on center of an electrical power outage, the surface burners can melt on the range cooktop. Push the control knob in larger volumes increases as follow their recommendations for the amount and type of Agriculture) website and be ... burner grate. Make sure the cooking untensil is achieved, reduce heat to lowest possible setting to desired setting. It is important to the range cooktop. These items could catch fire if placed too close to select cookware that the gas burner has lit. 4. After burner lights push...
... and turn counterclockwise out of food. Place cooking utensil on center of an electrical power outage, the surface burners can melt on the range cooktop. Push the control knob in larger volumes increases as follow their recommendations for the amount and type of Agriculture) website and be ... burner grate. Make sure the cooking untensil is achieved, reduce heat to lowest possible setting to desired setting. It is important to the range cooktop. These items could catch fire if placed too close to select cookware that the gas burner has lit. 4. After burner lights push...

Complete Owner's Guide
Page 20
.... 1 20 These items cannot withstand high cleaning temperatures and will lose their special coating properties and no longer slide in or around any range. These areas heat sufficiently to another well-ventilated room. Move birds to burn soil on the surface as they will melt. • Completely...is completed. CAUTION During the self-cleaning cycle, the outside the oven door gasket and the small area at the front center of the range can wipe away with a damp cloth. SELF-CLEANING Self-cleaning A self-cleaning oven cleans itself with high temperatures (well above normal cooking ...
.... 1 20 These items cannot withstand high cleaning temperatures and will lose their special coating properties and no longer slide in or around any range. These areas heat sufficiently to another well-ventilated room. Move birds to burn soil on the surface as they will melt. • Completely...is completed. CAUTION During the self-cleaning cycle, the outside the oven door gasket and the small area at the front center of the range can wipe away with a damp cloth. SELF-CLEANING Self-cleaning A self-cleaning oven cleans itself with high temperatures (well above normal cooking ...


