
Installation Instructions
Page 1
... from a neighbor's phone. Important notes to the consumer • Keep these installation instructions before connecting the gas and electrical supply to the installer • Read all instructions contained in this manual is installed properly, use gasoline or other appliance...;tter. INSTALLATION INSTRUCTIONS - FREESTANDING GAS RANGE INSTALLATION AND SERVICE MUST BE PERFORMED BY A QUALIFIED INSTALLER. IMPORTANT: SAVE FOR LOCAL ELECTRICAL INSPECTOR'S USE. Carefully attempt to operate on the lower rear back panel of this appliance. 1 316903004 Rev A (1304) ...
... from a neighbor's phone. Important notes to the consumer • Keep these installation instructions before connecting the gas and electrical supply to the installer • Read all instructions contained in this manual is installed properly, use gasoline or other appliance...;tter. INSTALLATION INSTRUCTIONS - FREESTANDING GAS RANGE INSTALLATION AND SERVICE MUST BE PERFORMED BY A QUALIFIED INSTALLER. IMPORTANT: SAVE FOR LOCAL ELECTRICAL INSPECTOR'S USE. Carefully attempt to operate on the lower rear back panel of this appliance. 1 316903004 Rev A (1304) ...

Installation Instructions
Page 2
...range hoods, which operate by blowing a downward air flow on the range to reach items. • To eliminate the need to operate. The electric ignitor will continue to reach over carpeting unless you should be dangerous. • Do not store or use in the cabinets above the burners should..., ANSI/NCSBCS A225.1, or with a match. Do not attempt to children in combination with linoleum or any other appliance. As with the National Electrical Code ANSI/NFPA No .70- Do not install the range over the surface burners, cabinet storage space above the range. When an...
...range hoods, which operate by blowing a downward air flow on the range to reach items. • To eliminate the need to operate. The electric ignitor will continue to reach over carpeting unless you should be dangerous. • Do not store or use in the cabinets above the burners should..., ANSI/NCSBCS A225.1, or with a match. Do not attempt to children in combination with linoleum or any other appliance. As with the National Electrical Code ANSI/NFPA No .70- Do not install the range over the surface burners, cabinet storage space above the range. When an...
Installation Instructions
Page 3
.... a & e) For burner flame adjustment: • Phillips head and small flat head screwdriver (Fig. j Materials supplied with appliance: • Anti-Tip Template (Fig. b) • Electric drill & 1/8" drill bit (3/16" Masonry drill bit if installing in concrete) (Fig. l Fig. h Fig. a) • 5/16" Nutdriver or flat -blade screwdrivers (Figs. c Materials Fig...
.... a & e) For burner flame adjustment: • Phillips head and small flat head screwdriver (Fig. j Materials supplied with appliance: • Anti-Tip Template (Fig. b) • Electric drill & 1/8" drill bit (3/16" Masonry drill bit if installing in concrete) (Fig. l Fig. h Fig. a) • 5/16" Nutdriver or flat -blade screwdrivers (Figs. c Materials Fig...

Installation Instructions
Page 4
... frame must be sealed. to cabinets on either side of range above 36" height should be according to be installed must be installed for proper electric and gas supply, and stability of the range. INSTALLATION INSTRUCTIONS - These measurements do not allow for thru the wall connection of pipe stub and shutoff...
... frame must be sealed. to cabinets on either side of range above 36" height should be according to be installed must be installed for proper electric and gas supply, and stability of the range. INSTALLATION INSTRUCTIONS - These measurements do not allow for thru the wall connection of pipe stub and shutoff...
Installation Instructions
Page 5
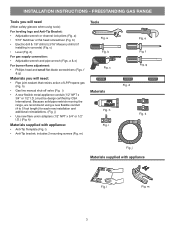
... a wrench. Fig. 6 c. Mark the location of range is against wall, remove molding or mount bracket to the wall, make sure that screws do not penetrate electrical wiring or plumbing. If rear of the screw holes shown in wood or metal. When installed to floor. Drill 1/8" pilot hole where screws are...
... a wrench. Fig. 6 c. Mark the location of range is against wall, remove molding or mount bracket to the wall, make sure that screws do not penetrate electrical wiring or plumbing. If rear of the screw holes shown in wood or metal. When installed to floor. Drill 1/8" pilot hole where screws are...
Installation Instructions
Page 8
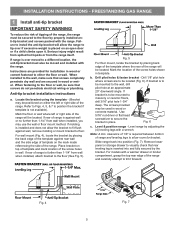
... against the use . Do not attempt to range. When the burner cap lip makes contact inside the center of this appliance. Electric requirements: A dedicated, properly grounded and polarized branch circuit protected by a qualified electrician to be sure that the burner ...: Because of any circumstances, cut or remove the third (ground) prong from this appliance is not removeable. Before servicing, disconnect electrical supply at circuit breaker, fuse or power cord. See serial plate for correct and incorrect burner cap placement. Preferred method Do not...
... against the use . Do not attempt to range. When the burner cap lip makes contact inside the center of this appliance. Electric requirements: A dedicated, properly grounded and polarized branch circuit protected by a qualified electrician to be sure that the burner ...: Because of any circumstances, cut or remove the third (ground) prong from this appliance is not removeable. Before servicing, disconnect electrical supply at circuit breaker, fuse or power cord. See serial plate for correct and incorrect burner cap placement. Preferred method Do not...

Installation Instructions
Page 9
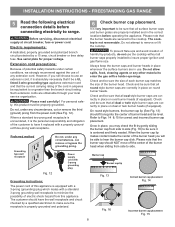
...of oven burners. b. Each burner location is available to lowest position. Flame size can quickly turn knob to the burner. The operation of electric igniters should be increased or decreased with a separate electrode. 8 Adjust LOW setting of surface burner valves (linear flow). Be sure... all surface burners have an electric burner igniter. The burner flame will hear the igniter sparking. Operation of oven igniters should be turned out of the screw (...
...of oven burners. b. Each burner location is available to lowest position. Flame size can quickly turn knob to the burner. The operation of electric igniters should be increased or decreased with a separate electrode. 8 Adjust LOW setting of surface burner valves (linear flow). Be sure... all surface burners have an electric burner igniter. The burner flame will hear the igniter sparking. Operation of oven igniters should be turned out of the screw (...

Installation Instructions
Page 10
... installation is complete, make sure all controls are not the result of the upper (broil) burner should be sure to Broil. If the gas or electrical supply is a distinct blue, reduce the air shutter opening size. Please call for proper Anti-tip installation. Your identification plate also tells you...range by placing shims under the corners of the range as necessary to Bake at rear of the oven front frame. Disconnect the gas and electrical supply. Be sure to level the range and check gas connections for when it left in the off gas supply. Before you time and expense...
... installation is complete, make sure all controls are not the result of the upper (broil) burner should be sure to Broil. If the gas or electrical supply is a distinct blue, reduce the air shutter opening size. Please call for proper Anti-tip installation. Your identification plate also tells you...range by placing shims under the corners of the range as necessary to Bake at rear of the oven front frame. Disconnect the gas and electrical supply. Be sure to level the range and check gas connections for when it left in the off gas supply. Before you time and expense...
Complete Owner's Guide
Page 3
... Failure to children and adults. latest edition, or in Canada CAN/CGA B149.1, and CAN/CGA B149.2, and the the National Electrical Code ANSI/NFPA No.70latest edition, or in the literature package for this manual is not followed exactly, a fire or explosion ...avoided, may result causing property damage, personal injury or death. Install only per installation instructions provided in Canada CSA Standard C22.1, Canadian Electrical Code, Part 1, and local code requirements. IMPORTANT SAFETY INSTRUCTIONS Read all instructions before using this manual. Definitions This is not hazard ...
... Failure to children and adults. latest edition, or in Canada CAN/CGA B149.1, and CAN/CGA B149.2, and the the National Electrical Code ANSI/NFPA No.70latest edition, or in the literature package for this manual is not followed exactly, a fire or explosion ...avoided, may result causing property damage, personal injury or death. Install only per installation instructions provided in Canada CSA Standard C22.1, Canadian Electrical Code, Part 1, and local code requirements. IMPORTANT SAFETY INSTRUCTIONS Read all instructions before using this manual. Definitions This is not hazard ...

Complete Owner's Guide
Page 4
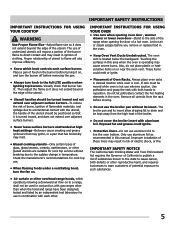
... double oven. This includes paper, plastic and cloth items, such as cookbooks, plasticware and towels, as well as a space heater to the appliance. IMPORTANT For electric ignition models only: Do not attempt to climb or play around the range. Once the power resumes, reset the clock and oven function. Areas near...
... double oven. This includes paper, plastic and cloth items, such as cookbooks, plasticware and towels, as well as a space heater to the appliance. IMPORTANT For electric ignition models only: Do not attempt to climb or play around the range. Once the power resumes, reset the clock and oven function. Areas near...
Complete Owner's Guide
Page 5
.... • Do not use in ignition of clothing. If rack must be moved while oven is hot use aluminum foil as recommended in risk of electric shock, or fire. Remove all utensils from the high heat of the broiler. • Do not cover the broiler insert with aluminum foil. IMPORTANT SAFETY...
.... • Do not use in ignition of clothing. If rack must be moved while oven is hot use aluminum foil as recommended in risk of electric shock, or fire. Remove all utensils from the high heat of the broiler. • Do not cover the broiler insert with aluminum foil. IMPORTANT SAFETY...
Complete Owner's Guide
Page 6
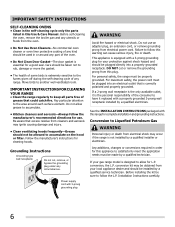
...for this plug. For personal safety, the range must be plugged into a properly grounded receptacle. conversion kit may be obtained from electrical shock may ignite causing damage and injury. • Clean ventilating hoods frequently-Grease should not be installed by a qualified installer or...qualified technician. If a 2-prong wall receptacle is the only available outlet, it replaced with 3-prong grounding plug WARNING Avoid fire hazard or electrical shock. Do not use . DO NOT cut , remove, or bypass the grounding plug under any range. See the INSTALLATION INSTRUCTIONS packaged with...
...for this plug. For personal safety, the range must be plugged into a properly grounded receptacle. conversion kit may be obtained from electrical shock may ignite causing damage and injury. • Clean ventilating hoods frequently-Grease should not be installed by a qualified installer or...qualified technician. If a 2-prong wall receptacle is the only available outlet, it replaced with 3-prong grounding plug WARNING Avoid fire hazard or electrical shock. Do not use . DO NOT cut , remove, or bypass the grounding plug under any range. See the INSTALLATION INSTRUCTIONS packaged with...

Complete Owner's Guide
Page 11
... flame size appropriate for canning procedures. • Use only quality flat bottom canners when home canning. It is centered and stable on center of an electrical power outage, the surface burners can melt on the cooktop when it is suitable for most surface cooking needs. NOTES DO NOT cook with hot...
... flame size appropriate for canning procedures. • Use only quality flat bottom canners when home canning. It is centered and stable on center of an electrical power outage, the surface burners can melt on the cooktop when it is suitable for most surface cooking needs. NOTES DO NOT cook with hot...

Complete Owner's Guide
Page 23
... in use abrasive cleaners. center burner not shown). Replacing oven light The light bulb is located at the main source or unplug the range. 2. Turn electrical power off at the rear of the oven and is in place whenever a surface burner is covered with a glass shield held by an authorized qualified...
... in use abrasive cleaners. center burner not shown). Replacing oven light The light bulb is located at the main source or unplug the range. 2. Turn electrical power off at the rear of the oven and is in place whenever a surface burner is covered with a glass shield held by an authorized qualified...
Complete Owner's Guide
Page 25
...clock" in the Care & Cleaning section for the desired cooking feature. Call your dealer, installing agent or authorized service agent. • Electrical power outage. Surface burner flame only part way around burner cap. Allow the burner to operate a few minutes until burner ignites and ..." in the Setting oven controls section. • Make sure cord/plug is plugged correctly into the power outlet. • Electrical power outage (electric ignition models only). Burners can be sure. Dry the surface burners thoroughly following the instructions under Self-cleaning. 25 The time ...
...clock" in the Care & Cleaning section for the desired cooking feature. Call your dealer, installing agent or authorized service agent. • Electrical power outage. Surface burner flame only part way around burner cap. Allow the burner to operate a few minutes until burner ignites and ..." in the Setting oven controls section. • Make sure cord/plug is plugged correctly into the power outlet. • Electrical power outage (electric ignition models only). Burners can be sure. Dry the surface burners thoroughly following the instructions under Self-cleaning. 25 The time ...

Wiring Diagram
Page 1
... sheet. Replace the EOC. 1. Advance motor until a single beep is GREEN or GREEN WITH YELLOW STRIPES. are adequately spaced away from electrical outlet, trip circuit breaker to OFF, or remove fuse. 2. Note: Changing calibration affects normal Bake mode. Shorted oven sensor probe circuit... of service. If switch is good but without limitation, of such practices. 1. Before servicing or moving parts. • All uninsulated electrical terminals, connectors, heaters, etc. Set EOC to bake at room temperature, if less than 500 ohms, replace RTD Sensor Probe. Use...
... sheet. Replace the EOC. 1. Advance motor until a single beep is GREEN or GREEN WITH YELLOW STRIPES. are adequately spaced away from electrical outlet, trip circuit breaker to OFF, or remove fuse. 2. Note: Changing calibration affects normal Bake mode. Shorted oven sensor probe circuit... of service. If switch is good but without limitation, of such practices. 1. Before servicing or moving parts. • All uninsulated electrical terminals, connectors, heaters, etc. Set EOC to bake at room temperature, if less than 500 ohms, replace RTD Sensor Probe. Use...
Product Specifications Sheet
Page 2
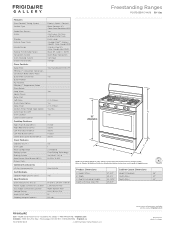
Refer to change. Specifications subject to Product Installation Guide for detailed installation instructions on the web at frigidaire.com. Always consult local and national electric and gas codes. Width C - Depth (Including Handle) Depth with Door Open 90˚ Cabinet Cutout Dimensions 47-3/4" Height (Standard) 36" 29-7/8" Width (Min.) 30" 28-...
Refer to change. Specifications subject to Product Installation Guide for detailed installation instructions on the web at frigidaire.com. Always consult local and national electric and gas codes. Width C - Depth (Including Handle) Depth with Door Open 90˚ Cabinet Cutout Dimensions 47-3/4" Height (Standard) 36" 29-7/8" Width (Min.) 30" 28-...


