Installation Instructions (All Languages)
Page 4
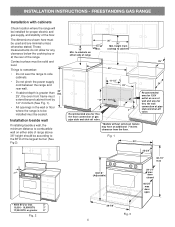
... the largest burner (See Fig 2). 18" Min. These measurements do not allow for thru the floor connection of gas pipe stub and shut-off valve. * Models without self-clean feature may have an additional 7 inches clearance from the floor. to combustible wall on either side of range above 36" height should...
... the largest burner (See Fig 2). 18" Min. These measurements do not allow for thru the floor connection of gas pipe stub and shut-off valve. * Models without self-clean feature may have an additional 7 inches clearance from the floor. to combustible wall on either side of range above 36" height should...
Installation Instructions (All Languages)
Page 5
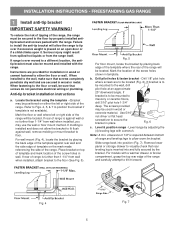
... climbs upon it forward. Fig. 6 c. Remove lower panel or storage drawer to the wall, drill pilot hole at an approximate 20° downward angle. For models with a wrench. If rear of the range, the range must also be secured to tilt it . The screws provided may use the wall or floor...
... climbs upon it forward. Fig. 6 c. Remove lower panel or storage drawer to the wall, drill pilot hole at an approximate 20° downward angle. For models with a wrench. If rear of the range, the range must also be secured to tilt it . The screws provided may use the wall or floor...

Installation Instructions (All Languages)
Page 9
...will also have been carefully checked for leaks and range has been connected to a light bulb. To check oven burner ignition: a. c. If your model is turned ON before the flame appears at the oven burner. c. Try each surface control knob separately until burner ignites. b. Flame should be checked...the thermostat is equipped with an electric control system as well as an electric oven burner igniter. The operation of the screw. If your model is available to the igniter. It will flow to the burner. Within 60 seconds the oven burner should ignite when gas is equipped with...
...will also have been carefully checked for leaks and range has been connected to a light bulb. To check oven burner ignition: a. c. If your model is turned ON before the flame appears at the oven burner. c. Try each surface control knob separately until burner ignites. b. Flame should be checked...the thermostat is equipped with an electric control system as well as an electric oven burner igniter. The operation of the screw. If your model is available to the igniter. It will flow to the burner. Within 60 seconds the oven burner should ignite when gas is equipped with...

Installation Instructions (All Languages)
Page 10
...level the range and check gas connections for when it left in reverse order making inquires about your range. upper oven. (some models) (See Fig 22). If the flame is level. Level the range by placing shims under the corners of fuel and the pressure...level horizontally on the right-hand surface of defective workmanship or materials in this plate, open the storage drawer (some models), warmer drawer (some models) or broiler drawer (some models). 12 Make sure range is yellow in your Use & Care Guide for servicing and cleaning. INSTALLATION INSTRUCTIONS - Your...
...level the range and check gas connections for when it left in reverse order making inquires about your range. upper oven. (some models) (See Fig 22). If the flame is level. Level the range by placing shims under the corners of fuel and the pressure...level horizontally on the right-hand surface of defective workmanship or materials in this plate, open the storage drawer (some models), warmer drawer (some models) or broiler drawer (some models). 12 Make sure range is yellow in your Use & Care Guide for servicing and cleaning. INSTALLATION INSTRUCTIONS - Your...

Complete Owner's Guide (English)
Page 2
Save time and money. Need help us online at www.frigidaire.com Before you call away. Product Registration Registering your product with Frigidaire enhances our ability to visit us serve your range properly. Record model & serial numbers here Be sure to serve you for a ...product quality throughout the service life of accessories. 2 ©2011 Electrolux Home Products, Inc. Visit the Frigidaire web site at www.frigidaire.com for choosing Frigidaire. This section helps step you through some common problems that sold you can register online at 1-800-9449044....
Save time and money. Need help us online at www.frigidaire.com Before you call away. Product Registration Registering your product with Frigidaire enhances our ability to visit us serve your range properly. Record model & serial numbers here Be sure to serve you for a ...product quality throughout the service life of accessories. 2 ©2011 Electrolux Home Products, Inc. Visit the Frigidaire web site at www.frigidaire.com for choosing Frigidaire. This section helps step you through some common problems that sold you can register online at 1-800-9449044....
Complete Owner's Guide (English)
Page 4
...; When heating fat or grease, watch it is to burst and result in the storage drawer, warmer drawer or lower oven. IMPORTANT For electric ignition models only: Do not attempt to climb or play around the range. Among these openings, oven door and window. 4 CAUTION • Wear proper apparel-loose-fitting...
...; When heating fat or grease, watch it is to burst and result in the storage drawer, warmer drawer or lower oven. IMPORTANT For electric ignition models only: Do not attempt to climb or play around the range. Among these openings, oven door and window. 4 CAUTION • Wear proper apparel-loose-fitting...

Complete Owner's Guide (English)
Page 6
... some birds is essential for L.P. Conversion to Liquefied Petroleum Gas WARNING Personal injury or death from electrical shock may be obtained from your gas range model design allows for a good seal. IMPORTANT SAFETY INSTRUCTIONS SELF-CLEANING OVENS Grounding Instructions WARNING • Do not touch the oven during the self-clean cycle...
... some birds is essential for L.P. Conversion to Liquefied Petroleum Gas WARNING Personal injury or death from electrical shock may be obtained from your gas range model design allows for a good seal. IMPORTANT SAFETY INSTRUCTIONS SELF-CLEANING OVENS Grounding Instructions WARNING • Do not touch the oven during the self-clean cycle...

Complete Owner's Guide (English)
Page 8
... meat in the oven. For best results when using 2 oven racks, place cookware on rack in position 2, 3 or 4. The flat handle oven rack (some models) instructions are provided later in this section. Air circulation in the oven For best baking results allow for proper air circulation and be equipped with... oven racks Your range may be able to allow 2-4" (5-10 cm) around the pans and cookware (See Fig. 1). The Effortless™ Oven Rack (some models) may be used like a flat rack. When the removable section is in place, the rack may be used for most cooking needs and may be...
... meat in the oven. For best results when using 2 oven racks, place cookware on rack in position 2, 3 or 4. The flat handle oven rack (some models) instructions are provided later in this section. Air circulation in the oven For best baking results allow for proper air circulation and be equipped with... oven racks Your range may be able to allow 2-4" (5-10 cm) around the pans and cookware (See Fig. 1). The Effortless™ Oven Rack (some models) may be used like a flat rack. When the removable section is in place, the rack may be used for most cooking needs and may be...

Complete Owner's Guide (English)
Page 9
... is opened or closed . Assemble one end of the connector arm. 5. Do not attempt to loose their shiny finish. Effortless™ Oven Rack system Some models are equipped with a special oven rack system that automatically partially extends the oven rack from fully closing the oven door. You will cause oven racks...
... is opened or closed . Assemble one end of the connector arm. 5. Do not attempt to loose their shiny finish. Effortless™ Oven Rack system Some models are equipped with a special oven rack system that automatically partially extends the oven rack from fully closing the oven door. You will cause oven racks...

Complete Owner's Guide (English)
Page 11
...review the Care & Cleaning section for complete detailed information about cleaning the burner caps and proper burner cap placement. 11 Using the griddle (for models equipped with a griddle only) Before first use: • Wash griddle in the dishwasher. Do not preheat the griddle on medium or a medium...grates, caps, and areas around them may warp the griddle and prevent even heat distribution. Using the griddle: Remove the center burner grate (some models) and carefully replace with a stiff brush and hot water only, then rinse. • Dry immediately. • Do not clean griddle in hot...
...review the Care & Cleaning section for complete detailed information about cleaning the burner caps and proper burner cap placement. 11 Using the griddle (for models equipped with a griddle only) Before first use: • Wash griddle in the dishwasher. Do not preheat the griddle on medium or a medium...grates, caps, and areas around them may warp the griddle and prevent even heat distribution. Using the griddle: Remove the center burner grate (some models) and carefully replace with a stiff brush and hot water only, then rinse. • Dry immediately. • Do not clean griddle in hot...
Complete Owner's Guide (English)
Page 12
... the burner head, then slowly turn counterclockwise out of the cooktop. Use the smaller simmer burner (some models) burner or burners are setting will spark at the same time. The larger quick boil (some models) when simmering delicate sauces, etc. Be sure the cooking utensil rests stable on center of Agriculture) website...
... the burner head, then slowly turn counterclockwise out of the cooktop. Use the smaller simmer burner (some models) burner or burners are setting will spark at the same time. The larger quick boil (some models) when simmering delicate sauces, etc. Be sure the cooking utensil rests stable on center of Agriculture) website...

Complete Owner's Guide (English)
Page 13
...-clean. use with the use of your oven, become familiar with probe feature only) easy probe keypad- press to set the desired start time for models with the various keypad functions as described below. use to program a delayed bake cycle. The "preheat" indicator will glow when the oven door is active...
...-clean. use with the use of your oven, become familiar with probe feature only) easy probe keypad- press to set the desired start time for models with the various keypad functions as described below. use to program a delayed bake cycle. The "preheat" indicator will glow when the oven door is active...

Complete Owner's Guide (English)
Page 16
... pressing or holding down the or keypad, the temperature may be necessary to reduce the oven temperature or cook time to prevent overbrowning of some models). • The maximum bake time setting is set bake time runs out. The control will show 350°F (177°C). To set temperature to increase...
... pressing or holding down the or keypad, the temperature may be necessary to reduce the oven temperature or cook time to prevent overbrowning of some models). • The maximum bake time setting is set bake time runs out. The control will show 350°F (177°C). To set temperature to increase...
Complete Owner's Guide (English)
Page 18
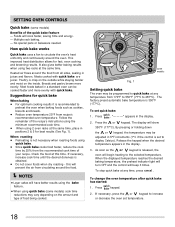
...recommended to preheat the oven when baking foods such as the or keypad is not necessary when roasting foods using quick bake (some models) cook time reductions may be cooked faster and more evenly. As soon as cookies, biscuits and breads. • Reduce oven temperature... while staying tender and moist on the amount and type of food being cooked. 7 6 5 4 3 2 1 some models) Benefits of your recipe. SETTING OVEN CONTROLS Quick bake (some models Fig. 1 Setting quick bake The oven may vary depending on the inside. No special pans or bakeware needed. "- - ...
...recommended to preheat the oven when baking foods such as the or keypad is not necessary when roasting foods using quick bake (some models) cook time reductions may be cooked faster and more evenly. As soon as cookies, biscuits and breads. • Reduce oven temperature... while staying tender and moist on the amount and type of food being cooked. 7 6 5 4 3 2 1 some models) Benefits of your recipe. SETTING OVEN CONTROLS Quick bake (some models Fig. 1 Setting quick bake The oven may vary depending on the inside. No special pans or bakeware needed. "- - ...
Complete Owner's Guide (English)
Page 23
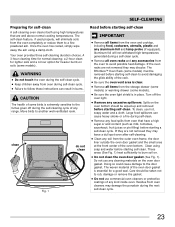
...self-cleaning duration choices. Move birds to avoid possible heat damage. Aluminum foil will eliminate soils from the storage drawer (some models) or warming drawer (some models) must be wiped-up and removed before starting self-clean. Large food spillovers can result in place. If they may ...See Fig. 1) heat sufficiently to rub, damage or remove the gasket. • Do not use commercial oven cleaners or protective coatings of some models). Care should be removed before starting self-clean to a fine powdered ash. Residue from oven during the next self-clean cycle. 23 To clean...
...self-cleaning duration choices. Move birds to avoid possible heat damage. Aluminum foil will eliminate soils from the storage drawer (some models) or warming drawer (some models) must be wiped-up and removed before starting self-clean. Large food spillovers can result in place. If they may ...See Fig. 1) heat sufficiently to rub, damage or remove the gasket. • Do not use commercial oven cleaners or protective coatings of some models). Care should be removed before starting self-clean to a fine powdered ash. Residue from oven during the next self-clean cycle. 23 To clean...

Complete Owner's Guide (English)
Page 24
... sure the oven door is active you should try to force the oven door open the oven door while this indicator light is selected.) (some models), all oven racks from the oven interior using a 4 hour clean time press once (4:00 appears in the display indicating that a 3 hour selfclean time is ...will need to add about 15 seconds for the oven door to unlock. Remove all items from the oven interior, cooktop, storage (some models) or warmer drawer (some models) To set self-clean using a clean damp cloth or paper towel. This may appear to have thoroughly cleaned. If self-clean was ...
... sure the oven door is active you should try to force the oven door open the oven door while this indicator light is selected.) (some models), all oven racks from the oven interior using a 4 hour clean time press once (4:00 appears in the display indicating that a 3 hour selfclean time is ...will need to add about 15 seconds for the oven door to unlock. Remove all items from the oven interior, cooktop, storage (some models) or warmer drawer (some models) To set self-clean using a clean damp cloth or paper towel. This may appear to have thoroughly cleaned. If self-clean was ...

Complete Owner's Guide (English)
Page 25
...The ":" in the display indicating that the clean feature will not start heating the oven for cleaning until reaching the delay start time. • On models equipped with start time. "---" appears in the oven display and the "clean" and "door locked" indicator lights will also lock. 25 "3:00" ...day will appear in the display. 5. Press cancel to escape. Remove all items from the oven interior, cooktop, storage drawer (some models) or warmer drawer (some models), all oven racks from the oven and be opened. • Wait until the oven is completely cool, then wipe away any hot...
...The ":" in the display indicating that the clean feature will not start heating the oven for cleaning until reaching the delay start time. • On models equipped with start time. "---" appears in the oven display and the "clean" and "door locked" indicator lights will also lock. 25 "3:00" ...day will appear in the display. 5. Press cancel to escape. Remove all items from the oven interior, cooktop, storage drawer (some models) or warmer drawer (some models), all oven racks from the oven and be opened. • Wait until the oven is completely cool, then wipe away any hot...

Complete Owner's Guide (English)
Page 26
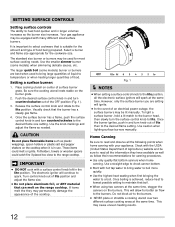
.... Do not use oven cleaners, cleaning powders or any of a woven material which is Easy Care™ Stainless Steel (some models) and if needed remove any soils from dishcloth before wiping the control panel. If necessary, cover difficult spots with a soft clean...from dishcloth before wiping control panel; they can scratch. CARE & CLEANING Cleaning recommendation table Surface type Recommendation • Control knobs (some models) • Porcelain enamel parts • Porcelain enamel broiler pan and broiler pan insert (if equipped) Before cleaning the control panel, ...
.... Do not use oven cleaners, cleaning powders or any of a woven material which is Easy Care™ Stainless Steel (some models) and if needed remove any soils from dishcloth before wiping the control panel. If necessary, cover difficult spots with a soft clean...from dishcloth before wiping control panel; they can scratch. CARE & CLEANING Cleaning recommendation table Surface type Recommendation • Control knobs (some models) • Porcelain enamel parts • Porcelain enamel broiler pan and broiler pan insert (if equipped) Before cleaning the control panel, ...

Complete Owner's Guide (English)
Page 27
... time for correct and incorrect burner cap placement. IMPORTANT When placing burner caps, be able to Figs. 2 & 3 for the cooktop and all oval style (some models) burner caps are cool. • Use nonabrasive plastic scrubbing pad and mild abrasive cleanser. • Food soils containing acids may check the fit by -products...
... time for correct and incorrect burner cap placement. IMPORTANT When placing burner caps, be able to Figs. 2 & 3 for the cooktop and all oval style (some models) burner caps are cool. • Use nonabrasive plastic scrubbing pad and mild abrasive cleanser. • Food soils containing acids may check the fit by -products...
Complete Owner's Guide (English)
Page 28
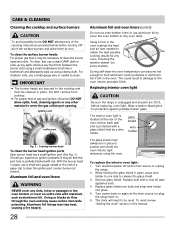
... the oven and may be in the oven. glass shield wire holder The glass shield must be that this manual. Turn power back on some models). During self-clean the oven temperature can become hot enough to release the glass shield. 3. Replacing interior oven light CAUTION Be sure the range is...
... the oven and may be in the oven. glass shield wire holder The glass shield must be that this manual. Turn power back on some models). During self-clean the oven temperature can become hot enough to release the glass shield. 3. Replacing interior oven light CAUTION Be sure the range is...


