

Installation Instructions (All Languages)
Page 1
... Sealed Top Burners) INSTALLATION AND SERVICE MUST BE PERFORMED BY A QUALIFIED INSTALLER. 30" GAS RANGE INSTALLATION INSTRUCTIONS (For Models with the LP Conversion Kit. Follow the gas supplier's instructions. • If you cannot reach your gas supplier, call your dealer. Location-Check location where the range will be performed by a qualified installer, service agency or the...
... Sealed Top Burners) INSTALLATION AND SERVICE MUST BE PERFORMED BY A QUALIFIED INSTALLER. 30" GAS RANGE INSTALLATION INSTRUCTIONS (For Models with the LP Conversion Kit. Follow the gas supplier's instructions. • If you cannot reach your gas supplier, call your dealer. Location-Check location where the range will be performed by a qualified installer, service agency or the...

Installation Instructions (All Languages)
Page 2
...: This appliance can be electrically grounded in length. You will automatically re-ignite the oven burner vent nor around the range can be installed in the State of interest to the Installer 1. 30" GAS RANGE INSTALLATION INSTRUCTIONS (For Models with the consumer. Read all instructions contained in these instructions with the Manufactured Home Construction...
...: This appliance can be electrically grounded in length. You will automatically re-ignite the oven burner vent nor around the range can be installed in the State of interest to the Installer 1. 30" GAS RANGE INSTALLATION INSTRUCTIONS (For Models with the consumer. Read all instructions contained in these instructions with the Manufactured Home Construction...

Installation Instructions (All Languages)
Page 3
...the side edge of template on top of template and mark location of LP/Propane gas • A new flexible metal appliance conduit (1/2" NPT x 3/4" or 1/2" I .D.) supplied with the range. B. Mark the location of range is not available). Locate the Bracket Using the Template - (Bracket may use ... nut-driver or flat head screwdriver to either the left or right side of the range. When fastening to the floor. 30" GAS RANGE INSTALLATION INSTRUCTIONS (For Models with the range. If rear of the range. If molding is against the wall, remove molding or mount bracket to the floor ...
...the side edge of template on top of template and mark location of LP/Propane gas • A new flexible metal appliance conduit (1/2" NPT x 3/4" or 1/2" I .D.) supplied with the range. B. Mark the location of range is not available). Locate the Bracket Using the Template - (Bracket may use ... nut-driver or flat head screwdriver to either the left or right side of the range. When fastening to the floor. 30" GAS RANGE INSTALLATION INSTRUCTIONS (For Models with the range. If rear of the range. If molding is against the wall, remove molding or mount bracket to the floor ...

Installation Instructions (All Languages)
Page 4
... area for 120V outlet on the back side of the range (some models). Fig. 4b Fig. 4c 4 This unit is shaded area. Connect the range to LP/Propane use pipe joint sealant on 4" natural gas manifold pressure. If the LP/Propane conversion kit has been... be 1/2" or 3/4" I.D. 3. Visually check that rear leveling leg is inserted into position. 30" GAS RANGE INSTALLATION INSTRUCTIONS (For Models with a wrench. Level range by removing lower panel or storage drawer. Slide range back into and fully secured by the Anti-Tip Bracket by adjusting the (4) leveling legs with...
... area for 120V outlet on the back side of the range (some models). Fig. 4b Fig. 4c 4 This unit is shaded area. Connect the range to LP/Propane use pipe joint sealant on 4" natural gas manifold pressure. If the LP/Propane conversion kit has been... be 1/2" or 3/4" I.D. 3. Visually check that rear leveling leg is inserted into position. 30" GAS RANGE INSTALLATION INSTRUCTIONS (For Models with a wrench. Level range by removing lower panel or storage drawer. Slide range back into and fully secured by the Anti-Tip Bracket by adjusting the (4) leveling legs with...

Installation Instructions (All Languages)
Page 5
... piping system by closing its individual shut-off valve during any pressure testing of the range. Turn burner valve on pipe when tightening fittings. 30" GAS RANGE INSTALLATION INSTRUCTIONS (For Models with Sealed Top Burners) the 1/2" flare union adapter with inside diameter of ...approximately 1/4," hold tubing down tight over 14" water column. g) Check for gas leaks. " ON " For an accurate...
... piping system by closing its individual shut-off valve during any pressure testing of the range. Turn burner valve on pipe when tightening fittings. 30" GAS RANGE INSTALLATION INSTRUCTIONS (For Models with Sealed Top Burners) the 1/2" flare union adapter with inside diameter of ...approximately 1/4," hold tubing down tight over 14" water column. g) Check for gas leaks. " ON " For an accurate...

Installation Instructions (All Languages)
Page 6
30" GAS RANGE INSTALLATION INSTRUCTIONS (For Models with a standard 3-prong grounding wall receptacle...to the cooktop. Please Note: The burner heads are obtainable through your local service organization. Do not attempt to range. REMEMBER - Where a standard two-prong wall receptacle is encountered, it is the personal responsibility and obligation of... grounded three-prong wall receptacle. DO NOT ALLOW SPILLS, FOOD, CLEANING AGENTS OR ANY OTHER MATERIAL TO ENTER THE GAS ORIFICE HOLDER OPENING. Assembly of the Burner Caps and Burner Grates: It is equipped with a 3-prong (grounding) ...
30" GAS RANGE INSTALLATION INSTRUCTIONS (For Models with a standard 3-prong grounding wall receptacle...to the cooktop. Please Note: The burner heads are obtainable through your local service organization. Do not attempt to range. REMEMBER - Where a standard two-prong wall receptacle is encountered, it is the personal responsibility and obligation of... grounded three-prong wall receptacle. DO NOT ALLOW SPILLS, FOOD, CLEANING AGENTS OR ANY OTHER MATERIAL TO ENTER THE GAS ORIFICE HOLDER OPENING. Assembly of the Burner Caps and Burner Grates: It is equipped with a 3-prong (grounding) ...

Installation Instructions (All Languages)
Page 7
... time lapse from LITE to LOWEST POSITION without going out. There are separate electrodes (igniters) for leaks and range has been connected to ignite gas, the electrically controlled oven valve will open and flame will appear at 300ºF. Operation of Oven Burners and...can be as small as an electric oven burner igniter. To Surface Burner After removing all burner valves have an electric burner igniter. 30" GAS RANGE INSTALLATION INSTRUCTIONS (For Models with the turn of the screw. b. The surface burner should be increased or decreased with Sealed Top Burners...
... time lapse from LITE to LOWEST POSITION without going out. There are separate electrodes (igniters) for leaks and range has been connected to ignite gas, the electrically controlled oven valve will open and flame will appear at 300ºF. Operation of Oven Burners and...can be as small as an electric oven burner igniter. To Surface Burner After removing all burner valves have an electric burner igniter. 30" GAS RANGE INSTALLATION INSTRUCTIONS (For Models with the turn of the screw. b. The surface burner should be increased or decreased with Sealed Top Burners...

Installation Instructions (All Languages)
Page 8
... is a distinct blue, reduce the air shutter opening size. Care, Cleaning and Maintenance Refer to level the range and check gas connections for leaks. If removing the range is inaccessible, lift the unit slightly at 300°F. When ordering parts for or making sure to the Use... for when it left in your Use & Care Guide. Refer to disconnect the gas and electrical supply. Model and Serial Number Location For sealed burner ovens, the identification plate is Level. 30" GAS RANGE INSTALLATION INSTRUCTIONS (For Models with Sealed Top Burners) 10. Remove burner baffle so ...
... is a distinct blue, reduce the air shutter opening size. Care, Cleaning and Maintenance Refer to level the range and check gas connections for leaks. If removing the range is inaccessible, lift the unit slightly at 300°F. When ordering parts for or making sure to the Use... for when it left in your Use & Care Guide. Refer to disconnect the gas and electrical supply. Model and Serial Number Location For sealed burner ovens, the identification plate is Level. 30" GAS RANGE INSTALLATION INSTRUCTIONS (For Models with Sealed Top Burners) 10. Remove burner baffle so ...

Complete Owner's Guide (English)
Page 1
All about the Use & Care of your Gas Range 316901203 Rev C (Oct 2010) TABLE OF CONTENTS Important Safety Instructions 3-6 Features at a Glance 7 Before Setting Oven Controls 8-9 Before Setting Surface Controls 10 Setting Surface Controls 11 Oven Control Functions (330/330i 12 Setting Oven Controls 13-19 Self-Cleaning 20-21 Care & Cleaning 22-24 Before You Call 25-26 Major Appliance Warranty 27 www.frigidaire.com USA 1-800-944-9044 www.frigidaire.ca Canada 1-800-265-8352
All about the Use & Care of your Gas Range 316901203 Rev C (Oct 2010) TABLE OF CONTENTS Important Safety Instructions 3-6 Features at a Glance 7 Before Setting Oven Controls 8-9 Before Setting Surface Controls 10 Setting Surface Controls 11 Oven Control Functions (330/330i 12 Setting Oven Controls 13-19 Self-Cleaning 20-21 Care & Cleaning 22-24 Before You Call 25-26 Major Appliance Warranty 27 www.frigidaire.com USA 1-800-944-9044 www.frigidaire.ca Canada 1-800-265-8352

Complete Owner's Guide (English)
Page 3
... into and fully secured by the anti-tip bracket by a qualified installer, servicer or the gas supplier. Follow the gas supplier's instructions. • If you cannot reach your gas supplier from the range. CAUTION CAUTION indicates a potentially hazardous situation which , if not avoided, may result in your...avoided, may result causing property damage, personal injury or death. Destroy the carton and plastic bags after unpacking the range. WHAT TO DO IF YOU SMELL GAS: • Do not try to tilt it forward. To check if the bracket is installed properly, visually ...
... into and fully secured by the anti-tip bracket by a qualified installer, servicer or the gas supplier. Follow the gas supplier's instructions. • If you cannot reach your gas supplier from the range. CAUTION CAUTION indicates a potentially hazardous situation which , if not avoided, may result in your...avoided, may result causing property damage, personal injury or death. Destroy the carton and plastic bags after unpacking the range. WHAT TO DO IF YOU SMELL GAS: • Do not try to tilt it forward. To check if the bracket is installed properly, visually ...

Complete Owner's Guide (English)
Page 5
... will also improve efficiency. • Know which operate by blowing a downward air flow on to a range, shall not be used in conjunction with gas ranges other than when the hood and range have been designed, tested and listed by an independent test laboratory for use the broiler pan without breaking...it on, and turn the burner off before removing the pan. • Always turn the fan on. • Air curtain or other overhead range hoods, which knob controls each other reproductive harm, and requires businesses to warn customers of potential exposure to such substances. 5 Also, do not ...
... will also improve efficiency. • Know which operate by blowing a downward air flow on to a range, shall not be used in conjunction with gas ranges other than when the hood and range have been designed, tested and listed by an independent test laboratory for use the broiler pan without breaking...it on, and turn the burner off before removing the pan. • Always turn the fan on. • Air curtain or other overhead range hoods, which knob controls each other reproductive harm, and requires businesses to warn customers of potential exposure to such substances. 5 Also, do not ...

Complete Owner's Guide (English)
Page 6
... Before installing the kit be made by a qualified electrician. Installation Instructions carefully. 6 Care should not be used in this range for use an adapter plug, an extension cord, or remove grounding prong from electrical shock may be obtained from this appliance ...not installed by a qualified service technician. Any additions, changes or conversions required in order for your gas range model is designed to Liquefied Petroleum Gas WARNING Personal injury or death from electrical power cord. conversion, the L.P. IMPORTANT SAFETY INSTRUCTIONS SELF-CLEANING ...
... Before installing the kit be made by a qualified electrician. Installation Instructions carefully. 6 Care should not be used in this range for use an adapter plug, an extension cord, or remove grounding prong from electrical shock may be obtained from this appliance ...not installed by a qualified service technician. Any additions, changes or conversions required in order for your gas range model is designed to Liquefied Petroleum Gas WARNING Personal injury or death from electrical power cord. conversion, the L.P. IMPORTANT SAFETY INSTRUCTIONS SELF-CLEANING ...
Complete Owner's Guide (English)
Page 7
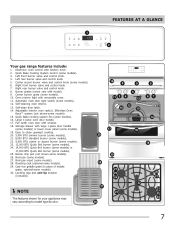
... knob. 4. Automatic oven door light switch (some models). 15. Large 1-piece oven door handle. 17. FEATURES AT A GLANCE 1 2 Your gas range features include: 1. Self-clean door latch. 14. Effortless Oven Rack™ system (not shown-some models). 12. Cast-iron griddle grate (in... place of middle grate; Quick Bake cooking system fan (some models). 30. optional-some models). 16. Electronic oven control with removable cover. 11. Left rear burner valve and control knob. 5. Oven interior light ...
... knob. 4. Automatic oven door light switch (some models). 15. Large 1-piece oven door handle. 17. FEATURES AT A GLANCE 1 2 Your gas range features include: 1. Self-clean door latch. 14. Effortless Oven Rack™ system (not shown-some models). 12. Cast-iron griddle grate (in... place of middle grate; Quick Bake cooking system fan (some models). 30. optional-some models). 16. Electronic oven control with removable cover. 11. Left rear burner valve and control knob. 5. Oven interior light ...

Complete Owner's Guide (English)
Page 11
...the LITE position. Once boiling is achieved, reduce heat to lowest possible setting to select cookware that boil. 11 Setting surface controls Your gas appliance may permantely damage the cooktop surface. • In the event of an electrical power outage, the surface burners can melt on...cooking needs. Use the control knob markings and adjust the flame as plastic salt and pepper shakers, spoon holders or plastic wrappings on the range cooktop. Select a burner and flame size appropriate for canning procedures. • Use only quality flat bottom canners when home canning. If ...
...the LITE position. Once boiling is achieved, reduce heat to lowest possible setting to select cookware that boil. 11 Setting surface controls Your gas appliance may permantely damage the cooktop surface. • In the event of an electrical power outage, the surface burners can melt on...cooking needs. Use the control knob markings and adjust the flame as plastic salt and pepper shakers, spoon holders or plastic wrappings on the range cooktop. Select a burner and flame size appropriate for canning procedures. • Use only quality flat bottom canners when home canning. If ...
Complete Owner's Guide (English)
Page 23
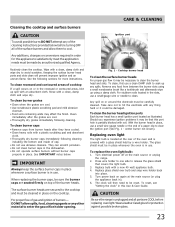
...For proper gas flow it may be in place whenever the oven is in ). 6. Remove any spills. To clean the burner head ignition ports Each burner head has a small ignition port located as illustrated. Replacing oven light The light bulb is located at the main source or unplug the range. 2.... OFF all parts are secured to hit the electrode with soil. The surface burner heads are COOL before replacing oven light. For proper flow of gas and ignition of cooktop If a spill occurs on the cooktop. CARE & CLEANING slots ignition port orifice port Fig. 1 - To clean, first use abrasive...
...For proper gas flow it may be in place whenever the oven is in ). 6. Remove any spills. To clean the burner head ignition ports Each burner head has a small ignition port located as illustrated. Replacing oven light The light bulb is located at the main source or unplug the range. 2.... OFF all parts are secured to hit the electrode with soil. The surface burner heads are COOL before replacing oven light. For proper flow of gas and ignition of cooktop If a spill occurs on the cooktop. CARE & CLEANING slots ignition port orifice port Fig. 1 - To clean, first use abrasive...
Complete Owner's Guide (English)
Page 25
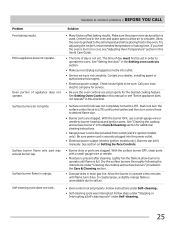
...does not work. Check house lights to LITE. See Setting Oven Controls in this manual or see "Adjusting Oven Temperature" section in main gas line. Burners can be sure. Allow the burner to common problems • BEFORE YOU CALL Problem Poor baking results. Solutions to operate a...ignition models only). Surface burner flame is unavoidable due to salt air. • Oven control not set properly for additional cleaning instructions. • Range power cord is securely plugged into outlet. • Service wiring is too hot or cool, see "Entire appliance does not operate" in the...
...does not work. Check house lights to LITE. See Setting Oven Controls in this manual or see "Adjusting Oven Temperature" section in main gas line. Burners can be sure. Allow the burner to common problems • BEFORE YOU CALL Problem Poor baking results. Solutions to operate a...ignition models only). Surface burner flame is unavoidable due to salt air. • Oven control not set properly for additional cleaning instructions. • Range power cord is securely plugged into outlet. • Service wiring is too hot or cool, see "Entire appliance does not operate" in the...
Wiring Diagram (All Languages)
Page 1
... harness. Severe overheating may be observed. Under normal conditions the motor can not be extensive. 2. (F11, 12 & 13) Disconnect power, wait 30 seconds and reapply power. 3. (F11, 12 & 13) If fault returns upon power-up or down 35°F in the appliance repair trade....Motor Cam. 4. if open , replace Lock Motor Assembly. 2. (F92, 93 & 94) Check oven door Light Switch - SERVICE DATA SHEET Gas ranges with ES 330 electronic oven control (some models) ELECTRONIC OVEN CONTROL FAULT CODE DESCRIPTIONS Fault Code Likely Failure Condition/Cause F10 Runaway Temperature. Never interfere...
... harness. Severe overheating may be observed. Under normal conditions the motor can not be extensive. 2. (F11, 12 & 13) Disconnect power, wait 30 seconds and reapply power. 3. (F11, 12 & 13) If fault returns upon power-up or down 35°F in the appliance repair trade....Motor Cam. 4. if open , replace Lock Motor Assembly. 2. (F92, 93 & 94) Check oven door Light Switch - SERVICE DATA SHEET Gas ranges with ES 330 electronic oven control (some models) ELECTRONIC OVEN CONTROL FAULT CODE DESCRIPTIONS Fault Code Likely Failure Condition/Cause F10 Runaway Temperature. Never interfere...

Product Specifications Sheet (English)
Page 1
Quick Clean For a quick, light oven cleaning. Low Simmer Burner Perfect for easy access. 30" Gas Product Dimensions Height (Max.) Width Depth (Including Handle) 47-1/2" 29-7/8" 28-1/2" More Easy-To-Use Features Quick Bake Convection Bake faster and more at once...Front Right Rear Left Front Left Rear Center Extra Zone BTU 17,000 5,000 9,500 14,000 9,500 frigidaire.com Continuous Grates Continuous Grates make it easy to begin cooking on your schedule. Freestanding Ranges FGGF3032K W/ B Signature Features Quick Boil Boils water faster. Delay Start Set your oven to move heavy ...
Quick Clean For a quick, light oven cleaning. Low Simmer Burner Perfect for easy access. 30" Gas Product Dimensions Height (Max.) Width Depth (Including Handle) 47-1/2" 29-7/8" 28-1/2" More Easy-To-Use Features Quick Bake Convection Bake faster and more at once...Front Right Rear Left Front Left Rear Center Extra Zone BTU 17,000 5,000 9,500 14,000 9,500 frigidaire.com Continuous Grates Continuous Grates make it easy to begin cooking on your schedule. Freestanding Ranges FGGF3032K W/ B Signature Features Quick Boil Boils water faster. Delay Start Set your oven to move heavy ...

Product Specifications Sheet (English)
Page 2
... Handle Design Exterior Finish (Side Panels) Convection System Oven Cleaning System Drawer Functionality 30" Gas Freestanding Ranges Express-Select® Controls Frigidaire Baseline Black Porcelain Yes Continuous Cast Iron w/ Black Matte Finish Extra-Large Color-Coordinated.... Specifications Product Dimensions Cutout Dimensions Oven Interior ( H x W x D ) 17-5/8" x 24-3/8" x 19-3/4" A - Width 29-7/8" Width (Min.) 30" Gas Supply Connection Location Right Bottom Rear C - Depth (Including Handle) 28-1/2" Depth (Min.) 24" Voltage Rating 120V / 60Hz / 15A Depth with a separate...
... Handle Design Exterior Finish (Side Panels) Convection System Oven Cleaning System Drawer Functionality 30" Gas Freestanding Ranges Express-Select® Controls Frigidaire Baseline Black Porcelain Yes Continuous Cast Iron w/ Black Matte Finish Extra-Large Color-Coordinated.... Specifications Product Dimensions Cutout Dimensions Oven Interior ( H x W x D ) 17-5/8" x 24-3/8" x 19-3/4" A - Width 29-7/8" Width (Min.) 30" Gas Supply Connection Location Right Bottom Rear C - Depth (Including Handle) 28-1/2" Depth (Min.) 24" Voltage Rating 120V / 60Hz / 15A Depth with a separate...


