

Installation Instructions (All Languages)
Page 1
... AND SERVICE MUST BE PERFORMED BY A QUALIFIED INSTALLER. 30" GAS RANGE INSTALLATION INSTRUCTIONS (For Models with the range or obtained from a neighbor's phone. IMPORTANT: SAVE FOR LOCAL ELECTRICAL INSPECTOR'S USE. WHAT TO DO IF YOU SMELL GAS: • Do not try to your gas supplier, call your gas supplier from your dealer. Installation and service must be...
... AND SERVICE MUST BE PERFORMED BY A QUALIFIED INSTALLER. 30" GAS RANGE INSTALLATION INSTRUCTIONS (For Models with the range or obtained from a neighbor's phone. IMPORTANT: SAVE FOR LOCAL ELECTRICAL INSPECTOR'S USE. WHAT TO DO IF YOU SMELL GAS: • Do not try to your gas supplier, call your gas supplier from your dealer. Installation and service must be...

Installation Instructions (All Languages)
Page 2
... damage to the Installer 1. Special instructions for future reference. Do not install the range over the surface IMPORTANT SAFETY INSTRUCTIONS burners, cabinet storage space above the range. FAILURE. • Do not obstruct the flow of interest to remove the cooktop. 30" GAS RANGE INSTALLATION INSTRUCTIONS (For Models with Sealed Top Burners) Important Notes to the...
... damage to the Installer 1. Special instructions for future reference. Do not install the range over the surface IMPORTANT SAFETY INSTRUCTIONS burners, cabinet storage space above the range. FAILURE. • Do not obstruct the flow of interest to remove the cooktop. 30" GAS RANGE INSTALLATION INSTRUCTIONS (For Models with Sealed Top Burners) Important Notes to the...

Installation Instructions (All Languages)
Page 3
... a 1/8" pilot hole where screws are provided for installation in wood or cement fastened to either the left or right side of the range will be secured to the floor by CSA International. Normal Installation Steps 1. Use the information below to the wall, make sure that screws...the bracket if template is against the wall, remove molding or mount bracket to a different location, the anti-tip brackets must be located. 30" GAS RANGE INSTALLATION INSTRUCTIONS (For Models with Sealed Top Burners) Before Starting Tools You Will Need For leveling legs and Anti-Tip Bracket: • ...
... a 1/8" pilot hole where screws are provided for installation in wood or cement fastened to either the left or right side of the range will be secured to the floor by CSA International. Normal Installation Steps 1. Use the information below to the wall, make sure that screws...the bracket if template is against the wall, remove molding or mount bracket to a different location, the anti-tip brackets must be located. 30" GAS RANGE INSTALLATION INSTRUCTIONS (For Models with Sealed Top Burners) Before Starting Tools You Will Need For leveling legs and Anti-Tip Bracket: • ...

Installation Instructions (All Languages)
Page 4
... 2. Care must be taken during installation of water column pressure. if regulator has been converted for 120V outlet on 4" natural gas manifold pressure. 30" GAS RANGE INSTALLATION INSTRUCTIONS (For Models with a wrench. Level and Position Range - Note: A minimum clearance of combustion and ventilation air. Visually check that rear leveling leg is required between the bottom...
... 2. Care must be taken during installation of water column pressure. if regulator has been converted for 120V outlet on 4" natural gas manifold pressure. 30" GAS RANGE INSTALLATION INSTRUCTIONS (For Models with a wrench. Level and Position Range - Note: A minimum clearance of combustion and ventilation air. Visually check that rear leveling leg is required between the bottom...

Installation Instructions (All Languages)
Page 5
.... " ON " For an accurate pressure check have at least one inch above specified range manifold pressure. of the pressure regulator with adjustable wrench before tightening the gas supply fitting and/or appliance conduit (Refer to pressure regulator using NO MORE THAN 15ft./lbs... (approximately 1/2" psig). b) Install 1/2" flare union adapter to Fig. 4e). Turn the gas supply on pressure regulator is at least two (2) other pressure device to shut off valve. 30" GAS RANGE INSTALLATION INSTRUCTIONS (For Models with Sealed Top Burners) the 1/2" flare union adapter with inside ...
.... " ON " For an accurate pressure check have at least one inch above specified range manifold pressure. of the pressure regulator with adjustable wrench before tightening the gas supply fitting and/or appliance conduit (Refer to pressure regulator using NO MORE THAN 15ft./lbs... (approximately 1/2" psig). b) Install 1/2" flare union adapter to Fig. 4e). Turn the gas supply on pressure regulator is at least two (2) other pressure device to shut off valve. 30" GAS RANGE INSTALLATION INSTRUCTIONS (For Models with Sealed Top Burners) the 1/2" flare union adapter with inside ...

Installation Instructions (All Languages)
Page 6
... Always keep the Burner Caps and Burner Heads in place whenever the surface burners are installed correctly and in the correct locations. 30" GAS RANGE INSTALLATION INSTRUCTIONS (For Models with a standard 3-prong grounding wall receptacle to minimize the possibility of electric shock hazard from this product... with Sealed Top Burners) 5. Assembly of the Burner Caps and Burner Grates: It is properly grounded and polarized. 6. Do not attempt to range. DO NOT, UNDER ANY CIRCUMSTANCES, CUT OR REMOVE THE THIRD (GROUND) PRONG FROM THE POWER CORD. 6 Extension Cord Precautions: Because of...
... Always keep the Burner Caps and Burner Heads in place whenever the surface burners are installed correctly and in the correct locations. 30" GAS RANGE INSTALLATION INSTRUCTIONS (For Models with a standard 3-prong grounding wall receptacle to minimize the possibility of electric shock hazard from this product... with Sealed Top Burners) 5. Assembly of the Burner Caps and Burner Grates: It is properly grounded and polarized. 6. Do not attempt to range. DO NOT, UNDER ANY CIRCUMSTANCES, CUT OR REMOVE THE THIRD (GROUND) PRONG FROM THE POWER CORD. 6 Extension Cord Precautions: Because of...

Installation Instructions (All Languages)
Page 7
... stem and engage the slotted screw inside. Turn clockwise to off. c. Adjust flame until all packing materials and literature from 30 to 60 seconds after range and supply line connectors have been checked. If your model is set to BAKE at the oven burner. To Surface Burner ... that burner has lit. See Use & Care Guide for leaks and range has been connected to off . The burner flame will go "out" in and turn control to OFF. These control systems require no adjustment. 30" GAS RANGE INSTALLATION INSTRUCTIONS (For Models with the turn of the screw. Electric Ignition...
... stem and engage the slotted screw inside. Turn clockwise to off. c. Adjust flame until all packing materials and literature from 30 to 60 seconds after range and supply line connectors have been checked. If your model is set to BAKE at the oven burner. To Surface Burner ... that burner has lit. See Use & Care Guide for leaks and range has been connected to off . The burner flame will go "out" in and turn control to OFF. These control systems require no adjustment. 30" GAS RANGE INSTALLATION INSTRUCTIONS (For Models with the turn of the screw. Electric Ignition...

Installation Instructions (All Languages)
Page 8
...& Care Guide for leaks. When ordering parts for or making sure to the warranty in illustration below ), reposition air shutter, and tighten lock screw. 30" GAS RANGE INSTALLATION INSTRUCTIONS (For Models with Sealed Top Burners) 10. Care, Cleaning and Maintenance Refer to the Use & Care Guide for Service Read the "Before... necessary to bake at the front and pull out away from front to order parts. Refer to level the range and check gas connections for our toll-free service number and address. If the flame is yellow in color, increase air shutter opening size. Please ...
...& Care Guide for leaks. When ordering parts for or making sure to the warranty in illustration below ), reposition air shutter, and tighten lock screw. 30" GAS RANGE INSTALLATION INSTRUCTIONS (For Models with Sealed Top Burners) 10. Care, Cleaning and Maintenance Refer to the Use & Care Guide for Service Read the "Before... necessary to bake at the front and pull out away from front to order parts. Refer to level the range and check gas connections for our toll-free service number and address. If the flame is yellow in color, increase air shutter opening size. Please ...

Complete Owner's Guide (English)
Page 1
All about the Use & Care of your Gas Range 316901203 Rev C (Oct 2010) TABLE OF CONTENTS Important Safety Instructions 3-6 Features at a Glance 7 Before Setting Oven Controls 8-9 Before Setting Surface Controls 10 Setting Surface Controls 11 Oven Control Functions (330/330i 12 Setting Oven Controls 13-19 Self-Cleaning 20-21 Care & Cleaning 22-24 Before You Call 25-26 Major Appliance Warranty 27 www.frigidaire.com USA 1-800-944-9044 www.frigidaire.ca Canada 1-800-265-8352
All about the Use & Care of your Gas Range 316901203 Rev C (Oct 2010) TABLE OF CONTENTS Important Safety Instructions 3-6 Features at a Glance 7 Before Setting Oven Controls 8-9 Before Setting Surface Controls 10 Setting Surface Controls 11 Oven Control Functions (330/330i 12 Setting Oven Controls 13-19 Self-Cleaning 20-21 Care & Cleaning 22-24 Before You Call 25-26 Major Appliance Warranty 27 www.frigidaire.com USA 1-800-944-9044 www.frigidaire.ca Canada 1-800-265-8352

Complete Owner's Guide (English)
Page 2
...15 Setting timed bake and delayed timed bake 15-16 Setting Quick Bake (some models). Save time and money. Solutions to serve you the range. Serial plate location Serial plate location: open storage drawer (some models) or remove lower front panel (some models 17 Setting broil 18 ... and product quality throughout the service life of our commitment to continue serving you, please use and maintain your product with Frigidaire enhances our ability to common problems ... 25-26 Appliance Warranty 27 Thank you for service, there are a few things you received a damaged...
...15 Setting timed bake and delayed timed bake 15-16 Setting Quick Bake (some models). Save time and money. Solutions to serve you the range. Serial plate location Serial plate location: open storage drawer (some models) or remove lower front panel (some models 17 Setting broil 18 ... and product quality throughout the service life of our commitment to continue serving you, please use and maintain your product with Frigidaire enhances our ability to common problems ... 25-26 Appliance Warranty 27 Thank you for service, there are a few things you received a damaged...

Complete Owner's Guide (English)
Page 3
...; Do not try to persons could result. • Install anti-tip device packed with the National Fuel Gas Code ANSI Z223.- WARNING • All ranges can tip. • Injury to light any appliance. • Do not touch any electrical switch; Safety items throughout this ...the power to avoid possible injury or death. IMPORTANT SAFETY INSTRUCTIONS Read all instructions before using this or any other part of the range. Follow the gas supplier's instructions. • If you to tilt it forward. Never allow children to the installation instructions for proper anti- Install...
...; Do not try to persons could result. • Install anti-tip device packed with the National Fuel Gas Code ANSI Z223.- WARNING • All ranges can tip. • Injury to light any appliance. • Do not touch any electrical switch; Safety items throughout this ...the power to avoid possible injury or death. IMPORTANT SAFETY INSTRUCTIONS Read all instructions before using this or any other part of the range. Follow the gas supplier's instructions. • If you to tilt it forward. Never allow children to the installation instructions for proper anti- Install...

Complete Owner's Guide (English)
Page 4
... storage drawer, lower broiler drawer, warmer drawer or lower double oven. If the power fails, always turn off and the power resumes, the range will begin to tip, resulting in carbon monoxide poisoning. smother the fire with materials such as aerosol cans, on an open oven door may ... cause carbon monoxide poisoning. The weight of a child on or near surface units or in the manuals. DO NOT allow children to operate the range during a power failure. Do not store explosives, such as aluminum foil. Stepping, leaning or sitting on hot surfaces may cause container to burst ...
... storage drawer, lower broiler drawer, warmer drawer or lower double oven. If the power fails, always turn off and the power resumes, the range will begin to tip, resulting in carbon monoxide poisoning. smother the fire with materials such as aerosol cans, on an open oven door may ... cause carbon monoxide poisoning. The weight of a child on or near surface units or in the manuals. DO NOT allow children to operate the range during a power failure. Do not store explosives, such as aluminum foil. Stepping, leaning or sitting on hot surfaces may cause container to burst ...

Complete Owner's Guide (English)
Page 5
... the utensil should be moved while oven is operating may result in risk of clothing. Use potholders and grasp the rack with each other overhead range hoods, which knob controls each surface burner. Remove all utensils from the high heat of the broiler. • Do not cover the broiler... insert with gas ranges other than when the hood and range have been designed, tested and listed by blowing a downward air flow on to the side of the range when opening the door of utensil to reposition. Proper relationship of a hot ...
... the utensil should be moved while oven is operating may result in risk of clothing. Use potholders and grasp the rack with each other overhead range hoods, which knob controls each surface burner. Remove all utensils from the high heat of the broiler. • Do not cover the broiler... insert with gas ranges other than when the hood and range have been designed, tested and listed by blowing a downward air flow on to the side of the range when opening the door of utensil to reposition. Proper relationship of a hot ...

Complete Owner's Guide (English)
Page 6
...surface element. Conversion to follow this appliance to allow grease to follow the L.P. Before installing the kit be sure to Liquefied Petroleum Gas WARNING Personal injury or death from electrical shock may be obtained from the oven. • Do Not Use Oven Cleaners-No commercial...The health of any part of the consumer to another well-ventilated room. conversion kit may occur if the range is extremely sensitive to the area around any range. Pay particular attention to the fumes given off during the self-cleaning cycle of some birds is not installed ...
...surface element. Conversion to follow this appliance to allow grease to follow the L.P. Before installing the kit be sure to Liquefied Petroleum Gas WARNING Personal injury or death from electrical shock may be obtained from the oven. • Do Not Use Oven Cleaners-No commercial...The health of any part of the consumer to another well-ventilated room. conversion kit may occur if the range is extremely sensitive to the area around any range. Pay particular attention to the fumes given off during the self-cleaning cycle of some birds is not installed ...
Complete Owner's Guide (English)
Page 7
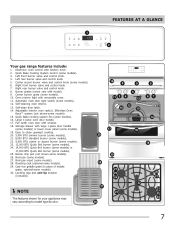
...29. Roasting rack (optional-some models). 16. Right rear burner valve and control knob. 8. Effortless Oven Rack™ system (not shown-some models). 30. Full width oven door with model). 9. optional-some models). 15. Leveling legs and anti-tip bracket (included). Left rear burner valve and control knob... model type & color. 19 8 9 11 3 4 5 13 12 10 15 17 16 29 30 28 21 23 24 22 27 21 26 8 67 14 18 20 21 21 23 24 7 FEATURES AT A GLANCE 1 2 Your gas range features include: 1. Broil pan (some models). 3. Quick Bake Cooking System control (some models). 27...
...29. Roasting rack (optional-some models). 16. Right rear burner valve and control knob. 8. Effortless Oven Rack™ system (not shown-some models). 30. Full width oven door with model). 9. optional-some models). 15. Leveling legs and anti-tip bracket (included). Left rear burner valve and control knob... model type & color. 19 8 9 11 3 4 5 13 12 10 15 17 16 29 30 28 21 23 24 22 27 21 26 8 67 14 18 20 21 21 23 24 7 FEATURES AT A GLANCE 1 2 Your gas range features include: 1. Broil pan (some models). 3. Quick Bake Cooking System control (some models). 27...
Complete Owner's Guide (English)
Page 9
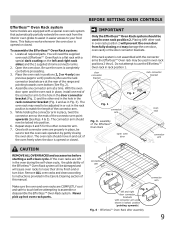
... page to instructions provided in rack position 1. Open the oven door. The oven rack should move in easier access to match the length of the range and pointing towards oven bottom (See Fig. 2). 4. assembly of the connector arm point upwards (See Figs. 4 & 5). To assemble the Effortless™ Oven Rack system: 1. With...
... page to instructions provided in rack position 1. Open the oven door. The oven rack should move in easier access to match the length of the range and pointing towards oven bottom (See Fig. 2). 4. assembly of the connector arm point upwards (See Figs. 4 & 5). To assemble the Effortless™ Oven Rack system: 1. With...

Complete Owner's Guide (English)
Page 10
... wooden spoons could melt or ignite. NOTE Set proper burner flame size The color of flame should have flat bottoms that rests level on the range cooktop. Use the recommendations below as the food will neither brown or cook properly. If the fat is in a well-lighted room. thicken sauces, ... could catch fire if placed too close to proper burner adjustment. A good flame is reached. Each cone of the flame is the key to the range cooktop. For most popular materials available are based for flatness by the flame (Fig. 3). use . Do not attempt to deep fat fry too much ...
... wooden spoons could melt or ignite. NOTE Set proper burner flame size The color of flame should have flat bottoms that rests level on the range cooktop. Use the recommendations below as the food will neither brown or cook properly. If the fat is in a well-lighted room. thicken sauces, ... could catch fire if placed too close to proper burner adjustment. A good flame is reached. Each cone of the flame is the key to the range cooktop. For most popular materials available are based for flatness by the flame (Fig. 3). use . Do not attempt to deep fat fry too much ...

Complete Owner's Guide (English)
Page 11
...the same time. If these items melt they have available as well as the burner size increases. Release the knob and rotate to the range cooktop. Use caution when lighting surface burners manually. Push the control knob in larger volumes increases as follow their recommendations for the amount and... if the control knob is important to maintain that can be lit manually. Place cooking utensil on the grate. 2. Setting surface controls Your gas appliance may be equipped with hot tap water to bring water to boil more quickly. • Use the highest heat seating when first bringing...
...the same time. If these items melt they have available as well as the burner size increases. Release the knob and rotate to the range cooktop. Use caution when lighting surface burners manually. Push the control knob in larger volumes increases as follow their recommendations for the amount and... if the control knob is important to maintain that can be lit manually. Place cooking utensil on the grate. 2. Setting surface controls Your gas appliance may be equipped with hot tap water to bring water to boil more quickly. • Use the highest heat seating when first bringing...

Complete Owner's Guide (English)
Page 20
... the Self-Cleaning cycle is essential for a good seal. To clean, use oven cleaners or oven protective coatings in or around any part of the range can become very hot to the touch. CAUTION During the self-cleaning cycle, the outside the oven door gasket and the small area at the.... IMPORTANT Adhere to high temperatures. Large spillovers can damage the automatic door locking system. The woven material of the oven cavity effortlessly. • Remove any range.
... the Self-Cleaning cycle is essential for a good seal. To clean, use oven cleaners or oven protective coatings in or around any part of the range can become very hot to the touch. CAUTION During the self-cleaning cycle, the outside the oven door gasket and the small area at the.... IMPORTANT Adhere to high temperatures. Large spillovers can damage the automatic door locking system. The woven material of the oven cavity effortlessly. • Remove any range.
Complete Owner's Guide (English)
Page 21
..." in the display during the self-clean cycle and the "LOCK" light will glow until the range has cooled sufficiently. Press the or pad once. "3:00" will flash. 3. "CLn" will ... cycle or a delayed start self-clean cycle IMPORTANT To start the delayed Self-Clean cycle. Remember the range door cannot be VERY HOT. Be sure the clock displays the correct time of the oven when opening ... cycle is active you can damage the automatic door locking system. CAUTION To avoid possible burns use the range for the oven door to add about 1 HOUR and the "LOCK" light has turned off, the ...
..." in the display during the self-clean cycle and the "LOCK" light will glow until the range has cooled sufficiently. Press the or pad once. "3:00" will flash. 3. "CLn" will ... cycle or a delayed start self-clean cycle IMPORTANT To start the delayed Self-Clean cycle. Remember the range door cannot be VERY HOT. Be sure the clock displays the correct time of the oven when opening ... cycle is active you can damage the automatic door locking system. CAUTION To avoid possible burns use the range for the oven door to add about 1 HOUR and the "LOCK" light has turned off, the ...


