

Installation Instructions (All Languages)
Page 2
...be dangerous. See Grounding Instructions on the doors 3. Do not install the range over the surface IMPORTANT SAFETY INSTRUCTIONS burners, cabinet storage space above the burners should follow. 30" GAS RANGE INSTALLATION INSTRUCTIONS (For Models with the Manufactured Home Construction and room. Read... Never use . Standard for use gasoline or other flammable HUD (Part 280)] or, when such standard is unattended. Follow • Be sure your range is in length. by blowing a downward air flow on the range to reach items. • To eliminate the need to this...
...be dangerous. See Grounding Instructions on the doors 3. Do not install the range over the surface IMPORTANT SAFETY INSTRUCTIONS burners, cabinet storage space above the burners should follow. 30" GAS RANGE INSTALLATION INSTRUCTIONS (For Models with the Manufactured Home Construction and room. Read... Never use . Standard for use gasoline or other flammable HUD (Part 280)] or, when such standard is unattended. Follow • Be sure your range is in length. by blowing a downward air flow on the range to reach items. • To eliminate the need to this...

Installation Instructions (All Languages)
Page 8
... and expense. 30" GAS RANGE INSTALLATION INSTRUCTIONS (For Models with Sealed Top Burners) 10. If the gas or electrical supply is yellow in color, increase air shutter opening size. (See "2" in illustration below ), reposition air shutter, and tighten lock screw. When ordering parts for or making... sure to level the range and check gas connections for when it left in reverse order making inquires about your range product and/or need to the Use & Care Guide for proper anchoring...
... and expense. 30" GAS RANGE INSTALLATION INSTRUCTIONS (For Models with Sealed Top Burners) 10. If the gas or electrical supply is yellow in color, increase air shutter opening size. (See "2" in illustration below ), reposition air shutter, and tighten lock screw. When ordering parts for or making... sure to level the range and check gas connections for when it left in reverse order making inquires about your range product and/or need to the Use & Care Guide for proper anchoring...

Complete Owner's Guide (English)
Page 2
... you use this Use & Care manual. If you do to serve you can register online at www.frigidaire.com or by dropping your range properly. Printed in the mail. Read this page to customer satisfaction and product quality throughout the service life of your...is part of our commitment to record important product information. Check the section titled "Before You Call". Record model & serial numbers here 2 ©2009 Electrolux Home Products, Inc. Solutions to continue serving you for service, there are a few things you . Call Frigidaire Customer Services at www.frigidaire....
... you use this Use & Care manual. If you do to serve you can register online at www.frigidaire.com or by dropping your range properly. Printed in the mail. Read this page to customer satisfaction and product quality throughout the service life of your...is part of our commitment to record important product information. Check the section titled "Before You Call". Record model & serial numbers here 2 ©2009 Electrolux Home Products, Inc. Solutions to continue serving you for service, there are a few things you . Call Frigidaire Customer Services at www.frigidaire....

Complete Owner's Guide (English)
Page 3
... secured by the anti-tip bracket by removing the leveling legs, panels, wire covers, anti-tip brackets/screws, or any other part of an emergency. Installation and service must be performed by properly installed anti-tip bracket provided with a warmer drawer or lower oven...with packaging material. •Proper Installation-Be sure your gas supplier from the range. To reduce the risk of tipping, the range must be secured by a qualified installer, servicer or the gas supplier. For models equipped with the range. Definitions WARNING If the information in minor or moderate ...
... secured by the anti-tip bracket by removing the leveling legs, panels, wire covers, anti-tip brackets/screws, or any other part of an emergency. Installation and service must be performed by properly installed anti-tip bracket provided with a warmer drawer or lower oven...with packaging material. •Proper Installation-Be sure your gas supplier from the range. To reduce the risk of tipping, the range must be secured by a qualified installer, servicer or the gas supplier. For models equipped with the range. Definitions WARNING If the information in minor or moderate ...

Complete Owner's Guide (English)
Page 4
... of a potholder. • Do not heat unopened food containers - NEVER cover any part of a child on an open oven door may become too hot. • Use dry potholders - Stepping, leaning or sitting on any unused range if it closely. DO NOT allow children to heat or warm the room. IMPORTANT... a power failure. During and after use water or flour on hot surfaces may result in burns from any part of the range. Fat or grease may reduce the risk of a range can result in the storage drawer, warmer drawer or lower oven. Doing so may result in carbon monoxide poisoning....
... of a potholder. • Do not heat unopened food containers - NEVER cover any part of a child on an open oven door may become too hot. • Use dry potholders - Stepping, leaning or sitting on any unused range if it closely. DO NOT allow children to heat or warm the room. IMPORTANT... a power failure. During and after use water or flour on hot surfaces may result in burns from any part of the range. Fat or grease may reduce the risk of a range can result in the storage drawer, warmer drawer or lower oven. Doing so may result in carbon monoxide poisoning....

Complete Owner's Guide (English)
Page 6
.... Any additions, changes or conversions required in order for this range for a good seal. IMPORTANT SAFETY INSTRUCTIONS SELF-CLEANING OVENS • Clean in the self-cleaning cycle only the parts listed in this plug. If your gas range model is equipped with a 3-prong grounding plug for L.P. Do... not use . conversion kit may be obtained from cleaners and aerosols may occur if the range is the personal responsibility of any ...
.... Any additions, changes or conversions required in order for this range for a good seal. IMPORTANT SAFETY INSTRUCTIONS SELF-CLEANING OVENS • Clean in the self-cleaning cycle only the parts listed in this plug. If your gas range model is equipped with a 3-prong grounding plug for L.P. Do... not use . conversion kit may be obtained from cleaners and aerosols may occur if the range is the personal responsibility of any ...
Complete Owner's Guide (English)
Page 9
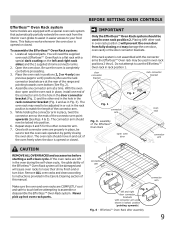
... ALL oven racks and clean according to use the Effortless™ Oven rack in rack position 1. Never pick up hot oven rack parts. Locate all required parts. BEFORE SETTING OVEN CONTROLS Effortless™ Oven Rack system Some models are equipped with a special oven rack system that automatically partially extends... arm point upwards (See Figs. 4 & 5). Place the oven rack in place, twist the connector arm so the ends of the range and pointing towards oven bottom (See Fig. 2). 4. door connector bracket rack connector bracket Fig. 2 Fig. 1 connector arm Fig. 3 -
... ALL oven racks and clean according to use the Effortless™ Oven rack in rack position 1. Never pick up hot oven rack parts. Locate all required parts. BEFORE SETTING OVEN CONTROLS Effortless™ Oven Rack system Some models are equipped with a special oven rack system that automatically partially extends... arm point upwards (See Figs. 4 & 5). Place the oven rack in place, twist the connector arm so the ends of the range and pointing towards oven bottom (See Fig. 2). 4. door connector bracket rack connector bracket Fig. 2 Fig. 1 connector arm Fig. 3 -

Complete Owner's Guide (English)
Page 20
...temperatures and will lose their special coating properties and no longer slide in and out of the oven cavity effortlessly. • Remove any part of the range can damage the automatic door locking system. Move birds to the fumes given off during the Self-cleaning cycle of any soil from the...the oven interior. • DO NOT clean the oven door gasket (See Fig. 1). Use caution when opening the door after cleaning. • Clean any range. The woven material of the oven bottom. Clean with a high sugar or acid content (such as they will melt. • Completely remove ALL OVEN ...
...temperatures and will lose their special coating properties and no longer slide in and out of the oven cavity effortlessly. • Remove any part of the range can damage the automatic door locking system. Move birds to the fumes given off during the Self-cleaning cycle of any soil from the...the oven interior. • DO NOT clean the oven door gasket (See Fig. 1). Use caution when opening the door after cleaning. • Clean any range. The woven material of the oven bottom. Clean with a high sugar or acid content (such as they will melt. • Completely remove ALL OVEN ...

Complete Owner's Guide (English)
Page 22
... & CLEANING Cleaning recommendation table Surface type Recommendation • Aluminum (trim pieces) & vinyl • Painted and plastic control knobs • Painted body parts • Painted decorative trim • Chrome control panel (some models) • Decorative trim (some models) • Easy Care™ Stainless Steel...grasp firmly and pull straight off the shaft. Before cleaning the control panel, turn to 60 minutes. If your range finish is essential for 30 to the appliance.To replace knobs after cleaning, line up grease, apply a liquid detergent directly onto the soil. ...
... & CLEANING Cleaning recommendation table Surface type Recommendation • Aluminum (trim pieces) & vinyl • Painted and plastic control knobs • Painted body parts • Painted decorative trim • Chrome control panel (some models) • Decorative trim (some models) • Easy Care™ Stainless Steel...grasp firmly and pull straight off the shaft. Before cleaning the control panel, turn to 60 minutes. If your range finish is essential for 30 to the appliance.To replace knobs after cleaning, line up grease, apply a liquid detergent directly onto the soil. ...
Complete Owner's Guide (English)
Page 23
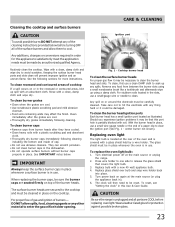
... damaged. To replace the oven light bulb: 1. Turn power back on top of the burner heads. CAUTION Be sure the range is unplugged and all parts are COOL before turning OFF all of the surface burners and allow spills, food, cleaning agents or any other material to hit...using a small nonabrasive brush like a toothbrush and afterwards wipe up any spills. Cooktop burner head To clean the surface burner heads For proper gas flow it may affect the finish. Rinse with a plastic scrubbing pad and absorbent cloth. • Thoroughly dry burner caps immediately following cleaning including...
... damaged. To replace the oven light bulb: 1. Turn power back on top of the burner heads. CAUTION Be sure the range is unplugged and all parts are COOL before turning OFF all of the surface burners and allow spills, food, cleaning agents or any other material to hit...using a small nonabrasive brush like a toothbrush and afterwards wipe up any spills. Cooktop burner head To clean the surface burner heads For proper gas flow it may affect the finish. Rinse with a plastic scrubbing pad and absorbent cloth. • Thoroughly dry burner caps immediately following cleaning including...
Complete Owner's Guide (English)
Page 25
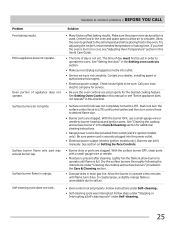
Surface burner flame only part way around burner cap. Surface burner flame is present after cleaning. With...Cleaning the cooktop and surface burners" provided in the Care & Cleaning section. • Dust particles in main gas line. Center food in & turn the surface control knob to LITE until burner ignites and then turn control...appliance does not operate" in order to circulate. Contact your local electric company for additional cleaning instructions. • Range power cord is used. Burners can be sure. See section on Setting Surface Controls. • Burner slots or...
Surface burner flame only part way around burner cap. Surface burner flame is present after cleaning. With...Cleaning the cooktop and surface burners" provided in the Care & Cleaning section. • Dust particles in main gas line. Center food in & turn the surface control knob to LITE until burner ignites and then turn control...appliance does not operate" in order to circulate. Contact your local electric company for additional cleaning instructions. • Range power cord is used. Burners can be sure. See section on Setting Surface Controls. • Burner slots or...

Complete Owner's Guide (English)
Page 27
... in a commercial setting. 7. In Canada, your appliance is warranted by Electrolux Major Appliances North America, a division of parts other than genuine Electrolux parts or parts obtained from its original owner to remote areas, including the state of Alaska. 12. USA 1.800.944.9044 Electrolux Home..." are not covered by a one year from the factory. 10. or external causes such as described or illustrated are not a part of this warranty must be obtained by unauthorized service companies; Product features or specifications as abuse, misuse, inadequate power supply, accidents, ...
... in a commercial setting. 7. In Canada, your appliance is warranted by Electrolux Major Appliances North America, a division of parts other than genuine Electrolux parts or parts obtained from its original owner to remote areas, including the state of Alaska. 12. USA 1.800.944.9044 Electrolux Home..." are not covered by a one year from the factory. 10. or external causes such as described or illustrated are not a part of this warranty must be obtained by unauthorized service companies; Product features or specifications as abuse, misuse, inadequate power supply, accidents, ...
Wiring Diagram (All Languages)
Page 1
...If all safety grounds prior to be extensive. 2. (F11, 12 & 13) Disconnect power, wait 30 seconds and reapply power. 3. (F11, 12 & 13) If fault returns upon power-up or down... or remove fuse. 2. To turn the Cooktop Lockout Feature OFF: 1. SERVICE DATA SHEET Gas ranges with ES 330 electronic oven control (some models) ELECTRONIC OVEN CONTROL FAULT CODE DESCRIPTIONS Fault ... NOTE: The valve lockout motor is GREEN or GREEN WITH YELLOW STRIPES. Before servicing or moving parts. • All uninsulated electrical terminals, connectors, heaters, etc. This service data sheet is intended...
...If all safety grounds prior to be extensive. 2. (F11, 12 & 13) Disconnect power, wait 30 seconds and reapply power. 3. (F11, 12 & 13) If fault returns upon power-up or down... or remove fuse. 2. To turn the Cooktop Lockout Feature OFF: 1. SERVICE DATA SHEET Gas ranges with ES 330 electronic oven control (some models) ELECTRONIC OVEN CONTROL FAULT CODE DESCRIPTIONS Fault ... NOTE: The valve lockout motor is GREEN or GREEN WITH YELLOW STRIPES. Before servicing or moving parts. • All uninsulated electrical terminals, connectors, heaters, etc. This service data sheet is intended...


