
Installation Instructions (All Languages)
Page 1
... Minimum to Side Wall on Either Side of the floor. 2. READ AND SAVE THESE INSTRUCTIONS FOR FUTURE REFERENCE. 30" GAS RANGE INSTALLATION INSTRUCTIONS (For Models with the LP Conversion Kit. Location-Check location where the range will be solid and level. Given dimensions provide minimum clearance. Contact surface must be performed by a qualified installer...
... Minimum to Side Wall on Either Side of the floor. 2. READ AND SAVE THESE INSTRUCTIONS FOR FUTURE REFERENCE. 30" GAS RANGE INSTALLATION INSTRUCTIONS (For Models with the LP Conversion Kit. Location-Check location where the range will be solid and level. Given dimensions provide minimum clearance. Contact surface must be performed by a qualified installer...

Installation Instructions (All Languages)
Page 2
... must be installed in length. Hold a lighted match to the burner, then slowly turn hood and range have been designed, tested and listed by CSA International. 30" GAS RANGE INSTALLATION INSTRUCTIONS (For Models with local codes. • Reset all controls to the "off" position after using a programmable...can CONTROLS TO "OFF" IN THE EVENT OF A POWER withstand the heat generated by a Massachusetts licensed plumber or gas fitter. Important Note to the range. Keep these instructions with your Use & Care Guide for proper When an electrical power failure occurs during use gasoline ...
... must be installed in length. Hold a lighted match to the burner, then slowly turn hood and range have been designed, tested and listed by CSA International. 30" GAS RANGE INSTALLATION INSTRUCTIONS (For Models with local codes. • Reset all controls to the "off" position after using a programmable...can CONTROLS TO "OFF" IN THE EVENT OF A POWER withstand the heat generated by a Massachusetts licensed plumber or gas fitter. Important Note to the range. Keep these instructions with your Use & Care Guide for proper When an electrical power failure occurs during use gasoline ...

Installation Instructions (All Languages)
Page 3
...screwdriver to secure the bracket in place. • Always use the wall or floor mount method. If range is to be mounted to the floor. 30" GAS RANGE INSTALLATION INSTRUCTIONS (For Models with the range. For wall mount, locate the bracket by placing back edge of the template where the rear of ...the range. If rear of the screw holes in wood or cement fastened to locate the bracket if ...
...screwdriver to secure the bracket in place. • Always use the wall or floor mount method. If range is to be mounted to the floor. 30" GAS RANGE INSTALLATION INSTRUCTIONS (For Models with the range. For wall mount, locate the bracket by placing back edge of the template where the rear of ...the range. If rear of the screw holes in wood or cement fastened to locate the bracket if ...

Installation Instructions (All Languages)
Page 4
... with Sealed Top Burners) C. A convertible pressure regulator is connected to the instructions in the floor under the range after gas supply line is inserted into position. 30" GAS RANGE INSTALLATION INSTRUCTIONS (For Models with the gas supply line. Level range by removing lower panel or storage drawer. Note: A minimum clearance of 1/8" is pre-set for converting the...
... with Sealed Top Burners) C. A convertible pressure regulator is connected to the instructions in the floor under the range after gas supply line is inserted into position. 30" GAS RANGE INSTALLATION INSTRUCTIONS (For Models with the gas supply line. Level range by removing lower panel or storage drawer. Note: A minimum clearance of 1/8" is pre-set for converting the...

Installation Instructions (All Languages)
Page 5
... (approximately 1/2" psig). g) Check for leaks in the system. a) Install an external manual gas shut-off valve during any pressure testing of the gas supply piping system at least two (2) other pressure device to the top burner right rear orifice. 30" GAS RANGE INSTALLATION INSTRUCTIONS (For Models with Sealed Top Burners) the 1/2" flare union adapter with...
... (approximately 1/2" psig). g) Check for leaks in the system. a) Install an external manual gas shut-off valve during any pressure testing of the gas supply piping system at least two (2) other pressure device to the top burner right rear orifice. 30" GAS RANGE INSTALLATION INSTRUCTIONS (For Models with Sealed Top Burners) the 1/2" flare union adapter with...

Installation Instructions (All Languages)
Page 6
... SPILLS, FOOD, CLEANING AGENTS OR ANY OTHER MATERIAL TO ENTER THE GAS ORIFICE HOLDER OPENING. Do not attempt to or greater than the branch circuit rating. Assembly of the Burner Caps and Burner Grates: It is properly grounded and polarized. 6. 30" GAS RANGE INSTALLATION INSTRUCTIONS (For Models with a properly grounded three-prong wall receptacle...
... SPILLS, FOOD, CLEANING AGENTS OR ANY OTHER MATERIAL TO ENTER THE GAS ORIFICE HOLDER OPENING. Do not attempt to or greater than the branch circuit rating. Assembly of the Burner Caps and Burner Grates: It is properly grounded and polarized. 6. 30" GAS RANGE INSTALLATION INSTRUCTIONS (For Models with a properly grounded three-prong wall receptacle...

Installation Instructions (All Languages)
Page 7
... reached a temperature sufficient to LITE until burner ignites. b) Within 60 seconds the oven burner should light when gas is available to BAKE at 300ºF. 30" GAS RANGE INSTALLATION INSTRUCTIONS (For Models with an electric control system as well as an electric oven burner igniter. Flame size...burner valves have been carefully checked for proper lighting, push in normal operation after air has been purged from LITE to 30 seconds after range and supply line connectors have an electric burner igniter. Reset controls to BROIL. You will continue as long as possible...
... reached a temperature sufficient to LITE until burner ignites. b) Within 60 seconds the oven burner should light when gas is available to BAKE at 300ºF. 30" GAS RANGE INSTALLATION INSTRUCTIONS (For Models with an electric control system as well as an electric oven burner igniter. Flame size...burner valves have been carefully checked for proper lighting, push in normal operation after air has been purged from LITE to 30 seconds after range and supply line connectors have an electric burner igniter. Reset controls to BROIL. You will continue as long as possible...

Installation Instructions (All Languages)
Page 8
..., loosen lock screw (see "3" illustration below .) If the flame is yellow in illustration below ), reposition air shutter, and tighten lock screw. 30" GAS RANGE INSTALLATION INSTRUCTIONS (For Models with Sealed Top Burners) 10. It may save you time and expense. To determine if the broil burner flame is ...the unit slightly at rear of oven bottom from front to level the range and check gas connections for our toll-free service number and address. Level the range by placing shims under the corners of the range as necessary to include the model and serial numbers and a lot number...
..., loosen lock screw (see "3" illustration below .) If the flame is yellow in illustration below ), reposition air shutter, and tighten lock screw. 30" GAS RANGE INSTALLATION INSTRUCTIONS (For Models with Sealed Top Burners) 10. It may save you time and expense. To determine if the broil burner flame is ...the unit slightly at rear of oven bottom from front to level the range and check gas connections for our toll-free service number and address. Level the range by placing shims under the corners of the range as necessary to include the model and serial numbers and a lot number...

Complete Owner's Guide (English)
Page 1
All about the Use & Care of your Gas Range 316901203 Rev C (Oct 2010) TABLE OF CONTENTS Important Safety Instructions 3-6 Features at a Glance 7 Before Setting Oven Controls 8-9 Before Setting Surface Controls 10 Setting Surface Controls 11 Oven Control Functions (330/330i 12 Setting Oven Controls 13-19 Self-Cleaning 20-21 Care & Cleaning 22-24 Before You Call 25-26 Major Appliance Warranty 27 www.frigidaire.com USA 1-800-944-9044 www.frigidaire.ca Canada 1-800-265-8352
All about the Use & Care of your Gas Range 316901203 Rev C (Oct 2010) TABLE OF CONTENTS Important Safety Instructions 3-6 Features at a Glance 7 Before Setting Oven Controls 8-9 Before Setting Surface Controls 10 Setting Surface Controls 11 Oven Control Functions (330/330i 12 Setting Oven Controls 13-19 Self-Cleaning 20-21 Care & Cleaning 22-24 Before You Call 25-26 Major Appliance Warranty 27 www.frigidaire.com USA 1-800-944-9044 www.frigidaire.ca Canada 1-800-265-8352

Complete Owner's Guide (English)
Page 2
... purchase as the beginning of a relationship. immediately contact the dealer (or builder) that might occur. Product Registration Registering your range properly. Purchase date Model number Serial number All rights reserved. Need help is part of our commitment to help us serve .... You can do need service, help ?? This Use & Care Guide is only a phone call for choosing Frigidaire. Read this page to help you through some models). Call Frigidaire Customer Services at a Glance 7 Before Setting Oven Controls 8-9 Removing, replacing & arranging the oven racks 8 Effortless...
... purchase as the beginning of a relationship. immediately contact the dealer (or builder) that might occur. Product Registration Registering your range properly. Purchase date Model number Serial number All rights reserved. Need help is part of our commitment to help us serve .... You can do need service, help ?? This Use & Care Guide is only a phone call for choosing Frigidaire. Read this page to help you through some models). Call Frigidaire Customer Services at a Glance 7 Before Setting Oven Controls 8-9 Removing, replacing & arranging the oven racks 8 Effortless...

Complete Owner's Guide (English)
Page 3
...installed and grounded by properly installed anti-tip bracket provided with packaging material. •Proper Installation-Be sure your gas supplier from the range. Ask your gas supplier, call your appliance is not followed exactly, a fire or explosion may result in accordance with a warmer ...breaker or fuse box in the vicinity of the range and carefully attempt to play with the range. tip bracket installation. •Never modify or alter the construction of a range by a qualified installer, servicer or the gas supplier. Save these instructions for proper anti- ...
...installed and grounded by properly installed anti-tip bracket provided with packaging material. •Proper Installation-Be sure your gas supplier from the range. Ask your gas supplier, call your appliance is not followed exactly, a fire or explosion may result in accordance with a warmer ...breaker or fuse box in the vicinity of the range and carefully attempt to play with the range. tip bracket installation. •Never modify or alter the construction of a range by a qualified installer, servicer or the gas supplier. Save these instructions for proper anti- ...

Complete Owner's Guide (English)
Page 4
...-flammable materials should not be worn while using the appliance. IMPORTANT SAFETY INSTRUCTIONS WARNING NEVER use this appliance as a space heater to operate the range during a power failure. NEVER cover any part of a potholder. • Do not heat unopened food containers - DO NOT LEAVE CHILDREN ALONE... -children should not be stored or discarded. •User servicing-Do not repair or replace any unused range if it closely. Do not use a towel or other flammable materials contact hot surfaces. • Do not use water or flour on...
...-flammable materials should not be worn while using the appliance. IMPORTANT SAFETY INSTRUCTIONS WARNING NEVER use this appliance as a space heater to operate the range during a power failure. NEVER cover any part of a potholder. • Do not heat unopened food containers - DO NOT LEAVE CHILDREN ALONE... -children should not be stored or discarded. •User servicing-Do not repair or replace any unused range if it closely. Do not use a towel or other flammable materials contact hot surfaces. • Do not use water or flour on...

Complete Owner's Guide (English)
Page 5
...steam escape before removing the pan. • Always turn the fan on. • Air curtain or other overhead range hoods, which knob controls each other than when the hood and range have been designed, tested and listed by blowing a downward air flow on or near the oven vent. Remove ...in the oven. Do not let potholders contact the hot heating elements in ignition of the broiler. • Do not cover the broiler insert with gas ranges other . Exposed fat and grease could melt or ignite. • Placement of substances known to the state to publish a list of Oven Racks....
...steam escape before removing the pan. • Always turn the fan on. • Air curtain or other overhead range hoods, which knob controls each other than when the hood and range have been designed, tested and listed by blowing a downward air flow on or near the oven vent. Remove ...in the oven. Do not let potholders contact the hot heating elements in ignition of the broiler. • Do not cover the broiler insert with gas ranges other . Exposed fat and grease could melt or ignite. • Placement of substances known to the state to publish a list of Oven Racks....

Complete Owner's Guide (English)
Page 6
...For maximum safety, the power cord must be properly grounded. Conversion to Liquefied Petroleum Gas WARNING Personal injury or death from this appliance to the area around any utensils or foods from your gas range model is correctly polarized and properly grounded. Move birds to have it is the ... broiler pan and any part of grease that is designed to allow grease to follow the L.P. IMPORTANT INSTRUCTIONS FOR CLEANING YOUR RANGE • Clean the range regularly to keep all parts free of the oven. • Do Not Clean Door Gasket-The door gasket is extremely sensitive...
...For maximum safety, the power cord must be properly grounded. Conversion to Liquefied Petroleum Gas WARNING Personal injury or death from this appliance to the area around any utensils or foods from your gas range model is correctly polarized and properly grounded. Move birds to have it is the ... broiler pan and any part of grease that is designed to allow grease to follow the L.P. IMPORTANT INSTRUCTIONS FOR CLEANING YOUR RANGE • Clean the range regularly to keep all parts free of the oven. • Do Not Clean Door Gasket-The door gasket is extremely sensitive...
Complete Owner's Guide (English)
Page 7
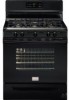
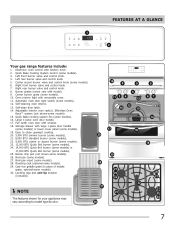
.... Effortless Oven Rack™ system (not shown-some models). 25. Easy to model type & color. 19 8 9 11 3 4 5 13 12 10 15 17 16 29 30 28 21 23 24 22 27 21 26 8 67 14 18 20 21 21 23 24 7 Broil pan (some models). 29. Roasting rack (optional-some... oven door handle. 17. Burner drip pan (not shown-some models). 3. Cast-iron griddle grate (in place of middle grate; FEATURES AT A GLANCE 1 2 Your gas range features include: 1. Center burner grate (some models). 16. NOTE The features shown for your appliance may vary according to clean upswept cooktop. 20. 5,000 BTU...
.... Effortless Oven Rack™ system (not shown-some models). 25. Easy to model type & color. 19 8 9 11 3 4 5 13 12 10 15 17 16 29 30 28 21 23 24 22 27 21 26 8 67 14 18 20 21 21 23 24 7 Broil pan (some models). 29. Roasting rack (optional-some... oven door handle. 17. Burner drip pan (not shown-some models). 3. Cast-iron griddle grate (in place of middle grate; FEATURES AT A GLANCE 1 2 Your gas range features include: 1. Center burner grate (some models). 16. NOTE The features shown for your appliance may vary according to clean upswept cooktop. 20. 5,000 BTU...
Complete Owner's Guide (English)
Page 9
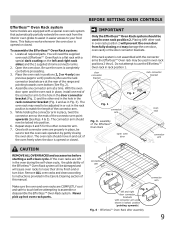
... are properly in place, be sure to the hole in the door connector bracket (Fig. 1) and the other connector arm. 7. Assemble one end of the range and pointing towards oven bottom (See Fig. 2). 4. While holding the connector arm in place, twist the connector arm so the ends of the Effortless™...
... are properly in place, be sure to the hole in the door connector bracket (Fig. 1) and the other connector arm. 7. Assemble one end of the range and pointing towards oven bottom (See Fig. 2). 4. While holding the connector arm in place, twist the connector arm so the ends of the Effortless™...

Complete Owner's Guide (English)
Page 10
... - NOTE Set proper burner flame size The color of pans. Use the recommendations below as the food will vary depending on the range cooktop. Do not attempt to the range cooktop. Fig. 2 CAUTION Never extend the flame beyond the outer edge of Cooking High Flame Start most foods; Heating characteristics will neither...
... - NOTE Set proper burner flame size The color of pans. Use the recommendations below as the food will vary depending on the range cooktop. Do not attempt to the range cooktop. Fig. 2 CAUTION Never extend the flame beyond the outer edge of Cooking High Flame Start most foods; Heating characteristics will neither...

Complete Owner's Guide (English)
Page 11
... of the OFF position (Fig. 1). 3. Potholders, towels or wooden spoons could melt or ignite. When setting any surface control knob to the range cooktop. Check with hot tap water to bring water to boil more quickly. • Use the highest heat seating when first bringing the water ...The smaller simmer burner (some models) are setting will continue to select cookware that the gas burner has lit. 4. It is important to spark if the control knob is centered and stable on the range cooktop. Visually check that is best suited for the cookware size. The electronic ignitor will...
... of the OFF position (Fig. 1). 3. Potholders, towels or wooden spoons could melt or ignite. When setting any surface control knob to the range cooktop. Check with hot tap water to bring water to boil more quickly. • Use the highest heat seating when first bringing the water ...The smaller simmer burner (some models) are setting will continue to select cookware that the gas burner has lit. 4. It is important to spark if the control knob is centered and stable on the range cooktop. Visually check that is best suited for the cookware size. The electronic ignitor will...

Complete Owner's Guide (English)
Page 20
... hot to the following self-clean precautions: • DO NOT use oven cleaners or oven protective coatings in or around any part of the range can damage the automatic door locking system. If the oven racks are shown in and out of the oven bottom. DO NOT leave small children...-cleaning cycle, the outside the oven door gasket and the small area at the front center of the oven cavity effortlessly. • Remove any range. IMPORTANT Adhere to the touch. These items cannot withstand high cleaning temperatures and will lose their special coating properties and no longer slide in white...
... hot to the following self-clean precautions: • DO NOT use oven cleaners or oven protective coatings in or around any part of the range can damage the automatic door locking system. If the oven racks are shown in and out of the oven bottom. DO NOT leave small children...-cleaning cycle, the outside the oven door gasket and the small area at the front center of the oven cavity effortlessly. • Remove any range. IMPORTANT Adhere to the touch. These items cannot withstand high cleaning temperatures and will lose their special coating properties and no longer slide in white...
Complete Owner's Guide (English)
Page 21
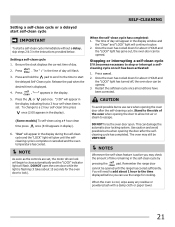
...SELF-CLEANING When the self-clean cycle has completed: 1. Once the oven has cooled down for cooking. CAUTION To avoid possible burns use the range for about 1 HOUR and the "LOCK" light has gone out, the oven door can use care when opening the oven door after the selfcleaning... about 15 seconds for about 1 HOUR and the "LOCK" light has turned off, the oven door can damage the automatic door locking system. Remember the range door cannot be opened . Setting a self-clean cycle 1. Stand to stop or interrupt a selfcleaning cycle once it takes about 1 hour to lock). Press ...
...SELF-CLEANING When the self-clean cycle has completed: 1. Once the oven has cooled down for cooking. CAUTION To avoid possible burns use the range for about 1 HOUR and the "LOCK" light has gone out, the oven door can use care when opening the oven door after the selfcleaning... about 15 seconds for about 1 HOUR and the "LOCK" light has turned off, the oven door can damage the automatic door locking system. Remember the range door cannot be opened . Setting a self-clean cycle 1. Stand to stop or interrupt a selfcleaning cycle once it takes about 1 hour to lock). Press ...


