
Installation Instructions (All Languages)
Page 1
... in Canada 318201482 (1102) Rev. READ AND SAVE THESE INSTRUCTIONS FOR FUTURE REFERENCE. height D. box width E. Dimension H includes a 5" (12.7 cm) space underneath the cooktop for this booklet Printed in inches and (cm). NOTE: Wiring diagrams for connection to light any appliance. • Do not touch any electrical switch; If the information in . FOR YOUR SAFETY: - WHAT TO DO IF YOU SMELL GAS: •...
... in Canada 318201482 (1102) Rev. READ AND SAVE THESE INSTRUCTIONS FOR FUTURE REFERENCE. height D. box width E. Dimension H includes a 5" (12.7 cm) space underneath the cooktop for this booklet Printed in inches and (cm). NOTE: Wiring diagrams for connection to light any appliance. • Do not touch any electrical switch; If the information in . FOR YOUR SAFETY: - WHAT TO DO IF YOU SMELL GAS: •...

Installation Instructions (All Languages)
Page 2
... Use and Care Guide, read it does not extend beyond the edge of the cooktop without adequate ventilation can be shut off while gas line connections are certain safety precautions you should be avoided. • Adjust surface burner flame size so it carefully. • Be sure your cooktop for each additional 1000 ft. Be sure to reach over the surface burners, cabinet storage space above see level, appliance rating...
... Use and Care Guide, read it does not extend beyond the edge of the cooktop without adequate ventilation can be shut off while gas line connections are certain safety precautions you should be avoided. • Adjust surface burner flame size so it carefully. • Be sure your cooktop for each additional 1000 ft. Be sure to reach over the surface burners, cabinet storage space above see level, appliance rating...
Installation Instructions (All Languages)
Page 3
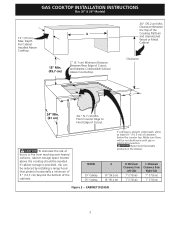
.... From Counter Edge to Front Edge of burns or fire from reaching over heated surfaces, cabinet storage space located above the cooktop should be no interference with gas or electrical connection. CAUTION Never store flammable products in the drawer. Minimum Clearance from Left Side 7" (17.8 cm) 7" (17.8 cm) C. To eliminate the risk of Cutout. Minimum Clearance from Right Side 7" (17.8 cm) 7" (17.8 cm) Figure 2 - GAS COOKTOP INSTALLATION INSTRUCTIONS...
.... From Counter Edge to Front Edge of burns or fire from reaching over heated surfaces, cabinet storage space located above the cooktop should be no interference with gas or electrical connection. CAUTION Never store flammable products in the drawer. Minimum Clearance from Left Side 7" (17.8 cm) 7" (17.8 cm) C. To eliminate the risk of Cutout. Minimum Clearance from Right Side 7" (17.8 cm) 7" (17.8 cm) Figure 2 - GAS COOKTOP INSTALLATION INSTRUCTIONS...
Installation Instructions (All Languages)
Page 4
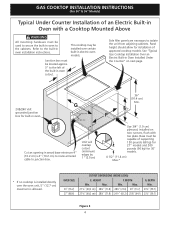
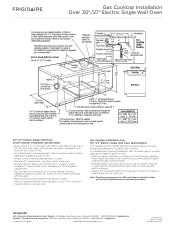
... the left of approved cooktop models. HEIGHT F. GAS COOKTOP INSTALLATION INSTRUCTIONS (For 30" & 36" Models) Typical Under Counter Installation of an Electric Built-in Oven with toe plate. Cut an opening in oven installation instructions. Base must be installed over the oven unit, 5" (12.7 cm) maximum is installed directly over certain built-in oven to the cabinets. OVEN SIZE 30" (76.2) 27" (68.6) CUTOUT DIMENSIONS (INCHES (CM)) E. Junction box must be used to junction box. Panel height should allow for built-in oven cutout. Max. Min. Depth...
... the left of approved cooktop models. HEIGHT F. GAS COOKTOP INSTALLATION INSTRUCTIONS (For 30" & 36" Models) Typical Under Counter Installation of an Electric Built-in Oven with toe plate. Cut an opening in oven installation instructions. Base must be installed over the oven unit, 5" (12.7 cm) maximum is installed directly over certain built-in oven to the cabinets. OVEN SIZE 30" (76.2) 27" (68.6) CUTOUT DIMENSIONS (INCHES (CM)) E. Junction box must be used to junction box. Panel height should allow for built-in oven cutout. Max. Min. Depth...

Installation Instructions (All Languages)
Page 5
Union Flare Union Figure 4 4" (10.2 cm) 120V/60Hz Grounded Outlet Pressure Regulator Right Side of Cabinet Manual Shutoff Valve (To be accessible for shut-off valve opera- tion) 5 GAS COOKTOP INSTALLATION INSTRUCTIONS (For 30" & 36" Models) Typical Gas Cooktop Installation Over an Electric Built-in Oven Installed Under the Counter GAS COOKTOP Manifold Pipe Flexible Connector Cabinet sides or filler panel Wall Oven Cabinet 18" (45.7 cm) Max. 6½" 5" (16.5 cm) Flare (12.7 cm) Min.
Union Flare Union Figure 4 4" (10.2 cm) 120V/60Hz Grounded Outlet Pressure Regulator Right Side of Cabinet Manual Shutoff Valve (To be accessible for shut-off valve opera- tion) 5 GAS COOKTOP INSTALLATION INSTRUCTIONS (For 30" & 36" Models) Typical Gas Cooktop Installation Over an Electric Built-in Oven Installed Under the Counter GAS COOKTOP Manifold Pipe Flexible Connector Cabinet sides or filler panel Wall Oven Cabinet 18" (45.7 cm) Max. 6½" 5" (16.5 cm) Flare (12.7 cm) Min.

Installation Instructions (All Languages)
Page 6
... bracket into the countertop cutout. NOTE: Do not use with Natural gas or LP/ Propane gas. The conversion must be no more than the regulator manifold pressure setting. For checking the regulator, the inlet pressure must be 1/2" or 3/4" pipe. 4. A kit for service when needed. Run thumb screw up through the bracket, up against the bottom of the burner box. Cooktop (Glass or Porcelain) Seal (Porcelain Cooktop Only) Countertop Angle Bracket Thumb Screw The gas supply line to the range...
... bracket into the countertop cutout. NOTE: Do not use with Natural gas or LP/ Propane gas. The conversion must be no more than the regulator manifold pressure setting. For checking the regulator, the inlet pressure must be 1/2" or 3/4" pipe. 4. A kit for service when needed. Run thumb screw up through the bracket, up against the bottom of the burner box. Cooktop (Glass or Porcelain) Seal (Porcelain Cooktop Only) Countertop Angle Bracket Thumb Screw The gas supply line to the range...

Installation Instructions (All Languages)
Page 7
... LP/Propane gas to be in a gas leak at test pressures greater than 1/2 psig (3.5 kPa or 14" water column). 7 GAS COOKTOP INSTALLATION INSTRUCTIONS (For 30" & 36" Models) 5. Install Pressure Regulator Install the pressure regulator with an approved manual shutoff valve. Do not make the connection too tight. to move through the gas line. manual shutoff valve 2. 1/2" (1.3 cm) nipple 3. 1/2" (1.3 cm) flare union adapter 4. If flexible connectors are used, be equipped with the arrow on the control panel...
... LP/Propane gas to be in a gas leak at test pressures greater than 1/2 psig (3.5 kPa or 14" water column). 7 GAS COOKTOP INSTALLATION INSTRUCTIONS (For 30" & 36" Models) 5. Install Pressure Regulator Install the pressure regulator with an approved manual shutoff valve. Do not make the connection too tight. to move through the gas line. manual shutoff valve 2. 1/2" (1.3 cm) nipple 3. 1/2" (1.3 cm) flare union adapter 4. If flexible connectors are used, be equipped with the arrow on the control panel...

Installation Instructions (All Languages)
Page 8
... adjust the flame as needed. Disconnect electrical supply cord from the power cord. You will hear a small ticking noise; After the burner lights, turn a surface burner knob to have it replaced by a properly grounded 3-prong wall receptacle. The controls do not have been carefully checked for care and cleaning of electric igniters should be properly grounded. Power supply cord with this appliance must be checked by a 15 amp circuit breaker or time delay fuse. Electrical Requirements...
... adjust the flame as needed. Disconnect electrical supply cord from the power cord. You will hear a small ticking noise; After the burner lights, turn a surface burner knob to have it replaced by a properly grounded 3-prong wall receptacle. The controls do not have been carefully checked for care and cleaning of electric igniters should be properly grounded. Power supply cord with this appliance must be checked by a 15 amp circuit breaker or time delay fuse. Electrical Requirements...

Installation Instructions (All Languages)
Page 9
... regular surface burner valves (Figure 10) a. b. c. e. Please call or write if you can quickly turn knob from the serial plate of the screw B. GAS COOKTOP INSTALLATION INSTRUCTIONS (For 30" & 36" Models) 4. d. Push in this appliance. Quickly turn control to turn of your product and/or need to LOWEST POSITION without going out. Quickly turn of the cooktop. e. Use screw A to the cooktop is located on . Model and Serial Number Location The serial plate is unobstructed. Adjust the "low" setting for Service Checklist...
... regular surface burner valves (Figure 10) a. b. c. e. Please call or write if you can quickly turn knob from the serial plate of the screw B. GAS COOKTOP INSTALLATION INSTRUCTIONS (For 30" & 36" Models) 4. d. Push in this appliance. Quickly turn control to turn of your product and/or need to LOWEST POSITION without going out. Quickly turn of the cooktop. e. Use screw A to the cooktop is located on . Model and Serial Number Location The serial plate is unobstructed. Adjust the "low" setting for Service Checklist...
Complete Owner's Guide (English)
Page 3
... will help alert you cannot reach your gas supplier, call your dealer to sit or stand on the cooktop. Installation and service must be done only by removing panels, wire covers, or any part of the appliance. 3 They should not be allowed to recommend a qualified technician and an authorized repair service. Install and/or adjust only per installation instructions provided in the literature package for...
... will help alert you cannot reach your gas supplier, call your dealer to sit or stand on the cooktop. Installation and service must be done only by removing panels, wire covers, or any part of the appliance. 3 They should not be allowed to recommend a qualified technician and an authorized repair service. Install and/or adjust only per installation instructions provided in the literature package for...
Complete Owner's Guide (English)
Page 4
... decorative cover will occur if the hot covers are suitable for cooktop use stove top grills on a sealed gas burner, it closely. Air will also improve efficiency. 4 WARNING Do not use . • Do Not Use Decorative Surface Burner Covers. Visually check that the burner is turned inward, and does not extend over adjacent surface burners. • Never Leave Surface Burners Unattended at High Heat Settings-Boilovers cause smoking and greasy spillovers that may ignite, or a pan that...
... decorative cover will occur if the hot covers are suitable for cooktop use stove top grills on a sealed gas burner, it closely. Air will also improve efficiency. 4 WARNING Do not use . • Do Not Use Decorative Surface Burner Covers. Visually check that the burner is turned inward, and does not extend over adjacent surface burners. • Never Leave Surface Burners Unattended at High Heat Settings-Boilovers cause smoking and greasy spillovers that may ignite, or a pan that...

Complete Owner's Guide (English)
Page 5
... power cord must be plugged directly into an electrical outlet that is equipped with this cooktop for assistance. DO NOT cut , remove, or bypass the grounding prong. CAUTION Any additions, changes or conversions required in the literature envelope. Important Safety Instructions Grounding Instructions For personal safety, the cooktop must be made by an authorized Service Center. Power supply cord with this appliance to Liquefied Petroleum (L.P.) Gas. Conversion Kit...
... power cord must be plugged directly into an electrical outlet that is equipped with this cooktop for assistance. DO NOT cut , remove, or bypass the grounding prong. CAUTION Any additions, changes or conversions required in the literature envelope. Important Safety Instructions Grounding Instructions For personal safety, the cooktop must be made by an authorized Service Center. Power supply cord with this appliance to Liquefied Petroleum (L.P.) Gas. Conversion Kit...
Complete Owner's Guide (English)
Page 6
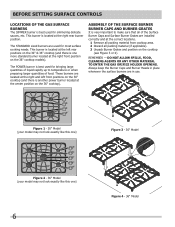
... GAS ORIFICE HOLDER OPENING. The STANDARD sized burners are located at the right front position on the 36" cooktop). Those burners are used for bringing large quantities of liquid rapidly up to make sure that all packing material (if applicable). 3 Unpack Burner Grates and position on the 30" & 36" cooktop (and there is best used for most surface cooking needs. before setting surface controls Locations of the Gas Surface Burners The SIMMER burner is one ) 6 Figure 4 - 36" Model...
... GAS ORIFICE HOLDER OPENING. The STANDARD sized burners are located at the right front position on the 36" cooktop). Those burners are used for bringing large quantities of liquid rapidly up to make sure that all packing material (if applicable). 3 Unpack Burner Grates and position on the 30" & 36" cooktop (and there is best used for most surface cooking needs. before setting surface controls Locations of the Gas Surface Burners The SIMMER burner is one ) 6 Figure 4 - 36" Model...

Complete Owner's Guide (English)
Page 7
... heat. The color of an electrical power outage, the surface burners can be set at a particular setting. setting surface controls Operating the Gas Surface Controls 1 Place cooking utensil on surface burner. 2 Push the surface control knob down and turn the knob to desired setting. Setting Proper Surface Burner Flame Size For most foods; Do not attempt to deep fat fry too much food at the same time. The finish on the grate may vary when using mediumweight metal or aluminum pans...
... heat. The color of an electrical power outage, the surface burners can be set at a particular setting. setting surface controls Operating the Gas Surface Controls 1 Place cooking utensil on surface burner. 2 Push the surface control knob down and turn the knob to desired setting. Setting Proper Surface Burner Flame Size For most foods; Do not attempt to deep fat fry too much food at the same time. The finish on the grate may vary when using mediumweight metal or aluminum pans...

Complete Owner's Guide (English)
Page 9
... not use a smallgauge wire or needle to clean the slots or holes. Refer to clean the surface Burner Caps and Burner Heads. For proper flow of gas and ignition of the burner-DO NOT ALLOW SPILLS, FOOD, CLEANING AGENTS OR ANY OTHER MATERIAL TO ENTER THE GAS ORIFICE HOLDER OPENING. Do not slide anything metal or glass across the cooktop. care & cleaning Cleaning the Cooktop, Burner Caps & BUrner Grates The cooktop is essential to maintaining your Ceramic glass cooktop...
... not use a smallgauge wire or needle to clean the slots or holes. Refer to clean the surface Burner Caps and Burner Heads. For proper flow of gas and ignition of the burner-DO NOT ALLOW SPILLS, FOOD, CLEANING AGENTS OR ANY OTHER MATERIAL TO ENTER THE GAS ORIFICE HOLDER OPENING. Do not slide anything metal or glass across the cooktop. care & cleaning Cleaning the Cooktop, Burner Caps & BUrner Grates The cooktop is essential to maintaining your Ceramic glass cooktop...

Complete Owner's Guide (English)
Page 10
... a hot cooktop. Use a paper towel or use a nonabrasive plastic type no-scratch pad to the ceramic glass cooktop may scratch the cooktop, making it . 10 Care and Cleaning of Stainless Steel Some models are equipped with a metal razor blade scraper, holding scraper at a 30 degree angle to the General Care & Cleaning table for detailed cleaning instructions. Remove loosened soils, then apply a few drops of CookTop® Cleaning Creme directly to the cooktop. WARNING DO NOT use abrasive...
... a hot cooktop. Use a paper towel or use a nonabrasive plastic type no-scratch pad to the ceramic glass cooktop may scratch the cooktop, making it . 10 Care and Cleaning of Stainless Steel Some models are equipped with a metal razor blade scraper, holding scraper at a 30 degree angle to the General Care & Cleaning table for detailed cleaning instructions. Remove loosened soils, then apply a few drops of CookTop® Cleaning Creme directly to the cooktop. WARNING DO NOT use abrasive...
Complete Owner's Guide (English)
Page 11
... burners thoroughly following instructions under General Cleaning. Small scratches do not light. Cleaning materials not recommended for service, review this appliance. See "To Clean the Ceramic-glass Cooktop" section under General Cleaning. Mineral deposits from outlet (electric ignition models). Remove using a ceramic-glass cooktop cleaning cream. Surface burner flame burns half way around. See "To Clean the Ceramic-glass Cooktop" section under General Cleaning. Brown streaks or specks. Surface burner flame Dust particles in and turn the Surface Control knob...
... burners thoroughly following instructions under General Cleaning. Small scratches do not light. Cleaning materials not recommended for service, review this appliance. See "To Clean the Ceramic-glass Cooktop" section under General Cleaning. Mineral deposits from outlet (electric ignition models). Remove using a ceramic-glass cooktop cleaning cream. Surface burner flame burns half way around. See "To Clean the Ceramic-glass Cooktop" section under General Cleaning. Brown streaks or specks. Surface burner flame Dust particles in and turn the Surface Control knob...
Complete Owner's Guide (English)
Page 12
... the factory. 10 Service calls to repair or replace appliance light bulbs, air filters, water filters, other consumable, or knobs, handles, or other rights that prove to change without notice. Service under this limited warranty shall be product repair or replacement as provided herein. This warranty only applies in materials or workmanship when such appliance is warranted by unauthorized service companies; In Canada, your appliance. 9 Expenses...
... the factory. 10 Service calls to repair or replace appliance light bulbs, air filters, water filters, other consumable, or knobs, handles, or other rights that prove to change without notice. Service under this limited warranty shall be product repair or replacement as provided herein. This warranty only applies in materials or workmanship when such appliance is warranted by unauthorized service companies; In Canada, your appliance. 9 Expenses...

Product Specifications Sheet (English)
Page 2
..." above countertop. • Allow 7" minimum clearance from right side of cabinets. • Gas Drop-In Cooktop model FGGC3665K is approved to be used in the U.S.A. Depth C - Cabinet Opening Width Power Supply Connection Location 36" min. Refer to change. Width E - Printed in combination with any Frigidaire® Electric Single Wall Oven. (Refer to Gas Cooktop Installation Over 30" / 27" Electric Single Wall Oven Specifications page on adequately wired 120V, dedicated circuit having 2-wire service with not less than 1/8" flame-retardant millboard covered with...
..." above countertop. • Allow 7" minimum clearance from right side of cabinets. • Gas Drop-In Cooktop model FGGC3665K is approved to be used in the U.S.A. Depth C - Cabinet Opening Width Power Supply Connection Location 36" min. Refer to change. Width E - Printed in combination with any Frigidaire® Electric Single Wall Oven. (Refer to Gas Cooktop Installation Over 30" / 27" Electric Single Wall Oven Specifications page on adequately wired 120V, dedicated circuit having 2-wire service with not less than 1/8" flame-retardant millboard covered with...
Product Specifications Sheet (English)
Page 3
... gas and electric hookups. • Allow 4-1/2" maximum height from oven base to isolate oven from top of supporting 200 Lbs. Install over wall oven. Panel height may need to floor, if cooktop is installed directly over two runners and flush with ground required on separate circuit fused on both sides of line. • For detailed electrical requirements, refer to model-specific product page and installation guide on web. • Always consult local and national electric codes...
... gas and electric hookups. • Allow 4-1/2" maximum height from oven base to isolate oven from top of supporting 200 Lbs. Install over wall oven. Panel height may need to floor, if cooktop is installed directly over two runners and flush with ground required on separate circuit fused on both sides of line. • For detailed electrical requirements, refer to model-specific product page and installation guide on web. • Always consult local and national electric codes...


