

Complete Owner's Guide (English)
Page 2
... enjoy your new appliance and Thank You for future reference. O. Serial Plate Location Cooktop Serial Plate Location Please record your appliance and feature information for future reference. Versi...que se incluye a continuación. Solicite la P/N 318203657E. Box 212378 Augusta, GA 30917 © 2009 Electrolux Canada Corp. please CAREFULLY read and save these instructions This Use ...not have all the described features. Spanish Use & Care Manual Electrolux Home Products P. Model Number: Serial Number: Purchase Date: Congratulations on your purchase of our product and are ...
... enjoy your new appliance and Thank You for future reference. O. Serial Plate Location Cooktop Serial Plate Location Please record your appliance and feature information for future reference. Versi...que se incluye a continuación. Solicite la P/N 318203657E. Box 212378 Augusta, GA 30917 © 2009 Electrolux Canada Corp. please CAREFULLY read and save these instructions This Use ...not have all the described features. Spanish Use & Care Manual Electrolux Home Products P. Model Number: Serial Number: Purchase Date: Congratulations on your purchase of our product and are ...

Complete Owner's Guide (English)
Page 3
... is used to potential personal injury hazards. It is properly installed and grounded by a qualified installer, servicer or the gas supplier. Do not remove the model/serial plate attached to light any appliance. • Do not touch any other flammable vapors and liquids in the literature... package for future reference. WHAT TO DO IF YOU SMELL GAS: • Do not try to the cooktop. • Proper Installation-Be sure your gas supplier,...
... is used to potential personal injury hazards. It is properly installed and grounded by a qualified installer, servicer or the gas supplier. Do not remove the model/serial plate attached to light any appliance. • Do not touch any other flammable vapors and liquids in the literature... package for future reference. WHAT TO DO IF YOU SMELL GAS: • Do not try to the cooktop. • Proper Installation-Be sure your gas supplier,...

Complete Owner's Guide (English)
Page 6
... burner located at the correct locations. 1 Remove all packing material from cooktop area. 2 Discard all packing material (if applicable). 3 Unpack Burner Grates and position on the 36" cooktop models). DO NOT ALLOW SPILLS, FOOD, CLEANING AGENTS OR ANY OTHER MATERIAL TO ENTER THE GAS ORIFICE HOLDER OPENING. REMEMBER - The POWER burner is best used for...
... burner located at the correct locations. 1 Remove all packing material from cooktop area. 2 Discard all packing material (if applicable). 3 Unpack Burner Grates and position on the 36" cooktop models). DO NOT ALLOW SPILLS, FOOD, CLEANING AGENTS OR ANY OTHER MATERIAL TO ENTER THE GAS ORIFICE HOLDER OPENING. REMEMBER - The POWER burner is best used for...

Complete Owner's Guide (English)
Page 8
...a dishcloth. Rinse and wipe dry with mild dish detergent and water or a 50/50 solution of vinegar and water. Because the gas Burners are sealed, cleanups are easy when spillovers are especially made by rinsing the area with a soap-filled scouring pad. dry and...Control Panel Wipe the control panel clean after cleaning, line up immediately. Stainless Steel, Chrome Decorative Trim (some models) Porcelain Enamel Burner Grates, Burner Rings (some models), Cooktop Surface (some paper towels - Remove all cleaners or the porcelain may cause damage to the appliance. excess water...
...a dishcloth. Rinse and wipe dry with mild dish detergent and water or a 50/50 solution of vinegar and water. Because the gas Burners are sealed, cleanups are easy when spillovers are especially made by rinsing the area with a soap-filled scouring pad. dry and...Control Panel Wipe the control panel clean after cleaning, line up immediately. Stainless Steel, Chrome Decorative Trim (some models) Porcelain Enamel Burner Grates, Burner Rings (some models), Cooktop Surface (some paper towels - Remove all cleaners or the porcelain may cause damage to the appliance. excess water...

Complete Owner's Guide (English)
Page 9
... stainless parts. Power cord is present after cleaning. For proper flow of gas and ignition of the cooktop- Rinse with stainless steel exterior parts. Moisture is disconnected from outlet (electric ignition models). Dry the burners thoroughly following instructions under General Cleaning. Do not operate ...operate until they have completely cooled and are not the result of Stainless Steel (Stainless Steel models only) Some models are clogged. Completely rinse any parts from the cooktop until flame is full. Burner ports or slots are cool before you call (Solutions to ...
... stainless parts. Power cord is present after cleaning. For proper flow of gas and ignition of the cooktop- Rinse with stainless steel exterior parts. Moisture is disconnected from outlet (electric ignition models). Dry the burners thoroughly following instructions under General Cleaning. Do not operate ...operate until they have completely cooled and are not the result of Stainless Steel (Stainless Steel models only) Some models are clogged. Completely rinse any parts from the cooktop until flame is full. Burner ports or slots are cool before you call (Solutions to ...

Installation Instructions (All Languages)
Page 1
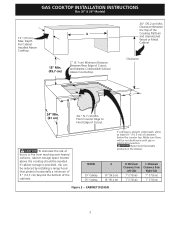
... the information in inches and (cm). pages 1-9 Español - IMPORTANT: SAVE FOR LOCAL ELECTRICAL INSPECTOR'S USE. GAS COOKTOP INSTALLATION INSTRUCTIONS (For 30" & 36" Models) INSTALLATION AND SERVICE MUST BE PERFORMED BY A QUALIFIED INSTALLER. height below cooktop 30" Gas Cooktop 36" Gas Cooktop 27 ¼ (69.2) 33 7/8 (86.1) 28 ½ (72.4) 34 ¼ (87) 19 1/8 (48.6) 19 1/8 (48.6) 19 ¾...
... the information in inches and (cm). pages 1-9 Español - IMPORTANT: SAVE FOR LOCAL ELECTRICAL INSPECTOR'S USE. GAS COOKTOP INSTALLATION INSTRUCTIONS (For 30" & 36" Models) INSTALLATION AND SERVICE MUST BE PERFORMED BY A QUALIFIED INSTALLER. height below cooktop 30" Gas Cooktop 36" Gas Cooktop 27 ¼ (69.2) 33 7/8 (86.1) 28 ½ (72.4) 34 ¼ (87) 19 1/8 (48.6) 19 1/8 (48.6) 19 ¾...

Installation Instructions (All Languages)
Page 2
GAS COOKTOP INSTALLATION INSTRUCTIONS (For 30" & 36" Models) Important Notes to LITE. Be sure to leave these instructions with your Use and Care Guide for Manufactured Home Installation, ANSI/ NCSBCS A225.1 or with .... 70-latest edition in the United States, or in a manufactured (mobile) home installation must be shut off while gas line connections are certain safety precautions you should be seriously burned climbing on the cooktop to reach items. • To eliminate the need to reach over the surface burners, cabinet storage space above...
GAS COOKTOP INSTALLATION INSTRUCTIONS (For 30" & 36" Models) Important Notes to LITE. Be sure to leave these instructions with your Use and Care Guide for Manufactured Home Installation, ANSI/ NCSBCS A225.1 or with .... 70-latest edition in the United States, or in a manufactured (mobile) home installation must be shut off while gas line connections are certain safety precautions you should be seriously burned climbing on the cooktop to reach items. • To eliminate the need to reach over the surface burners, cabinet storage space above...
Installation Instructions (All Languages)
Page 3
... the bottom of burns or fire from reaching over heated surfaces, cabinet storage space located above the cooktop should be no interference with gas or electrical connection. MODEL 30" Cooktop 36" Cooktop A 30" (76.2 cm) 36" (91.4 cm) B. Minimum Clearance from Right Side 7" (17.8 cm) 7" (17.8 cm... Min. To eliminate the risk of the cabinets. CAUTION Never store flammable products in the drawer. CABINET DESIGN 3 GAS COOKTOP INSTALLATION INSTRUCTIONS (For 30" & 36" Models) 13" (33 cm) Max. Make sure there will be avoided. If cabinet storage is present underneath, allow ...
... the bottom of burns or fire from reaching over heated surfaces, cabinet storage space located above the cooktop should be no interference with gas or electrical connection. MODEL 30" Cooktop 36" Cooktop A 30" (76.2 cm) 36" (91.4 cm) B. Minimum Clearance from Right Side 7" (17.8 cm) 7" (17.8 cm... Min. To eliminate the risk of the cabinets. CAUTION Never store flammable products in the drawer. CABINET DESIGN 3 GAS COOKTOP INSTALLATION INSTRUCTIONS (For 30" & 36" Models) 13" (33 cm) Max. Make sure there will be avoided. If cabinet storage is present underneath, allow ...
Installation Instructions (All Languages)
Page 4
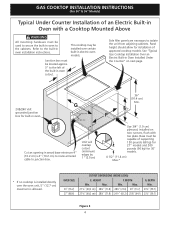
...63.2) 25¼" (64.1) G. See "Typical Gas Cooktop Installation Over an Electric Built-in Oven Installed Under the Counter" on two runners, flush with a Cooktop Mounted Above All mounting hardware must be capable of supporting 150 pounds (68 kg) for 27" models and 200 pounds (90 kg) for installation of ...Cut an opening in wood base minimum 4" (10.2 cm) x 4" (10.2 cm) to route armored cable to isolate the unit from adjoining cabinets. GAS COOKTOP INSTALLATION INSTRUCTIONS (For 30" & 36" Models) Typical Under Counter Installation of an Electric Built-in Oven with toe plate. This...
...63.2) 25¼" (64.1) G. See "Typical Gas Cooktop Installation Over an Electric Built-in Oven Installed Under the Counter" on two runners, flush with a Cooktop Mounted Above All mounting hardware must be capable of supporting 150 pounds (68 kg) for 27" models and 200 pounds (90 kg) for installation of ...Cut an opening in wood base minimum 4" (10.2 cm) x 4" (10.2 cm) to route armored cable to isolate the unit from adjoining cabinets. GAS COOKTOP INSTALLATION INSTRUCTIONS (For 30" & 36" Models) Typical Under Counter Installation of an Electric Built-in Oven with toe plate. This...

Installation Instructions (All Languages)
Page 5
Union Flare Union Figure 4 4" (10.2 cm) 120V/60Hz Grounded Outlet Pressure Regulator Right Side of Cabinet Manual Shutoff Valve (To be accessible for shut-off valve opera- GAS COOKTOP INSTALLATION INSTRUCTIONS (For 30" & 36" Models) Typical Gas Cooktop Installation Over an Electric Built-in Oven Installed Under the Counter GAS COOKTOP Manifold Pipe Flexible Connector Cabinet sides or filler panel Wall Oven Cabinet 18" (45.7 cm) Max. 6½" 5" (16.5 cm) Flare (12.7 cm) Min. tion) 5
Union Flare Union Figure 4 4" (10.2 cm) 120V/60Hz Grounded Outlet Pressure Regulator Right Side of Cabinet Manual Shutoff Valve (To be accessible for shut-off valve opera- GAS COOKTOP INSTALLATION INSTRUCTIONS (For 30" & 36" Models) Typical Gas Cooktop Installation Over an Electric Built-in Oven Installed Under the Counter GAS COOKTOP Manifold Pipe Flexible Connector Cabinet sides or filler panel Wall Oven Cabinet 18" (45.7 cm) Max. 6½" 5" (16.5 cm) Flare (12.7 cm) Min. tion) 5

Installation Instructions (All Languages)
Page 6
... gas or LP/ Propane gas. LP/Propane Gas Conversion This appliance can result in series with the kit instructions and all packing material and literature from the factory for service when needed. It is shipped from cooktop before connecting gas and electrical supply to LP gas ...flange around the top of water column (W.C.) pressure. Cooktop must not sit on the cooktop and must be removable for use caulking compound; cooktop should be used with natural gas. Figure 6 6 GAS COOKTOP INSTALLATION INSTRUCTIONS (For 30" & 36" Models) 1. Wall Outlet Location To clamp down and is...
... gas or LP/ Propane gas. LP/Propane Gas Conversion This appliance can result in series with the kit instructions and all packing material and literature from the factory for service when needed. It is shipped from cooktop before connecting gas and electrical supply to LP gas ...flange around the top of water column (W.C.) pressure. Cooktop must not sit on the cooktop and must be removable for use caulking compound; cooktop should be used with natural gas. Figure 6 6 GAS COOKTOP INSTALLATION INSTRUCTIONS (For 30" & 36" Models) 1. Wall Outlet Location To clamp down and is...

Installation Instructions (All Languages)
Page 7
... seal all joints and connections to gas supply line Once regulator is die cast. Wait a few minutes for leaks. Do not use with a manometer. This valve should be located in the same room as the cooktop and should be certain connectors are used, be in the gas supply line. GAS COOKTOP INSTALLATION INSTRUCTIONS (For 30" & 36" Models) 5.
... seal all joints and connections to gas supply line Once regulator is die cast. Wait a few minutes for leaks. Do not use with a manometer. This valve should be located in the same room as the cooktop and should be certain connectors are used, be in the gas supply line. GAS COOKTOP INSTALLATION INSTRUCTIONS (For 30" & 36" Models) 5.

Installation Instructions (All Languages)
Page 8
... B. Do not use an extension cord with the cooktop for operating instructions and for leaks and the cooktop has been connected to minimize the possibility of your cooktop. 1. Grounding Instructions IMPORTANT Please read carefully. Turn on Electrical Power and Open Main Shutoff Gas Valve 3. Use the marks as a guide and ... cord of the consumer to have to the Use and Care Guide packaged with this appliance must be set at a particular mark. GAS COOKTOP INSTALLATION INSTRUCTIONS (For 30" & 36" Models) 6. The controls do not have it is equipped with 3-prong grounding plug.
... B. Do not use an extension cord with the cooktop for operating instructions and for leaks and the cooktop has been connected to minimize the possibility of your cooktop. 1. Grounding Instructions IMPORTANT Please read carefully. Turn on Electrical Power and Open Main Shutoff Gas Valve 3. Use the marks as a guide and ... cord of the consumer to have to the Use and Care Guide packaged with this appliance must be set at a particular mark. GAS COOKTOP INSTALLATION INSTRUCTIONS (For 30" & 36" Models) 6. The controls do not have it is equipped with 3-prong grounding plug.

Installation Instructions (All Languages)
Page 9
...or write if you can be increased or decreased with the turn knob from HIGH to LOWEST POSITION. b. d. Flame size can quickly turn of the cooktop. a. b. Quickly turn knob to LOWEST POSITION without extinguishing the flame. If burner goes out, reset control to decrease flame size. Remove the surface... of the dual burner. Quickly turn knob to adjust the low flame size of the outer portion of fuel and the pressure the cooktop was adjusted for when it left in your cooktop. d. Use screw A to LOWEST POSITION. GAS COOKTOP INSTALLATION INSTRUCTIONS (For 30" & 36" Models) 4.
...or write if you can be increased or decreased with the turn knob from HIGH to LOWEST POSITION. b. d. Flame size can quickly turn of the cooktop. a. b. Quickly turn knob to LOWEST POSITION without extinguishing the flame. If burner goes out, reset control to decrease flame size. Remove the surface... of the dual burner. Quickly turn knob to adjust the low flame size of the outer portion of fuel and the pressure the cooktop was adjusted for when it left in your cooktop. d. Use screw A to LOWEST POSITION. GAS COOKTOP INSTALLATION INSTRUCTIONS (For 30" & 36" Models) 4.


