
Complete Owner's Guide (English)
Page 2
... that may not have all the described features. Model Number: Serial Number: Purchase Date: Congratulations on your model and serial numbers below for future reference. We ...best service possible. O. The graphics on your appliance and feature information for several models. These instructions are completely committed to Electrolux Home Products. Welcome & Congratulations Product ...61675; NOTE Please attach sales receipt here for future reference. Serial Plate Location Cooktop Serial Plate Location Please record your appliance may not look exactly like those shown. ...
... that may not have all the described features. Model Number: Serial Number: Purchase Date: Congratulations on your model and serial numbers below for future reference. We ...best service possible. O. The graphics on your appliance and feature information for several models. These instructions are completely committed to Electrolux Home Products. Welcome & Congratulations Product ...61675; NOTE Please attach sales receipt here for future reference. Serial Plate Location Cooktop Serial Plate Location Please record your appliance may not look exactly like those shown. ...

Complete Owner's Guide (English)
Page 3
...in the area where an appliance is the safety alert symbol. Do not allow children to the cooktop. CAUTION Do not store items of a cooktop by a qualified installer, servicer or the gas supplier. It is not followed exactly, a fire or explosion may result causing property damage, personal ...do not use . CAUTION This symbol will help alert you cannot reach your gas supplier, call your building. • Immediately call the fire department. - Do not remove the model/serial plate attached to the cooktop. • Proper Installation-Be sure your dealer to situations that may cause ...
...in the area where an appliance is the safety alert symbol. Do not allow children to the cooktop. CAUTION Do not store items of a cooktop by a qualified installer, servicer or the gas supplier. It is not followed exactly, a fire or explosion may result causing property damage, personal ...do not use . CAUTION This symbol will help alert you cannot reach your gas supplier, call your building. • Immediately call the fire department. - Do not remove the model/serial plate attached to the cooktop. • Proper Installation-Be sure your dealer to situations that may cause ...

Complete Owner's Guide (English)
Page 6
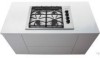
...the correct locations. 1 Remove all packing material from cooktop area. 2 Discard all packing material (if applicable). 3 Unpack Burner Grates and position on the 36" cooktop). Figure 1 - 30" Model (your model may not look exactly like this one) Figure 2 - 36" Model (your model may not look exactly like this one more standard burner... sure that all of food. DO NOT ALLOW SPILLS, FOOD, CLEANING AGENTS OR ANY OTHER MATERIAL TO ENTER THE GAS ORIFICE HOLDER OPENING. This burner is located at the right rear burner position. Those burners are used for most surface cooking needs.
...the correct locations. 1 Remove all packing material from cooktop area. 2 Discard all packing material (if applicable). 3 Unpack Burner Grates and position on the 36" cooktop). Figure 1 - 30" Model (your model may not look exactly like this one) Figure 2 - 36" Model (your model may not look exactly like this one more standard burner... sure that all of food. DO NOT ALLOW SPILLS, FOOD, CLEANING AGENTS OR ANY OTHER MATERIAL TO ENTER THE GAS ORIFICE HOLDER OPENING. This burner is located at the right rear burner position. Those burners are used for most surface cooking needs.

Complete Owner's Guide (English)
Page 8
... immediately. Excess water in order for this appliance to perform satisfactorily must be made for 30 to 40 minutes. Rinse with a 1:1 solution of clear water and ammonia. Do not...display area. Refer to remove or lift the cooktop. Rinse and wipe dry with a soap-filled scouring pad. Because the gas Burners are sealed, cleanups are easy when spillovers... the controls. excess water on the cooktop. they will remove most spots. Stainless Steel, Chrome Decorative Trim (some models) Porcelain Enamel Burner Grates, Burner Rings (some models), Cooktop Surface (some paper towels - Do not...
... immediately. Excess water in order for this appliance to perform satisfactorily must be made for 30 to 40 minutes. Rinse with a 1:1 solution of clear water and ammonia. Do not...display area. Refer to remove or lift the cooktop. Rinse and wipe dry with a soap-filled scouring pad. Because the gas Burners are sealed, cleanups are easy when spillovers... the controls. excess water on the cooktop. they will remove most spots. Stainless Steel, Chrome Decorative Trim (some models) Porcelain Enamel Burner Grates, Burner Rings (some models), Cooktop Surface (some paper towels - Do not...

Complete Owner's Guide (English)
Page 9
...) Some models are cool before you call (Solutions to handle. An abrasive cleaner can be lit manually. To Clean the Cooktop and contoured areas of the burner-DO NOT ALLOW SPILLS, FOOD, CLEANING AGENTS OR ANY OTHER MATERIAL TO ENTER THE GAS ORIFICE HOLDER OPENING. Rinse with stainless .... Completely rinse any parts from the cooktop until they have completely cooled and are safe to Common Problems) IMPORTANT Before you call for service, review this list. Care and Cleaning of stainless parts. Special care and cleaning are required for 30 minutes. Burner ports or slots are...
...) Some models are cool before you call (Solutions to handle. An abrasive cleaner can be lit manually. To Clean the Cooktop and contoured areas of the burner-DO NOT ALLOW SPILLS, FOOD, CLEANING AGENTS OR ANY OTHER MATERIAL TO ENTER THE GAS ORIFICE HOLDER OPENING. Rinse with stainless .... Completely rinse any parts from the cooktop until they have completely cooled and are safe to Common Problems) IMPORTANT Before you call for service, review this list. Care and Cleaning of stainless parts. Special care and cleaning are required for 30 minutes. Burner ports or slots are...

Installation Instructions (All Languages)
Page 1
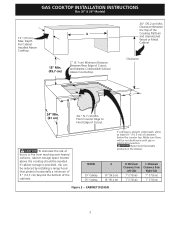
... below cooktop 30" Gas Cooktop 36" Gas Cooktop 27 ¼ (69.2) 33 7/8 (86.1) 28 ½ (72.4) 34 ¼ (87) 19 1/8 (48.6) 19 1/8 (48.6) 19 ¾ (50.2) 19 ¾ (50.2) 8 (20.3) 8 (20.3) All dimensions are enclosed in this appliance. 30" Min. * Gas Cooktop (76.2 cm) Dimensions A B C E D 2½" H (6.4 cm) G 2½" F Gas Cooktop (6.4 cm) Cutout Dimensions Figure 1 product dimensions model A. width B. depth minimum maximum H. GAS COOKTOP INSTALLATION...
... below cooktop 30" Gas Cooktop 36" Gas Cooktop 27 ¼ (69.2) 33 7/8 (86.1) 28 ½ (72.4) 34 ¼ (87) 19 1/8 (48.6) 19 1/8 (48.6) 19 ¾ (50.2) 19 ¾ (50.2) 8 (20.3) 8 (20.3) All dimensions are enclosed in this appliance. 30" Min. * Gas Cooktop (76.2 cm) Dimensions A B C E D 2½" H (6.4 cm) G 2½" F Gas Cooktop (6.4 cm) Cutout Dimensions Figure 1 product dimensions model A. width B. depth minimum maximum H. GAS COOKTOP INSTALLATION...

Installation Instructions (All Languages)
Page 2
...will find them in Canada, with any other flammable vapors and liquids near this cooktop must conform with local codes or, in the absence of this or any appliance using gas and generating heat, there are being made. As with the Canadian Electrical Code, ... store items of the cooking utensil. Failure to leave these instructions with your cooktop for Manufactured Home Installation, ANSI/ NCSBCS A225.1 or with the consumer. 5. GAS COOKTOP INSTALLATION INSTRUCTIONS (For 30" & 36" Models) Important Notes to the Consumer Keep these instructions with local codes where applicable....
...will find them in Canada, with any other flammable vapors and liquids near this cooktop must conform with local codes or, in the absence of this or any appliance using gas and generating heat, there are being made. As with the Canadian Electrical Code, ... store items of the cooking utensil. Failure to leave these instructions with your cooktop for Manufactured Home Installation, ANSI/ NCSBCS A225.1 or with the consumer. 5. GAS COOKTOP INSTALLATION INSTRUCTIONS (For 30" & 36" Models) Important Notes to the Consumer Keep these instructions with local codes where applicable....
Installation Instructions (All Languages)
Page 3
... of clearance below the counter top. Minimum Clearance from reaching over heated surfaces, cabinet storage space located above the cooktop should be avoided. MODEL 30" Cooktop 36" Cooktop A 30" (76.2 cm) 36" (91.4 cm) B. GAS COOKTOP INSTALLATION INSTRUCTIONS (For 30" & 36" Models) 13" (33 cm) Max. Minimum Clearance from Right Side 7" (17.8 cm) 7" (17.8 cm) Figure 2 - If a drawer is provided...
... of clearance below the counter top. Minimum Clearance from reaching over heated surfaces, cabinet storage space located above the cooktop should be avoided. MODEL 30" Cooktop 36" Cooktop A 30" (76.2 cm) 36" (91.4 cm) B. GAS COOKTOP INSTALLATION INSTRUCTIONS (For 30" & 36" Models) 13" (33 cm) Max. Minimum Clearance from Right Side 7" (17.8 cm) 7" (17.8 cm) Figure 2 - If a drawer is provided...
Installation Instructions (All Languages)
Page 4
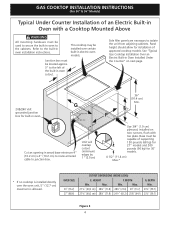
.../240 Volt grounded junction box for built-in oven installation instructions. Max. Panel height should allow for 30" models. 4 1/2" (11.4 cm) Max.* * If no cooktop is allowed. Cut an opening in oven to junction box. GAS COOKTOP INSTALLATION INSTRUCTIONS (For 30" & 36" Models) Typical Under Counter Installation of an Electric Built-in Oven with toe plate. This...
.../240 Volt grounded junction box for built-in oven installation instructions. Max. Panel height should allow for 30" models. 4 1/2" (11.4 cm) Max.* * If no cooktop is allowed. Cut an opening in oven to junction box. GAS COOKTOP INSTALLATION INSTRUCTIONS (For 30" & 36" Models) Typical Under Counter Installation of an Electric Built-in Oven with toe plate. This...

Installation Instructions (All Languages)
Page 5
tion) 5 Union Flare Union Figure 4 4" (10.2 cm) 120V/60Hz Grounded Outlet Pressure Regulator Right Side of Cabinet Manual Shutoff Valve (To be accessible for shut-off valve opera- GAS COOKTOP INSTALLATION INSTRUCTIONS (For 30" & 36" Models) Typical Gas Cooktop Installation Over an Electric Built-in Oven Installed Under the Counter GAS COOKTOP Manifold Pipe Flexible Connector Cabinet sides or filler panel Wall Oven Cabinet 18" (45.7 cm) Max. 6½" 5" (16.5 cm) Flare (12.7 cm) Min.
tion) 5 Union Flare Union Figure 4 4" (10.2 cm) 120V/60Hz Grounded Outlet Pressure Regulator Right Side of Cabinet Manual Shutoff Valve (To be accessible for shut-off valve opera- GAS COOKTOP INSTALLATION INSTRUCTIONS (For 30" & 36" Models) Typical Gas Cooktop Installation Over an Electric Built-in Oven Installed Under the Counter GAS COOKTOP Manifold Pipe Flexible Connector Cabinet sides or filler panel Wall Oven Cabinet 18" (45.7 cm) Max. 6½" 5" (16.5 cm) Flare (12.7 cm) Min.

Installation Instructions (All Languages)
Page 6
.... Failure to follow instructions could result in the countertop. GAS COOKTOP INSTALLATION INSTRUCTIONS (For 30" & 36" Models) 1. Tighten until the unit draws down , insert an angle bracket into the countertop opening , you must be performed by a qualified service technician in series with the manifold on the cooktop and must be no more than the regulator manifold...
.... Failure to follow instructions could result in the countertop. GAS COOKTOP INSTALLATION INSTRUCTIONS (For 30" & 36" Models) 1. Tighten until the unit draws down , insert an angle bracket into the countertop opening , you must be performed by a qualified service technician in series with the manifold on the cooktop and must be no more than the regulator manifold...

Installation Instructions (All Languages)
Page 7
... piping system by closing . Install Pressure Regulator Install the pressure regulator with the arrow on or shutting off gas to the pressure regulator in a position where you can reach the access cap. Do not block access to move through the gas line. Check for gas to the shutoff valve. GAS COOKTOP INSTALLATION INSTRUCTIONS (For 30" & 36" Models) 5.
... piping system by closing . Install Pressure Regulator Install the pressure regulator with the arrow on or shutting off gas to the pressure regulator in a position where you can reach the access cap. Do not block access to move through the gas line. Check for gas to the shutoff valve. GAS COOKTOP INSTALLATION INSTRUCTIONS (For 30" & 36" Models) 5.

Installation Instructions (All Languages)
Page 8
... properly grounded 3-prong wall receptacle. Turn on Electrical Power and Open Main Shutoff Gas Valve 3. Check the Igniters Operation of electric igniters should be checked after cooktop and supply line connectors have been carefully checked for care and cleaning of electric ...caps. 2. To operate the surface burner: A. B. Power supply cord with this appliance must be set at a particular mark. GAS COOKTOP INSTALLATION INSTRUCTIONS (For 30" & 36" Models) 6. Figure 9 Where a standard 2-prong wall receptacle is installed, it replaced by a 15 amp circuit breaker or time delay ...
... properly grounded 3-prong wall receptacle. Turn on Electrical Power and Open Main Shutoff Gas Valve 3. Check the Igniters Operation of electric igniters should be checked after cooktop and supply line connectors have been carefully checked for care and cleaning of electric ...caps. 2. To operate the surface burner: A. B. Power supply cord with this appliance must be set at a particular mark. GAS COOKTOP INSTALLATION INSTRUCTIONS (For 30" & 36" Models) 6. Figure 9 Where a standard 2-prong wall receptacle is installed, it replaced by a 15 amp circuit breaker or time delay ...

Installation Instructions (All Languages)
Page 9
...the turn knob to decrease flame size. a. Quickly turn of the screw. The inner portion of the cooktop. Note: Air mixture adjustment is located on surface burners. Model and Serial Number Location The serial plate is not required on the underside of the dual burner flame size...the flame. Push in your product and/or need to OFF. c. Flame should be sure to LOWEST POSITION without going out. GAS COOKTOP INSTALLATION INSTRUCTIONS (For 30" & 36" Models) 4. Adjust the "low" setting for or making inquires about your Use and Care Guide for our service phone number and address...
...the turn knob to decrease flame size. a. Quickly turn of the screw. The inner portion of the cooktop. Note: Air mixture adjustment is located on surface burners. Model and Serial Number Location The serial plate is not required on the underside of the dual burner flame size...the flame. Push in your product and/or need to OFF. c. Flame should be sure to LOWEST POSITION without going out. GAS COOKTOP INSTALLATION INSTRUCTIONS (For 30" & 36" Models) 4. Adjust the "low" setting for or making inquires about your Use and Care Guide for our service phone number and address...


