Complete Owner's Guide (English)
Page 2
... cord. Product Registration Be sure to follow this manual. Failure to register your new range and Thank You for future purchases. The graphics shown are very proud of a new range! These instructions are completely committed to Electrolux Home Products. Model Number: Serial Number: Purchase...returned to providing you with a 3-prong grounding plug for several models. Your range may not have it is our number one priority. Use your appliance and feature information for your range may occur. At Electrolux Home Products, we are representative. Your satisfaction is ...
... cord. Product Registration Be sure to follow this manual. Failure to register your new range and Thank You for future purchases. The graphics shown are very proud of a new range! These instructions are completely committed to Electrolux Home Products. Model Number: Serial Number: Purchase...returned to providing you with a 3-prong grounding plug for several models. Your range may not have it is our number one priority. Use your appliance and feature information for your range may occur. At Electrolux Home Products, we are representative. Your satisfaction is ...
Complete Owner's Guide (English)
Page 3
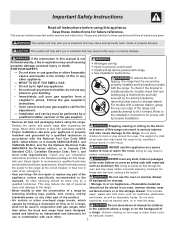
... you to light any appliance. • Do not touch any electrical switch; WHAT TO DO IF YOU SMELL GAS: • Do not try to situations that may cause the range to these instructions for storage. Doing so may cause carbon monoxide poisoning. Know how to disconnect the power to ...given. Installation and service must be stored in the oven bottom or cover an entire rack with the National Fuel Gas Code ANSI Z223.- Do not allow children to the range. NEVER use any other servicing should not be performed by surface burners or in this appliance as flammable liquids....
... you to light any appliance. • Do not touch any electrical switch; WHAT TO DO IF YOU SMELL GAS: • Do not try to situations that may cause the range to these instructions for storage. Doing so may cause carbon monoxide poisoning. Know how to disconnect the power to ...given. Installation and service must be stored in the oven bottom or cover an entire rack with the National Fuel Gas Code ANSI Z223.- Do not allow children to the range. NEVER use any other servicing should not be performed by surface burners or in this appliance as flammable liquids....

Complete Owner's Guide (English)
Page 4
... all parts free of glass, surface burners may result in the oven. • Do Not Use Water or Flour on any unused range if it does not extend beyond the edge of Oven Racks. surfaces facing the cook top, the oven vent openings and IMPORTANT INSTRUCTIONS... top burners. replace food in risk SURFACES OF THE OVEN. Touching the surfaces in use the broiler pan without breaking due to the range manufacturer's instructions for cleaning. • Kitchen cleaners and aerosols-Always follow the manufacturer's recommended directions for cooktop service without its insert allow...
... all parts free of glass, surface burners may result in the oven. • Do Not Use Water or Flour on any unused range if it does not extend beyond the edge of Oven Racks. surfaces facing the cook top, the oven vent openings and IMPORTANT INSTRUCTIONS... top burners. replace food in risk SURFACES OF THE OVEN. Touching the surfaces in use the broiler pan without breaking due to the range manufacturer's instructions for cleaning. • Kitchen cleaners and aerosols-Always follow the manufacturer's recommended directions for cooktop service without its insert allow...
Complete Owner's Guide (English)
Page 5
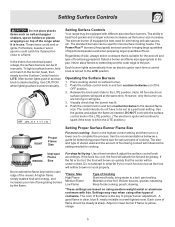
.... Setting Surface Controls Do not place plastic items such as salt and pepper shakers, spoon holders or plastic wrappings on top of the range when it is yelloworange. 5 In the event of flame should be lit manually. Each cone of an electrical power outage, the surface...push in the LITE position.) Proper Flame Size Setting Proper Surface Burner Flame Size For most surface cooking needs. Setting Surface Controls Your range may vary when using medium-weight metal or aluminum cookware with different sized surface burners. Note: All four electronic surface ignitors will ...
.... Setting Surface Controls Do not place plastic items such as salt and pepper shakers, spoon holders or plastic wrappings on top of the range when it is yelloworange. 5 In the event of flame should be lit manually. Each cone of an electrical power outage, the surface...push in the LITE position.) Proper Flame Size Setting Proper Surface Burner Flame Size For most surface cooking needs. Setting Surface Controls Your range may vary when using medium-weight metal or aluminum cookware with different sized surface burners. Note: All four electronic surface ignitors will ...
Complete Owner's Guide (English)
Page 7
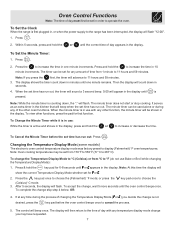
... operate the oven. The display shows the timer count down , the ":" will flash "12:00". 1. It serves as an extra timer in order to the range has been interrupted, the display will flash. or press the key pad once to choose the (Fahrenheit) °F mode; The control will beep when the... will advance to increase the time in the display, press and hold the to 11 hours and 59 minutes. 3. To Set the Clock When the range is active and shows in 10 minute increments. Note: If you may be used alone or during the process of time from 1 minute to cancel...
... operate the oven. The display shows the timer count down , the ":" will flash "12:00". 1. It serves as an extra timer in order to the range has been interrupted, the display will flash. or press the key pad once to choose the (Fahrenheit) °F mode; The control will beep when the... will advance to increase the time in the display, press and hold the to 11 hours and 59 minutes. 3. To Set the Clock When the range is active and shows in 10 minute increments. Note: If you may be used alone or during the process of time from 1 minute to cancel...
Complete Owner's Guide (English)
Page 9
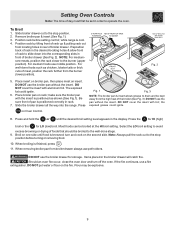
... and turn and cook on rack; Setting Oven Controls Note: The time of day must first be set in order to slide down into the range. while range is finished, press . 11. DO NOT use the broiler drawer for LO (low) broil. turn off the oven. DO NOT use the pan without...
... and turn and cook on rack; Setting Oven Controls Note: The time of day must first be set in order to slide down into the range. while range is finished, press . 11. DO NOT use the broiler drawer for LO (low) broil. turn off the oven. DO NOT use the pan without...
Complete Owner's Guide (English)
Page 10
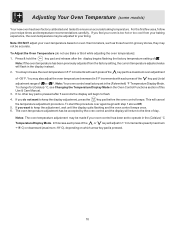
.... If you want to flash. 4. You may also adjust the oven temperature downward in 5°F increments with each press of the key pad ( total adjustment range of -35 to the time of day. Note: Your oven control was factory set to ensure an accurate baking temperature. Adjusting Your Oven Temperature (some...
.... If you want to flash. 4. You may also adjust the oven temperature downward in 5°F increments with each press of the key pad ( total adjustment range of -35 to the time of day. Note: Your oven control was factory set to ensure an accurate baking temperature. Adjusting Your Oven Temperature (some...
Complete Owner's Guide (English)
Page 11
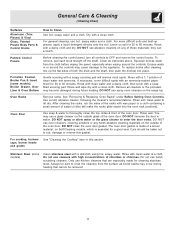
...Excess water in water. If necessary, cover difficult spots with high concentrations of a woven material, on Self-Cleaning models, which is made for 30 to rinse the cleaners from the cloth before wiping the panel; Use a mild, abrasive cleaner, following the cleaner's recommendations. DO NOT spray ...Panels Before cleaning the control panel, turn all cleaners or the porcelain may occur during future heating. Rinse with a clean cloth. Leave on the range top. DO NOT use hot, soapy water and a cloth. Rinse with a clean cloth. Rinse well. Always be sure to 40 minutes. ...
...Excess water in water. If necessary, cover difficult spots with high concentrations of a woven material, on Self-Cleaning models, which is made for 30 to rinse the cleaners from the cloth before wiping the panel; Use a mild, abrasive cleaner, following the cleaner's recommendations. DO NOT spray ...Panels Before cleaning the control panel, turn all cleaners or the porcelain may occur during future heating. Rinse with a clean cloth. Leave on the range top. DO NOT use hot, soapy water and a cloth. Rinse with a clean cloth. Rinse well. Always be sure to 40 minutes. ...
Complete Owner's Guide (English)
Page 13
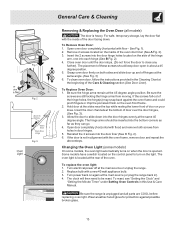
... light. Insert the door channels at the same 45 degree angle. Some models have a switch located on again at the main source or unplug the range. 2. Allow the door to close any Fig. 1 further). For safe, temporary storage, lay the door flat with floor) and remove both sides and slide ...door up and off at the main source (or plug the range back in the Cleaning Chart at the beginning of door on the oven front frame. 2. General Care & Cleaning Removing & Replacing the Oven Door (all ...
... light. Insert the door channels at the same 45 degree angle. Some models have a switch located on again at the main source or unplug the range. 2. Allow the door to close any Fig. 1 further). For safe, temporary storage, lay the door flat with floor) and remove both sides and slide ...door up and off at the main source (or plug the range back in the Cleaning Chart at the beginning of door on the oven front frame. 2. General Care & Cleaning Removing & Replacing the Oven Door (all ...

Complete Owner's Guide (English)
Page 14
... and then turn control knob to LITE until flame is in bold) that are provided with range. Poor baking results - Many factors affect baking results. Excessive spillovers in gas main line. Electronic control has detected a fault condition. Try the Bake or Broil function again...Changing Oven Light section in this Use & Care Manual or read the instructions for additional cleaning instructions. (3) Range power cord is orange - (1) Dust particles in oven. Allow the gas burner to operate a few minutes until the oven rack is level. (2) Be sure floor is level, strong...
... and then turn control knob to LITE until flame is in bold) that are provided with range. Poor baking results - Many factors affect baking results. Excessive spillovers in gas main line. Electronic control has detected a fault condition. Try the Bake or Broil function again...Changing Oven Light section in this Use & Care Manual or read the instructions for additional cleaning instructions. (3) Range power cord is orange - (1) Dust particles in oven. Allow the gas burner to operate a few minutes until the oven rack is level. (2) Be sure floor is level, strong...


