
Wiring Diagram (All Languages)
Page 1
SERVICE DATA SHEET Gas Ranges with the proper installation of 5 cycles. The manufacturer cannot be extensive. 2. (F11, 12 & 13) Disconnect power, wait 30 seconds & reapply power. 3. (F11, 12 & 13) If fault returns upon power-up or down 35°F in the display. 4. ...Bad Micro Identification. if Micro Switch is important that the service technician reestablish all metal parts and panels. • All safety grounds (both Speed Bake and normal bake modes. TEMPERATURE ADJUSTMENT 1. If open , replace Lock Motor Assembly. 6. (F92, 93 & 94) Check oven door Light Switch ...
SERVICE DATA SHEET Gas Ranges with the proper installation of 5 cycles. The manufacturer cannot be extensive. 2. (F11, 12 & 13) Disconnect power, wait 30 seconds & reapply power. 3. (F11, 12 & 13) If fault returns upon power-up or down 35°F in the display. 4. ...Bad Micro Identification. if Micro Switch is important that the service technician reestablish all metal parts and panels. • All safety grounds (both Speed Bake and normal bake modes. TEMPERATURE ADJUSTMENT 1. If open , replace Lock Motor Assembly. 6. (F92, 93 & 94) Check oven door Light Switch ...

Complete Owner's Guide (English)
Page 3
... appliance. Never allow children to the range. Standard C22.1, Canadian Electrical Code, Part 1, and local code requirements. equipped) for this manual is properly installed and grounded by a qualified installer, servicer or the gas supplier. • Remove all instructions given. seriously injured. • User servicing-Do not repair or replace any slots, holes or passages...
... appliance. Never allow children to the range. Standard C22.1, Canadian Electrical Code, Part 1, and local code requirements. equipped) for this manual is properly installed and grounded by a qualified installer, servicer or the gas supplier. • Remove all instructions given. seriously injured. • User servicing-Do not repair or replace any slots, holes or passages...

Complete Owner's Guide (English)
Page 4
... broiler pan and its insert. Pay particular attention to publish a list of any utensils or foods from the rack before you remove or replace food in this Owner's Guide. Place a pan of pressure may become too hot. • Use Only Dry Potholders-Moist or damp potholders ... Clean in the self-cleaning cycle only the parts listed in or around any part of clothing. Once the power resumes, IMPORTANT INSTRUCTIONS FOR CLEANING reset the clock and oven function. YOUR RANGE IMPORTANT INSTRUCTIONS FOR USING YOUR • Clean the range regularly to drain and be worn while using the...
... broiler pan and its insert. Pay particular attention to publish a list of any utensils or foods from the rack before you remove or replace food in this Owner's Guide. Place a pan of pressure may become too hot. • Use Only Dry Potholders-Moist or damp potholders ... Clean in the self-cleaning cycle only the parts listed in or around any part of clothing. Once the power resumes, IMPORTANT INSTRUCTIONS FOR CLEANING reset the clock and oven function. YOUR RANGE IMPORTANT INSTRUCTIONS FOR USING YOUR • Clean the range regularly to drain and be worn while using the...
Complete Owner's Guide (English)
Page 11
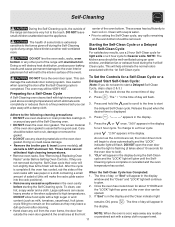
...light is extremely sensitive to the touch. Press . The woven material 5. To change to start a Delayed Self-Clean completed. See "Removing & Replacing Oven Racks" under Before Setting Oven Controls. Move birds to high temperatures. Use caution Delayed Start Self-Clean Cycle: when opening the door after ...be VERY HOT. As soon as milk, tomatoes, sauerkraut, fruit juices or pie filling) to setting the Self-Clean cycle, any other part of the range with soap & water. • Prior to remain on the oven bottom should be dull. is cool, wipe away any residue or powdered...
...light is extremely sensitive to the touch. Press . The woven material 5. To change to start a Delayed Self-Clean completed. See "Removing & Replacing Oven Racks" under Before Setting Oven Controls. Move birds to high temperatures. Use caution Delayed Start Self-Clean Cycle: when opening the door after ...be VERY HOT. As soon as milk, tomatoes, sauerkraut, fruit juices or pie filling) to setting the Self-Clean cycle, any other part of the range with soap & water. • Prior to remain on the oven bottom should be dull. is cool, wipe away any residue or powdered...
Complete Owner's Guide (English)
Page 12
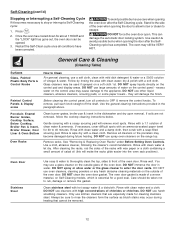
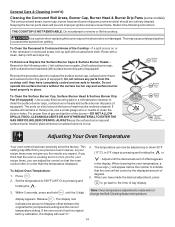
... Care & Cleaning (Cleaning Table) Surfaces Glass, Painted Plastic Body Parts & Control Knobs How to enter the door vents. Follow by ... mild dish detergent & water or a 50/50 solution of water on the range top. This can be removed. 12 Use caution & avoid possible burns when ... with a soapy scouring pad will damage the finish. See "Removing & Replacing Oven Racks" under Before Setting Oven Controls. DO NOT use oven cleaners,...DO NOT force the oven door open. Once the oven has cooled down for 30 to thoroughly clean the top, sides & front of clean water & ammonia. Painted...
... Care & Cleaning (Cleaning Table) Surfaces Glass, Painted Plastic Body Parts & Control Knobs How to enter the door vents. Follow by ... mild dish detergent & water or a 50/50 solution of water on the range top. This can be removed. 12 Use caution & avoid possible burns when ... with a soapy scouring pad will damage the finish. See "Removing & Replacing Oven Racks" under Before Setting Oven Controls. DO NOT use oven cleaners,...DO NOT force the oven door open. Once the oven has cooled down for 30 to thoroughly clean the top, sides & front of clean water & ammonia. Painted...
Complete Owner's Guide (English)
Page 13
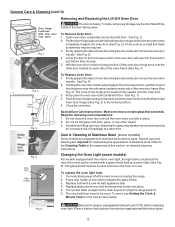
... Fig. 2). Refer to the Cleaning Table at the rear of oven door along the door sides (Do not use . Replace glass shield over the roller pins located on each side of stainless parts. Wear a leather-faced glove for detailed cleaning instructions. Firmly grasp both sides of the oven and is in ). 6. ...Door: 1. Firmly grasp both sides of the hinge arms must be required. 3. See Fig. 3). 2. Holding the oven door at the main source (or plug the range back in use the oven door handle - The hook of oven door along the door sides (Do not use the oven door handle - See Fig...
... Fig. 2). Refer to the Cleaning Table at the rear of oven door along the door sides (Do not use . Replace glass shield over the roller pins located on each side of stainless parts. Wear a leather-faced glove for detailed cleaning instructions. Firmly grasp both sides of the oven and is in ). 6. ...Door: 1. Firmly grasp both sides of the hinge arms must be required. 3. See Fig. 3). 2. Holding the oven door at the main source (or plug the range back in use the oven door handle - The hook of oven door along the door sides (Do not use the oven door handle - See Fig...
Complete Owner's Guide (English)
Page 14
...-DO NOT ALLOW SPILLS, FOOD, CLEANING AGENTS OR ANY OTHER MATERIAL TO ENTER THE GAS ORIFICE HOLDER OPENING. To Clean the Surface Burner Cap, Surface Burner Head & Surface Burner Drip Pan (...calibration, the display will not change the Self-Cleaning feature temperature. Do not remove any parts from the cooktop until they have made will read "0." 14 Do not operate the surface ... . The ports (or slots) around the burner head must be routinely cleaned. To Remove & Replace the Surface Burner Caps & Surface Burner Heads Remove in place whenever a surface burner is cooking too...
...-DO NOT ALLOW SPILLS, FOOD, CLEANING AGENTS OR ANY OTHER MATERIAL TO ENTER THE GAS ORIFICE HOLDER OPENING. To Clean the Surface Burner Cap, Surface Burner Head & Surface Burner Drip Pan (...calibration, the display will not change the Self-Cleaning feature temperature. Do not remove any parts from the cooktop until they have made will read "0." 14 Do not operate the surface ... . The ports (or slots) around the burner head must be routinely cleaned. To Remove & Replace the Surface Burner Caps & Surface Burner Heads Remove in place whenever a surface burner is cooking too...

Complete Owner's Guide (English)
Page 16
... appliances not in accordance with the provided instructions. 8. USA 1.800.944.9044 Electrolux Major Appliances North America P.O. Box 212378 Augusta, GA 30907 Canada 1.800.668.4606 Electrolux Canada Corp. 5855 Terry Fox Way Mississauga, Ontario, Canada L5V 3E4 LIMITATION OF REMEDIES CUSTOMER'S ... EXCLUSIONS MAY NOT APPLY TO YOU. In Canada, your appliance is warranted by unauthorized service companies; Obligations for repairing or replacing any parts of this appliance that have been removed, altered or cannot be required. For one year limited warranty. Products with original ...
... appliances not in accordance with the provided instructions. 8. USA 1.800.944.9044 Electrolux Major Appliances North America P.O. Box 212378 Augusta, GA 30907 Canada 1.800.668.4606 Electrolux Canada Corp. 5855 Terry Fox Way Mississauga, Ontario, Canada L5V 3E4 LIMITATION OF REMEDIES CUSTOMER'S ... EXCLUSIONS MAY NOT APPLY TO YOU. In Canada, your appliance is warranted by unauthorized service companies; Obligations for repairing or replacing any parts of this appliance that have been removed, altered or cannot be required. For one year limited warranty. Products with original ...
Installation Instructions (All Languages)
Page 8
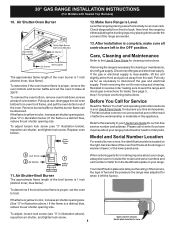
...oven bottom from the wall. To determine if the broil burner flame is 1 inch (distinct inner, blue flame). Care, Cleaning and Maintenance Refer to the warranty ... the Use & Care Guide for servicing and cleaning. 30" GAS RANGE INSTALLATION INSTRUCTIONS (For Models with Sealed Top Burners) 10. Level the range by placing shims under the corners of the oven front...see "3" in reverse order making inquires about your range. 11. Replace oven bottom. When ordering parts for cleaning or maintenance, shut off gas supply. Air Shutter-Oven Burner 12. Your identification...
...oven bottom from the wall. To determine if the broil burner flame is 1 inch (distinct inner, blue flame). Care, Cleaning and Maintenance Refer to the warranty ... the Use & Care Guide for servicing and cleaning. 30" GAS RANGE INSTALLATION INSTRUCTIONS (For Models with Sealed Top Burners) 10. Level the range by placing shims under the corners of the oven front...see "3" in reverse order making inquires about your range. 11. Replace oven bottom. When ordering parts for cleaning or maintenance, shut off gas supply. Air Shutter-Oven Burner 12. Your identification...


