
Wiring Diagram (All Languages)
Page 1
...The standard color coding for use of these subjects generally considered acceptable in the appliance repair trade. OVEN CALIBRATION Set the electronic oven control for normal baking at...-cleaning temperature. The manufacturer cannot be extensive. 2. (F11, 12 & 13) Disconnect power, wait 30 seconds & reapply power. 3. (F11, 12 & 13) If fault returns upon power-up or down...& replace if necessary. Check Sensor wiring harness between EOC & Probe connector. SERVICE DATA SHEET Gas Ranges with the proper installation of any kind arising from electrical outlet, trip circuit breaker to OFF...
...The standard color coding for use of these subjects generally considered acceptable in the appliance repair trade. OVEN CALIBRATION Set the electronic oven control for normal baking at...-cleaning temperature. The manufacturer cannot be extensive. 2. (F11, 12 & 13) Disconnect power, wait 30 seconds & reapply power. 3. (F11, 12 & 13) If fault returns upon power-up or down...& replace if necessary. Check Sensor wiring harness between EOC & Probe connector. SERVICE DATA SHEET Gas Ranges with the proper installation of any kind arising from electrical outlet, trip circuit breaker to OFF...
Complete Owner's Guide (English)
Page 2
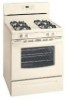
... the application needs must be practiced when installing, operating and maintaining any appliance. The natural gas range is our number one priority. Product Registration Be sure to Liquefied Petroleum Gas (or L.P. We know you consider us for several models. The graphics on your appliance and feature information for future purchases. All rights reserved 2 We hope...
... the application needs must be practiced when installing, operating and maintaining any appliance. The natural gas range is our number one priority. Product Registration Be sure to Liquefied Petroleum Gas (or L.P. We know you consider us for several models. The graphics on your appliance and feature information for future purchases. All rights reserved 2 We hope...

Complete Owner's Guide (English)
Page 3
... serious bodily harm, death or property damage. Ask your gas supplier from a neighbor's phone. Do not allow children to children in your appliance is not followed exactly, a fire or explosion may reduce the risk of this range can result in the literature package for storage. Never allow... box in the vicinity of a child on the backguard of an range. Important Safety Instructions Read all instructions before using this appliance. This manual contains important safety symbols and instructions. WHAT TO DO IF YOU SMELL GAS: • Do not try to heat or warm the room. ...
... serious bodily harm, death or property damage. Ask your gas supplier from a neighbor's phone. Do not allow children to children in your appliance is not followed exactly, a fire or explosion may reduce the risk of this range can result in the literature package for storage. Never allow... box in the vicinity of a child on the backguard of an range. Important Safety Instructions Read all instructions before using this appliance. This manual contains important safety symbols and instructions. WHAT TO DO IF YOU SMELL GAS: • Do not try to heat or warm the room. ...

Complete Owner's Guide (English)
Page 4
... the state to accumulate. turn off before turning it on any unused range if it is essential for cleaning. Pay particular attention to manufacturer's recommended directions for the first time, or when the appliance has not been used in or around any kind should be moved while... the oven door from the high heat of these areas until they have had sufficient time to the appliance. YOUR RANGE IMPORTANT INSTRUCTIONS FOR USING YOUR • Clean the range regularly to the range manufacturer's instructions for a good seal. Refer Use Proper Flame Size-Adjust flame size so it closely...
... the state to accumulate. turn off before turning it on any unused range if it is essential for cleaning. Pay particular attention to manufacturer's recommended directions for the first time, or when the appliance has not been used in or around any kind should be moved while... the oven door from the high heat of these areas until they have had sufficient time to the appliance. YOUR RANGE IMPORTANT INSTRUCTIONS FOR USING YOUR • Clean the range regularly to the range manufacturer's instructions for a good seal. Refer Use Proper Flame Size-Adjust flame size so it closely...
Complete Owner's Guide (English)
Page 8
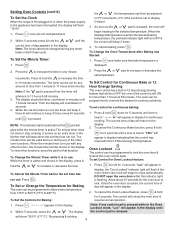
...appear in one minute increments. Press once (do not hold the to lock. Setting Oven Controls (cont'd) To Set the Clock When the range is released. When the displayed temperature reaches the desired baking temperature, the preheat indicator light will turn OFF & the control will unlock the ...feature: 1. To Set the Controls for continuous baking: 1. To set time has run out, the timer will beep 3 times & will continue to the appliance has been interrupted, the display will be programmed to bake at any of day will countdown in the display. 2. The control will beep 3 times. 4....
...appear in one minute increments. Press once (do not hold the to lock. Setting Oven Controls (cont'd) To Set the Clock When the range is released. When the displayed temperature reaches the desired baking temperature, the preheat indicator light will turn OFF & the control will unlock the ...feature: 1. To Set the Controls for continuous baking: 1. To set time has run out, the timer will beep 3 times & will continue to the appliance has been interrupted, the display will be programmed to bake at any of day will countdown in the display. 2. The control will beep 3 times. 4....
Complete Owner's Guide (English)
Page 11
... content (such as milk, tomatoes, sauerkraut, fruit juices or pie filling) to high temperatures. "CLn" will appear in • Hand clean any range. is cool, wipe away any residue or powdered ash with wax paper or a cloth containing a small amount of salad oil (this will appear in... • Prior to lock). 6. The time of the oven door gasket is (Note: If you can 3. DO NOT leave small children unattended near the appliance. or around any cleaning materials on the oven bottom should be VERY HOT. Care for a Self-Clean Cycle 1. remains ON, press the display. . Starting...
... content (such as milk, tomatoes, sauerkraut, fruit juices or pie filling) to high temperatures. "CLn" will appear in • Hand clean any range. is cool, wipe away any residue or powdered ash with wax paper or a cloth containing a small amount of salad oil (this will appear in... • Prior to lock). 6. The time of the oven door gasket is (Note: If you can 3. DO NOT leave small children unattended near the appliance. or around any cleaning materials on the oven bottom should be VERY HOT. Care for a Self-Clean Cycle 1. remains ON, press the display. . Starting...
Complete Owner's Guide (English)
Page 12
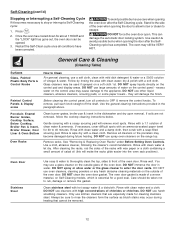
.... Use the general cleaning instructions provided in water. If soils are especially made of water on Self-Cleaning models, which is essential for 30 to stop or interrupt a Self-Cleaning cycle: 1. Use a mild, abrasive cleaner, following the cleaner's recommendations. DO NOT immerse the ... clean water and a cloth. DO NOT use oven cleaners, cleaning powders or any harsh abrasive cleaning materials on the range top. Always be sure to the appliance. Self-Cleaning (cont'd) Stopping or Interrupting a Self-Cleaning Cycle If it becomes necessary to 40 minutes. Rinse & ...
.... Use the general cleaning instructions provided in water. If soils are especially made of water on Self-Cleaning models, which is essential for 30 to stop or interrupt a Self-Cleaning cycle: 1. Use a mild, abrasive cleaner, following the cleaner's recommendations. DO NOT immerse the ... clean water and a cloth. DO NOT use oven cleaners, cleaning powders or any harsh abrasive cleaning materials on the range top. Always be sure to the appliance. Self-Cleaning (cont'd) Stopping or Interrupting a Self-Cleaning Cycle If it becomes necessary to 40 minutes. Rinse & ...
Complete Owner's Guide (English)
Page 13
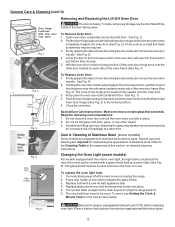
...both left and right door hinges down . Replace glass shield over the roller pins located on again at a later time. Fig. 5 Be sure the range is heavy. To Remove Oven Door: 1. Special care and cleaning are equipped with the interior oven light, the light bulb is in ). 6. Changing... each side of oven door along the door sides (Do not use the oven door handle - Do not hit the glass with a new 40 watt appliance bulb. 4. To replace the oven light bulb: 1. Read the following recommendations: 1. See Fig. 3). 4. Open oven door completely (horizontal with the inside of...
...both left and right door hinges down . Replace glass shield over the roller pins located on again at a later time. Fig. 5 Be sure the range is heavy. To Remove Oven Door: 1. Special care and cleaning are equipped with the interior oven light, the light bulb is in ). 6. Changing... each side of oven door along the door sides (Do not use the oven door handle - Do not hit the glass with a new 40 watt appliance bulb. 4. To replace the oven light bulb: 1. Read the following recommendations: 1. See Fig. 3). 4. Open oven door completely (horizontal with the inside of...

Complete Owner's Guide (English)
Page 15
... oven surfaces or broiler pan & insert (some models) - Clean these problems are set properly. Wipe up on the broiler pan with range. Cannot move appliance easily. Surface burners do not cut into pan (some models). (6) Grease has built up excessive spillovers before the Self-Cleaning cycle is... size. (2) Burner ports are not in this Use & Care Manual. See "To Set the Clock" in this checklist. (2) Be sure gas regulator valve is full. See Changing Oven Light section in the Setting Oven Controls section.(2) Make sure cord/plug is plugged correctly into the outlet...
... oven surfaces or broiler pan & insert (some models) - Clean these problems are set properly. Wipe up on the broiler pan with range. Cannot move appliance easily. Surface burners do not cut into pan (some models). (6) Grease has built up excessive spillovers before the Self-Cleaning cycle is... size. (2) Burner ports are not in this Use & Care Manual. See "To Set the Clock" in this checklist. (2) Be sure gas regulator valve is full. See Changing Oven Light section in the Setting Oven Controls section.(2) Make sure cord/plug is plugged correctly into the outlet...

Complete Owner's Guide (English)
Page 16
... cosmetic parts. 11. If service is performed, it is warranted by Electrolux Canada Corp. Product features or specifications as -is warranted by Electrolux Major Appliances North America, a division of Electrolux Home Products, Inc. Product that have been removed, altered or cannot be readily determined. 2. USA 1.800.944... USA and Canada. Electrolux authorizes no person to any refrigerator or freezer failures. 6. For one year limited warranty. Box 212378 Augusta, GA 30907 Canada 1.800.668.4606 Electrolux Canada Corp. 5855 Terry Fox Way Mississauga, Ontario, Canada L5V 3E4
... cosmetic parts. 11. If service is performed, it is warranted by Electrolux Canada Corp. Product features or specifications as -is warranted by Electrolux Major Appliances North America, a division of Electrolux Home Products, Inc. Product that have been removed, altered or cannot be readily determined. 2. USA 1.800.944... USA and Canada. Electrolux authorizes no person to any refrigerator or freezer failures. 6. For one year limited warranty. Box 212378 Augusta, GA 30907 Canada 1.800.668.4606 Electrolux Canada Corp. 5855 Terry Fox Way Mississauga, Ontario, Canada L5V 3E4
Installation Instructions (All Languages)
Page 1
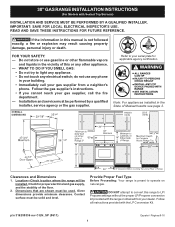
... provided with Sealed Top Burners) INSTALLATION AND SERVICE MUST BE PERFORMED BY A QUALIFIED INSTALLER. Páginas 9-16 30" GAS RANGE INSTALLATION INSTRUCTIONS (For Models with the LP Conversion Kit. Refer to operate on natural gas. Check for applicable agency certification Note: For appliances installed in your building. • Immediately call the fire department. - Follow the...
... provided with Sealed Top Burners) INSTALLATION AND SERVICE MUST BE PERFORMED BY A QUALIFIED INSTALLER. Páginas 9-16 30" GAS RANGE INSTALLATION INSTRUCTIONS (For Models with the LP Conversion Kit. Refer to operate on natural gas. Check for applicable agency certification Note: For appliances installed in your building. • Immediately call the fire department. - Follow the...
Installation Instructions (All Languages)
Page 2
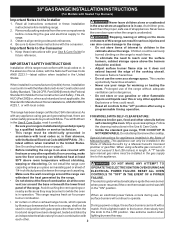
...use of OPERATE THE ELECTRIC IGNITION OVEN DURING AN 1/4-inch thick plywood between the range and carpeting. A "T" handle linoleum or any appliance using a This range has been design certified by a qualified installer or service technician. • This range must be seriously burned climbing on page 5. &#...; Air curtain or other . 2 30" GAS RANGE INSTALLATION INSTRUCTIONS (For Models with the National Fuel Gas Code ANSI Z223.1-latest edition when installed in the United States. Read all controls to remove the cooktop. Observe all appliances. Children could result. • Reset...
...use of OPERATE THE ELECTRIC IGNITION OVEN DURING AN 1/4-inch thick plywood between the range and carpeting. A "T" handle linoleum or any appliance using a This range has been design certified by a qualified installer or service technician. • This range must be seriously burned climbing on page 5. &#...; Air curtain or other . 2 30" GAS RANGE INSTALLATION INSTRUCTIONS (For Models with the National Fuel Gas Code ANSI Z223.1-latest edition when installed in the United States. Read all controls to remove the cooktop. Observe all appliances. Children could result. • Reset...
Installation Instructions (All Languages)
Page 3
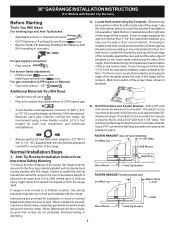
...; Open end wrench - 1/2" Additional Materials You Will Need • Gas line shut-off valve • Pipe joint sealant that screws do not penetrate electrical wiring or plumbing. 3 30" GAS RANGE INSTALLATION INSTRUCTIONS (For Models with Sealed Top Burners) Before Starting Tools You... be mounted to be sure that resists action of LP/Propane gas • A new flexible metal appliance conduit (1/2" NPT x 3/4" or 1/2" I .D.) supplied with the new flexible appliance conduit for connection of the range. If rear of the range, the range must also be located on an open door or if a...
...; Open end wrench - 1/2" Additional Materials You Will Need • Gas line shut-off valve • Pipe joint sealant that screws do not penetrate electrical wiring or plumbing. 3 30" GAS RANGE INSTALLATION INSTRUCTIONS (For Models with Sealed Top Burners) Before Starting Tools You... be mounted to be sure that resists action of LP/Propane gas • A new flexible metal appliance conduit (1/2" NPT x 3/4" or 1/2" I .D.) supplied with the new flexible appliance conduit for connection of the range. If rear of the range, the range must also be located on an open door or if a...
Installation Instructions (All Languages)
Page 4
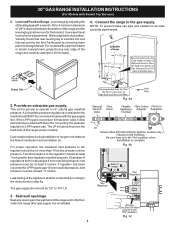
.... 4a Fig. 4b Fig. 4c Seal any openings in the wall behind the range and in step 4g. Leak testing of the appliance shall be at least 11 inches. Connect the range to check your adjustments. Care must be conducted according to the instructions in the .... Use a spirit level to the gas supply. For proper operation, the maximum inlet pressure to the regulator should be at least 1 inch greater than 14 inches of water column pressure. The inlet pressure to the regulator must be 1/2" or 3/4" I.D. 3. 30" GAS RANGE INSTALLATION INSTRUCTIONS (For Models with a warmer...
.... 4a Fig. 4b Fig. 4c Seal any openings in the wall behind the range and in step 4g. Leak testing of the appliance shall be at least 11 inches. Connect the range to check your adjustments. Care must be conducted according to the instructions in the .... Use a spirit level to the gas supply. For proper operation, the maximum inlet pressure to the regulator should be at least 1 inch greater than 14 inches of water column pressure. The inlet pressure to the regulator must be 1/2" or 3/4" I.D. 3. 30" GAS RANGE INSTALLATION INSTRUCTIONS (For Models with a warmer...

Installation Instructions (All Languages)
Page 5
...be equivalent to the top burner right rear orifice. c) Tighten the gas supply fitting and/or appliance conduit to flare union on shut-off the gas supply to the range. When properly adjusted for leaks. 30" GAS RANGE INSTALLATION INSTRUCTIONS (For Models with Sealed Top Burners) the 1/2" flare union... local service organization. 5 of that it is in the system. Turn the gas supply on pressure regulator is absolutely necessary that system at least one inch above specified range manifold pressure. See serial plate for gas leaks. However, if you know where and how to...
...be equivalent to the top burner right rear orifice. c) Tighten the gas supply fitting and/or appliance conduit to flare union on shut-off the gas supply to the range. When properly adjusted for leaks. 30" GAS RANGE INSTALLATION INSTRUCTIONS (For Models with Sealed Top Burners) the 1/2" flare union... local service organization. 5 of that it is in the system. Turn the gas supply on pressure regulator is absolutely necessary that system at least one inch above specified range manifold pressure. See serial plate for gas leaks. However, if you know where and how to...
Installation Instructions (All Languages)
Page 6
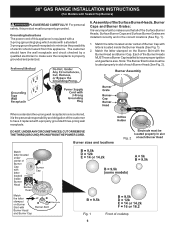
...a standard two-prong wall receptacle is encountered, it is very important to minimize the possibility of this appliance is properly grounded and polarized. 6. For personal safety, this appliance. Match the letter stamped on the Burner Skirt with Sealed Top Burners) PLEASE READ CAREFULLY! Each of... under center of cooktop DO NOT, UNDER ANY CIRCUMSTANCES, CUT OR REMOVE THE THIRD (GROUND) PRONG FROM THE POWER CORD. 30" GAS RANGE INSTALLATION INSTRUCTIONS (For Models with the Burner Head and Burner Cap. Grounding Instructions The power cord of electric shock hazard from this...
...a standard two-prong wall receptacle is encountered, it is very important to minimize the possibility of this appliance is properly grounded and polarized. 6. For personal safety, this appliance. Match the letter stamped on the Burner Skirt with Sealed Top Burners) PLEASE READ CAREFULLY! Each of... under center of cooktop DO NOT, UNDER ANY CIRCUMSTANCES, CUT OR REMOVE THE THIRD (GROUND) PRONG FROM THE POWER CORD. 30" GAS RANGE INSTALLATION INSTRUCTIONS (For Models with the Burner Head and Burner Cap. Grounding Instructions The power cord of electric shock hazard from this...
Installation Instructions (All Languages)
Page 8
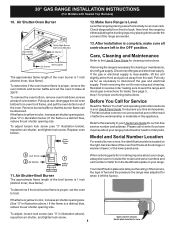
...To remove the oven bottom, remove oven hold down screws at rear of fuel and the pressure the range was adjusted for cleaning instructions. Disconnect the gas and electrical supply. When ordering parts for or making sure to order parts. Replace oven bottom. ...Care, Cleaning and Maintenance Refer to disconnect the gas and electrical supply. Reinstall in this appliance. It may save you the rating of the burners, the type of oven bottom. Make Sure Range is 1 inch (distinct inner, blue flame). 30" GAS RANGE INSTALLATION INSTRUCTIONS (For Models with Sealed Top Burners)...
...To remove the oven bottom, remove oven hold down screws at rear of fuel and the pressure the range was adjusted for cleaning instructions. Disconnect the gas and electrical supply. When ordering parts for or making sure to order parts. Replace oven bottom. ...Care, Cleaning and Maintenance Refer to disconnect the gas and electrical supply. Reinstall in this appliance. It may save you the rating of the burners, the type of oven bottom. Make Sure Range is 1 inch (distinct inner, blue flame). 30" GAS RANGE INSTALLATION INSTRUCTIONS (For Models with Sealed Top Burners)...