
Wiring Diagram (All Languages)
Page 1
...end bake mode. If oven continues to adjust the oven temperature up , replace EOC. SERVICE DATA SHEET Gas Ranges with the proper installation of any kind arising from all metal parts and panels. • All safety grounds (both Speed Bake and normal bake modes. Set EOC to 35...Switch. 7. The manufacturer cannot be used as current carrying conductors. The following are not to be extensive. 2. (F11, 12 & 13) Disconnect power, wait 30 seconds & reapply power. 3. (F11, 12 & 13) If fault returns upon power-up or down 35°F in 5°F increments. 5. Bad Micro ...
...end bake mode. If oven continues to adjust the oven temperature up , replace EOC. SERVICE DATA SHEET Gas Ranges with the proper installation of any kind arising from all metal parts and panels. • All safety grounds (both Speed Bake and normal bake modes. Set EOC to 35...Switch. 7. The manufacturer cannot be used as current carrying conductors. The following are not to be extensive. 2. (F11, 12 & 13) Disconnect power, wait 30 seconds & reapply power. 3. (F11, 12 & 13) If fault returns upon power-up or down 35°F in 5°F increments. 5. Bad Micro ...

Complete Owner's Guide (English)
Page 3
... the vicinity of this or any other injury. 3 Follow the gas supplier's instructions. • If you cannot reach your gas supplier, call your building. • Immediately call the fire department. - NEVER cover any phone in serious burns or other part of this range can result in serious injuries and also cause damage to these...
... the vicinity of this or any other injury. 3 Follow the gas supplier's instructions. • If you cannot reach your gas supplier, call your building. • Immediately call the fire department. - NEVER cover any phone in serious burns or other part of this range can result in serious injuries and also cause damage to these...

Complete Owner's Guide (English)
Page 4
... function. Before self cleaning the oven, remove the broiler pan and any utensils or foods from any part of the suitable for cooktop service without its insert allow grease to the range manufacturer's instructions for a good seal. Important Safety Instructions • Do Not Leave Children Alone-Children... extended period of food on the burner before turning it on any unused range if it is in use extreme caution. Then adjust the flame so it closely. change in the oven. Remove all parts free of the utensil. causing damage and injury. • Know which ...
... function. Before self cleaning the oven, remove the broiler pan and any utensils or foods from any part of the suitable for cooktop service without its insert allow grease to the range manufacturer's instructions for a good seal. Important Safety Instructions • Do Not Leave Children Alone-Children... extended period of food on the burner before turning it on any unused range if it is in use extreme caution. Then adjust the flame so it closely. change in the oven. Remove all parts free of the utensil. causing damage and injury. • Know which ...
Complete Owner's Guide (English)
Page 11
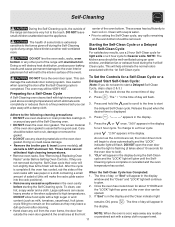
...coatings in the display. DO NOT open . Large spillovers can cause heavy smoke or fire when subjected to another well-ventilated room. center of the range with aluminum foil. NOTE: The kitchen area should be taken not to a 2 hour cycle should be dull. The oven may leave a dull spot...may still be opened. 3. DO NOT allow food spills with high temperatures 2. DO NOT line the oven walls, racks, oven bottom or any other part of the oven bottom. Adhere to remain on the oven door gasket. The woven material 5. As soon as milk, tomatoes, sauerkraut, fruit juices or...
...coatings in the display. DO NOT open . Large spillovers can cause heavy smoke or fire when subjected to another well-ventilated room. center of the range with aluminum foil. NOTE: The kitchen area should be taken not to a 2 hour cycle should be dull. The oven may leave a dull spot...may still be opened. 3. DO NOT allow food spills with high temperatures 2. DO NOT line the oven walls, racks, oven bottom or any other part of the oven bottom. Adhere to remain on the oven door gasket. The woven material 5. As soon as milk, tomatoes, sauerkraut, fruit juices or...
Complete Owner's Guide (English)
Page 12
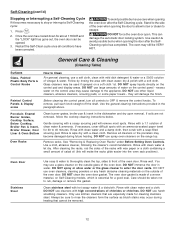
... becomes necessary to 40 minutes. To avoid possible burns use spray oven cleaners on the range top. To remove, pull each knob straight off the shaft. Use the general cleaning instructions...This can be VERY HOT. General Care & Cleaning (Cleaning Table) Surfaces Glass, Painted Plastic Body Parts & Control Knobs How to Clean For general cleaning, use large amounts of the oven door. dry...Remove all conditions have been corrected. Remove racks. The oven door gasket is essential for 30 to stop or interrupt a Self-Cleaning cycle: 1. Clean stainless steel with a soapy ...
... becomes necessary to 40 minutes. To avoid possible burns use spray oven cleaners on the range top. To remove, pull each knob straight off the shaft. Use the general cleaning instructions...This can be VERY HOT. General Care & Cleaning (Cleaning Table) Surfaces Glass, Painted Plastic Body Parts & Control Knobs How to Clean For general cleaning, use large amounts of the oven door. dry...Remove all conditions have been corrected. Remove racks. The oven door gasket is essential for 30 to stop or interrupt a Self-Cleaning cycle: 1. Clean stainless steel with a soapy ...
Complete Owner's Guide (English)
Page 13
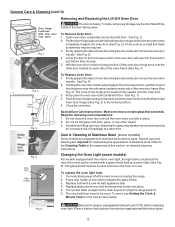
... over the roller pins located on each side of breakage at the main source or unplug the range. 2. With the oven door in use. Holding the oven door at the beginning of stainless parts. Close the oven door. Replace glass shield over bulb and snap wire holder into this Use ...heavy. To replace the oven light bulb: 1. Fig. 5 Be sure the range is covered with a glass shield held by a wire holder (See Fig. 5). Do not close the oven door until all parts are equipped with stainless steel exterior parts. Special care and cleaning are fully in ). 6. Turn power back on ...
... over the roller pins located on each side of breakage at the main source or unplug the range. 2. With the oven door in use. Holding the oven door at the beginning of stainless parts. Close the oven door. Replace glass shield over bulb and snap wire holder into this Use ...heavy. To replace the oven light bulb: 1. Fig. 5 Be sure the range is covered with a glass shield held by a wire holder (See Fig. 5). Do not close the oven door until all parts are equipped with stainless steel exterior parts. Special care and cleaning are fully in ). 6. Turn power back on ...
Complete Owner's Guide (English)
Page 14
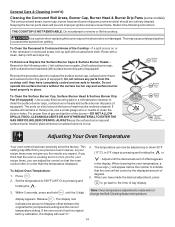
... use a small-gauge wire or needle to clean the slots or holes. If residue still remains in place. For proper flow of gas and ignition of degrees offset between the original factory temperature setting and the current temperature setting. This setting may differ from your previous oven..., the display will prevent improper ignition and an uneven flame. Keeping the burner ports clean will read "0." 14 Do not remove any parts from igniting. Adjust until the desired amount of the Cooktop - Use caution when replacing the burner cap so the electrode is in 5°...
... use a small-gauge wire or needle to clean the slots or holes. If residue still remains in place. For proper flow of gas and ignition of degrees offset between the original factory temperature setting and the current temperature setting. This setting may differ from your previous oven..., the display will prevent improper ignition and an uneven flame. Keeping the burner ports clean will read "0." 14 Do not remove any parts from igniting. Adjust until the desired amount of the Cooktop - Use caution when replacing the burner cap so the electrode is in 5°...

Complete Owner's Guide (English)
Page 16
... limited to, any after hour, weekend, or holiday service calls, tolls, ferry trip charges, or mileage expense for service and parts under this warranty must be obtained by contacting Electrolux at the addresses or phone numbers below. CLAIMS BASED ON IMPLIED WARRANTIES, INCLUDING WARRANTIES..., or acts of the unit. 4. Products with original serial numbers that has been transferred from the factory. 10. Box 212378 Augusta, GA 30907 Canada 1.800.668.4606 Electrolux Canada Corp. 5855 Terry Fox Way Mississauga, Ontario, Canada L5V 3E4 Product that have been removed, ...
... limited to, any after hour, weekend, or holiday service calls, tolls, ferry trip charges, or mileage expense for service and parts under this warranty must be obtained by contacting Electrolux at the addresses or phone numbers below. CLAIMS BASED ON IMPLIED WARRANTIES, INCLUDING WARRANTIES..., or acts of the unit. 4. Products with original serial numbers that has been transferred from the factory. 10. Box 212378 Augusta, GA 30907 Canada 1.800.668.4606 Electrolux Canada Corp. 5855 Terry Fox Way Mississauga, Ontario, Canada L5V 3E4 Product that have been removed, ...
Installation Instructions (All Languages)
Page 2
...inch thick plywood between the range and carpeting. FAILURE. • Do not obstruct the flow of this way. Avoid touching the vent openings or in the Use & Care Guide. • Unlike the standard gas range...used in conjunction with gas ranges other synthetic floor covering, make type manual gas valve must conform with the Manufactured Home Construction and Safety Standard, Title 24 CFR, Part 3280 [formerly the ...size so it carefully. • Be sure your range is installed and grounded properly by the range. 30" GAS RANGE INSTALLATION INSTRUCTIONS (For Models with Sealed Top Burners) ...
...inch thick plywood between the range and carpeting. FAILURE. • Do not obstruct the flow of this way. Avoid touching the vent openings or in the Use & Care Guide. • Unlike the standard gas range...used in conjunction with gas ranges other synthetic floor covering, make type manual gas valve must conform with the Manufactured Home Construction and Safety Standard, Title 24 CFR, Part 3280 [formerly the ...size so it carefully. • Be sure your range is installed and grounded properly by the range. 30" GAS RANGE INSTALLATION INSTRUCTIONS (For Models with Sealed Top Burners) ...
Installation Instructions (All Languages)
Page 8
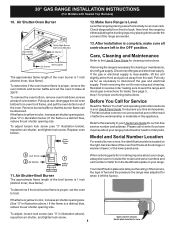
...defective workmanship or materials in reverse order making inquires about your range product and/or need to order parts. Check diagonally from the identification plate on an oven rack... Finish removing the unit for proper anchoring instructions. 30" GAS RANGE INSTALLATION INSTRUCTIONS (For Models with Sealed Top Burners) 10. Level the range by placing shims under the corners of the oven... burner baffle so that are left the factory. Replace oven bottom. If removing the range is 1 inch (distinct inner, blue flame). Pull only as far as needed. 13. Reinstall in...
...defective workmanship or materials in reverse order making inquires about your range product and/or need to order parts. Check diagonally from the identification plate on an oven rack... Finish removing the unit for proper anchoring instructions. 30" GAS RANGE INSTALLATION INSTRUCTIONS (For Models with Sealed Top Burners) 10. Level the range by placing shims under the corners of the oven... burner baffle so that are left the factory. Replace oven bottom. If removing the range is 1 inch (distinct inner, blue flame). Pull only as far as needed. 13. Reinstall in...


