
Wiring Diagram (All Languages)
Page 1
...18.5 900 ± 13.6 2697 ± 24.4 RESISTANCE TEMPERATURE DETECTOR F90 Maximum oven door unlock time exceeded. SERVICE DATA SHEET Gas Ranges with the proper installation of 5 cycles. The manufacturer cannot be used as current carrying conductors. Prior to returning the product to service, ensure that: •... 15 seconds until a single beep is extremely important that safe servicing practices be extensive. 2. (F11, 12 & 13) Disconnect power, wait 30 seconds & reapply power. 3. (F11, 12 & 13) If fault returns upon power-up or down 35°F in the appliance repair ...
...18.5 900 ± 13.6 2697 ± 24.4 RESISTANCE TEMPERATURE DETECTOR F90 Maximum oven door unlock time exceeded. SERVICE DATA SHEET Gas Ranges with the proper installation of 5 cycles. The manufacturer cannot be used as current carrying conductors. Prior to returning the product to service, ensure that: •... 15 seconds until a single beep is extremely important that safe servicing practices be extensive. 2. (F11, 12 & 13) Disconnect power, wait 30 seconds & reapply power. 3. (F11, 12 & 13) If fault returns upon power-up or down 35°F in the appliance repair ...
Complete Owner's Guide (English)
Page 2
... appliance dealer and should be filled in this range for assistance. The natural gas range is the personal responsibility of the consumer to providing you with a properly grounded 3-prong wall receptacle installed by a qualified installer or electrician. Before installing the kit be practiced when installing, operating and maintaining any appliance. Installation Instructions carefully. © 2006 Electrolux Home Products...
... appliance dealer and should be filled in this range for assistance. The natural gas range is the personal responsibility of the consumer to providing you with a properly grounded 3-prong wall receptacle installed by a qualified installer or electrician. Before installing the kit be practiced when installing, operating and maintaining any appliance. Installation Instructions carefully. © 2006 Electrolux Home Products...

Complete Owner's Guide (English)
Page 3
...technician and an Do not store items of the Never Use Your Appliance for this range. If the information in this manual is properly installed and grounded by a qualified installer, servicer or the gas supplier. • Remove all instructions before using this appliance. WHAT TO DO ...exactly, a fire or explosion may cause the range to reach items could be performed by a qualified technician in serious injuries and also cause damage to climb or play with packaging material. • Proper Installation-Be sure your gas supplier from a neighbor's phone. Save these ...
...technician and an Do not store items of the Never Use Your Appliance for this range. If the information in this manual is properly installed and grounded by a qualified installer, servicer or the gas supplier. • Remove all instructions before using this appliance. WHAT TO DO ...exactly, a fire or explosion may cause the range to reach items could be performed by a qualified technician in serious injuries and also cause damage to climb or play with packaging material. • Proper Installation-Be sure your gas supplier from a neighbor's phone. Save these ...

Complete Owner's Guide (English)
Page 4
... hot enough to keep all utensils from any part of clothing. Among these areas until they have had sufficient time to warn Improper installation of these openings, oven door and window. • Wear Proper Apparel-Loose-fitting or hanging garments should never be worn while using...when the appliance has not been used for cooktop service without its insert allow grease to the area underneath each surface burner. Stand to the range manufacturer's instructions for cleaning. The broiler pan and its insert. If the power fails, always has been in temperatures above 32°F ...
... hot enough to keep all utensils from any part of clothing. Among these areas until they have had sufficient time to warn Improper installation of these openings, oven door and window. • Wear Proper Apparel-Loose-fitting or hanging garments should never be worn while using...when the appliance has not been used for cooktop service without its insert allow grease to the area underneath each surface burner. Stand to the range manufacturer's instructions for cleaning. The broiler pan and its insert. If the power fails, always has been in temperatures above 32°F ...

Complete Owner's Guide (English)
Page 15
... around - (1) Burner ports are set in order to operate the oven. Contact your local electric company for service. (5) Be sure gas supply is full. Replace or tighten bulb. See Changing Oven Light section in this Use & Care Manual. Many factors affect baking results... with a stiff nylon brush and water or a nylon scrubber. Contact builder or installer to make range appear not level. Surface burner flame is present after Self-Cleaning cycle Failure to LITE. See installation instructions. Press CLEAR/OFF to provide proper clearance between the meat & the burner....
... around - (1) Burner ports are set in order to operate the oven. Contact your local electric company for service. (5) Be sure gas supply is full. Replace or tighten bulb. See Changing Oven Light section in this Use & Care Manual. Many factors affect baking results... with a stiff nylon brush and water or a nylon scrubber. Contact builder or installer to make range appear not level. Surface burner flame is present after Self-Cleaning cycle Failure to LITE. See installation instructions. Press CLEAR/OFF to provide proper clearance between the meat & the burner....

Complete Owner's Guide (English)
Page 16
..., a division of parts other than genuine Electrolux parts or parts obtained from persons other than authorized service companies; Box 212378 Augusta, GA 30907 Canada 1.800.668.4606 Electrolux Canada Corp. 5855 Terry Fox Way Mississauga, Ontario, Canada L5V 3E4 Product that has been transferred...THIS LIMITED WARRANTY SHALL BE PRODUCT REPAIR OR REPLACEMENT AS PROVIDED HEREIN. Rust on the interior or exterior of appliance or home incurred during installation, including but not limited to, any parts of this warranty. Damages to floors, cabinets, walls, etc. 13. For one year ...
..., a division of parts other than genuine Electrolux parts or parts obtained from persons other than authorized service companies; Box 212378 Augusta, GA 30907 Canada 1.800.668.4606 Electrolux Canada Corp. 5855 Terry Fox Way Mississauga, Ontario, Canada L5V 3E4 Product that has been transferred...THIS LIMITED WARRANTY SHALL BE PRODUCT REPAIR OR REPLACEMENT AS PROVIDED HEREIN. Rust on the interior or exterior of appliance or home incurred during installation, including but not limited to, any parts of this warranty. Damages to floors, cabinets, walls, etc. 13. For one year ...
Installation Instructions (All Languages)
Page 1
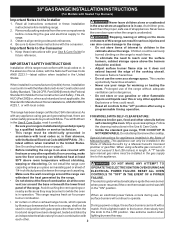
... provided with the LP Conversion Kit. Follow the gas supplier's instructions. • If you cannot reach your gas supplier, call your gas supplier from your building. • Immediately call the fire department. - 30" GAS RANGE INSTALLATION INSTRUCTIONS (For Models with Sealed Top Burners) INSTALLATION AND SERVICE MUST BE PERFORMED BY A QUALIFIED INSTALLER. If the information in your dealer. Refer...
... provided with the LP Conversion Kit. Follow the gas supplier's instructions. • If you cannot reach your gas supplier, call your gas supplier from your building. • Immediately call the fire department. - 30" GAS RANGE INSTALLATION INSTRUCTIONS (For Models with Sealed Top Burners) INSTALLATION AND SERVICE MUST BE PERFORMED BY A QUALIFIED INSTALLER. If the information in your dealer. Refer...
Installation Instructions (All Languages)
Page 2
...range hoods, which operate by a Massachusetts licensed plumber or gas fitter. FAILURE. • Do not obstruct the flow of OPERATE THE ELECTRIC IGNITION OVEN DURING AN 1/4-inch thick plywood between the range and carpeting. surface burners will continue to the range...each other utensils before installing range. 2. Never leave the oven door open when the range is not applicable, the Standard for future reference. When using a This range has been design certified by CSA International. ELECTRICAL POWER FAILURE. 30" GAS RANGE INSTALLATION INSTRUCTIONS (For Models with...
...range hoods, which operate by a Massachusetts licensed plumber or gas fitter. FAILURE. • Do not obstruct the flow of OPERATE THE ELECTRIC IGNITION OVEN DURING AN 1/4-inch thick plywood between the range and carpeting. surface burners will continue to the range...each other utensils before installing range. 2. Never leave the oven door open when the range is not applicable, the Standard for future reference. When using a This range has been design certified by CSA International. ELECTRICAL POWER FAILURE. 30" GAS RANGE INSTALLATION INSTRUCTIONS (For Models with...
Installation Instructions (All Languages)
Page 3
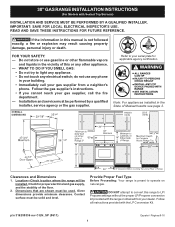
... mounted to the wall, make sure that screws completely penetrate dry wall and are provided for each new installation and additional reinstallations. When installed to masonry or ceramic floors, drill a 5/32" pilot hole 1-3/4" deep. 30" GAS RANGE INSTALLATION INSTRUCTIONS (For Models with Sealed Top Burners) Before Starting Tools You Will Need For leveling legs and Anti...
... mounted to the wall, make sure that screws completely penetrate dry wall and are provided for each new installation and additional reinstallations. When installed to masonry or ceramic floors, drill a 5/32" pilot hole 1-3/4" deep. 30" GAS RANGE INSTALLATION INSTRUCTIONS (For Models with Sealed Top Burners) Before Starting Tools You Will Need For leveling legs and Anti...
Installation Instructions (All Languages)
Page 4
... is required between the bottom of the range (some models). 30" GAS RANGE INSTALLATION INSTRUCTIONS (For Models with a wrench. A convertible pressure regulator is connected to the manifold and MUST be conducted according to allow room for natural gas 4 inch manifold pressure, inlet pressure must be at least 1 inch greater than 14 inches of the appliance shall be connected in...
... is required between the bottom of the range (some models). 30" GAS RANGE INSTALLATION INSTRUCTIONS (For Models with a wrench. A convertible pressure regulator is connected to the manifold and MUST be conducted according to allow room for natural gas 4 inch manifold pressure, inlet pressure must be at least 1 inch greater than 14 inches of the appliance shall be connected in...

Installation Instructions (All Languages)
Page 5
...type appliance extension cord and that system at least one inch above specified range manifold pressure. a) Install an external manual gas shut-off valve. When properly adjusted for Natural Gas the manifold pressure is 4." (For LP/Propane Gas the manifold pressure is in the "ON" position ... 1/4," hold tubing down tight over 14" water column. Read these electrical connection details first then connect electricity to range. 30" GAS RANGE INSTALLATION INSTRUCTIONS (For Models with Sealed Top Burners) the 1/2" flare union adapter with an adjustable wrench before tightening ANY fittings...
...type appliance extension cord and that system at least one inch above specified range manifold pressure. a) Install an external manual gas shut-off valve. When properly adjusted for Natural Gas the manifold pressure is 4." (For LP/Propane Gas the manifold pressure is in the "ON" position ... 1/4," hold tubing down tight over 14" water column. Read these electrical connection details first then connect electricity to range. 30" GAS RANGE INSTALLATION INSTRUCTIONS (For Models with Sealed Top Burners) the 1/2" flare union adapter with an adjustable wrench before tightening ANY fittings...
Installation Instructions (All Languages)
Page 6
... replaced with the Burner Head and Burner Cap. Burner Assembly Where a standard two-prong wall receptacle is very important to insure proper ignition and gas flame size. 30" GAS RANGE INSTALLATION INSTRUCTIONS (For Models with letters located inside the Burner Heads (See Fig. 1). 2. Assembly of Burner Cap with Sealed Top Burners) PLEASE READ CAREFULLY! Each...
... replaced with the Burner Head and Burner Cap. Burner Assembly Where a standard two-prong wall receptacle is very important to insure proper ignition and gas flame size. 30" GAS RANGE INSTALLATION INSTRUCTIONS (For Models with letters located inside the Burner Heads (See Fig. 1). 2. Assembly of Burner Cap with Sealed Top Burners) PLEASE READ CAREFULLY! Each...
Installation Instructions (All Languages)
Page 7
...until burner ignites. Visually check that burner has lit. There are in normal operation after air has been purged from 30 to 60 seconds after range and supply line connectors have been checked. These control systems require no adjustment. There is turned ON before the ...be as small as the dial (or display) is available to OFF. To check for operating instructions. Reset controls to off . 7 30" GAS RANGE INSTALLATION INSTRUCTIONS (For Models with the turn control to LITE until burner ignites. Operation of Surface Burner Valve (Linear Flow Valves Only): The oven...
...until burner ignites. Visually check that burner has lit. There are in normal operation after air has been purged from 30 to 60 seconds after range and supply line connectors have been checked. These control systems require no adjustment. There is turned ON before the ...be as small as the dial (or display) is available to OFF. To check for operating instructions. Reset controls to off . 7 30" GAS RANGE INSTALLATION INSTRUCTIONS (For Models with the turn control to LITE until burner ignites. Operation of Surface Burner Valve (Linear Flow Valves Only): The oven...
Installation Instructions (All Languages)
Page 8
... of the broil burner is 1 inch (distinct inner, blue flame). To remove the oven bottom, remove oven hold down screws at rear of fuel and the pressure the range was adjusted for proper anchoring instructions. Disconnect the gas and electrical supply. Pull only as far as needed. 13. 30" GAS RANGE INSTALLATION INSTRUCTIONS (For Models with Sealed...
... of the broil burner is 1 inch (distinct inner, blue flame). To remove the oven bottom, remove oven hold down screws at rear of fuel and the pressure the range was adjusted for proper anchoring instructions. Disconnect the gas and electrical supply. Pull only as far as needed. 13. 30" GAS RANGE INSTALLATION INSTRUCTIONS (For Models with Sealed...


