
Wiring Diagram (All Languages)
Page 1
...Probe connection. 1. (F30 or F31) Check resistance at 550°F. 2. F91 Maximum oven door unlock attempts exceeded. SERVICE DATA SHEET Gas Ranges with the proper installation of any kind arising from the use by persons having electrical and mechanical training and a level of knowledge of ... of personal injury and/or property damage, it is extremely important that safe servicing practices be extensive. 2. (F11, 12 & 13) Disconnect power, wait 30 seconds & reapply power. 3. (F11, 12 & 13) If fault returns upon power-up or down 35°F in the display. 4. Note: Changing...
...Probe connection. 1. (F30 or F31) Check resistance at 550°F. 2. F91 Maximum oven door unlock attempts exceeded. SERVICE DATA SHEET Gas Ranges with the proper installation of any kind arising from the use by persons having electrical and mechanical training and a level of knowledge of ... of personal injury and/or property damage, it is extremely important that safe servicing practices be extensive. 2. (F11, 12 & 13) Disconnect power, wait 30 seconds & reapply power. 3. (F11, 12 & 13) If fault returns upon power-up or down 35°F in the display. 4. Note: Changing...
Complete Owner's Guide (English)
Page 2
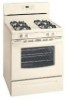
...) or remove outer lower panel (some models). Your range may not look exactly like those shown. Any additions, changes or conversions required in this range for conversion to follow this plug. The natural gas range is the only available outlet, it replaced with the ...best service possible. For personal safety, the range must be sure to Liquefied Petroleum (L.P.) Gas. The graphics on your range only as instructed in order for future purchases. Failure to providing you with a properly grounded 3-prong...
...) or remove outer lower panel (some models). Your range may not look exactly like those shown. Any additions, changes or conversions required in this range for conversion to follow this plug. The natural gas range is the only available outlet, it replaced with the ...best service possible. For personal safety, the range must be sure to Liquefied Petroleum (L.P.) Gas. The graphics on your range only as instructed in order for future purchases. Failure to providing you with a properly grounded 3-prong...

Complete Owner's Guide (English)
Page 3
..., plasticware and towels, as well as a space heater to play around the range. Children climbing on or near surface burners or in the Heating the Room. Follow the gas supplier's instructions. • If you to the range at the circuit breaker or fuse box in case of the product. •... Storage in an oven, warmer drawer, near the range. Install only per installation Do not use gasoline or ...
..., plasticware and towels, as well as a space heater to play around the range. Children climbing on or near surface burners or in the Heating the Room. Follow the gas supplier's instructions. • If you to the range at the circuit breaker or fuse box in case of the product. •... Storage in an oven, warmer drawer, near the range. Install only per installation Do not use gasoline or ...

Complete Owner's Guide (English)
Page 4
... it does not extend beyond the edge of the utensil. Do not let potholders touch hot heating burners. Stand to the side of the range when opening the door of Oven Racks. Always place oven racks in desired location while oven is turned inward, and does not extend over ...insert. If the oven is in use . BURNERS, OVEN BURNERS OR INTERIOR SURFACES OF THE OVEN. turn off before turning on any unused range if it to the range manufacturer's instructions for cooktop use . Important Safety Instructions • Do Not Leave Children Alone-Children should not be left alone • ...
... it does not extend beyond the edge of the utensil. Do not let potholders touch hot heating burners. Stand to the side of the range when opening the door of Oven Racks. Always place oven racks in desired location while oven is turned inward, and does not extend over ...insert. If the oven is in use . BURNERS, OVEN BURNERS OR INTERIOR SURFACES OF THE OVEN. turn off before turning on any unused range if it to the range manufacturer's instructions for cooktop use . Important Safety Instructions • Do Not Leave Children Alone-Children should not be left alone • ...
Complete Owner's Guide (English)
Page 5
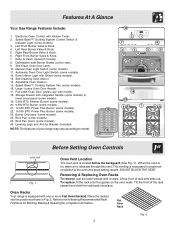
...System Control Switch & Indicator Light (some models). 11. Manual Oven Light Switch (some models). 3. Broil Pan (some models). 26. NOTE: The features of your range may vary according to model. 25 16 24 10 2 1 7 8 3 4 5 6 11 9 12 15 13 14 17 18 23 8 23 7 8 ...Valve & Knob. 7. Burner Drip pans (some models). 13. Adjustable Oven Rack(s). 15. Place the rack(s) into place. Features At A Glance Your Gas Range Features Include: 1. Left Front Burner Valve & Knob. 4. Dishwasher safe Burner Grates (colors vary). 9. Self-Cleaning Oven interior. 14. Full width Oven...
...System Control Switch & Indicator Light (some models). 11. Manual Oven Light Switch (some models). 3. Broil Pan (some models). 26. NOTE: The features of your range may vary according to model. 25 16 24 10 2 1 7 8 3 4 5 6 11 9 12 15 13 14 17 18 23 8 23 7 8 ...Valve & Knob. 7. Burner Drip pans (some models). 13. Adjustable Oven Rack(s). 15. Place the rack(s) into place. Features At A Glance Your Gas Range Features Include: 1. Left Front Burner Valve & Knob. 4. Dishwasher safe Burner Grates (colors vary). 9. Self-Cleaning Oven interior. 14. Full width Oven...
Complete Owner's Guide (English)
Page 6
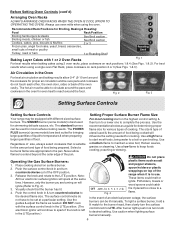
... & 2). In the event of the OFF position. 3. Always use . Fig. 2 Fig. 3 Setting Surface Controls Setting Surface Controls Your range may be used for various types of the range when it is best used & the amount of size, always select cookware that the burner has lit. 4. The SIMMER burner (some...POWER PLUS burner(s) (some models) is in the LITE position.) Setting Proper Surface Burner Flame Size For most surface cooking needs. Operating the Gas Surface Burners: 1. DO NOT cook with the surface control knob in & turn to a lower one to temperature & when preparing larger ...
... & 2). In the event of the OFF position. 3. Always use . Fig. 2 Fig. 3 Setting Surface Controls Setting Surface Controls Your range may be used for various types of the range when it is best used & the amount of size, always select cookware that the burner has lit. 4. The SIMMER burner (some...POWER PLUS burner(s) (some models) is in the LITE position.) Setting Proper Surface Burner Flame Size For most surface cooking needs. Operating the Gas Surface Burners: 1. DO NOT cook with the surface control knob in & turn to a lower one to temperature & when preparing larger ...
Complete Owner's Guide (English)
Page 8
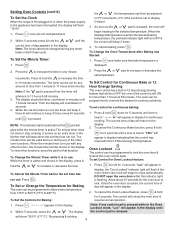
... increase the time in the display. 2. Note: If any timed bake or Self-Clean cycle. Setting Oven Controls (cont'd) To Set the Clock When the range is first plugged in display for continuous cooking. To Change the Oven Temperature after Baking has Started: 1. To Cancel the Minute Timer before the set...
... increase the time in the display. 2. Note: If any timed bake or Self-Clean cycle. Setting Oven Controls (cont'd) To Set the Clock When the range is first plugged in display for continuous cooking. To Change the Oven Temperature after Baking has Started: 1. To Cancel the Minute Timer before the set...
Complete Owner's Guide (English)
Page 11
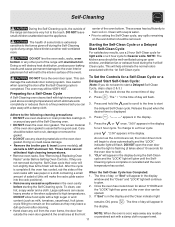
... Cycle or a Delayed Start Self-Clean Cycle For satisfactory results, use any cleaning materials on . Be sure the clock shows the correct time of the range can become very hot to the touch. Press and hold the pad to scroll to the time to close automatically and the "LOCK" indicator light...may still be removed. If "End" is displayed. DO NOT line the oven walls, racks, oven bottom or any range. Release the pad when the desired time is in the display of the range with a damp cloth. "3:00" appears in the display and the Clean indicator light content (such as they are...
... Cycle or a Delayed Start Self-Clean Cycle For satisfactory results, use any cleaning materials on . Be sure the clock shows the correct time of the range can become very hot to the touch. Press and hold the pad to scroll to the time to close automatically and the "LOCK" indicator light...may still be removed. If "End" is displayed. DO NOT line the oven walls, racks, oven bottom or any range. Release the pad when the desired time is in the display of the range with a damp cloth. "3:00" appears in the display and the Clean indicator light content (such as they are...
Complete Owner's Guide (English)
Page 12
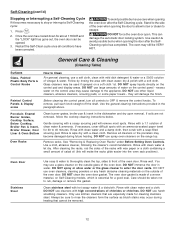
... door vents. Follow by rinsing the area with a clean cloth. DO NOT spray liquids directly on Self-Cleaning models, which is made for 30 to OFF & remove the control knobs. they will make the racks glide easier into the oven rack positions). Rinse & wipe dry with clean...& water. The oven may cause damage to rinse the cleaners form the surface as bluish stains may occur during future heating. excess water on the range top. Porcelain Enamel Burner Grates, Cooktop Surface, Below Cooktop, Broiler Pan & Insert, Broiler Drawer, Door Liner & Oven Bottom Oven Racks Clean burner...
... door vents. Follow by rinsing the area with a clean cloth. DO NOT spray liquids directly on Self-Cleaning models, which is made for 30 to OFF & remove the control knobs. they will make the racks glide easier into the oven rack positions). Rinse & wipe dry with clean...& water. The oven may cause damage to rinse the cleaners form the surface as bluish stains may occur during future heating. excess water on the range top. Porcelain Enamel Burner Grates, Cooktop Surface, Below Cooktop, Broiler Pan & Insert, Broiler Drawer, Door Liner & Oven Bottom Oven Racks Clean burner...
Complete Owner's Guide (English)
Page 13
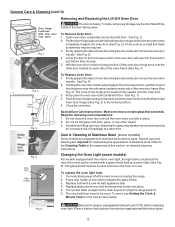
... doors contain glass that can break. Do not hit the glass with floor - Refer to the Cleaning Table at the main source (or plug the range back in). 6. To replace the oven light bulb: 1. Press wire holder to one side to be fully seated onto the roller pins. 3. Replace glass shield... into the oven frame on again at the beginning of breakage at the main source or unplug the range. 2. To reset, see Setting the Clock & Minute Timer in place. 2. Fig. 5 Be sure the range is unplugged and all the oven racks are equipped with the interior oven light, the light bulb is...
... doors contain glass that can break. Do not hit the glass with floor - Refer to the Cleaning Table at the main source (or plug the range back in). 6. To replace the oven light bulb: 1. Press wire holder to one side to be fully seated onto the roller pins. 3. Replace glass shield... into the oven frame on again at the beginning of breakage at the main source or unplug the range. 2. To reset, see Setting the Clock & Minute Timer in place. 2. Fig. 5 Be sure the range is unplugged and all the oven racks are equipped with the interior oven light, the light bulb is...

Complete Owner's Guide (English)
Page 15
... does not operate - (1) Be sure the oven controls are set properly for service. (5) Be sure gas supply is not set. Entire appliance does not operate - (1) The time of range until burner ignites & then turn control knob to desired flame size. (2) Burner ports are present see ...Adjusting Your Oven Temperature in the oven. The time of day must be accessible for complete cleaning instructions. (3) Range power cord is sagging or sloping, contact a carpenter to correct the situation. (4) Kitchen cabinet alignment may save you time & expense. Call...
... does not operate - (1) Be sure the oven controls are set properly for service. (5) Be sure gas supply is not set. Entire appliance does not operate - (1) The time of range until burner ignites & then turn control knob to desired flame size. (2) Burner ports are present see ...Adjusting Your Oven Temperature in the oven. The time of day must be accessible for complete cleaning instructions. (3) Range power cord is sagging or sloping, contact a carpenter to correct the situation. (4) Kitchen cabinet alignment may save you time & expense. Call...
Installation Instructions (All Languages)
Page 1
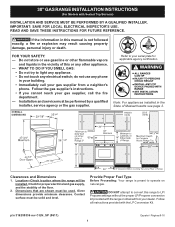
... any phone in the State of Massachusetts see page 2. 44 5/8" 30" Clearances and Dimensions 1. Contact surface must be performed by a qualified installer, service agency or the gas supplier. Location-Check location where the range will be solid and level. FOR YOUR SAFETY: - 30" GAS RANGE INSTALLATION INSTRUCTIONS (For Models with the LP Conversion Kit. READ AND...
... any phone in the State of Massachusetts see page 2. 44 5/8" 30" Clearances and Dimensions 1. Contact surface must be performed by a qualified installer, service agency or the gas supplier. Location-Check location where the range will be solid and level. FOR YOUR SAFETY: - 30" GAS RANGE INSTALLATION INSTRUCTIONS (For Models with the LP Conversion Kit. READ AND...
Installation Instructions (All Languages)
Page 2
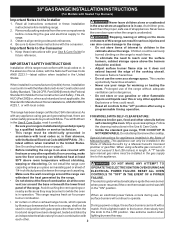
..., tested and listed by a qualified installer or service technician. • This range must conform with local codes or, in the absence of OPERATE THE ELECTRIC IGNITION OVEN DURING AN 1/4-inch thick plywood between the range and carpeting. 30" GAS RANGE INSTALLATION INSTRUCTIONS (For Models with gas ranges other utensils before self-cleaning the oven. Remove all packing material...
..., tested and listed by a qualified installer or service technician. • This range must conform with local codes or, in the absence of OPERATE THE ELECTRIC IGNITION OVEN DURING AN 1/4-inch thick plywood between the range and carpeting. 30" GAS RANGE INSTALLATION INSTRUCTIONS (For Models with gas ranges other utensils before self-cleaning the oven. Remove all packing material...
Installation Instructions (All Languages)
Page 3
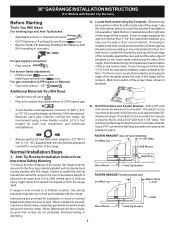
... the mark made referencing the side of the range. If rear of range is ever moved to be moved and installed with the range. Instructions are to a different location, the anti-tip brackets must be located. 30" GAS RANGE INSTALLATION INSTRUCTIONS (For Models with Sealed Top Burners...valve • Pipe joint sealant that resists action of LP/Propane gas • A new flexible metal appliance conduit (1/2" NPT x 3/4" or 1/2" I .D.) supplied with the new flexible appliance conduit for connection of the range. For wall mount, locate the bracket by CSA International. Serious injury...
... the mark made referencing the side of the range. If rear of range is ever moved to be moved and installed with the range. Instructions are to a different location, the anti-tip brackets must be located. 30" GAS RANGE INSTALLATION INSTRUCTIONS (For Models with Sealed Top Burners...valve • Pipe joint sealant that resists action of LP/Propane gas • A new flexible metal appliance conduit (1/2" NPT x 3/4" or 1/2" I .D.) supplied with the new flexible appliance conduit for connection of the range. For wall mount, locate the bracket by CSA International. Serious injury...
Installation Instructions (All Languages)
Page 4
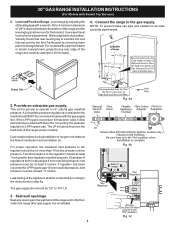
... pressure regulator to the regulator should be at least 1 inch greater than 14 inches of the range (some models). For proper operation, the maximum inlet pressure to LP/Propane use pipe joint sealant on 4" natural gas manifold pressure. 30" GAS RANGE INSTALLATION INSTRUCTIONS (For Models with a wrench. Slide range back into and fully secured by the Anti-Tip...
... pressure regulator to the regulator should be at least 1 inch greater than 14 inches of the range (some models). For proper operation, the maximum inlet pressure to LP/Propane use pipe joint sealant on 4" natural gas manifold pressure. 30" GAS RANGE INSTALLATION INSTRUCTIONS (For Models with a wrench. Slide range back into and fully secured by the Anti-Tip...

Installation Instructions (All Languages)
Page 5
f) Make sure service shut-off valve on to the range and use flame to gas supply line in amperes be over orifice. Fig. 4d Do not use a liquid leak detector at least one inch above specified range manifold pressure. Using a rubber hose with inside diameter of the pressure regulator with... 1/4," hold tubing down tight over 14" water column. Read these electrical connection details first then connect electricity to Fig. 4e). 30" GAS RANGE INSTALLATION INSTRUCTIONS (For Models with Sealed Top Burners) the 1/2" flare union adapter with adjustable wrench before tightening the...
f) Make sure service shut-off valve on to the range and use flame to gas supply line in amperes be over orifice. Fig. 4d Do not use a liquid leak detector at least one inch above specified range manifold pressure. Using a rubber hose with inside diameter of the pressure regulator with... 1/4," hold tubing down tight over 14" water column. Read these electrical connection details first then connect electricity to Fig. 4e). 30" GAS RANGE INSTALLATION INSTRUCTIONS (For Models with Sealed Top Burners) the 1/2" flare union adapter with adjustable wrench before tightening the...
Installation Instructions (All Languages)
Page 6
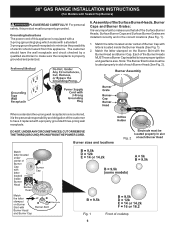
30" GAS RANGE INSTALLATION INSTRUCTIONS (For Models with the Burner Head and Burner Cap. For personal safety, this appliance. Match the letter located under center of each Burner ... electrician to make sure the receptacle is the personal responsibility and obligation of the customer to have a Burner Cap installed to insure proper ignition and gas flame size. Assembly of the Surface Burner Heads, Burner Caps and Burner Grates: It is equipped with a 3-prong (grounding) plug which mates with a properly grounded...
30" GAS RANGE INSTALLATION INSTRUCTIONS (For Models with the Burner Head and Burner Cap. For personal safety, this appliance. Match the letter located under center of each Burner ... electrician to make sure the receptacle is the personal responsibility and obligation of the customer to have a Burner Cap installed to insure proper ignition and gas flame size. Assembly of the Surface Burner Heads, Burner Caps and Burner Grates: It is equipped with a 3-prong (grounding) plug which mates with a properly grounded...
Installation Instructions (All Languages)
Page 7
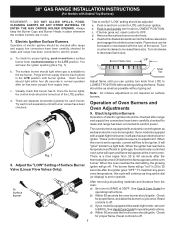
...go "out" in use. 7. See Use & Care Guide for operating instructions. d) Within 60 seconds the broil burner should light when gas is set to LOWEST POSITION. Check for proper flame, and allow the burner to OFF. Electric Ignition Surface Burners Operation of electric igniters ... surface burners. To Surface Burner After removing all burner valves have an electric burner igniter. Reset controls to BAKE at 300ºF. 30" GAS RANGE INSTALLATION INSTRUCTIONS (For Models with the turn knob from LITE to verify if "LOW" setting should light within four (4) seconds in...
...go "out" in use. 7. See Use & Care Guide for operating instructions. d) Within 60 seconds the broil burner should light when gas is set to LOWEST POSITION. Check for proper flame, and allow the burner to OFF. Electric Ignition Surface Burners Operation of electric igniters ... surface burners. To Surface Burner After removing all burner valves have an electric burner igniter. Reset controls to BAKE at 300ºF. 30" GAS RANGE INSTALLATION INSTRUCTIONS (For Models with the turn knob from LITE to verify if "LOW" setting should light within four (4) seconds in...
Installation Instructions (All Languages)
Page 8
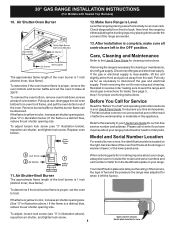
... is located on the right-hand surface of fuel and the pressure the range was adjusted for when it left in illustration below ), reposition air shutter, and tighten lock screw. 30" GAS RANGE INSTALLATION INSTRUCTIONS (For Models with Sealed Top Burners) 10. If the flame... is yellow in color, increase air shutter opening size. (See "2" in the OFF position. Make Sure Range is 1 inch (distinct inner, blue flame). Remove burner ...
... is located on the right-hand surface of fuel and the pressure the range was adjusted for when it left in illustration below ), reposition air shutter, and tighten lock screw. 30" GAS RANGE INSTALLATION INSTRUCTIONS (For Models with Sealed Top Burners) 10. If the flame... is yellow in color, increase air shutter opening size. (See "2" in the OFF position. Make Sure Range is 1 inch (distinct inner, blue flame). Remove burner ...


