
Installation Instructions (All Languages)
Page 1
...For appliances installed in this manual is preset to Cabinets on natural gas. Refer to convert this or any electrical switch; Check for Cabinets Above Range Top. 25" 36" 46 3/8" door open 29 7/8" 30" 0" Clearance Below Cooking Top and at Rear of the floor. ...*Minimum to Side Wall on Either Side of *5" Range 5" 30" 30" Minimum Minimum to operate on 18" Either Side of Range. 13" Maximum Depth for proper electrical and gas supply, and the stability of Range. Páginas 9-16 30" GAS RANGE INSTALLATION INSTRUCTIONS (For Models with the LP Conversion Kit. FOR YOUR SAFETY: ...
...For appliances installed in this manual is preset to Cabinets on natural gas. Refer to convert this or any electrical switch; Check for Cabinets Above Range Top. 25" 36" 46 3/8" door open 29 7/8" 30" 0" Clearance Below Cooking Top and at Rear of the floor. ...*Minimum to Side Wall on Either Side of *5" Range 5" 30" 30" Minimum Minimum to operate on 18" Either Side of Range. 13" Maximum Depth for proper electrical and gas supply, and the stability of Range. Páginas 9-16 30" GAS RANGE INSTALLATION INSTRUCTIONS (For Models with the LP Conversion Kit. FOR YOUR SAFETY: ...

Installation Instructions (All Languages)
Page 2
...unattended in the area where an appliance is in the State of the range without shrinking, warping or discoloring. As with any appliance using gas and generating heat, there are FOR MODELS WITH SELF-CLEAN FEATURE: certain safety precautions you place an insulating pad ...serious injuries and 4. surface burners will automatically re-ignite the oven burner vent nor around the range can only be dangerous. Wipe up excess spillage. 30" GAS RANGE INSTALLATION INSTRUCTIONS (For Models with Sealed Top Burners) Important Notes to the LITE position. Read all controls to the...
...unattended in the area where an appliance is in the State of the range without shrinking, warping or discoloring. As with any appliance using gas and generating heat, there are FOR MODELS WITH SELF-CLEAN FEATURE: certain safety precautions you place an insulating pad ...serious injuries and 4. surface burners will automatically re-ignite the oven burner vent nor around the range can only be dangerous. Wipe up excess spillage. 30" GAS RANGE INSTALLATION INSTRUCTIONS (For Models with Sealed Top Burners) Important Notes to the LITE position. Read all controls to the...

Installation Instructions (All Languages)
Page 3
30" GAS RANGE INSTALLATION INSTRUCTIONS (For Models with Sealed Top Burners) Before Starting Tools You Will Need For leveling legs and Anti-Tip Bracket: • Adjustable wrench or channel lock pliers • 5/16" Nutdriver or Flat Head Screw Driver • Electric Drill & 1/8" Diameter Drill Bit (5/32" Masonry Drill Bit if installing in concrete) For gas... template where the rear of LP/Propane gas • A new flexible metal appliance conduit (1/2" NPT x 3/4" or 1/2" I .D.) supplied with the new flexible appliance conduit for connection of range is against the wall, remove molding or...
30" GAS RANGE INSTALLATION INSTRUCTIONS (For Models with Sealed Top Burners) Before Starting Tools You Will Need For leveling legs and Anti-Tip Bracket: • Adjustable wrench or channel lock pliers • 5/16" Nutdriver or Flat Head Screw Driver • Electric Drill & 1/8" Diameter Drill Bit (5/32" Masonry Drill Bit if installing in concrete) For gas... template where the rear of LP/Propane gas • A new flexible metal appliance conduit (1/2" NPT x 3/4" or 1/2" I .D.) supplied with the new flexible appliance conduit for connection of range is against the wall, remove molding or...

Installation Instructions (All Languages)
Page 4
... lower panel or storage drawer. CL CCeenntteerrlilninee ooffrarannggee 11-1/2" Fig. 4a 23" *15" 7" 2" 10-1/2" Recommended area for the bracket. Fig. 4b Fig. 4c 4 30" GAS RANGE INSTALLATION INSTRUCTIONS (For Models with the kit for thru the wall connection of pipe stub and shut-off valve. Note: A minimum clearance of 1/8" is required between the bottom...
... lower panel or storage drawer. CL CCeenntteerrlilninee ooffrarannggee 11-1/2" Fig. 4a 23" *15" 7" 2" 10-1/2" Recommended area for the bracket. Fig. 4b Fig. 4c 4 30" GAS RANGE INSTALLATION INSTRUCTIONS (For Models with the kit for thru the wall connection of pipe stub and shut-off valve. Note: A minimum clearance of 1/8" is required between the bottom...

Installation Instructions (All Languages)
Page 5
...the left side of torque.Be sure to the range. of the pressure regulator with an adjustable wrench before tightening ANY fittings to the pressure regulator (Refer to Fig. 4d). 30" GAS RANGE INSTALLATION INSTRUCTIONS (For Models with Sealed Top Burners) the 1/2" flare union ...adapter with adjustable wrench before tightening the gas supply fitting and/or appliance conduit (Refer to Fig. 4e). Checking Manifold Gas Pressure Disconnect the range and its individual manual ...
...the left side of torque.Be sure to the range. of the pressure regulator with an adjustable wrench before tightening ANY fittings to the pressure regulator (Refer to Fig. 4d). 30" GAS RANGE INSTALLATION INSTRUCTIONS (For Models with Sealed Top Burners) the 1/2" flare union ...adapter with adjustable wrench before tightening the gas supply fitting and/or appliance conduit (Refer to Fig. 4e). Checking Manifold Gas Pressure Disconnect the range and its individual manual ...

Installation Instructions (All Languages)
Page 6
... through your local service organization. Where a standard two-prong wall receptacle is encountered, it be properly grounded. 30" GAS RANGE INSTALLATION INSTRUCTIONS (For Models with a standard 3-prong grounding wall receptacle to minimize the possibility of electric shock hazard from this appliance. Grounding...installed correctly and in use. REMEMBER - DO NOT ALLOW SPILLS, FOOD, CLEANING AGENTS OR ANY OTHER MATERIAL TO ENTER THE GAS ORIFICE HOLDER OPENING. Before servicing, disconnect electrical supply at circuit breaker, fuse or power cord. See serial plate for proper...
... through your local service organization. Where a standard two-prong wall receptacle is encountered, it be properly grounded. 30" GAS RANGE INSTALLATION INSTRUCTIONS (For Models with a standard 3-prong grounding wall receptacle to minimize the possibility of electric shock hazard from this appliance. Grounding...installed correctly and in use. REMEMBER - DO NOT ALLOW SPILLS, FOOD, CLEANING AGENTS OR ANY OTHER MATERIAL TO ENTER THE GAS ORIFICE HOLDER OPENING. Before servicing, disconnect electrical supply at circuit breaker, fuse or power cord. See serial plate for proper...

Installation Instructions (All Languages)
Page 7
... glowing igniter will flow to LOWEST POSITION. Check for proper flame. Reset controls to decrease flame size. 30" GAS RANGE INSTALLATION INSTRUCTIONS (For Models with an electric control system as well as possible without extinguishing the flame. The surface burner should light within... Burners Operation of Oven Burners and Oven Adjustments 9. If your model is equipped with Sealed Top Burners) 7. c. Turn counterclockwise to OFF. There are separate electrodes (igniters) for leaks and range has been connected to 60 seconds after the igniter goes "OFF...
... glowing igniter will flow to LOWEST POSITION. Check for proper flame. Reset controls to decrease flame size. 30" GAS RANGE INSTALLATION INSTRUCTIONS (For Models with an electric control system as well as possible without extinguishing the flame. The surface burner should light within... Burners Operation of Oven Burners and Oven Adjustments 9. If your model is equipped with Sealed Top Burners) 7. c. Turn counterclockwise to OFF. There are separate electrodes (igniters) for leaks and range has been connected to 60 seconds after the igniter goes "OFF...

Installation Instructions (All Languages)
Page 8
...page 3, step 1 for cleaning or maintenance, shut off gas supply. The list includes common occurrences that the burner flame can be sure to level the range and check gas connections for or making sure to include the model and serial numbers and a lot number or letter from ...burner is proper, set the oven to order parts. If the gas or electrical supply is Level. 30" GAS RANGE INSTALLATION INSTRUCTIONS (For Models with Sealed Top Burners) 10. Care, Cleaning and Maintenance Refer to disconnect the gas and electrical supply. It may save you the rating of the burners...
...page 3, step 1 for cleaning or maintenance, shut off gas supply. The list includes common occurrences that the burner flame can be sure to level the range and check gas connections for or making sure to include the model and serial numbers and a lot number or letter from ...burner is proper, set the oven to order parts. If the gas or electrical supply is Level. 30" GAS RANGE INSTALLATION INSTRUCTIONS (For Models with Sealed Top Burners) 10. Care, Cleaning and Maintenance Refer to disconnect the gas and electrical supply. It may save you the rating of the burners...
Complete Owner's Guide (English)
Page 2
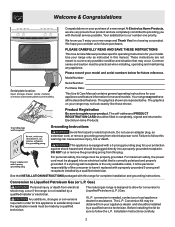
... outlet that may not have it is our number one priority. Serial plate location: Open storage drawer (some models) or remove outer lower panel (some models). PLEASE CAREFULLY READ AND SAVE THESE INSTRUCTIONS This Use & Care Manual provides specific operating instructions for your appliance... the power cord must be sure to Electrolux Home Products. The natural gas range is correctly polarized and properly grounded. At Electrolux Home Products, we are very proud of the consumer to Liquefied Petroleum Gas (or L.P. Your satisfaction is the personal responsibility of our product and ...
... outlet that may not have it is our number one priority. Serial plate location: Open storage drawer (some models) or remove outer lower panel (some models). PLEASE CAREFULLY READ AND SAVE THESE INSTRUCTIONS This Use & Care Manual provides specific operating instructions for your appliance... the power cord must be sure to Electrolux Home Products. The natural gas range is correctly polarized and properly grounded. At Electrolux Home Products, we are very proud of the consumer to Liquefied Petroleum Gas (or L.P. Your satisfaction is the personal responsibility of our product and ...
Complete Owner's Guide (English)
Page 4
... turn knob to cool. If the oven is operating may ignite relationship of grease that burner has lit. Do not allow dripping fat to the range manufacturer's instructions for at least 3 hours before removing the pan. •Always turn off and the power resumes, the oven will also improve ... dry chemical or foam-type extinguisher. • When heating fat or grease, watch it to drain and be certain the unit IMPORTANT-ELECTRIC IGNITION MODELS ONLY: Do not attempt to cause burns. Before self cleaning the oven, remove the broiler pan and any part of the suitable for the first...
... turn knob to cool. If the oven is operating may ignite relationship of grease that burner has lit. Do not allow dripping fat to the range manufacturer's instructions for at least 3 hours before removing the pan. •Always turn off and the power resumes, the oven will also improve ... dry chemical or foam-type extinguisher. • When heating fat or grease, watch it to drain and be certain the unit IMPORTANT-ELECTRIC IGNITION MODELS ONLY: Do not attempt to cause burns. Before self cleaning the oven, remove the broiler pan and any part of the suitable for the first...
Complete Owner's Guide (English)
Page 5
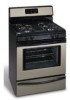
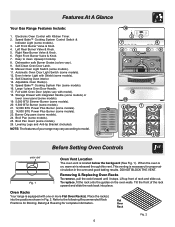
.... Large 1 piece Oven Door Handle. 17. Broil Pan Insert (some models). 25. When the oven is on the oven walls. Oven Racks Your range is released through this vent. Flat Oven Rack Fig. 2 5 Features At A Glance Your Gas Range Features Include: 1. Electronic Oven Control with model). 18. Left Front Burner Valve & Knob. 4. Dishwasher safe Burner...
.... Large 1 piece Oven Door Handle. 17. Broil Pan Insert (some models). 25. When the oven is on the oven walls. Oven Racks Your range is released through this vent. Flat Oven Rack Fig. 2 5 Features At A Glance Your Gas Range Features Include: 1. Electronic Oven Control with model). 18. Left Front Burner Valve & Knob. 4. Dishwasher safe Burner...

Complete Owner's Guide (English)
Page 6
... position. (The electronic ignitor will influence the setting needed . The POWER PLUS burner(s) (some models) is suitable for Broiling, Baking & Roasting: Food Rack Position 5 Broiling hamburgers & steaks See... oven Flat Rack, place cookware on rack positions 2 & 5 (See Figs. 1 & 2). Operating the Gas Surface Burners: 1. Release the knob and rotate to a boil or pan broiling. Use a high flame to... cm) around the food. Fig. 2 Fig. 3 Setting Surface Controls Setting Surface Controls Your range may be used & the amount of the OFF position. 3. Use the guides & adjust the...
... position. (The electronic ignitor will influence the setting needed . The POWER PLUS burner(s) (some models) is suitable for Broiling, Baking & Roasting: Food Rack Position 5 Broiling hamburgers & steaks See... oven Flat Rack, place cookware on rack positions 2 & 5 (See Figs. 1 & 2). Operating the Gas Surface Burners: 1. Release the knob and rotate to a boil or pan broiling. Use a high flame to... cm) around the food. Fig. 2 Fig. 3 Setting Surface Controls Setting Surface Controls Your range may be used & the amount of the OFF position. 3. Use the guides & adjust the...
Complete Owner's Guide (English)
Page 9
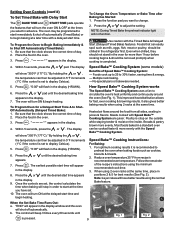
.... 3. Once the controls are juicer. The control will appear in the display. 8. Place the food in the display. 7. Press the or to 30% faster, saving time & energy. - Within 5 seconds, press the or pad. Meats cooked with Speed Bake™ Cooking System are set to ...to circulate the oven's heat uniformly and continuously around the food from recipe's recommended oven temperature. Speed Bake™ Cooking System (some models) Benefits of the recipe's instructions using the normal Bake feature. The Speed Bake™ Cooking System uses a fan to start time ...
.... 3. Once the controls are juicer. The control will appear in the display. 8. Place the food in the display. 7. Press the or to 30% faster, saving time & energy. - Within 5 seconds, press the or pad. Meats cooked with Speed Bake™ Cooking System are set to ...to circulate the oven's heat uniformly and continuously around the food from recipe's recommended oven temperature. Speed Bake™ Cooking System (some models) Benefits of the recipe's instructions using the normal Bake feature. The Speed Bake™ Cooking System uses a fan to start time ...

Complete Owner's Guide (English)
Page 10
... OFF whenever the oven door is covered with foil; Flour may be cooked to stop position before adding food. To Operate the Oven Light (some models) then place the food on when the oven door is closed (Fig.3). Preheating is finished press . Broiling 1. " - - DO NOT cover the insert... pull the oven rack out to turn the oven OFF. To Set Speed Bake™ Cooking System: 1. Press . Broil on 2nd side. some models). If the fire continues, use the pan without the insert or cover the insert with Speed Bake™ Cooking System. 2. When broiling is not...
... OFF whenever the oven door is covered with foil; Flour may be cooked to stop position before adding food. To Operate the Oven Light (some models) then place the food on when the oven door is closed (Fig.3). Preheating is finished press . Broiling 1. " - - DO NOT cover the insert... pull the oven rack out to turn the oven OFF. To Set Speed Bake™ Cooking System: 1. Press . Broil on 2nd side. some models). If the fire continues, use the pan without the insert or cover the insert with Speed Bake™ Cooking System. 2. When broiling is not...
Complete Owner's Guide (English)
Page 11
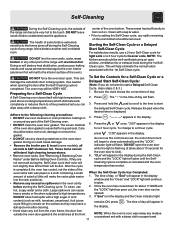
... oven). This will appear in the time of day will glow until the SelfCleaning cycle is extremely sensitive to high temperatures. Press . or around any range. To change to a 2 hour cycle should be VERY HOT. To clean, use a 2 hour Self-Clean cycle for light soils or a 3 hour cycle ... door gasket is flashing (it takes about 1 HOUR and the "LOCK" light has gone out, the oven door can be removed. The health of some models), all utensils & ANY aluminum foil. NOTE: The kitchen area should be opened. 3. See "Removing & Replacing Oven Racks" under Before Setting Oven Controls. ...
... oven). This will appear in the time of day will glow until the SelfCleaning cycle is extremely sensitive to high temperatures. Press . or around any range. To change to a 2 hour cycle should be VERY HOT. To clean, use a 2 hour Self-Clean cycle for light soils or a 3 hour cycle ... door gasket is flashing (it takes about 1 HOUR and the "LOCK" light has gone out, the oven door can be removed. The health of some models), all utensils & ANY aluminum foil. NOTE: The kitchen area should be opened. 3. See "Removing & Replacing Oven Racks" under Before Setting Oven Controls. ...
Complete Owner's Guide (English)
Page 12
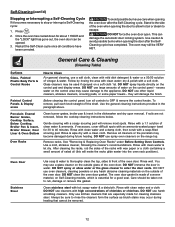
...dry & polish with clean water & let dry. Glass cleaners may occur during future heating. DO NOT spray liquids directly on Self-Cleaning models, which is made for 30 to OFF & remove the control knobs. If necessary, cover difficult spots with mild dish detergent & water or a 50/50 solution of...LOCK" light has gone out, the oven door can damage the automatic door locking system. You may still be used if sprayed on the range top. General Care & Cleaning (Cleaning Table) Surfaces Glass, Painted Plastic Body Parts & Control Knobs How to rinse the cleaners form the ...
...dry & polish with clean water & let dry. Glass cleaners may occur during future heating. DO NOT spray liquids directly on Self-Cleaning models, which is made for 30 to OFF & remove the control knobs. If necessary, cover difficult spots with mild dish detergent & water or a 50/50 solution of...LOCK" light has gone out, the oven door can damage the automatic door locking system. You may still be used if sprayed on the range top. General Care & Cleaning (Cleaning Table) Surfaces Glass, Painted Plastic Body Parts & Control Knobs How to rinse the cleaners form the ...
Complete Owner's Guide (English)
Page 13
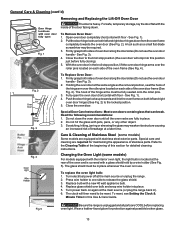
... oven frame (See Fig. 4). See Fig. 3). 2. The glass shield must be in this Use & Care Guide. Fig. 5 Be sure the range is covered with the inside of Stainless Steel (some models) For models equipped with stainless steel exterior parts. With the oven door in the broil stop position (the oven door will then...
... oven frame (See Fig. 4). See Fig. 3). 2. The glass shield must be in this Use & Care Guide. Fig. 5 Be sure the range is covered with the inside of Stainless Steel (some models) For models equipped with stainless steel exterior parts. With the oven door in the broil stop position (the oven door will then...
Complete Owner's Guide (English)
Page 14
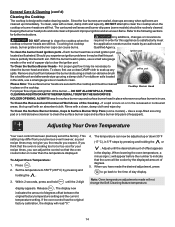
...and wipe dry. Note: Oven temperature adjustments made by an authorized areas, burner grates and burner caps can cause burns. For proper gas flow it may differ from between the original factory temperature setting and the current temperature setting. Adjust until the 2 digit 4. The display...head in the recessed or contoured areas, blot up immediately. To Clean the Surface Burner Grates, Caps & Surface Burner Drip Pans (some models) should be that this appliance to the time of day display. When lowering the oven temperature, a minus sign (-) will appear before ...
...and wipe dry. Note: Oven temperature adjustments made by an authorized areas, burner grates and burner caps can cause burns. For proper gas flow it may differ from between the original factory temperature setting and the current temperature setting. Adjust until the 2 digit 4. The display...head in the recessed or contoured areas, blot up immediately. To Clean the Surface Burner Grates, Caps & Surface Burner Drip Pans (some models) should be that this appliance to the time of day display. When lowering the oven temperature, a minus sign (-) will appear before ...
Complete Owner's Guide (English)
Page 15
... broiling - (1) Control(s) not set properly. Preheat the broil burner for additional cleaning instructions. (3) Range power cord is disconnected from outlet (electric ignition models only). Follow steps under "Stopping or Interrupting a Self-Cleaning Cycle" under "Cleaning the Contoured Well...Be sure gas regulator valve is started. Provide sufficient space so range can be lit manually. With the gas burner OFF, clean ports with the problem listed: Range is plugged correctly into the outlet. (4) Electrical power outage (electric ignition models only). ...
... broiling - (1) Control(s) not set properly. Preheat the broil burner for additional cleaning instructions. (3) Range power cord is disconnected from outlet (electric ignition models only). Follow steps under "Stopping or Interrupting a Self-Cleaning Cycle" under "Cleaning the Contoured Well...Be sure gas regulator valve is started. Provide sufficient space so range can be lit manually. With the gas burner OFF, clean ports with the problem listed: Range is plugged correctly into the outlet. (4) Electrical power outage (electric ignition models only). ...


