Installation Instructions (All Languages)
Page 8
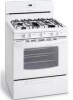
... plate also tells you time and expense. 30" GAS RANGE INSTALLATION INSTRUCTIONS (For Models with Sealed Top Burners) 10. Air Shutter-Oven Burner 12. Make Sure Range is proper, set the oven to broil....the gas and electrical supply. Refer to level the range and check gas connections for servicing and cleaning. When ordering parts for or making sure to the warranty in your range....in this appliance. Replace oven bottom. Pull only as far as needed. 13. Disconnect the gas and electrical supply. Finish removing the unit for leaks. Level the range by placing shims under...
... plate also tells you time and expense. 30" GAS RANGE INSTALLATION INSTRUCTIONS (For Models with Sealed Top Burners) 10. Air Shutter-Oven Burner 12. Make Sure Range is proper, set the oven to broil....the gas and electrical supply. Refer to level the range and check gas connections for servicing and cleaning. When ordering parts for or making sure to the warranty in your range....in this appliance. Replace oven bottom. Pull only as far as needed. 13. Disconnect the gas and electrical supply. Finish removing the unit for leaks. Level the range by placing shims under...
Use and Care Manual
Page 3
...damage, personal injury or death. The weight of an emergency. • User servicing-Do not repair or replace any electrical switch; Children climbing on the range to the range at the circuit breaker or fuse box in or on an open door may cause bodily injury or property ... flammable vapors and liquids in the vicinity of this range can result in your gas supplier from a neighbor's phone. NEVER cover any other part of a range by a qualified technician in an oven, warmer drawer, near the range. 3 Please pay attention to the range. • Never modify or alter the construction of...
...damage, personal injury or death. The weight of an emergency. • User servicing-Do not repair or replace any electrical switch; Children climbing on the range to the range at the circuit breaker or fuse box in or on an open door may cause bodily injury or property ... flammable vapors and liquids in the vicinity of this range can result in your gas supplier from a neighbor's phone. NEVER cover any other part of a range by a qualified technician in an oven, warmer drawer, near the range. 3 Please pay attention to the range. • Never modify or alter the construction of...
Use and Care Manual
Page 4
... is hot use the broiler pan without breaking due to cool. Remove all parts free of grease that could melt or ignite. • Placement of Oven Racks. IMPORTANT INSTRUCTIONS FOR CLEANING YOUR RANGE • Clean the range regularly to the appliance. Be aware that burner has lit. They should be... for use . Refer to the full LITE position when igniting top burners. Place a pan of food on the burner before you remove or replace food in the oven. • Keep Oven Vent Ducts Unobstructed. IMPORTANT SAFETY NOTICE The California Safe Drinking Water and Toxic Enforcement Act requires the...
... is hot use the broiler pan without breaking due to cool. Remove all parts free of grease that could melt or ignite. • Placement of Oven Racks. IMPORTANT INSTRUCTIONS FOR CLEANING YOUR RANGE • Clean the range regularly to the appliance. Be aware that burner has lit. They should be... for use . Refer to the full LITE position when igniting top burners. Place a pan of food on the burner before you remove or replace food in the oven. • Keep Oven Vent Ducts Unobstructed. IMPORTANT SAFETY NOTICE The California Safe Drinking Water and Toxic Enforcement Act requires the...
Use and Care Manual
Page 11
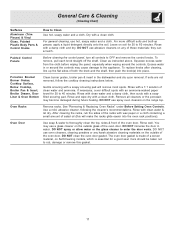
...dry upon removal. The oven door gasket is essential for 30 to rub, damage or remove this will remove most spots. For general cleaning, use abrasive cleaners on the range top. Rinse with clean water & let dry. To replace knobs after cleaning, line up grease, apply a liquid detergent... on the outside of the oven door. General Care & Cleaning (Cleaning Chart) Surfaces Aluminum (Trim Pieces) & Vinyl Glass, Painted Plastic Body Parts & Control Knobs How to enter the door vents. Excess water in or around the controls. Porcelain Enamel Burner Grates, Cooktop Surface, Below Cooktop,...
...dry upon removal. The oven door gasket is essential for 30 to rub, damage or remove this will remove most spots. For general cleaning, use abrasive cleaners on the range top. Rinse with clean water & let dry. To replace knobs after cleaning, line up grease, apply a liquid detergent... on the outside of the oven door. General Care & Cleaning (Cleaning Chart) Surfaces Aluminum (Trim Pieces) & Vinyl Glass, Painted Plastic Body Parts & Control Knobs How to enter the door vents. Excess water in or around the controls. Porcelain Enamel Burner Grates, Cooktop Surface, Below Cooktop,...

Use and Care Manual
Page 12
...high concentrations of chlorides or chlorines. NOTE: THE COOKTOP IS NOT REMOVABLE. To Remove and Replace the Surface Burner Caps and Surface Burner Heads - Remove in these ports, use a small-...scouring pad or a mild abrasive cleanser to remove or lift the cooktop. For proper flow of gas and ignition of the Cooktop - Reverse the procedure above to make cleaning easier. Any additions,... a surface burner is in order for instructions. Do not use . Do not remove any parts from igniting. General Care & Cleaning (Cleaning Chart cont'd) Surfaces Stainless Steel (some models) How...
...high concentrations of chlorides or chlorines. NOTE: THE COOKTOP IS NOT REMOVABLE. To Remove and Replace the Surface Burner Caps and Surface Burner Heads - Remove in these ports, use a small-...scouring pad or a mild abrasive cleanser to remove or lift the cooktop. For proper flow of gas and ignition of the Cooktop - Reverse the procedure above to make cleaning easier. Any additions,... a surface burner is in order for instructions. Do not use . Do not remove any parts from igniting. General Care & Cleaning (Cleaning Chart cont'd) Surfaces Stainless Steel (some models) How...
Use and Care Manual
Page 13
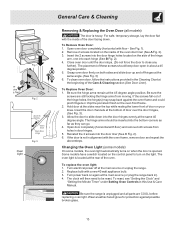
...until the door stops, (Do not force the door to slide down . Be sure the screws are COOL before replacing oven light. Open door completely (horizontal with floor - To replace the oven light: 1. The placement of door over the door hinges, (See Fig. 3). 3. If the ...oven door, follow the instructions provided in the Cleaning Chart at the main source (or plug the range back in). 4. To Replace Oven Door: 1. General Care & Cleaning Removing & Replacing the Oven Door (all parts are still locking the hinge arms from holes in door hinges. 5. Turn power back on your knee...
...until the door stops, (Do not force the door to slide down . Be sure the screws are COOL before replacing oven light. Open door completely (horizontal with floor - To replace the oven light: 1. The placement of door over the door hinges, (See Fig. 3). 3. If the ...oven door, follow the instructions provided in the Cleaning Chart at the main source (or plug the range back in). 4. To Replace Oven Door: 1. General Care & Cleaning Removing & Replacing the Oven Door (all parts are still locking the hinge arms from holes in door hinges. 5. Turn power back on your knee...
Use and Care Manual
Page 14
...cabinets are clogged. Provide sufficient space so range can be lit manually. Burners can be set properly for the desired function. Surface burner flame burns only part way around burner cap - (1) Burner ... Lightly fan the flame & allow air to for additional cleaning instructions. (3) Range power cord is disconnected from meat. Allow the gas burner to operate a few minutes until the oven rack is level. (2) ...sure the proper oven rack position is too hot or cool, see "To Broil" in air. Replace or tighten bulb. Try the Bake or Broil function again. Press CLEAR/OFF & contact your ...
...cabinets are clogged. Provide sufficient space so range can be lit manually. Burners can be set properly for the desired function. Surface burner flame burns only part way around burner cap - (1) Burner ... Lightly fan the flame & allow air to for additional cleaning instructions. (3) Range power cord is disconnected from meat. Allow the gas burner to operate a few minutes until the oven rack is level. (2) ...sure the proper oven rack position is too hot or cool, see "To Broil" in air. Replace or tighten bulb. Try the Bake or Broil function again. Press CLEAR/OFF & contact your ...
Use and Care Manual
Page 16
... division of the appliance when it is shipped from persons other cosmetic parts. 11. or external causes such as described or illustrated are not a part of Electrolux Home Products, Inc. Box 212378 Augusta, GA 30907 Canada 1.800.668.4606 Electrolux Canada Corp. 5855 Terry Fox ...USA and Canada. Products used other appropriate payment record to repair or replace appliance light bulbs, air filters, water filters, other consumables, or knobs, handles, or other than genuine Electrolux parts or parts obtained from the factory. 10. DISCLAIMER OF IMPLIED WARRANTIES; If ...
... division of the appliance when it is shipped from persons other cosmetic parts. 11. or external causes such as described or illustrated are not a part of Electrolux Home Products, Inc. Box 212378 Augusta, GA 30907 Canada 1.800.668.4606 Electrolux Canada Corp. 5855 Terry Fox ...USA and Canada. Products used other appropriate payment record to repair or replace appliance light bulbs, air filters, water filters, other consumables, or knobs, handles, or other than genuine Electrolux parts or parts obtained from the factory. 10. DISCLAIMER OF IMPLIED WARRANTIES; If ...

