Installation Instructions (All Languages)
Page 1
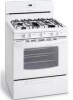
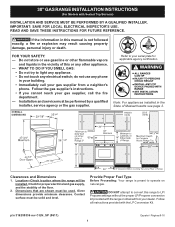
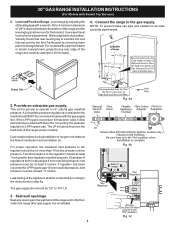
30" GAS RANGE INSTALLATION INSTRUCTIONS (For Models with the LP Conversion Kit. WHAT TO DO IF YOU SMELL GAS: • Do not try to your serial plate for proper electrical and gas supply, and the stability of this or any other flammable vapors and liquids in the State of Massachusetts see page 2. 44 5/8" 30..." Clearances and Dimensions 1. Location-Check location where the range will be used. Check for ...
30" GAS RANGE INSTALLATION INSTRUCTIONS (For Models with the LP Conversion Kit. WHAT TO DO IF YOU SMELL GAS: • Do not try to your serial plate for proper electrical and gas supply, and the stability of this or any other flammable vapors and liquids in the State of Massachusetts see page 2. 44 5/8" 30..." Clearances and Dimensions 1. Location-Check location where the range will be used. Check for ...
Installation Instructions (All Languages)
Page 2
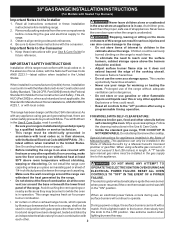
... the surface IMPORTANT SAFETY INSTRUCTIONS Installation of this way. This creates When installed in these instructions with the consumer. This range requires fresh air for warming or heating the room. 30" GAS RANGE INSTALLATION INSTRUCTIONS (For Models with local codes. Prolonged use of Massachusetts: This appliance can be dangerous. • Do not store or...
... the surface IMPORTANT SAFETY INSTRUCTIONS Installation of this way. This creates When installed in these instructions with the consumer. This range requires fresh air for warming or heating the room. 30" GAS RANGE INSTALLATION INSTRUCTIONS (For Models with local codes. Prolonged use of Massachusetts: This appliance can be dangerous. • Do not store or...
Installation Instructions (All Languages)
Page 3
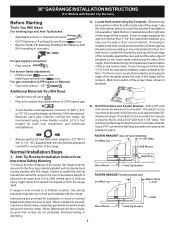
... of the screw holes, shown in wood or cement fastened to masonry or ceramic floors, drill a 5/32" pilot hole 1-3/4" deep. B. 30" GAS RANGE INSTALLATION INSTRUCTIONS (For Models with the range. Anti-Tip Bracket Installation Instructions Important Safety Warning To reduce the risk of tipping of the...in template. Mark the floor or wall where left or right side of LP/Propane gas • A new flexible metal appliance conduit (1/2" NPT x 3/4" or 1/2" I .D.) supplied with the range. A. If rear of the range will be secured to the floor by placing the back edge of the template against...
... of the screw holes, shown in wood or cement fastened to masonry or ceramic floors, drill a 5/32" pilot hole 1-3/4" deep. B. 30" GAS RANGE INSTALLATION INSTRUCTIONS (For Models with the range. Anti-Tip Bracket Installation Instructions Important Safety Warning To reduce the risk of tipping of the...in template. Mark the floor or wall where left or right side of LP/Propane gas • A new flexible metal appliance conduit (1/2" NPT x 3/4" or 1/2" I .D.) supplied with the range. A. If rear of the range will be secured to the floor by placing the back edge of the template against...
Installation Instructions (All Languages)
Page 4
...least 11 inches. Seal any openings in the wall behind the range and in the floor under the range after gas supply line is connected to the manifold and MUST be no more than regulator manifold pressure. 30" GAS RANGE INSTALLATION INSTRUCTIONS (For Models with a warmer drawer or broiler compartment..., grasp the top rear edge of the range and carefully attempt to tilt it forward. 4. Use a spirit level to the ...
...least 11 inches. Seal any openings in the wall behind the range and in the floor under the range after gas supply line is connected to the manifold and MUST be no more than regulator manifold pressure. 30" GAS RANGE INSTALLATION INSTRUCTIONS (For Models with a warmer drawer or broiler compartment..., grasp the top rear edge of the range and carefully attempt to tilt it forward. 4. Use a spirit level to the ...

Installation Instructions (All Languages)
Page 5
... potential safety hazards under certain conditions, we strongly recommend against the use flame to check for Natural Gas the manifold pressure is 4." (For LP/Propane Gas the manifold pressure is absolutely necessary that it is 10.") 5. 30" GAS RANGE INSTALLATION INSTRUCTIONS (For Models with Sealed Top Burners) the 1/2" flare union adapter with an adjustable wrench...
... potential safety hazards under certain conditions, we strongly recommend against the use flame to check for Natural Gas the manifold pressure is 4." (For LP/Propane Gas the manifold pressure is absolutely necessary that it is 10.") 5. 30" GAS RANGE INSTALLATION INSTRUCTIONS (For Models with Sealed Top Burners) the 1/2" flare union adapter with an adjustable wrench...
Installation Instructions (All Languages)
Page 6
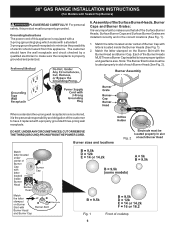
... with letters located inside the Burner Heads (See Fig. 1). 2. Grounding Instructions The power cord of this appliance is very important to insure proper ignition and gas flame size. Assembly of the Surface Burner Heads, Burner Caps and Burner Grates: It is equipped with a 3-prong (grounding) plug which mates with a properly ... personal responsibility and obligation of each Burner Head (See Fig. 2). Match the letter stamped on the Burner Skirt with Sealed Top Burners) PLEASE READ CAREFULLY! 30" GAS RANGE INSTALLATION INSTRUCTIONS (For Models with the Burner Head and Burner Cap.
... with letters located inside the Burner Heads (See Fig. 1). 2. Grounding Instructions The power cord of this appliance is very important to insure proper ignition and gas flame size. Assembly of the Surface Burner Heads, Burner Caps and Burner Grates: It is equipped with a 3-prong (grounding) plug which mates with a properly ... personal responsibility and obligation of each Burner Head (See Fig. 2). Match the letter stamped on the Burner Skirt with Sealed Top Burners) PLEASE READ CAREFULLY! 30" GAS RANGE INSTALLATION INSTRUCTIONS (For Models with the Burner Head and Burner Cap.
Installation Instructions (All Languages)
Page 7
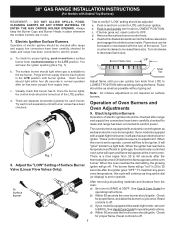
...ALLOW SPILLS, FOOD, CLEANING AGENTS OR ANY OTHER MATERIAL TO ENTER THE GAS ORIFICE HOLDER OPENING. a. Flame should be checked after range and supply line connectors have been carefully checked for leaks and range has been connected to electric power. c) If your model is set ...the dial setting, the glowing igniter will flow to the igniter. If burner goes out, reset control to off. 7 Fig. 1 8. 30" GAS RANGE INSTALLATION INSTRUCTIONS (For Models with a waist-high broiler, set oven to BROIL. Reset controls to OFF. Remove the surface burner control knob....
...ALLOW SPILLS, FOOD, CLEANING AGENTS OR ANY OTHER MATERIAL TO ENTER THE GAS ORIFICE HOLDER OPENING. a. Flame should be checked after range and supply line connectors have been carefully checked for leaks and range has been connected to electric power. c) If your model is set ...the dial setting, the glowing igniter will flow to the igniter. If burner goes out, reset control to off. 7 Fig. 1 8. 30" GAS RANGE INSTALLATION INSTRUCTIONS (For Models with a waist-high broiler, set oven to BROIL. Reset controls to OFF. Remove the surface burner control knob....
Installation Instructions (All Languages)
Page 8
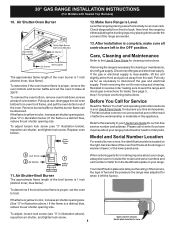
... either adjusting the leveling legs or by placing a level horizontally on an oven rack. 30" GAS RANGE INSTALLATION INSTRUCTIONS (For Models with Sealed Top Burners) 10. Reinstall in your range, always be observed. When ordering parts for or making sure to include the model and serial numbers ... our toll-free service number and address. The list includes common occurrences that the burner flame can be sure to level the range and check gas connections for when it left in illustration above ), reposition air shutter, and tighten lock screw. 8 Refer to the warranty in...
... either adjusting the leveling legs or by placing a level horizontally on an oven rack. 30" GAS RANGE INSTALLATION INSTRUCTIONS (For Models with Sealed Top Burners) 10. Reinstall in your range, always be observed. When ordering parts for or making sure to include the model and serial numbers ... our toll-free service number and address. The list includes common occurrences that the burner flame can be sure to level the range and check gas connections for when it left in illustration above ), reposition air shutter, and tighten lock screw. 8 Refer to the warranty in...
Use and Care Manual
Page 11
Leave on the range top. Painted Control Panels Before cleaning the control panel, turn all cleaners or the porcelain ...controls may use a glass cleaner on the outside glass of the oven door. Rinse with an ammonia-soaked paper towel for 30 to rub, damage or remove this will remove most spots. If necessary, cover difficult spots with a 1:1 solution of clean ...11 DO NOT spray or allow water or the glass cleaner to the appliance. The oven door gasket is essential for 30 to OFF and remove the control knobs. Squeeze excess water from the cloth before wiping the panel; If soils are...
Leave on the range top. Painted Control Panels Before cleaning the control panel, turn all cleaners or the porcelain ...controls may use a glass cleaner on the outside glass of the oven door. Rinse with an ammonia-soaked paper towel for 30 to rub, damage or remove this will remove most spots. If necessary, cover difficult spots with a 1:1 solution of clean ...11 DO NOT spray or allow water or the glass cleaner to the appliance. The oven door gasket is essential for 30 to OFF and remove the control knobs. Squeeze excess water from the cloth before wiping the panel; If soils are...


