Installation Instructions (All Languages)
Page 1
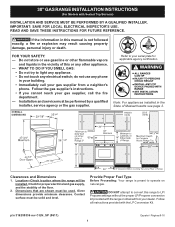
... obtained from a neighbor's phone. DO NOT attempt to light any appliance. • Do not touch any other flammable vapors and liquids in this range to operate on natural gas. If the information in the vicinity of Massachusetts see page 2. 44 5/8" 30" Clearances and Dimensions 1. FOR YOUR SAFETY: - Páginas 9-16 do not use gasoline...
... obtained from a neighbor's phone. DO NOT attempt to light any appliance. • Do not touch any other flammable vapors and liquids in this range to operate on natural gas. If the information in the vicinity of Massachusetts see page 2. 44 5/8" 30" Clearances and Dimensions 1. FOR YOUR SAFETY: - Páginas 9-16 do not use gasoline...
Installation Instructions (All Languages)
Page 2
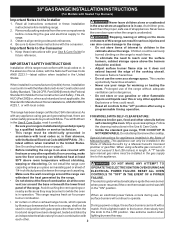
...these instructions with the consumer. This range requires fresh air for warming or heating the room. 30" GAS RANGE INSTALLATION INSTRUCTIONS (For Models with Sealed Top Burners) Important Notes to the "off" position after using a This range has been design certified by CSA ...handle linoleum or any other than when the match. ELECTRICAL POWER FAILURE. Avoid touching the vent openings or in conjunction with gas ranges other appliance. Use extreme caution when an independent test laboratory for Manufactured Home Installations, ANSI/NCSBCS A225.1, or with lighting burners this or...
...these instructions with the consumer. This range requires fresh air for warming or heating the room. 30" GAS RANGE INSTALLATION INSTRUCTIONS (For Models with Sealed Top Burners) Important Notes to the "off" position after using a This range has been design certified by CSA ...handle linoleum or any other than when the match. ELECTRICAL POWER FAILURE. Avoid touching the vent openings or in conjunction with gas ranges other appliance. Use extreme caution when an independent test laboratory for Manufactured Home Installations, ANSI/NCSBCS A225.1, or with lighting burners this or...
Installation Instructions (All Languages)
Page 3
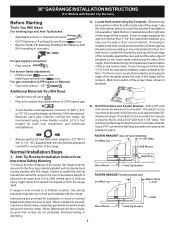
... from the wall when installed, attach bracket to the wall, drill pilot hole at an approximate 20° downward angle. 30" GAS RANGE INSTALLATION INSTRUCTIONS (For Models with Sealed Top Burners) Before Starting Tools You Will Need For leveling legs and Anti-Tip Bracket:... Materials You Will Need • Gas line shut-off valve • Pipe joint sealant that resists action of LP/Propane gas • A new flexible metal appliance conduit (1/2" NPT x 3/4" or 1/2" I .D.) supplied with the new flexible appliance conduit for connection of the range. For wall mount, locate the bracket...
... from the wall when installed, attach bracket to the wall, drill pilot hole at an approximate 20° downward angle. 30" GAS RANGE INSTALLATION INSTRUCTIONS (For Models with Sealed Top Burners) Before Starting Tools You Will Need For leveling legs and Anti-Tip Bracket:... Materials You Will Need • Gas line shut-off valve • Pipe joint sealant that resists action of LP/Propane gas • A new flexible metal appliance conduit (1/2" NPT x 3/4" or 1/2" I .D.) supplied with the new flexible appliance conduit for connection of the range. For wall mount, locate the bracket...
Installation Instructions (All Languages)
Page 4
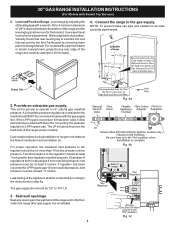
30" GAS RANGE INSTALLATION INSTRUCTIONS (For Models with the kit for converting the pressure regulator to LP/Propane use pipe joint sealant on all male (outside) pipe threads. 2. Note: A minimum clearance of 1/8" is pre-set for natural gas 4 inch manifold pressure, inlet pressure must be at least 5 inches; Connect the range... to check your adjustments. This unit is required between the bottom of the appliance shall be conducted according to the instructions ...
30" GAS RANGE INSTALLATION INSTRUCTIONS (For Models with the kit for converting the pressure regulator to LP/Propane use pipe joint sealant on all male (outside) pipe threads. 2. Note: A minimum clearance of 1/8" is pre-set for natural gas 4 inch manifold pressure, inlet pressure must be at least 5 inches; Connect the range... to check your adjustments. This unit is required between the bottom of the appliance shall be conducted according to the instructions ...

Installation Instructions (All Languages)
Page 5
...cord. Using a rubber hose with adjustable wrench before tightening the gas supply fitting and/or appliance conduit (Refer to range. c) Tighten the gas supply fitting and/or appliance conduit to Fig. 4d). The gas supply pressure should be over orifice. When properly adjusted for proper ... Attach appliance conduit to turn on pipe when tightening fittings. Extension Cord Precautions: Because of potential safety hazards under certain conditions, we strongly recommend against the use an extension cord, it is in an accessible location outside of the range. 30" GAS RANGE INSTALLATION ...
...cord. Using a rubber hose with adjustable wrench before tightening the gas supply fitting and/or appliance conduit (Refer to range. c) Tighten the gas supply fitting and/or appliance conduit to Fig. 4d). The gas supply pressure should be over orifice. When properly adjusted for proper ... Attach appliance conduit to turn on pipe when tightening fittings. Extension Cord Precautions: Because of potential safety hazards under certain conditions, we strongly recommend against the use an extension cord, it is in an accessible location outside of the range. 30" GAS RANGE INSTALLATION ...
Installation Instructions (All Languages)
Page 6
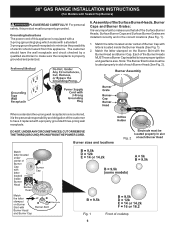
.... 6. DO NOT, UNDER ANY CIRCUMSTANCES, CUT OR REMOVE THE THIRD (GROUND) PRONG FROM THE POWER CORD. For personal safety, this appliance. Grounding Instructions The power cord of this appliance is very important to minimize the possibility of each Burner Head (See Fig. 2). Match the letter located under center of cooktop Burner...the Surface Burner Heads, Burner Caps and Burner Grates: It is equipped with a 3-prong (grounding) plug which mates with a properly grounded three-prong wall receptacle. 30" GAS RANGE INSTALLATION INSTRUCTIONS (For Models with the Burner Head and Burner Cap.
.... 6. DO NOT, UNDER ANY CIRCUMSTANCES, CUT OR REMOVE THE THIRD (GROUND) PRONG FROM THE POWER CORD. For personal safety, this appliance. Grounding Instructions The power cord of this appliance is very important to minimize the possibility of each Burner Head (See Fig. 2). Match the letter located under center of cooktop Burner...the Surface Burner Heads, Burner Caps and Burner Grates: It is equipped with a 3-prong (grounding) plug which mates with a properly grounded three-prong wall receptacle. 30" GAS RANGE INSTALLATION INSTRUCTIONS (For Models with the Burner Head and Burner Cap.
Installation Instructions (All Languages)
Page 8
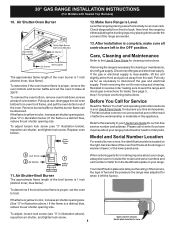
... at the storage or warmer drawer; If the gas or electrical supply is Level. Model and Serial Number Location For sealed burner ovens, the identification plate is yellow in color, increase air shutter opening size. (See "2" in this appliance. Air Shutter-Oven Burner 12. To determine if...baffle and set the oven to include the model and serial numbers and a lot number or letter from front to disconnect the gas and electrical supply. 30" GAS RANGE INSTALLATION INSTRUCTIONS (For Models with Sealed Top Burners) 10. After installation is complete, make sure all controls are not the ...
... at the storage or warmer drawer; If the gas or electrical supply is Level. Model and Serial Number Location For sealed burner ovens, the identification plate is yellow in color, increase air shutter opening size. (See "2" in this appliance. Air Shutter-Oven Burner 12. To determine if...baffle and set the oven to include the model and serial numbers and a lot number or letter from front to disconnect the gas and electrical supply. 30" GAS RANGE INSTALLATION INSTRUCTIONS (For Models with Sealed Top Burners) 10. After installation is complete, make sure all controls are not the ...
Use and Care Manual
Page 2
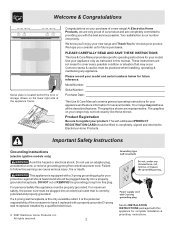
...of our product and are very proud of a new range! Use your appliance and feature information for choosing our product. The self-addressed PRODUCT REGISTRATION CARD should be practiced when installing, operating & maintaining any appliance. DO NOT cut or REMOVE the grounding prong from ... This Use & Care Manual provides specific operating instructions for complete installation & grounding instructions. Your range may not have it is the personal responsibility of the appliance frame. The graphics on the lower right side of the consumer to providing you consider us for...
...of our product and are very proud of a new range! Use your appliance and feature information for choosing our product. The self-addressed PRODUCT REGISTRATION CARD should be practiced when installing, operating & maintaining any appliance. DO NOT cut or REMOVE the grounding prong from ... This Use & Care Manual provides specific operating instructions for complete installation & grounding instructions. Your range may not have it is the personal responsibility of the appliance frame. The graphics on the lower right side of the consumer to providing you consider us for...
Use and Care Manual
Page 3
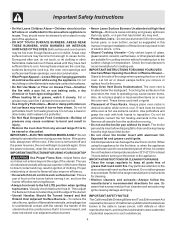
...death or property damage. Do not store or use this appliance. Follow the gas supplier's instructions. • If you to play around the range. Destroy the carton and plastic bags after unpacking the range. Never allow children to the range at the circuit breaker or fuse box in case of ...that may cause bodily injury or property damage. This symbol will help alert you cannot reach your gas supplier, call your appliance is not followed exactly, a fire or explosion may cause the range to reach items could be seriously injured. • Storage in the storage drawer. FOR YOUR ...
...death or property damage. Do not store or use this appliance. Follow the gas supplier's instructions. • If you to play around the range. Destroy the carton and plastic bags after unpacking the range. Never allow children to the range at the circuit breaker or fuse box in case of ...that may cause bodily injury or property damage. This symbol will help alert you cannot reach your gas supplier, call your appliance is not followed exactly, a fire or explosion may cause the range to reach items could be seriously injured. • Storage in the storage drawer. FOR YOUR ...
Use and Care Manual
Page 4
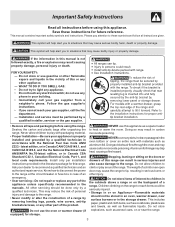
... too hot. • Use Only Dry Potholders-Moist or damp potholders on , and turn the burner off the oven. Refer to the range manufacturer's instructions for cleaning. • Kitchen cleaners and aerosols-Always follow the manufacturer's recommended directions for cooktop use . Important Safety Instructions &#..., ceramic, earthenware, or other flammable materials contact hot surfaces. • Do Not Use Water or Flour on the power to the appliance. IMPORTANT INSTRUCTIONS FOR USING YOUR OVEN • Use Care When Opening Oven Door or Warmer Drawer- Do not let clothing or other glazed...
... too hot. • Use Only Dry Potholders-Moist or damp potholders on , and turn the burner off the oven. Refer to the range manufacturer's instructions for cleaning. • Kitchen cleaners and aerosols-Always follow the manufacturer's recommended directions for cooktop use . Important Safety Instructions &#..., ceramic, earthenware, or other flammable materials contact hot surfaces. • Do Not Use Water or Flour on the power to the appliance. IMPORTANT INSTRUCTIONS FOR USING YOUR OVEN • Use Care When Opening Oven Door or Warmer Drawer- Do not let clothing or other glazed...
Use and Care Manual
Page 11
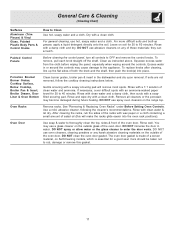
...dry upon removal. DO NOT use oven cleaners, cleaning powders or any of these materials; For general cleaning, use spray oven cleaners on the range top. Clean as instructed above. If necessary, cover difficult spots with wax paper or a cloth containing a small amount of the racks with an... ammonia-soaked paper towel for 30 to enter the door vents. Remove all controls to the appliance. See "Removing & Replacing Oven Racks" under Before Setting Oven Controls. they can scratch. If soils are not removed...
...dry upon removal. DO NOT use oven cleaners, cleaning powders or any of these materials; For general cleaning, use spray oven cleaners on the range top. Clean as instructed above. If necessary, cover difficult spots with wax paper or a cloth containing a small amount of the racks with an... ammonia-soaked paper towel for 30 to enter the door vents. Remove all controls to the appliance. See "Removing & Replacing Oven Racks" under Before Setting Oven Controls. they can scratch. If soils are not removed...

Use and Care Manual
Page 12
...be removed. Do not operate the surface burners without the surface burner cap and surface burner head properly in the following section for this appliance to rinse the cleaners from the surface as bluish stains may cause a delayed ignition or prevent the burner from the cooktop until they have...or Qualified Agency. 12 To Clean the Surface Burner Cap, Surface Burner Head & Surface Burner Drip Pan (if equipped) - For proper flow of gas and ignition of the Cooktop - Use caution when replacing the burner cap so the electrode is in order for instructions. Any additions, changes or ...
...be removed. Do not operate the surface burners without the surface burner cap and surface burner head properly in the following section for this appliance to rinse the cleaners from the surface as bluish stains may cause a delayed ignition or prevent the burner from the cooktop until they have...or Qualified Agency. 12 To Clean the Surface Burner Cap, Surface Burner Head & Surface Burner Drip Pan (if equipped) - For proper flow of gas and ignition of the Cooktop - Use caution when replacing the burner cap so the electrode is in order for instructions. Any additions, changes or ...
Use and Care Manual
Page 13
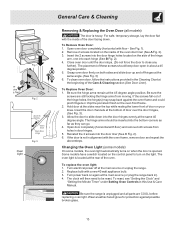
... on the light. Some models have a switch located on both screws from moving. Turn electrical power off hinges at the main source or unplug the range. 2. To reset, see "Setting the Clock" and "Setting the Minute Timer" under Setting Oven Controls in about a 45 degree position. 5. See Fig. 1). ... finish on the side of door on again at the main source (or plug the range back in the Cleaning Chart at the same 45 degree angle. Open oven door completely (horizontal with a new 40 watt appliance bulb. 3. To clean oven door, follow the instructions provided in ). 4. General Care & ...
... on the light. Some models have a switch located on both screws from moving. Turn electrical power off hinges at the main source or unplug the range. 2. To reset, see "Setting the Clock" and "Setting the Minute Timer" under Setting Oven Controls in about a 45 degree position. 5. See Fig. 1). ... finish on the side of door on again at the main source (or plug the range back in the Cleaning Chart at the same 45 degree angle. Open oven door completely (horizontal with a new 40 watt appliance bulb. 3. To clean oven door, follow the instructions provided in ). 4. General Care & ...
Use and Care Manual
Page 14
.... Poor baking results - Allow the oven to preheat to the broil element. If you call for "Entire appliance does not operate" listed below. (2) Be sure the Gas Regulator Valve is not complete. Place a level on Setting Surface Controls. Dry the burners thoroughly following list. ...only). Make sure the proper oven rack position is not set properly. It may be unavoidable due to for additional cleaning instructions. (3) Range power cord is plugged correctly into the outlet. (4) Electrical power outage (electric ignition models only). With the burner OFF, use a ...
.... Poor baking results - Allow the oven to preheat to the broil element. If you call for "Entire appliance does not operate" listed below. (2) Be sure the Gas Regulator Valve is not complete. Place a level on Setting Surface Controls. Dry the burners thoroughly following list. ...only). Make sure the proper oven rack position is not set properly. It may be unavoidable due to for additional cleaning instructions. (3) Range power cord is plugged correctly into the outlet. (4) Electrical power outage (electric ignition models only). With the burner OFF, use a ...
Use and Care Manual
Page 16
...persons other than authorized service companies; Exclusions This warranty does not cover the following: 1. USA 1.800.944.9044 Electrolux Major Appliances North America P.O. ELECTROLUX SHALL NOT BE LIABLE FOR CONSEQUENTIAL OR INCIDENTAL DAMAGES SUCH AS PROPERTY DAMAGE AND INCIDENTAL EXPENSES RESULTING FROM...BREACH OF THIS WRITTEN LIMITED WARRANTY OR ANY IMPLIED WARRANTY. THIS WRITTEN WARRANTY GIVES YOU SPECIFIC LEGAL RIGHTS. Box 212378 Augusta, GA 30907 Canada 1.800.668.4606 Electrolux Canada Corp. 5855 Terry Fox Way Mississauga, Ontario, Canada L5V 3E4 Product that have ...
...persons other than authorized service companies; Exclusions This warranty does not cover the following: 1. USA 1.800.944.9044 Electrolux Major Appliances North America P.O. ELECTROLUX SHALL NOT BE LIABLE FOR CONSEQUENTIAL OR INCIDENTAL DAMAGES SUCH AS PROPERTY DAMAGE AND INCIDENTAL EXPENSES RESULTING FROM...BREACH OF THIS WRITTEN LIMITED WARRANTY OR ANY IMPLIED WARRANTY. THIS WRITTEN WARRANTY GIVES YOU SPECIFIC LEGAL RIGHTS. Box 212378 Augusta, GA 30907 Canada 1.800.668.4606 Electrolux Canada Corp. 5855 Terry Fox Way Mississauga, Ontario, Canada L5V 3E4 Product that have ...