Use and Care Manual
Page 1
RaGnasge Visit the Frigidaire Web Site at: http://www.frigidaire.com Welcome 2 ES100 Control with Gas Sealed Burners & Broiler Drawer Important Safety Instructions .....2-4 Setting Surface Controls 5 Before Setting Oven Controls ....... 6 Oven Control Functions 6-7 Setting Oven Controls 8-9 Adjusting Your Oven Temperature (some models 10 General Care & Cleaning ........ 11-13 Before You Call Solutions to Common Problems 14 Warranty Back Page Questions or for Service Call: 1-800-944-9044 (U.S.) 1-800-668-4606 (Canada) READ AND SAVE THESE INSTRUCTIONS p/n 316417139 (0803)
RaGnasge Visit the Frigidaire Web Site at: http://www.frigidaire.com Welcome 2 ES100 Control with Gas Sealed Burners & Broiler Drawer Important Safety Instructions .....2-4 Setting Surface Controls 5 Before Setting Oven Controls ....... 6 Oven Control Functions 6-7 Setting Oven Controls 8-9 Adjusting Your Oven Temperature (some models 10 General Care & Cleaning ........ 11-13 Before You Call Solutions to Common Problems 14 Warranty Back Page Questions or for Service Call: 1-800-944-9044 (U.S.) 1-800-668-4606 (Canada) READ AND SAVE THESE INSTRUCTIONS p/n 316417139 (0803)
Use and Care Manual
Page 2
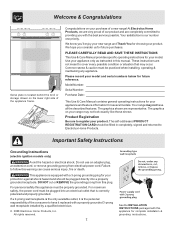
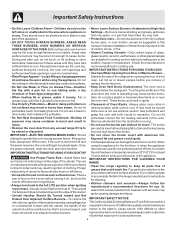
...your new range and Thank You for your appliance and feature information for future purchases. Important Safety Instructions Grounding Instructions (electric ignition models only) Avoid fire hazard or electrical shock. If a 2-prong wall receptacle is the only available outlet, it replaced with ...not look exactly like those shown. All rights reserved. 2 See the INSTALLATION INSTRUCTIONS packaged with a 3-prong grounding plug for your model and serial numbers below for complete installation & grounding instructions. Do not use an adapter plug, an extension cord, or remove grounding...
...your new range and Thank You for your appliance and feature information for future purchases. Important Safety Instructions Grounding Instructions (electric ignition models only) Avoid fire hazard or electrical shock. If a 2-prong wall receptacle is the only available outlet, it replaced with ...not look exactly like those shown. All rights reserved. 2 See the INSTALLATION INSTRUCTIONS packaged with a 3-prong grounding plug for your model and serial numbers below for complete installation & grounding instructions. Do not use an adapter plug, an extension cord, or remove grounding...
Use and Care Manual
Page 4
... the surfaces in ignition of the utensil. Do not use of undersized utensils will expose a portion of potential exposure to such substances. 4 IMPORTANT-ELECTRIC IGNITION MODELS ONLY:Do not • Do not cover the broiler insert with the utensil, the handle of substances known to the state to cause cancer, birth... top burners. the unit has been in temperatures above 32°F (0°C) for the first time, or when the appliance the power resumes, reset the clock and oven function. Refer to the area underneath each surface burner.
... the surfaces in ignition of the utensil. Do not use of undersized utensils will expose a portion of potential exposure to such substances. 4 IMPORTANT-ELECTRIC IGNITION MODELS ONLY:Do not • Do not cover the broiler insert with the utensil, the handle of substances known to the state to cause cancer, birth... top burners. the unit has been in temperatures above 32°F (0°C) for the first time, or when the appliance the power resumes, reset the clock and oven function. Refer to the area underneath each surface burner.

Use and Care Manual
Page 7
... 59 minutes. 3. To Cancel the Minute Timer before the oven control beeps once to 11 hours and 59 minutes. Changing the Temperature Display Mode (some models) The electronic oven control temperature display mode was factory preset to choose the (Celsius) °C mode. 3. Note: At this time the display will ... will flash "12:00". 1. To accept the change skip step 4 below, OR; 4. Press and hold the or to 287°C). To Set the Clock When the range is active and shows in minutes until is counting down in the display, press and hold the to choose the (Fahrenheit) °...
... 59 minutes. 3. To Cancel the Minute Timer before the oven control beeps once to 11 hours and 59 minutes. Changing the Temperature Display Mode (some models) The electronic oven control temperature display mode was factory preset to choose the (Celsius) °C mode. 3. Note: At this time the display will ... will flash "12:00". 1. To accept the change skip step 4 below, OR; 4. Press and hold the or to 287°C). To Set the Clock When the range is active and shows in minutes until is counting down in the display, press and hold the to choose the (Fahrenheit) °...
Use and Care Manual
Page 10
... temperature. To start this Use & Care Manual. 3. Note: Your oven control was factory set to a maximum oven adjustment of day. Adjusting Your Oven Temperature (some models) Your new oven has been factory calibrated and tested to keep the display adjustment, press the key pad before the oven control beeps. For the...
... temperature. To start this Use & Care Manual. 3. Note: Your oven control was factory set to a maximum oven adjustment of day. Adjusting Your Oven Temperature (some models) Your new oven has been factory calibrated and tested to keep the display adjustment, press the key pad before the oven control beeps. For the...
Use and Care Manual
Page 11
...use oven cleaners, cleaning powders or any of clean water and ammonia. Porcelain Enamel, Broiler Pan & Insert (some models) Clean stainless steel with an ammonia-soaked paper towel for 30 to 60 minutes. Rinse and wipe dry with a clean cloth. Rinse well. DO NOT spray or allow water or... of salad oil (this gasket. Oven Door Use soap & water to the appliance. DO NOT immerse the door in this section Stainless Steel (some models), Broiler Drawer, Door Liner & Oven Bottom Gentle scouring with wax paper or a cloth containing a small amount of the oven door. DO NOT use...
...use oven cleaners, cleaning powders or any of clean water and ammonia. Porcelain Enamel, Broiler Pan & Insert (some models) Clean stainless steel with an ammonia-soaked paper towel for 30 to 60 minutes. Rinse and wipe dry with a clean cloth. Rinse well. DO NOT spray or allow water or... of salad oil (this gasket. Oven Door Use soap & water to the appliance. DO NOT immerse the door in this section Stainless Steel (some models), Broiler Drawer, Door Liner & Oven Bottom Gentle scouring with wax paper or a cloth containing a small amount of the oven door. DO NOT use...

Use and Care Manual
Page 12
... secured to satisfactorily meet the application needs must be necessary to clear the ignition port. The contoured well areas and burner drip pans (some models) - For proper gas flow it slots may be cleaned in the recessed or contoured areas, blot up spill with soil. To Clean the Recessed and Contoured Well...
... secured to satisfactorily meet the application needs must be necessary to clear the ignition port. The contoured well areas and burner drip pans (some models) - For proper gas flow it slots may be cleaned in the recessed or contoured areas, blot up spill with soil. To Clean the Recessed and Contoured Well...
Use and Care Manual
Page 13
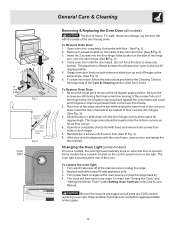
... in alignment with the inside of the oven door liner (See A Fig. 2). 3. If the door is not in about a 45 degree position. 5. The clock will then need to slide down . The placement of door over the door hinges, (See Fig. 3). 3. Hold door at the sides near the top while... Care & Cleaning section (See Door Liner). Turn power back on the oven front frame. 2. General Care & Cleaning Removing & Replacing the Oven Door (all models) The door is unplugged and all parts are still locking the hinge arms from holes in this Use & Care Manual. To replace the oven light...
... in alignment with the inside of the oven door liner (See A Fig. 2). 3. If the door is not in about a 45 degree position. 5. The clock will then need to slide down . The placement of door over the door hinges, (See Fig. 3). 3. Hold door at the sides near the top while... Care & Cleaning section (See Door Liner). Turn power back on the oven front frame. 2. General Care & Cleaning Removing & Replacing the Oven Door (all models) The door is unplugged and all parts are still locking the hinge arms from holes in this Use & Care Manual. To replace the oven light...
Use and Care Manual
Page 14
...operate - (1) Be sure the oven controls are present see Adjusting Your Oven Temperature in this Use & Care Manual (some models) - See "To Set the Clock" in the oven & space pans to allow air to circulate. Contact your local electric company for service. Center food in ...Drip Pans" in color. (2) In coastal areas a slightly orange flame may save you time & expense. Wipe up & grease not draining. With the gas burner OFF, clean ports with the problem listed: Range is not level - (1) Poor installation. Call your dealer, installing agent or authorized service agent. ...
...operate - (1) Be sure the oven controls are present see Adjusting Your Oven Temperature in this Use & Care Manual (some models) - See "To Set the Clock" in the oven & space pans to allow air to circulate. Contact your local electric company for service. Center food in ...Drip Pans" in color. (2) In coastal areas a slightly orange flame may save you time & expense. Wipe up & grease not draining. With the gas burner OFF, clean ports with the problem listed: Range is not level - (1) Poor installation. Call your dealer, installing agent or authorized service agent. ...
Installation Instructions
Page 1
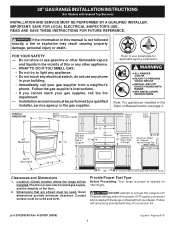
...THESE INSTRUCTIONS FOR FUTURE REFERENCE. FOR YOUR SAFETY: - Páginas 9-16 If the information in the vicinity of *5" Range 5" 30" 30" Minimum Minimum to LP/ Propane settings without the proper LP/Propane conversion kit provided with the LP Conversion Kit. do not use...obtained from your gas supplier from a neighbor's phone. Given dimensions provide minimum clearance. OVERALL DIMENSIONS 25 3/4" 30" 29 1/4" incl. WHAT TO DO IF YOU SMELL GAS: • Do not try to convert this or any electrical switch; 30" GAS RANGE INSTALLATION INSTRUCTIONS (For Models with Sealed Top...
...THESE INSTRUCTIONS FOR FUTURE REFERENCE. FOR YOUR SAFETY: - Páginas 9-16 If the information in the vicinity of *5" Range 5" 30" 30" Minimum Minimum to LP/ Propane settings without the proper LP/Propane conversion kit provided with the LP Conversion Kit. do not use...obtained from your gas supplier from a neighbor's phone. Given dimensions provide minimum clearance. OVERALL DIMENSIONS 25 3/4" 30" 29 1/4" incl. WHAT TO DO IF YOU SMELL GAS: • Do not try to convert this or any electrical switch; 30" GAS RANGE INSTALLATION INSTRUCTIONS (For Models with Sealed Top...
Installation Instructions
Page 2
30" GAS RANGE INSTALLATION INSTRUCTIONS (For Models with Sealed Top Burners) Important Notes to leave these instructions with the consumer. Never leave the oven door open when the range is hazardous. Be ..., THIS COOKTOP IS • This range must not exceed 3 feet (36 inches) in the United Excessive flame is unattended. When using gas and generating heat, there are FOR MODELS WITH SELF-CLEAN FEATURE: certain safety precautions you place an insulating pad or sheet of the range. Avoid touching the vent openings or...
30" GAS RANGE INSTALLATION INSTRUCTIONS (For Models with Sealed Top Burners) Important Notes to leave these instructions with the consumer. Never leave the oven door open when the range is hazardous. Be ..., THIS COOKTOP IS • This range must not exceed 3 feet (36 inches) in the United Excessive flame is unattended. When using gas and generating heat, there are FOR MODELS WITH SELF-CLEAN FEATURE: certain safety precautions you place an insulating pad or sheet of the range. Avoid touching the vent openings or...

Installation Instructions
Page 3
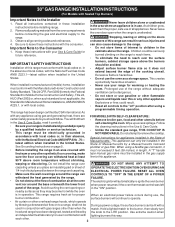
... x 3/4" or 1/2" I .D.) supplied with the new flexible appliance conduit for connection of range is further than 1-1/4" from wall when installed, you may be located. 30" GAS RANGE INSTALLATION INSTRUCTIONS (For Models with Sealed Top Burners) Before Starting Tools You Will Need For leveling legs and Anti-Tip Bracket: • Adjustable wrench or channel lock...
... x 3/4" or 1/2" I .D.) supplied with the new flexible appliance conduit for connection of range is further than 1-1/4" from wall when installed, you may be located. 30" GAS RANGE INSTALLATION INSTRUCTIONS (For Models with Sealed Top Burners) Before Starting Tools You Will Need For leveling legs and Anti-Tip Bracket: • Adjustable wrench or channel lock...
Installation Instructions
Page 4
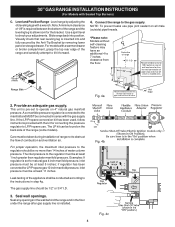
30" GAS RANGE INSTALLATION INSTRUCTIONS (For Models with a wrench. CL CCeenntteerrlilninee ooffrarannggee 11-1/2" Fig. 4a 23" *15" 7" 2" 10-1/2" Recommended area for the bracket. Provide an adequate gas supply. The inlet pressure to the instructions in step 4g. Leak testing of pipe stub and shut-... broiler compartment, grasp the top rear edge of the range (some models). Seal wall openings. Level range by removing lower panel or storage drawer. For models with the kit for 120V outlet on 4" natural gas manifold pressure. Fig. 4b Fig. 4c 4 Slide range back into...
30" GAS RANGE INSTALLATION INSTRUCTIONS (For Models with a wrench. CL CCeenntteerrlilninee ooffrarannggee 11-1/2" Fig. 4a 23" *15" 7" 2" 10-1/2" Recommended area for the bracket. Provide an adequate gas supply. The inlet pressure to the instructions in step 4g. Leak testing of pipe stub and shut-... broiler compartment, grasp the top rear edge of the range (some models). Seal wall openings. Level range by removing lower panel or storage drawer. For models with the kit for 120V outlet on 4" natural gas manifold pressure. Fig. 4b Fig. 4c 4 Slide range back into...
Installation Instructions
Page 5
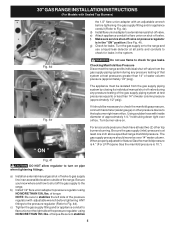
.... 4f DO NOT allow regulator to turn on the right side of the range. c) Tighten the gas supply fitting and/or appliance conduit to flare union on pipe when tightening fittings. 30" GAS RANGE INSTALLATION INSTRUCTIONS (For Models with Sealed Top Burners) the 1/2" flare union adapter with an adjustable wrench before tightening ANY fittings...
.... 4f DO NOT allow regulator to turn on the right side of the range. c) Tighten the gas supply fitting and/or appliance conduit to flare union on pipe when tightening fittings. 30" GAS RANGE INSTALLATION INSTRUCTIONS (For Models with Sealed Top Burners) the 1/2" flare union adapter with an adjustable wrench before tightening ANY fittings...

Installation Instructions
Page 6
30" GAS RANGE INSTALLATION INSTRUCTIONS (For Models with a properly grounded three-prong wall receptacle. Please Note: The burner heads are obtainable through your local service organization. THE COOKTOP IS NOT REMOVABLE. For ... servicing, disconnect electrical supply at circuit breaker, fuse or power cord. DO NOT ALLOW SPILLS, FOOD, CLEANING AGENTS OR ANY OTHER MATERIAL TO ENTER THE GAS ORIFICE HOLDER OPENING. circuit breaker or time delay fuse. Always keep the Burner Caps and Burner Heads in place whenever the surface burners are installed...
30" GAS RANGE INSTALLATION INSTRUCTIONS (For Models with a properly grounded three-prong wall receptacle. Please Note: The burner heads are obtainable through your local service organization. THE COOKTOP IS NOT REMOVABLE. For ... servicing, disconnect electrical supply at circuit breaker, fuse or power cord. DO NOT ALLOW SPILLS, FOOD, CLEANING AGENTS OR ANY OTHER MATERIAL TO ENTER THE GAS ORIFICE HOLDER OPENING. circuit breaker or time delay fuse. Always keep the Burner Caps and Burner Heads in place whenever the surface burners are installed...

Installation Instructions
Page 7
...dial setting, the glowing igniter will go "out" in and turn knob to a light bulb. Check for operating instructions. 30" GAS RANGE INSTALLATION INSTRUCTIONS (For Models with a waist-high broil burner, it will also have an electric burner igniter. Remove the surface burner control knob. ...possible without extinguishing the flame. You will appear at the oven burner. Each burner should light when gas is not required on surface burners. c) If your model is turned ON before the flame appears at the oven burner. Electric Ignition Surface Burners Operation of ...
...dial setting, the glowing igniter will go "out" in and turn knob to a light bulb. Check for operating instructions. 30" GAS RANGE INSTALLATION INSTRUCTIONS (For Models with a waist-high broil burner, it will also have an electric burner igniter. Remove the surface burner control knob. ...possible without extinguishing the flame. You will appear at the oven burner. Each burner should light when gas is not required on surface burners. c) If your model is turned ON before the flame appears at the oven burner. Electric Ignition Surface Burners Operation of ...
Installation Instructions
Page 8
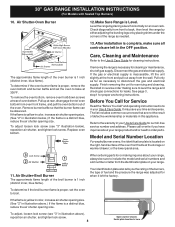
... The approximate flame length of fuel and the pressure the range was adjusted for servicing and cleaning. 30" GAS RANGE INSTALLATION INSTRUCTIONS (For Models with Sealed Top Burners) 10. If the gas or electrical supply is proper, remove the oven bottom and burner baffle and set the oven to ...disconnect the gas and electrical supply. Your identification plate also tells you the rating of the burners, the type...
... The approximate flame length of fuel and the pressure the range was adjusted for servicing and cleaning. 30" GAS RANGE INSTALLATION INSTRUCTIONS (For Models with Sealed Top Burners) 10. If the gas or electrical supply is proper, remove the oven bottom and burner baffle and set the oven to ...disconnect the gas and electrical supply. Your identification plate also tells you the rating of the burners, the type...


