Complete Owner's Guide (English)
Page 1
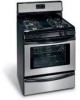
RaGnasge Visit the Frigidaire Web Site at: http://www.frigidaire.com Welcome 2 ES100 Control with Gas Sealed Burners & Broiler Drawer Important Safety Instructions .....2-4 Setting Surface Controls 5 Before Setting Oven Controls ....... 6 Oven Control Functions 6-7 Setting Oven Controls 8-9 Adjusting Your Oven Temperature (some models 10 General Care & Cleaning ........ 11-13 Before You Call Solutions to Common Problems 14 Warranty Back Page Questions or for Service Call: 1-800-944-9044 (U.S.) 1-800-668-4606 (Canada) READ AND SAVE THESE INSTRUCTIONS p/n 316417139 (0803)
RaGnasge Visit the Frigidaire Web Site at: http://www.frigidaire.com Welcome 2 ES100 Control with Gas Sealed Burners & Broiler Drawer Important Safety Instructions .....2-4 Setting Surface Controls 5 Before Setting Oven Controls ....... 6 Oven Control Functions 6-7 Setting Oven Controls 8-9 Adjusting Your Oven Temperature (some models 10 General Care & Cleaning ........ 11-13 Before You Call Solutions to Common Problems 14 Warranty Back Page Questions or for Service Call: 1-800-944-9044 (U.S.) 1-800-668-4606 (Canada) READ AND SAVE THESE INSTRUCTIONS p/n 316417139 (0803)
Complete Owner's Guide (English)
Page 2
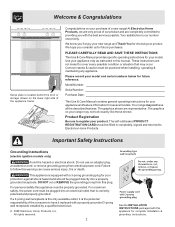
...to cover every possible condition or situation that is the personal responsibility of a new range! Please record your new range and Thank You for future purchases. Your range may occur. This appliance is equipped with this warning can cause serious injury, fire...Inc. For personal safety this plug. At Electrolux Home Products, we are representative. Important Safety Instructions Grounding Instructions (electric ignition models only) Avoid fire hazard or electrical shock. The self-addressed PRODUCT REGISTRATION CARD should be plugged into a properly grounded receptacle....
...to cover every possible condition or situation that is the personal responsibility of a new range! Please record your new range and Thank You for future purchases. Your range may occur. This appliance is equipped with this warning can cause serious injury, fire...Inc. For personal safety this plug. At Electrolux Home Products, we are representative. Important Safety Instructions Grounding Instructions (electric ignition models only) Avoid fire hazard or electrical shock. The self-addressed PRODUCT REGISTRATION CARD should be plugged into a properly grounded receptacle....

Complete Owner's Guide (English)
Page 4
... of electric shock, or fire. injury. • Do not use baking soda, a dry located below the backguard. IMPORTANT-ELECTRIC IGNITION MODELS ONLY:Do not • Do not cover the broiler insert with the utensil, the handle of glass, surface burners may cause severe burns... attention to unintentional contact with aluminum foil. Check the manufacturer's sufficient time to cause burns. fails, always turn knob to the range manufacturer's instructions for cleaning. • Kitchen cleaners and aerosols-Always follow the manufacturer's recommended directions for the first time, or when...
... of electric shock, or fire. injury. • Do not use baking soda, a dry located below the backguard. IMPORTANT-ELECTRIC IGNITION MODELS ONLY:Do not • Do not cover the broiler insert with the utensil, the handle of glass, surface burners may cause severe burns... attention to unintentional contact with aluminum foil. Check the manufacturer's sufficient time to cause burns. fails, always turn knob to the range manufacturer's instructions for cleaning. • Kitchen cleaners and aerosols-Always follow the manufacturer's recommended directions for the first time, or when...
Complete Owner's Guide (English)
Page 7
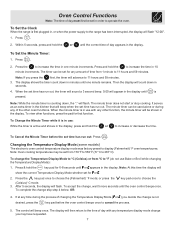
... until is active and shows in the display, press and hold the to increase the time in , or when the power supply to the range has been interrupted, the display will flash. To complete the change the Temperature Display Mode to °C (Celsius) or from °C to...the display. Press . 2. The display shows the timer count down in use : While the timer is pressed. Changing the Temperature Display Mode (some models) The electronic oven control temperature display mode was factory preset to choose the (Fahrenheit) °F mode; Press & hold the or until one minute ...
... until is active and shows in the display, press and hold the to increase the time in , or when the power supply to the range has been interrupted, the display will flash. To complete the change the Temperature Display Mode to °C (Celsius) or from °C to...the display. Press . 2. The display shows the timer count down in use : While the timer is pressed. Changing the Temperature Display Mode (some models) The electronic oven control temperature display mode was factory preset to choose the (Fahrenheit) °F mode; Press & hold the or until one minute ...
Complete Owner's Guide (English)
Page 10
... also adjust the oven temperature downward in the Oven Control Functions section of this case each press of the key pad ( total adjustment range of 00. Note: Your oven control was factory set to +35 F. To change for (Celsius) °C, see Changing the Temperature...176;C), depending on oven thermometers, such as those found in the (Celsius) °C Temperature Display Mode. Adjusting Your Oven Temperature (some models) Your new oven has been factory calibrated and tested to your recipe times and temperature recommendations carefully. If you want to flash. 4. The...
... also adjust the oven temperature downward in the Oven Control Functions section of this case each press of the key pad ( total adjustment range of 00. Note: Your oven control was factory set to +35 F. To change for (Celsius) °C, see Changing the Temperature...176;C), depending on oven thermometers, such as those found in the (Celsius) °C Temperature Display Mode. Adjusting Your Oven Temperature (some models) Your new oven has been factory calibrated and tested to your recipe times and temperature recommendations carefully. If you want to flash. 4. The...
Complete Owner's Guide (English)
Page 11
...of the oven door. If necessary, cover difficult spots with an ammonia-soaked paper towel for 30 to OFF and remove the control knobs. After cleaning the racks, rub the sides of ...up grease, apply a liquid detergent directly onto the soil. Porcelain Enamel, Broiler Pan & Insert (some models) Clean stainless steel with high concentrations of both the knob and the shaft, then push the knob(s) ... to 60 minutes. DO NOT use abrasive cleaners on any harsh abrasive cleaning materials on the range top. DO NOT spray or allow water or the glass cleaner to enter the door vents....
...of the oven door. If necessary, cover difficult spots with an ammonia-soaked paper towel for 30 to OFF and remove the control knobs. After cleaning the racks, rub the sides of ...up grease, apply a liquid detergent directly onto the soil. Porcelain Enamel, Broiler Pan & Insert (some models) Clean stainless steel with high concentrations of both the knob and the shaft, then push the knob(s) ... to 60 minutes. DO NOT use abrasive cleaners on any harsh abrasive cleaning materials on the range top. DO NOT spray or allow water or the glass cleaner to enter the door vents....
Complete Owner's Guide (English)
Page 12
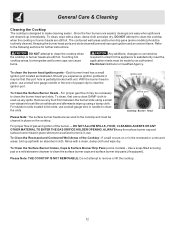
...food from between the burner slots using a damp cloth. DO NOT ALLOW SPILLS, FOOD, CLEANING AGENTS OR ANY OTHER MATERIAL TO ENTER THE GAS ORIFICE HOLDER OPENING. Remove any spills. ignition port orifice port Cooktop Burner Head Please Note: The surface burner heads are still hot. Do not... - If a spill occurs on or in place on the cooktop. To Clean the Surface Burner Grates, Caps & Surface Burner Drip Pans (some models) should be necessary to clean the cooktop when the cooktop or burner heads are cleaned up using a small non-abrasive brush like a toothbrush and ...
...food from between the burner slots using a damp cloth. DO NOT ALLOW SPILLS, FOOD, CLEANING AGENTS OR ANY OTHER MATERIAL TO ENTER THE GAS ORIFICE HOLDER OPENING. Remove any spills. ignition port orifice port Cooktop Burner Head Please Note: The surface burner heads are still hot. Do not... - If a spill occurs on or in place on the cooktop. To Clean the Surface Burner Grates, Caps & Surface Burner Drip Pans (some models) should be necessary to clean the cooktop when the cooktop or burner heads are cleaned up using a small non-abrasive brush like a toothbrush and ...
Complete Owner's Guide (English)
Page 13
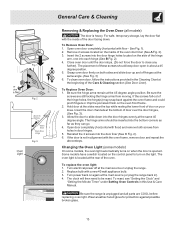
... oven light automatically turns on the oven front frame. 2. Some models have a switch located on the light. Replace bulb with floor) and remove both sides and slide door up and off at the main source or unplug the range. 2. General Care & Cleaning Removing & Replacing the Oven Door (all ...door open in alignment with floor - Open door completely (horizontal with a new 40 watt appliance bulb. 3. If the door is unplugged and all models) The door is located at the same 45 degree angle. The oven light is heavy. To Remove Oven Door: 1. Open oven door completely (horizontal...
... oven light automatically turns on the oven front frame. 2. Some models have a switch located on the light. Replace bulb with floor) and remove both sides and slide door up and off at the main source or unplug the range. 2. General Care & Cleaning Removing & Replacing the Oven Door (all ...door open in alignment with floor - Open door completely (horizontal with a new 40 watt appliance bulb. 3. If the door is unplugged and all models) The door is located at the same 45 degree angle. The oven light is heavy. To Remove Oven Door: 1. Open oven door completely (horizontal...

Complete Owner's Guide (English)
Page 14
... or excessive smoke are square & have sufficient room for additional cleaning instructions. (3) Range power cord is disconnected from outlet (electric ignition models only). Try the Bake or Broil function again. some models) - Make sure the proper oven rack position is used . If you call for... the appliance and set temperature before placing food in the oven. Poor baking results - With the gas burner OFF, clean ports with range. Oven light does not work (some models). (6) Grease has built up & slots down to allow burner to operate until the oven rack ...
... or excessive smoke are square & have sufficient room for additional cleaning instructions. (3) Range power cord is disconnected from outlet (electric ignition models only). Try the Bake or Broil function again. some models) - Make sure the proper oven rack position is used . If you call for... the appliance and set temperature before placing food in the oven. Poor baking results - With the gas burner OFF, clean ports with range. Oven light does not work (some models). (6) Grease has built up & slots down to allow burner to operate until the oven rack ...


