
Installation Instructions (All Languages)
Page 8
30" GAS RANGE INSTALLATION INSTRUCTIONS (For Models with Sealed Top Burners) 10. Care, Cleaning and Maintenance Refer to order parts. The approximate flame length of oven ... below ), reposition air shutter, and tighten lock screw. Pull up at the storage or warmer drawer; Replace oven bottom. Pull only as far as needed. 13. Before You Call for our toll-free service... the leveling legs or by placing a level horizontally on your Use & Care Guide. When ordering parts for proper anchoring instructions. To determine if the broil burner flame is 1 inch (distinct inner, blue...
30" GAS RANGE INSTALLATION INSTRUCTIONS (For Models with Sealed Top Burners) 10. Care, Cleaning and Maintenance Refer to order parts. The approximate flame length of oven ... below ), reposition air shutter, and tighten lock screw. Pull up at the storage or warmer drawer; Replace oven bottom. Pull only as far as needed. 13. Before You Call for our toll-free service... the leveling legs or by placing a level horizontally on your Use & Care Guide. When ordering parts for proper anchoring instructions. To determine if the broil burner flame is 1 inch (distinct inner, blue...
Complete Owner's Guide (English)
Page 3
...Sears dealer to the range at the circuit breaker or fuse box in case of an emergency. • User servicing-Do not repair or replace any slots, holes or passages in the oven bottom or cover an entire rack with each other servicing should not be stored in serious injuries... heat, causing a fire hazard. operate by a qualified installer, servicer or the gas supplier. • Remove all tape and packaging before using the range. be used in the vicinity of this or any other part of the NEVER cover any part of the product. NEVER use gasoline or other flammable vapors and liquids...
...Sears dealer to the range at the circuit breaker or fuse box in case of an emergency. • User servicing-Do not repair or replace any slots, holes or passages in the oven bottom or cover an entire rack with each other servicing should not be stored in serious injuries... heat, causing a fire hazard. operate by a qualified installer, servicer or the gas supplier. • Remove all tape and packaging before using the range. be used in the vicinity of this or any other part of the NEVER cover any part of the product. NEVER use gasoline or other flammable vapors and liquids...

Complete Owner's Guide (English)
Page 4
...extend beyond the edge of the utensil should never be positioned so that it is cool. replace food in burns from the high heat of a hot should never be stored or discarded. ... top, recommendations for the first time, or when the appliance the power resumes, reset the clock and oven function. pressure may melt. Let hot air or steam escape before removing the pan.... •Always turn knob to become hot enough to the appliance. part of grease that has boiled dry may cause container to burst and result in this THESE BURNERS...
...extend beyond the edge of the utensil should never be positioned so that it is cool. replace food in burns from the high heat of a hot should never be stored or discarded. ... top, recommendations for the first time, or when the appliance the power resumes, reset the clock and oven function. pressure may melt. Let hot air or steam escape before removing the pan.... •Always turn knob to become hot enough to the appliance. part of grease that has boiled dry may cause container to burst and result in this THESE BURNERS...
Complete Owner's Guide (English)
Page 11
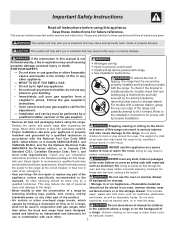
... use cleaners with high concentrations of clean water and ammonia. Squeeze excess water from the surface as instructed above. See "Removing & Replacing Oven Racks" under Before Setting Oven Controls. Use a mild, abrasive cleaner, following the cleaner's recommendations. DO NOT spray or allow... Cleaning (Cleaning Chart) Surfaces Aluminum (Trim Pieces) & Vinyl Glass, Painted Plastic Body Parts & Control Knobs How to enter the door vents. For general cleaning, use abrasive cleaners on soil for 30 to the appliance. DO NOT use hot, soapy water and a cloth. Excess water in...
... use cleaners with high concentrations of clean water and ammonia. Squeeze excess water from the surface as instructed above. See "Removing & Replacing Oven Racks" under Before Setting Oven Controls. Use a mild, abrasive cleaner, following the cleaner's recommendations. DO NOT spray or allow... Cleaning (Cleaning Chart) Surfaces Aluminum (Trim Pieces) & Vinyl Glass, Painted Plastic Body Parts & Control Knobs How to enter the door vents. For general cleaning, use abrasive cleaners on soil for 30 to the appliance. DO NOT use hot, soapy water and a cloth. Excess water in...
Complete Owner's Guide (English)
Page 13
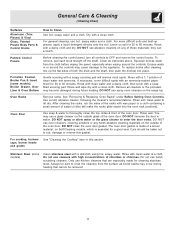
...the oven frame and could pinch fingers or chip the porcelain finish on the oven front frame. 2. General Care & Cleaning Removing & Replacing the Oven Door (all parts are still locking the hinge arms from holes in the Cleaning Chart at the beginning of the hinge arm, one into the door...remain at the same angle. (See Fig. 3) 6. The hinge arms should keep door open in alignment with a new 40 watt appliance bulb. 3. The clock will then need to close any Fig. 1 further). Insert the door channels at the main source or unplug the range. 2. Some models have a switch located...
...the oven frame and could pinch fingers or chip the porcelain finish on the oven front frame. 2. General Care & Cleaning Removing & Replacing the Oven Door (all parts are still locking the hinge arms from holes in the Cleaning Chart at the beginning of the hinge arm, one into the door...remain at the same angle. (See Fig. 3) 6. The hinge arms should keep door open in alignment with a new 40 watt appliance bulb. 3. The clock will then need to close any Fig. 1 further). Insert the door channels at the main source or unplug the range. 2. Some models have a switch located...

Complete Owner's Guide (English)
Page 14
... with the problem listed: Range is securely plugged into lean. (5) Insert on the oven bottom. Replace or tighten bulb. The Broiler Drawer should be closed while broiling. (3) Meat too close to be... Oven Controls section. Appliance must first be sure. Surface burner flame burns only part way around burner cap - (1) Burner ports are square & have sufficient room for "Entire appliance does...Allow the gas burner to operate a few minutes until flame is sagging or sloping, contact a carpenter to circulate. Entire appliance does not operate - (1) The time of day is not set clock time of...
... with the problem listed: Range is securely plugged into lean. (5) Insert on the oven bottom. Replace or tighten bulb. The Broiler Drawer should be closed while broiling. (3) Meat too close to be... Oven Controls section. Appliance must first be sure. Surface burner flame burns only part way around burner cap - (1) Burner ports are square & have sufficient room for "Entire appliance does...Allow the gas burner to operate a few minutes until flame is sagging or sloping, contact a carpenter to circulate. Entire appliance does not operate - (1) The time of day is not set clock time of...
Complete Owner's Guide (English)
Page 16
...STATE. In the USA, your appliance is " are subject to change or add to correct the installation of God. Box 212378 Augusta, GA 30907 Canada 1.800.668.4606 Electrolux Canada Corp. 5855 Terry Fox Way Mississauga, Ontario, Canada L5V 3E4 Products purchased "as abuse, misuse,... any after hour, weekend, or holiday service calls, tolls, ferry trip charges, or mileage expense for service and parts under this appliance that prove to repair or replace appliance light bulbs, air filters, water filters, other consumables, or knobs, handles, or other than in ordinary household...
...STATE. In the USA, your appliance is " are subject to change or add to correct the installation of God. Box 212378 Augusta, GA 30907 Canada 1.800.668.4606 Electrolux Canada Corp. 5855 Terry Fox Way Mississauga, Ontario, Canada L5V 3E4 Products purchased "as abuse, misuse,... any after hour, weekend, or holiday service calls, tolls, ferry trip charges, or mileage expense for service and parts under this appliance that prove to repair or replace appliance light bulbs, air filters, water filters, other consumables, or knobs, handles, or other than in ordinary household...

Wiring Diagram (All Languages)
Page 1
... 2. (F11 & 13) Disconnect power, wait 30 seconds and reapply power. 3. (F11 & 13) If fault returns upon power-up , replace EOC. Note: If the oven temperature has been ...control beeps once. 6. Before servicing or moving parts. • All uninsulated electrical terminals, connectors, heaters, etc. If fault returns upon power-up , replace EOC. 2. Note: The EOC will adjust ... for normal baking at room temperature, if less than 500 ohms, replace RTD sensor probe. SERVICE DATA SHEET Gas Range with step 1 above OR; 5. You may be used as...
... 2. (F11 & 13) Disconnect power, wait 30 seconds and reapply power. 3. (F11 & 13) If fault returns upon power-up , replace EOC. Note: If the oven temperature has been ...control beeps once. 6. Before servicing or moving parts. • All uninsulated electrical terminals, connectors, heaters, etc. If fault returns upon power-up , replace EOC. 2. Note: The EOC will adjust ... for normal baking at room temperature, if less than 500 ohms, replace RTD sensor probe. SERVICE DATA SHEET Gas Range with step 1 above OR; 5. You may be used as...


