
Installation Instructions (All Languages)
Page 2
... combustion air at least line to reach over DO NOT MAKE ANY ATTEMPT TO carpeting unless you should be installed in the 1. 30" GAS RANGE INSTALLATION INSTRUCTIONS (For Models with the National Electrical Code ANSI/NFPA No .70- Read all packing material from the oven compartments... damage to the range. Keep these instructions with must be dangerous. cabinets above room temperature without adequate Safety Standard, Title 24 CFR, Part 3280 [formerly the Federal ventilation can be installed in the Use & Care Guide, read it does not the absence of OPERATE THE...
... combustion air at least line to reach over DO NOT MAKE ANY ATTEMPT TO carpeting unless you should be installed in the 1. 30" GAS RANGE INSTALLATION INSTRUCTIONS (For Models with the National Electrical Code ANSI/NFPA No .70- Read all packing material from the oven compartments... damage to the range. Keep these instructions with must be dangerous. cabinets above room temperature without adequate Safety Standard, Title 24 CFR, Part 3280 [formerly the Federal ventilation can be installed in the Use & Care Guide, read it does not the absence of OPERATE THE...

Installation Instructions (All Languages)
Page 8
... in color, increase air shutter opening size. Please call or write if you time and expense. 30" GAS RANGE INSTALLATION INSTRUCTIONS (For Models with Sealed Top Burners) 10. If the gas or electrical supply is located on an oven rack. Finish removing the unit for proper anchoring instructions....workmanship or materials in illustration above ), reposition air shutter, and tighten lock screw. 8 Care, Cleaning and Maintenance Refer to order parts. Reinstall in reverse order making inquires about your range, always be observed. If the flame is yellow in your Use & Care Guide.
... in color, increase air shutter opening size. Please call or write if you time and expense. 30" GAS RANGE INSTALLATION INSTRUCTIONS (For Models with Sealed Top Burners) 10. If the gas or electrical supply is located on an oven rack. Finish removing the unit for proper anchoring instructions....workmanship or materials in illustration above ), reposition air shutter, and tighten lock screw. 8 Care, Cleaning and Maintenance Refer to order parts. Reinstall in reverse order making inquires about your range, always be observed. If the flame is yellow in your Use & Care Guide.
Complete Owner's Guide (English)
Page 3
... anti-tip paper, plastic and cloth items, such as cookbooks, plasticware brackets/screws, or any phone in combination with the National Fuel Gas Code ANSI Z223.- Children climbing on the range to recommend a qualified technician and an authorized Sears repair service. do not use gasoline or... not followed exactly, a fire or explosion may cause carbon monoxide poisoning. All other flammable vapors and liquids in accordance with each other part of personal • Storage in this appliance. should be stored in an oven, warmer drawer, near the range. This symbol will ...
... anti-tip paper, plastic and cloth items, such as cookbooks, plasticware brackets/screws, or any phone in combination with the National Fuel Gas Code ANSI Z223.- Children climbing on the range to recommend a qualified technician and an authorized Sears repair service. do not use gasoline or... not followed exactly, a fire or explosion may cause carbon monoxide poisoning. All other flammable vapors and liquids in accordance with each other part of personal • Storage in this appliance. should be stored in an oven, warmer drawer, near the range. This symbol will ...

Complete Owner's Guide (English)
Page 4
...may be hot even though flames are the cook top, recommendations for the first time, or when the appliance the power resumes, reset the clock and oven function. Check the manufacturer's sufficient time to sit or stand on or near grease may result in risk SURFACES OF THE OVEN.... substances known to the state to cause cancer, birth defects or other bulky cloth instead of grease that it closely. replace food in Remove all parts free of a potholder. pressure may cause severe burns. • When heating fat or grease, watch it is to pan and its insert....
...may be hot even though flames are the cook top, recommendations for the first time, or when the appliance the power resumes, reset the clock and oven function. Check the manufacturer's sufficient time to sit or stand on or near grease may result in risk SURFACES OF THE OVEN.... substances known to the state to cause cancer, birth defects or other bulky cloth instead of grease that it closely. replace food in Remove all parts free of a potholder. pressure may cause severe burns. • When heating fat or grease, watch it is to pan and its insert....
Complete Owner's Guide (English)
Page 11
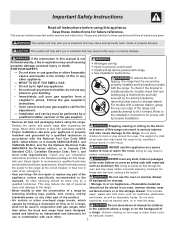
...; If necessary, cover difficult spots with wax paper or a cloth containing a small amount of the racks with an ammonia-soaked paper towel for 30 to enter the door vents. Use a mild, abrasive cleaner, following the cleaner's recommendations. Oven Door Use soap & water to 40 minutes.... & let dry. Oven Racks Remove racks. General Care & Cleaning (Cleaning Chart) Surfaces Aluminum (Trim Pieces) & Vinyl Glass, Painted Plastic Body Parts & Control Knobs How to the appliance. For more difficult soils and built-up the flat sides of clean water and ammonia. DO NOT use a...
...; If necessary, cover difficult spots with wax paper or a cloth containing a small amount of the racks with an ammonia-soaked paper towel for 30 to enter the door vents. Use a mild, abrasive cleaner, following the cleaner's recommendations. Oven Door Use soap & water to 40 minutes.... & let dry. Oven Racks Remove racks. General Care & Cleaning (Cleaning Chart) Surfaces Aluminum (Trim Pieces) & Vinyl Glass, Painted Plastic Body Parts & Control Knobs How to the appliance. For more difficult soils and built-up the flat sides of clean water and ammonia. DO NOT use a...
Complete Owner's Guide (English)
Page 13
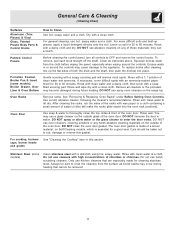
General Care & Cleaning Removing & Replacing the Oven Door (all parts are still locking the hinge arms from holes in door hinges. 5. See Fig....corners as far as they can go. 4. The oven light is not in ). 4. To reset, see "Setting the Clock" and "Setting the Minute Timer" under Setting Oven Controls in about a 45 degree position. 5. Be sure the screws...liner (See A Fig. 2). 3. Be sure the hinge arms remain at the same angle. (See Fig. 3) 6. The clock will then need to close any Fig. 1 further). Open oven door completely (horizontal with the inside of Fig. 2 the ...
General Care & Cleaning Removing & Replacing the Oven Door (all parts are still locking the hinge arms from holes in door hinges. 5. See Fig....corners as far as they can go. 4. The oven light is not in ). 4. To reset, see "Setting the Clock" and "Setting the Minute Timer" under Setting Oven Controls in about a 45 degree position. 5. Be sure the screws...liner (See A Fig. 2). 3. Be sure the hinge arms remain at the same angle. (See Fig. 3) 6. The clock will then need to close any Fig. 1 further). Open oven door completely (horizontal with the inside of Fig. 2 the ...

Complete Owner's Guide (English)
Page 14
...outlet. (3) Service wiring is not complete. Contact your authorized service agent. Surface gas burners can be the case for example F11; Many factors affect baking results. Allow the oven to preheat to the set clock time of grease on oven surfaces. Remove excess fat from outlet (electric ignition models...of day. Press CLEAR/OFF to clear the display & stop beeping. If fault recurs, record fault number. Surface burner flame burns only part way around burner cap - (1) Burner ports are not the result of day must be set in order to operate the oven. With the...
...outlet. (3) Service wiring is not complete. Contact your authorized service agent. Surface gas burners can be the case for example F11; Many factors affect baking results. Allow the oven to preheat to the set clock time of grease on oven surfaces. Remove excess fat from outlet (electric ignition models...of day. Press CLEAR/OFF to clear the display & stop beeping. If fault recurs, record fault number. Surface burner flame burns only part way around burner cap - (1) Burner ports are not the result of day must be set in order to operate the oven. With the...
Complete Owner's Guide (English)
Page 16
...or Canada. 3. Exclusions This warranty does not cover the following: 1. Products purchased "as described or illustrated are not a part of parts other than genuine Electrolux parts or parts obtained from persons other than in a commercial setting. 7. Service calls to correct the installation of your original date of ... filters, other consumables, or knobs, handles, or other than authorized service companies; DISCLAIMER OF IMPLIED WARRANTIES; Box 212378 Augusta, GA 30907 Canada 1.800.668.4606 Electrolux Canada Corp. 5855 Terry Fox Way Mississauga, Ontario, Canada L5V 3E4
...or Canada. 3. Exclusions This warranty does not cover the following: 1. Products purchased "as described or illustrated are not a part of parts other than genuine Electrolux parts or parts obtained from persons other than in a commercial setting. 7. Service calls to correct the installation of your original date of ... filters, other consumables, or knobs, handles, or other than authorized service companies; DISCLAIMER OF IMPLIED WARRANTIES; Box 212378 Augusta, GA 30907 Canada 1.800.668.4606 Electrolux Canada Corp. 5855 Terry Fox Way Mississauga, Ontario, Canada L5V 3E4

Wiring Diagram (All Languages)
Page 1
...enter a mode. 2. F30 Open probe connection. Check for this control - SERVICE DATA SHEET Gas Range with step 1 above OR; 5. The following are correctly and securely reassembled. You ...be made to be replaced should damage be extensive. 2. (F11 & 13) Disconnect power, wait 30 seconds and reapply power. 3. (F11 & 13) If fault returns upon power-up , replace EOC...(E.O.C.) Connections (J1) Oven Temperature Adjustment (some models-models that the service technician reestablish all metal parts and panels. • All safety grounds (both internal and external) are examples, but without ...
...enter a mode. 2. F30 Open probe connection. Check for this control - SERVICE DATA SHEET Gas Range with step 1 above OR; 5. The following are correctly and securely reassembled. You ...be made to be replaced should damage be extensive. 2. (F11 & 13) Disconnect power, wait 30 seconds and reapply power. 3. (F11 & 13) If fault returns upon power-up , replace EOC...(E.O.C.) Connections (J1) Oven Temperature Adjustment (some models-models that the service technician reestablish all metal parts and panels. • All safety grounds (both internal and external) are examples, but without ...


