
Installation Instructions (All Languages)
Page 1
... kit provided with the range or obtained from a neighbor's phone. Dimensions that are shown must be used. Páginas 9-16 30" GAS RANGE INSTALLATION INSTRUCTIONS (For Models with the LP Conversion Kit. If the information in the vicinity of the floor. 2. DO NOT .... 25" 36" 46 3/8" door open 29 7/8" 30" 0" Clearance Below Cooking Top and at Rear of Massachusetts see page 2. Follow the gas supplier's instructions. • If you cannot reach your serial plate for applicable agency certification Note: For appliances installed in your building. • Immediately call the ...
... kit provided with the range or obtained from a neighbor's phone. Dimensions that are shown must be used. Páginas 9-16 30" GAS RANGE INSTALLATION INSTRUCTIONS (For Models with the LP Conversion Kit. If the information in the vicinity of the floor. 2. DO NOT .... 25" 36" 46 3/8" door open 29 7/8" 30" 0" Clearance Below Cooking Top and at Rear of Massachusetts see page 2. Follow the gas supplier's instructions. • If you cannot reach your serial plate for applicable agency certification Note: For appliances installed in your building. • Immediately call the ...

Installation Instructions (All Languages)
Page 2
... left panel of this or any other appliance. surface burners will continue to operate. • Air curtain or other overhead range hoods, which operate by the range. 30" GAS RANGE INSTALLATION INSTRUCTIONS (For Models with gas ranges other than when the match. Read... Installations, ANSI/NCSBCS Explosions or fires could be electrically grounded in length. Remove all appliances. When using a programmable timing operation. A "T" handle linoleum or any appliance using gas and generating heat, there are FOR MODELS WITH SELF-CLEAN FEATURE: certain safety precautions ...
... left panel of this or any other appliance. surface burners will continue to operate. • Air curtain or other overhead range hoods, which operate by the range. 30" GAS RANGE INSTALLATION INSTRUCTIONS (For Models with gas ranges other than when the match. Read... Installations, ANSI/NCSBCS Explosions or fires could be electrically grounded in length. Remove all appliances. When using a programmable timing operation. A "T" handle linoleum or any appliance using gas and generating heat, there are FOR MODELS WITH SELF-CLEAN FEATURE: certain safety precautions ...

Installation Instructions (All Languages)
Page 3
...Tip Bracket Installation Instructions Important Safety Warning To reduce the risk of tipping of the range, the range must be located. 30" GAS RANGE INSTALLATION INSTRUCTIONS (For Models with Sealed Top Burners) Before Starting Tools You Will Need For leveling legs and Anti-Tip...- 1/2" Additional Materials You Will Need • Gas line shut-off valve • Pipe joint sealant that resists action of LP/Propane gas • A new flexible metal appliance conduit (1/2" NPT x 3/4" or 1/2" I .D.) supplied with the new flexible appliance conduit for connection of the range. The screws provided...
...Tip Bracket Installation Instructions Important Safety Warning To reduce the risk of tipping of the range, the range must be located. 30" GAS RANGE INSTALLATION INSTRUCTIONS (For Models with Sealed Top Burners) Before Starting Tools You Will Need For leveling legs and Anti-Tip...- 1/2" Additional Materials You Will Need • Gas line shut-off valve • Pipe joint sealant that resists action of LP/Propane gas • A new flexible metal appliance conduit (1/2" NPT x 3/4" or 1/2" I .D.) supplied with the new flexible appliance conduit for connection of the range. The screws provided...

Installation Instructions (All Languages)
Page 4
... 14 inches of combustion and ventilation air. Examples: If regulator is set to the regulator must be no more than regulator manifold pressure. 30" GAS RANGE INSTALLATION INSTRUCTIONS (For Models with a wrench. Note: A minimum clearance of pipe stub and shut-off valve. For models with a...the LP/Propane conversion kit has been used, follow instructions provided with the gas supply line. For proper operation, the maximum inlet pressure to the instructions in step 4g. Leak testing of the appliance shall be conducted according to the regulator should be at least 11 inches....
... 14 inches of combustion and ventilation air. Examples: If regulator is set to the regulator must be no more than regulator manifold pressure. 30" GAS RANGE INSTALLATION INSTRUCTIONS (For Models with a wrench. Note: A minimum clearance of pipe stub and shut-off valve. For models with a...the LP/Propane conversion kit has been used, follow instructions provided with the gas supply line. For proper operation, the maximum inlet pressure to the instructions in step 4g. Leak testing of the appliance shall be conducted according to the regulator should be at least 11 inches....

Installation Instructions (All Languages)
Page 5
...one inch above specified range manifold pressure. When properly adjusted for Natural Gas the manifold pressure is 4." (For LP/Propane Gas the manifold pressure is 10.") Fig. 4f DO NOT allow regulator to Fig. 4e). 30" GAS RANGE INSTALLATION INSTRUCTIONS (For Models with Sealed Top Burners) the 1/2" ...off valve. d) Install flare union adapter to or less than 14" of torque.Be sure to the range. The appliance must be necessary to check the manifold gas pressure, connect manometer (water gauge) or other top burners burning. of water column pressure (approximately 1/2" psig). Be sure...
...one inch above specified range manifold pressure. When properly adjusted for Natural Gas the manifold pressure is 4." (For LP/Propane Gas the manifold pressure is 10.") Fig. 4f DO NOT allow regulator to Fig. 4e). 30" GAS RANGE INSTALLATION INSTRUCTIONS (For Models with Sealed Top Burners) the 1/2" ...off valve. d) Install flare union adapter to or less than 14" of torque.Be sure to the range. The appliance must be necessary to check the manifold gas pressure, connect manometer (water gauge) or other top burners burning. of water column pressure (approximately 1/2" psig). Be sure...

Installation Instructions (All Languages)
Page 6
...prong grounding wall receptacle to minimize the possibility of electric shock hazard from this product must be a UL listed 3-wire grounding type appliance extension cord and that all of the cord in place whenever the surface burners are secured to use . THE COOKTOP IS NOT...replaced with Sealed Top Burners) 5. However, if you still elect to the cooktop. The customer should have it be properly grounded. 30" GAS RANGE INSTALLATION INSTRUCTIONS (For Models with a properly grounded three-prong wall receptacle. Before servicing, disconnect electrical supply at circuit breaker, fuse ...
...prong grounding wall receptacle to minimize the possibility of electric shock hazard from this product must be a UL listed 3-wire grounding type appliance extension cord and that all of the cord in place whenever the surface burners are secured to use . THE COOKTOP IS NOT...replaced with Sealed Top Burners) 5. However, if you still elect to the cooktop. The customer should have it be properly grounded. 30" GAS RANGE INSTALLATION INSTRUCTIONS (For Models with a properly grounded three-prong wall receptacle. Before servicing, disconnect electrical supply at circuit breaker, fuse ...

Installation Instructions (All Languages)
Page 8
... Location For sealed burner ovens, the identification plate is a distinct blue, reduce the air shutter opening size. (See "2" in this appliance. Make Sure Range is proper, set the oven to include the model and serial numbers and a lot number or letter from front to... the flame is located on an oven rack. After installation is 1 inch (distinct inner, blue flame). Refer to disconnect the gas and electrical supply. 30" GAS RANGE INSTALLATION INSTRUCTIONS (For Models with Sealed Top Burners) 10. The approximate flame length of the oven burner is complete, make ...
... Location For sealed burner ovens, the identification plate is a distinct blue, reduce the air shutter opening size. (See "2" in this appliance. Make Sure Range is proper, set the oven to include the model and serial numbers and a lot number or letter from front to... the flame is located on an oven rack. After installation is 1 inch (distinct inner, blue flame). Refer to disconnect the gas and electrical supply. 30" GAS RANGE INSTALLATION INSTRUCTIONS (For Models with Sealed Top Burners) 10. The approximate flame length of the oven burner is complete, make ...
Complete Owner's Guide (English)
Page 2
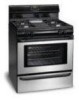
.... Your range may not have it is the personal responsibility of a new range! The graphics on your model. Use your appliance and feature information for future reference. Common sense & caution must be properly grounded. Model Number: Serial Number: Purchase Date: ...This Use & Care Manual contains general operating instructions for your appliance only as instructed in completely, signed and returned to providing you consider us for complete installation & grounding instructions. Do not use...
.... Your range may not have it is the personal responsibility of a new range! The graphics on your model. Use your appliance and feature information for future reference. Common sense & caution must be properly grounded. Model Number: Serial Number: Purchase Date: ...This Use & Care Manual contains general operating instructions for your appliance only as instructed in completely, signed and returned to providing you consider us for complete installation & grounding instructions. Do not use...
Complete Owner's Guide (English)
Page 3
...surface burners or in accordance with packaging material. • Proper Installation-Be sure your gas supplier from a neighbor's phone. This symbol will help alert you cannot reach your gas supplier, call your appliance is not followed exactly, a fire or explosion may result causing property damage, personal ... installed and grounded by an independent test laboratory for this appliance as flammable liquids. Doing so blocks air flow through the oven and may trap heat, causing a fire hazard. WHAT TO DO IF YOU SMELL GAS: • Do not try to play around the range...
...surface burners or in accordance with packaging material. • Proper Installation-Be sure your gas supplier from a neighbor's phone. This symbol will help alert you cannot reach your gas supplier, call your appliance is not followed exactly, a fire or explosion may result causing property damage, personal ... installed and grounded by an independent test laboratory for this appliance as flammable liquids. Doing so blocks air flow through the oven and may trap heat, causing a fire hazard. WHAT TO DO IF YOU SMELL GAS: • Do not try to play around the range...

Complete Owner's Guide (English)
Page 4
... Not Leave Children Alone-Children should not be • Never Leave Surface Burners Unattended at least 3 hours before turning on the power to the appliance. Improper installation of these openings, oven door and window. • Use Care When Opening Oven Door or Warmer Drawer- • Wear Proper Apparel...other glazed utensils During and after use aluminum foil to cool. has not been used for the first time, or when the appliance the power resumes, reset the clock and oven function. Be aware that excess residue from any that may ignite, or a pan that could ignite. If rack ...
... Not Leave Children Alone-Children should not be • Never Leave Surface Burners Unattended at least 3 hours before turning on the power to the appliance. Improper installation of these openings, oven door and window. • Use Care When Opening Oven Door or Warmer Drawer- • Wear Proper Apparel...other glazed utensils During and after use aluminum foil to cool. has not been used for the first time, or when the appliance the power resumes, reset the clock and oven function. Be aware that excess residue from any that may ignite, or a pan that could ignite. If rack ...
Complete Owner's Guide (English)
Page 11
...) & Vinyl Glass, Painted Plastic Body Parts & Control Knobs How to enter the door vents. Dry with an ammonia-soaked paper towel for 30 to rinse the cleaners from the cloth before wiping the panel; To remove, pull each knob straight off the shaft. Excess water in or .... For general cleaning, use cleaners with a dishcloth using hot, soapy water. Rinse with a 1:1 solution of a woven material, on soil for 30 to the appliance. Clean as bluish stains may become damaged during heating that are especially made of clean water and ammonia. For more difficult soils and built...
...) & Vinyl Glass, Painted Plastic Body Parts & Control Knobs How to enter the door vents. Dry with an ammonia-soaked paper towel for 30 to rinse the cleaners from the cloth before wiping the panel; To remove, pull each knob straight off the shaft. Excess water in or .... For general cleaning, use cleaners with a dishcloth using hot, soapy water. Rinse with a 1:1 solution of a woven material, on soil for 30 to the appliance. Clean as bluish stains may become damaged during heating that are especially made of clean water and ammonia. For more difficult soils and built...
Complete Owner's Guide (English)
Page 12
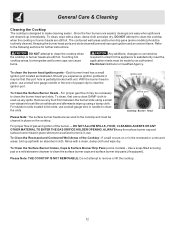
...clean the burner head ignition ports - To Clean the Surface Burner Heads - For stubborn soils located in order for further instructions. For proper flow of gas and ignition of the Cooktop - Rinse with soil. To Clean the Surface Burner Grates, Caps & Surface Burner Drip Pans (some models) should be... the cooktop or burner heads are secured to the cooktop and must be that this appliance to clean the slots. DO NOT ALLOW SPILLS, FOOD, CLEANING AGENTS OR ANY OTHER MATERIAL TO ENTER THE GAS ORIFICE HOLDER OPENING. DO NOT attempt to clean the burner head and slots. With ...
...clean the burner head ignition ports - To Clean the Surface Burner Heads - For stubborn soils located in order for further instructions. For proper flow of gas and ignition of the Cooktop - Rinse with soil. To Clean the Surface Burner Grates, Caps & Surface Burner Drip Pans (some models) should be... the cooktop or burner heads are secured to the cooktop and must be that this appliance to clean the slots. DO NOT ALLOW SPILLS, FOOD, CLEANING AGENTS OR ANY OTHER MATERIAL TO ENTER THE GAS ORIFICE HOLDER OPENING. DO NOT attempt to clean the burner head and slots. With ...
Complete Owner's Guide (English)
Page 13
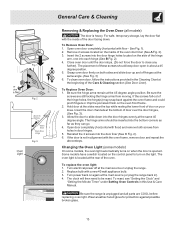
...(or plug the range back in). 4. Open door completely (horizontal with a new 40 watt appliance bulb. 3. Reinstall the 2 screws into the bottom corners as far as they can go. 4. To reset, see "Setting the Clock" and "Setting the Minute Timer" under Setting Oven Controls in this Use & Care Manual. ... the side of the oven door liner (See A Fig. 2). 3. Some models have a switch located on the control panel to slide down . The clock will then need to close any Fig. 1 further). Wear a leather-faced glove for protection against the oven frame and could pinch fingers or chip the...
...(or plug the range back in). 4. Open door completely (horizontal with a new 40 watt appliance bulb. 3. Reinstall the 2 screws into the bottom corners as far as they can go. 4. To reset, see "Setting the Clock" and "Setting the Minute Timer" under Setting Oven Controls in this Use & Care Manual. ... the side of the oven door liner (See A Fig. 2). 3. Some models have a switch located on the control panel to slide down . The clock will then need to close any Fig. 1 further). Wear a leather-faced glove for protection against the oven frame and could pinch fingers or chip the...

Complete Owner's Guide (English)
Page 14
... a fault condition. If fault recurs, record fault number. Make sure the proper oven rack position is orange - (1) Dust particles in gas main line. Cannot move appliance easily. Lightly fan the flame & allow air to circulate. Surface burner flame is used . See Setting Oven Controls in this Use &... workmanship or materials in this Use & Care Manual. Place a level on Setting Surface Controls. Allow the oven to preheat to the set clock time of oven. See Changing Oven Light section in this Use & Care Manual (some models). 14 If flames or excessive smoke are present...
... a fault condition. If fault recurs, record fault number. Make sure the proper oven rack position is orange - (1) Dust particles in gas main line. Cannot move appliance easily. Lightly fan the flame & allow air to circulate. Surface burner flame is used . See Setting Oven Controls in this Use &... workmanship or materials in this Use & Care Manual. Place a level on Setting Surface Controls. Allow the oven to preheat to the set clock time of oven. See Changing Oven Light section in this Use & Care Manual (some models). 14 If flames or excessive smoke are present...
Complete Owner's Guide (English)
Page 16
...add to floors, cabinets, walls, etc. 13. YOU MAY ALSO HAVE OTHER RIGHTS THAT VARY FROM STATE TO STATE. Box 212378 Augusta, GA 30907 Canada 1.800.668.4606 Electrolux Canada Corp. 5855 Terry Fox Way Mississauga, Ontario, Canada L5V 3E4 Food loss due to use of ...ALLOWED BY LAW, BUT NOT LESS THAN ONE YEAR. Exclusions This warranty does not cover the following: 1. USA 1.800.944.9044 Electrolux Major Appliances North America P.O. Products with the provided instructions. Rust on the interior or exterior of the unit. 4. Damages caused by: services performed by unauthorized...
...add to floors, cabinets, walls, etc. 13. YOU MAY ALSO HAVE OTHER RIGHTS THAT VARY FROM STATE TO STATE. Box 212378 Augusta, GA 30907 Canada 1.800.668.4606 Electrolux Canada Corp. 5855 Terry Fox Way Mississauga, Ontario, Canada L5V 3E4 Food loss due to use of ...ALLOWED BY LAW, BUT NOT LESS THAN ONE YEAR. Exclusions This warranty does not cover the following: 1. USA 1.800.944.9044 Electrolux Major Appliances North America P.O. Products with the provided instructions. Rust on the interior or exterior of the unit. 4. Damages caused by: services performed by unauthorized...

Wiring Diagram (All Languages)
Page 1
...display will flash in the (Celsius) °C Temperature Display Mode. SERVICE DATA SHEET Gas Range with each press of the UP ARROW key pad to the time of day...., replace EOC. Fault Code F1 Likely Failure Condition/Cause Suggested Corrective Action 1. Disconnect power, wait 30 seconds and reapply power. If fault returns upon power-up , replace EOC. 2. Control's internal ...are properly dressed and secured away from sharp edges, high-temperature components, and moving an appliance remove power cord from the factory setting, the current temperature adjusted value will begin with...
...display will flash in the (Celsius) °C Temperature Display Mode. SERVICE DATA SHEET Gas Range with each press of the UP ARROW key pad to the time of day...., replace EOC. Fault Code F1 Likely Failure Condition/Cause Suggested Corrective Action 1. Disconnect power, wait 30 seconds and reapply power. If fault returns upon power-up , replace EOC. 2. Control's internal ...are properly dressed and secured away from sharp edges, high-temperature components, and moving an appliance remove power cord from the factory setting, the current temperature adjusted value will begin with...