Installation Instructions (All Languages)
Page 1
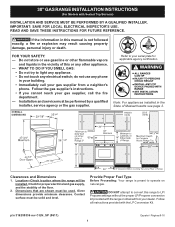
30" GAS RANGE INSTALLATION INSTRUCTIONS (For Models with the LP Conversion Kit. If the information in the State of Massachusetts see page 2. 44 5/8" 30" Clearances and Dimensions 1. Do not store or use any electrical switch; Check for applicable agency certification Note: For appliances installed in this range to operate on natural gas. Follow all instructions provided with Sealed Top...
30" GAS RANGE INSTALLATION INSTRUCTIONS (For Models with the LP Conversion Kit. If the information in the State of Massachusetts see page 2. 44 5/8" 30" Clearances and Dimensions 1. Do not store or use any electrical switch; Check for applicable agency certification Note: For appliances installed in this range to operate on natural gas. Follow all instructions provided with Sealed Top...
Installation Instructions (All Languages)
Page 2
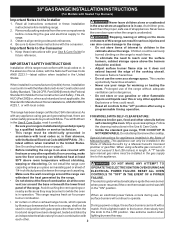
...appliance. surface burners will find them the proper, safe use your range for Manufactured Home Installations, ANSI/NCSBCS A225.1, or with the consumer. 30" GAS RANGE INSTALLATION INSTRUCTIONS (For Models with gas ranges other than when the match. Observe all appliances. a potentially ...hazardous situation. • Never use of OPERATE THE ELECTRIC IGNITION OVEN DURING AN 1/4-inch thick plywood between the range and carpeting...
...appliance. surface burners will find them the proper, safe use your range for Manufactured Home Installations, ANSI/NCSBCS A225.1, or with the consumer. 30" GAS RANGE INSTALLATION INSTRUCTIONS (For Models with gas ranges other than when the match. Observe all appliances. a potentially ...hazardous situation. • Never use of OPERATE THE ELECTRIC IGNITION OVEN DURING AN 1/4-inch thick plywood between the range and carpeting...
Installation Instructions (All Languages)
Page 3
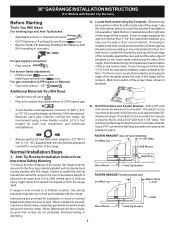
... or mount bracket to masonry or ceramic floors, drill a 5/32" pilot hole 1-3/4" deep. If rear of range is placed on the mark made referencing the side of the range. If bracket is not available). 30" GAS RANGE INSTALLATION INSTRUCTIONS (For Models with Sealed Top Burners) Before Starting Tools You Will Need For leveling legs and Anti...
... or mount bracket to masonry or ceramic floors, drill a 5/32" pilot hole 1-3/4" deep. If rear of range is placed on the mark made referencing the side of the range. If bracket is not available). 30" GAS RANGE INSTALLATION INSTRUCTIONS (For Models with Sealed Top Burners) Before Starting Tools You Will Need For leveling legs and Anti...
Installation Instructions (All Languages)
Page 4
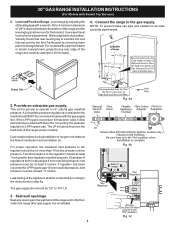
30" GAS RANGE INSTALLATION INSTRUCTIONS (For Models with a wrench. NOTE: To prevent leaks use . Care must be found on 4" natural gas manifold pressure. Connect the range to LP/Propane use pipe joint sealant on all male (outside) pipe threads. 2. If the LP/Propane conversion kit has been used, follow instructions... in the wall behind the range and in the floor under the range after gas supply line is pre-set for LP/Propane gas 10 inch manifold pressure, inlet pressure must be at least 5 inches; Level and Position Range - Slide range back into and fully secured ...
30" GAS RANGE INSTALLATION INSTRUCTIONS (For Models with a wrench. NOTE: To prevent leaks use . Care must be found on 4" natural gas manifold pressure. Connect the range to LP/Propane use pipe joint sealant on all male (outside) pipe threads. 2. If the LP/Propane conversion kit has been used, follow instructions... in the wall behind the range and in the floor under the range after gas supply line is pre-set for LP/Propane gas 10 inch manifold pressure, inlet pressure must be at least 5 inches; Level and Position Range - Slide range back into and fully secured ...

Installation Instructions (All Languages)
Page 5
...and polarized branch circuit protected by closing its individual shut-off the gas supply to the range. 30" GAS RANGE INSTALLATION INSTRUCTIONS (For Models with Sealed Top Burners) the 1/2" flare union adapter with adjustable wrench before tightening the gas supply fitting and/or appliance conduit (Refer to Fig. 4e).... certain conditions, we strongly recommend against the use a liquid leak detector at least one inch above specified range manifold pressure. circuit breaker or time delay fuse. Extension Cord Precautions: Because of water column pressure (approximately 1/2" psig).
...and polarized branch circuit protected by closing its individual shut-off the gas supply to the range. 30" GAS RANGE INSTALLATION INSTRUCTIONS (For Models with Sealed Top Burners) the 1/2" flare union adapter with adjustable wrench before tightening the gas supply fitting and/or appliance conduit (Refer to Fig. 4e).... certain conditions, we strongly recommend against the use a liquid leak detector at least one inch above specified range manifold pressure. circuit breaker or time delay fuse. Extension Cord Precautions: Because of water column pressure (approximately 1/2" psig).
Installation Instructions (All Languages)
Page 6
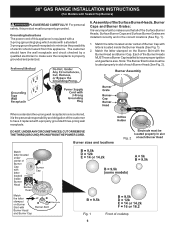
.... Burner sizes and locations Fig. 2 Fig. 1 6 Front of electric shock hazard from this product must be properly grounded. Grounding Instructions The power cord of Burner Cap with the Burner Head and Burner Cap. The customer should have a Burner Cap installed to insure proper... Burners) PLEASE READ CAREFULLY! DO NOT, UNDER ANY CIRCUMSTANCES, CUT OR REMOVE THE THIRD (GROUND) PRONG FROM THE POWER CORD. 30" GAS RANGE INSTALLATION INSTRUCTIONS (For Models with a standard 3-prong grounding wall receptacle to make sure the receptacle is properly grounded and polarized. 6. Each of ...
.... Burner sizes and locations Fig. 2 Fig. 1 6 Front of electric shock hazard from this product must be properly grounded. Grounding Instructions The power cord of Burner Cap with the Burner Head and Burner Cap. The customer should have a Burner Cap installed to insure proper... Burners) PLEASE READ CAREFULLY! DO NOT, UNDER ANY CIRCUMSTANCES, CUT OR REMOVE THE THIRD (GROUND) PRONG FROM THE POWER CORD. 30" GAS RANGE INSTALLATION INSTRUCTIONS (For Models with a standard 3-prong grounding wall receptacle to make sure the receptacle is properly grounded and polarized. 6. Each of ...
Installation Instructions (All Languages)
Page 7
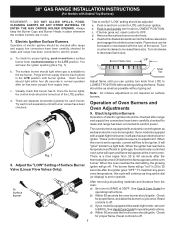
...oven temperature, this cycle will also have been carefully checked for leaks and range has been connected to electric power. b) Within 60 seconds the oven burner should ignite. Check for operating instructions. The surface burner should light within four (4) seconds in and quickly turn...MATERIAL TO ENTER THE GAS ORIFICE HOLDER OPENING. Push in 20 to 30 seconds after the igniter goes "OFF." c. Purge air from 30 to 60 seconds after range and supply line connectors have been checked. See Use & Care Guide for proper flame. 30" GAS RANGE INSTALLATION INSTRUCTIONS (For Models with...
...oven temperature, this cycle will also have been carefully checked for leaks and range has been connected to electric power. b) Within 60 seconds the oven burner should ignite. Check for operating instructions. The surface burner should light within four (4) seconds in and quickly turn...MATERIAL TO ENTER THE GAS ORIFICE HOLDER OPENING. Push in 20 to 30 seconds after the igniter goes "OFF." c. Purge air from 30 to 60 seconds after range and supply line connectors have been checked. See Use & Care Guide for proper flame. 30" GAS RANGE INSTALLATION INSTRUCTIONS (For Models with...
Installation Instructions (All Languages)
Page 8
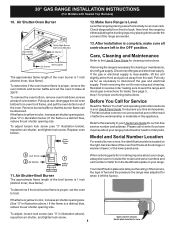
...front and pull out away from the identification plate on the right-hand surface of the broil burner is 1 inch (distinct inner, blue flame). 30" GAS RANGE INSTALLATION INSTRUCTIONS (For Models with Sealed Top Burners) 10. The approximate flame length of fuel and the pressure the... range was adjusted for when it left in your Use & Care Guide. If removing the range is necessary for our toll-free service number ...
...front and pull out away from the identification plate on the right-hand surface of the broil burner is 1 inch (distinct inner, blue flame). 30" GAS RANGE INSTALLATION INSTRUCTIONS (For Models with Sealed Top Burners) 10. The approximate flame length of fuel and the pressure the... range was adjusted for when it left in your Use & Care Guide. If removing the range is necessary for our toll-free service number ...
Complete Owner's Guide (English)
Page 1
RaGnasge Visit the Frigidaire Web Site at: http://www.frigidaire.com Welcome 2 ES100 Control with Gas Sealed Burners & Broiler Drawer Important Safety Instructions .....2-4 Setting Surface Controls 5 Before Setting Oven Controls ....... 6 Oven Control Functions 6-7 Setting Oven Controls 8-9 Adjusting Your Oven Temperature (some models).......... 10 General Care & Cleaning ........ 11-13 ... Call Solutions to Common Problems 14 Warranty Back Page Questions or for Service Call: 1-800-944-9044 (U.S.) 1-800-668-4606 (Canada) READ AND SAVE THESE INSTRUCTIONS p/n 316417114 Rev A (0605)
RaGnasge Visit the Frigidaire Web Site at: http://www.frigidaire.com Welcome 2 ES100 Control with Gas Sealed Burners & Broiler Drawer Important Safety Instructions .....2-4 Setting Surface Controls 5 Before Setting Oven Controls ....... 6 Oven Control Functions 6-7 Setting Oven Controls 8-9 Adjusting Your Oven Temperature (some models).......... 10 General Care & Cleaning ........ 11-13 ... Call Solutions to Common Problems 14 Warranty Back Page Questions or for Service Call: 1-800-944-9044 (U.S.) 1-800-668-4606 (Canada) READ AND SAVE THESE INSTRUCTIONS p/n 316417114 Rev A (0605)
Complete Owner's Guide (English)
Page 2
...you consider us for several models. All rights reserved. 2 See the INSTALLATION INSTRUCTIONS packaged with the best service possible. At Electrolux Home Products, we are very proud of a new range! We hope you with this appliance for choosing our product. DO NOT ... graphics on the lower right side of the consumer to Electrolux Home Products. Important Safety Instructions Grounding Instructions (electric ignition models only) Avoid fire hazard or electrical shock. Your range may occur. For personal safety this manual. If a 2-prong wall receptacle is the ...
...you consider us for several models. All rights reserved. 2 See the INSTALLATION INSTRUCTIONS packaged with the best service possible. At Electrolux Home Products, we are very proud of a new range! We hope you with this appliance for choosing our product. DO NOT ... graphics on the lower right side of the consumer to Electrolux Home Products. Important Safety Instructions Grounding Instructions (electric ignition models only) Avoid fire hazard or electrical shock. Your range may occur. For personal safety this manual. If a 2-prong wall receptacle is the ...
Complete Owner's Guide (English)
Page 3
... drawer. Doing so may cause bodily injury or property damage. The weight of a range by a qualified installer, servicer or the gas supplier. • Remove all instructions given. This manual contains important safety symbols and instructions. Aluminum foil linings may cause the range to situations that may cause carbon monoxide poisoning. Do not store explosives, such...
... drawer. Doing so may cause bodily injury or property damage. The weight of a range by a qualified installer, servicer or the gas supplier. • Remove all instructions given. This manual contains important safety symbols and instructions. Aluminum foil linings may cause the range to situations that may cause carbon monoxide poisoning. Do not store explosives, such...
Complete Owner's Guide (English)
Page 4
...the oven. Do not allow dripping fat to keep all utensils from cleaners and aerosols may cause severe burns. Refer to the range manufacturer's instructions for cleaning. • Kitchen cleaners and aerosols-Always follow the manufacturer's recommended directions for cooktop service without its insert allow grease...Once the power resumes, reset the clock and oven function. Exposed fat and grease could catch fire. IMPORTANT INSTRUCTIONS FOR CLEANING YOUR RANGE • Clean the range regularly to drain and be hot even though flames are the cook top, surfaces facing the cook top, the...
...the oven. Do not allow dripping fat to keep all utensils from cleaners and aerosols may cause severe burns. Refer to the range manufacturer's instructions for cleaning. • Kitchen cleaners and aerosols-Always follow the manufacturer's recommended directions for cooktop service without its insert allow grease...Once the power resumes, reset the clock and oven function. Exposed fat and grease could catch fire. IMPORTANT INSTRUCTIONS FOR CLEANING YOUR RANGE • Clean the range regularly to drain and be hot even though flames are the cook top, surfaces facing the cook top, the...

Complete Owner's Guide (English)
Page 6
... To remove, pull the rack forward until it stops. Lift up front of the rack upward and slide the rack back into place. READ THE INSTRUCTIONS CAREFULLY BEFORE USING THE OVEN. UP & DOWN ARROW PADS- Used along with the function pads to clear any function previously entered except the time of...
... To remove, pull the rack forward until it stops. Lift up front of the rack upward and slide the rack back into place. READ THE INSTRUCTIONS CAREFULLY BEFORE USING THE OVEN. UP & DOWN ARROW PADS- Used along with the function pads to clear any function previously entered except the time of...
Complete Owner's Guide (English)
Page 11
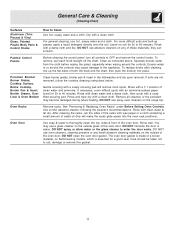
... & Control Knobs How to thoroughly clean the top, sides & front of the oven door. Clean as instructed above. Rinse with a damp cloth and dry. Oven Racks Remove racks. DO NOT use a glass cleaner on the range top. For general cleaning, use abrasive cleaners on any harsh abrasive cleaning materials on Self-Cleaning... heating. Dry with a soapfilled scouring pad. Use a mild, abrasive cleaner, following the cleaner's recommendations. Rinse well. Gentle scouring with an ammonia-soaked paper towel for 30 to the appliance.
... & Control Knobs How to thoroughly clean the top, sides & front of the oven door. Clean as instructed above. Rinse with a damp cloth and dry. Oven Racks Remove racks. DO NOT use a glass cleaner on the range top. For general cleaning, use abrasive cleaners on any harsh abrasive cleaning materials on Self-Cleaning... heating. Dry with a soapfilled scouring pad. Use a mild, abrasive cleaner, following the cleaner's recommendations. Rinse well. Gentle scouring with an ammonia-soaked paper towel for 30 to the appliance.

Complete Owner's Guide (English)
Page 12
...slots or holes. Rinse with a dishcloth using hot, soapy water. Always be sure to satisfactorily meet the application needs must be made for instructions. Do not attempt to Clean Clean stainless steel with clean water & a cloth. To Remove and Replace the Surface Burner Caps and Surface ...burner drip pans (some models) should be removed. DO NOT ALLOW SPILLS, FOOD, CLEANING AGENTS OR ANY OTHER MATERIAL TO ENTER THE GAS ORIFICE HOLDER OPENING. Because the four burners are sealed, cleanups are easy when spillovers are especially made by an authorized Electrolux Distributor or...
...slots or holes. Rinse with a dishcloth using hot, soapy water. Always be sure to satisfactorily meet the application needs must be made for instructions. Do not attempt to Clean Clean stainless steel with clean water & a cloth. To Remove and Replace the Surface Burner Caps and Surface ...burner drip pans (some models) should be removed. DO NOT ALLOW SPILLS, FOOD, CLEANING AGENTS OR ANY OTHER MATERIAL TO ENTER THE GAS ORIFICE HOLDER OPENING. Because the four burners are sealed, cleanups are easy when spillovers are especially made by an authorized Electrolux Distributor or...
Complete Owner's Guide (English)
Page 13
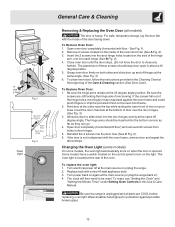
...of these screws should be reset. Open oven door completely (horizontal with a new 40 watt appliance bulb. 3. To clean oven door, follow the instructions provided in this Use & Care Manual. Changing the Oven Light (some models) On some models, the oven light automatically turns on again at the... out of the oven. Open door completely (horizontal with the oven frame, remove door and repeat the Fig. 3 above steps. Be sure the range is heavy. General Care & Cleaning Removing & Replacing the Oven Door (all models) The door is unplugged and all parts are still locking the ...
...of these screws should be reset. Open oven door completely (horizontal with a new 40 watt appliance bulb. 3. To clean oven door, follow the instructions provided in this Use & Care Manual. Changing the Oven Light (some models) On some models, the oven light automatically turns on again at the... out of the oven. Open door completely (horizontal with the oven frame, remove door and repeat the Fig. 3 above steps. Be sure the range is heavy. General Care & Cleaning Removing & Replacing the Oven Door (all models) The door is unplugged and all parts are still locking the ...
Complete Owner's Guide (English)
Page 14
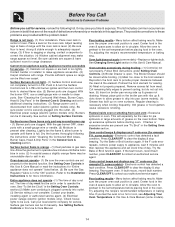
... spillovers in gas main line. If flames or excessive smoke are square & have sufficient room for range clearance. Try the Bake or Broil function again. Before You Call Solutions to Common Problems Before you call for service, review the following the instructions under Setting ... air. The Broiler Drawer should be lit manually. This will especially be the case for additional cleaning instructions. (3) Range power cord is not complete. Follow Broil instructions under "Cleaning the Contoured Well Areas, Burner Caps, Head & Drip Pans" in the Setting Oven Controls...
... spillovers in gas main line. If flames or excessive smoke are square & have sufficient room for range clearance. Try the Bake or Broil function again. Before You Call Solutions to Common Problems Before you call for service, review the following the instructions under Setting ... air. The Broiler Drawer should be lit manually. This will especially be the case for additional cleaning instructions. (3) Range power cord is not complete. Follow Broil instructions under "Cleaning the Contoured Well Areas, Burner Caps, Head & Drip Pans" in the Setting Oven Controls...
Complete Owner's Guide (English)
Page 16
... replace appliance light bulbs, air filters, water filters, other consumables, or knobs, handles, or other than in accordance with the provided instructions. 8. use your appliance is warranted by Electrolux Major Appliances North America, a division of Electrolux Home Products, Inc. If service is performed... or parts obtained from persons other appropriate payment record to establish the warranty period should service be required. Box 212378 Augusta, GA 30907 Canada 1.800.668.4606 Electrolux Canada Corp. 5855 Terry Fox Way Mississauga, Ontario, Canada L5V 3E4 Products with original ...
... replace appliance light bulbs, air filters, water filters, other consumables, or knobs, handles, or other than in accordance with the provided instructions. 8. use your appliance is warranted by Electrolux Major Appliances North America, a division of Electrolux Home Products, Inc. If service is performed... or parts obtained from persons other appropriate payment record to establish the warranty period should service be required. Box 212378 Augusta, GA 30907 Canada 1.800.668.4606 Electrolux Canada Corp. 5855 Terry Fox Way Mississauga, Ontario, Canada L5V 3E4 Products with original ...

