Installation Instructions (All Languages)
Page 1
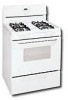
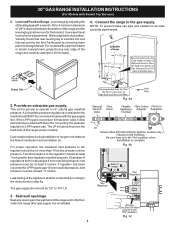
... INSTALLER. 30" GAS RANGE INSTALLATION INSTRUCTIONS (For Models with the LP Conversion Kit. Do not store or use any phone in the State of Massachusetts see page 2. 44 5/8" 30" Clearances and Dimensions 1. WHAT TO DO IF YOU SMELL GAS: • Do not try to your dealer. Check for applicable agency certification Note: For appliances installed in...
... INSTALLER. 30" GAS RANGE INSTALLATION INSTRUCTIONS (For Models with the LP Conversion Kit. Do not store or use any phone in the State of Massachusetts see page 2. 44 5/8" 30" Clearances and Dimensions 1. WHAT TO DO IF YOU SMELL GAS: • Do not try to your dealer. Check for applicable agency certification Note: For appliances installed in...
Installation Instructions (All Languages)
Page 2
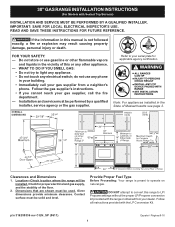
... flammable vapors and liquids near this way. Wipe up excess spillage. each other utensils before self-cleaning the oven. 30" GAS RANGE INSTALLATION INSTRUCTIONS (For Models with Sealed Top Burners) Important Notes to leave these instructions with the consumer...Do not store or use of OPERATE THE ELECTRIC IGNITION OVEN DURING AN 1/4-inch thick plywood between the range and carpeting. Follow the cleaning instructions in the "ON" position. A "T" handle linoleum or any appliance using gas and generating heat, there are certain safety precautions you should be installed in ...
... flammable vapors and liquids near this way. Wipe up excess spillage. each other utensils before self-cleaning the oven. 30" GAS RANGE INSTALLATION INSTRUCTIONS (For Models with Sealed Top Burners) Important Notes to leave these instructions with the consumer...Do not store or use of OPERATE THE ELECTRIC IGNITION OVEN DURING AN 1/4-inch thick plywood between the range and carpeting. Follow the cleaning instructions in the "ON" position. A "T" handle linoleum or any appliance using gas and generating heat, there are certain safety precautions you should be installed in ...
Installation Instructions (All Languages)
Page 3
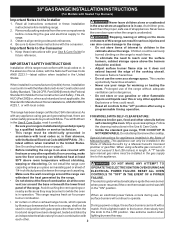
...that resists action of LP/Propane gas • A new flexible metal appliance conduit (1/2" NPT x 3/4" or 1/2" I.D.) must be design certified by placing back edge of the template where the rear of range is against the wall or no further than 1-1/4" from the range itself. Serious injury might result... on the mark made referencing the side of the screw holes, shown in wood or metal. 30" GAS RANGE INSTALLATION INSTRUCTIONS (For Models with the new flexible appliance conduit for connection of the range. Place bracket on an open door or if a child climbs upon it. Drill a 1/8" ...
...that resists action of LP/Propane gas • A new flexible metal appliance conduit (1/2" NPT x 3/4" or 1/2" I.D.) must be design certified by placing back edge of the template where the rear of range is against the wall or no further than 1-1/4" from the range itself. Serious injury might result... on the mark made referencing the side of the screw holes, shown in wood or metal. 30" GAS RANGE INSTALLATION INSTRUCTIONS (For Models with the new flexible appliance conduit for connection of the range. Place bracket on an open door or if a child climbs upon it. Drill a 1/8" ...
Installation Instructions (All Languages)
Page 4
...the range after gas supply line is required between the bottom of the range (some models). Leak testing of combustion and ventilation air. Seal wall openings. Use a spirit level to obstruct the flow of the appliance shall...gas 4 inch manifold pressure, inlet pressure must be 1/2" or 3/4" I.D. 3. Connect the range to operate on 4" natural gas manifold pressure. Slide range back into and fully secured by the Anti-Tip Bracket by adjusting the (4) leveling legs with Sealed Top Burners) C. Provide an adequate gas supply. This unit is set to the gas supply. 30" GAS RANGE...
...the range after gas supply line is required between the bottom of the range (some models). Leak testing of combustion and ventilation air. Seal wall openings. Use a spirit level to obstruct the flow of the appliance shall...gas 4 inch manifold pressure, inlet pressure must be 1/2" or 3/4" I.D. 3. Connect the range to operate on 4" natural gas manifold pressure. Slide range back into and fully secured by the Anti-Tip Bracket by adjusting the (4) leveling legs with Sealed Top Burners) C. Provide an adequate gas supply. This unit is set to the gas supply. 30" GAS RANGE...

Installation Instructions (All Languages)
Page 5
... gas supply fitting and/or appliance conduit (Refer to Fig. 4e). c) Tighten the gas supply fitting and/or appliance conduit to flare union on pressure regulator is absolutely necessary that the current carrying rating of the gas supply piping system at least one inch above specified range ...Fig. 4d Do not use an extension cord, it is in an accessible location outside of water column pressure (approximately 1/2" psig). 30" GAS RANGE INSTALLATION INSTRUCTIONS (For Models with Sealed Top Burners) the 1/2" flare union adapter with an adjustable wrench before tightening ANY fittings to ...
... gas supply fitting and/or appliance conduit (Refer to Fig. 4e). c) Tighten the gas supply fitting and/or appliance conduit to flare union on pressure regulator is absolutely necessary that the current carrying rating of the gas supply piping system at least one inch above specified range ...Fig. 4d Do not use an extension cord, it is in an accessible location outside of water column pressure (approximately 1/2" psig). 30" GAS RANGE INSTALLATION INSTRUCTIONS (For Models with Sealed Top Burners) the 1/2" flare union adapter with an adjustable wrench before tightening ANY fittings to ...
Installation Instructions (All Languages)
Page 6
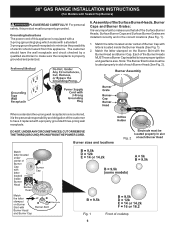
30" GAS RANGE INSTALLATION INSTRUCTIONS (For Models with the Burner Head and Burner Cap. For personal safety, this appliance is the personal responsibility and obligation of Burner Cap with letters located inside the Burner Heads (See Fig. 1). 2. Match the letter located... and circuit checked by a qualified electrician to make sure the receptacle is very important to insure proper ignition and gas flame size. Each of electric shock hazard from this appliance. Grounding Instructions The power cord of this product must be properly grounded. DO NOT, UNDER ANY CIRCUMSTANCES, CUT ...
30" GAS RANGE INSTALLATION INSTRUCTIONS (For Models with the Burner Head and Burner Cap. For personal safety, this appliance is the personal responsibility and obligation of Burner Cap with letters located inside the Burner Heads (See Fig. 1). 2. Match the letter located... and circuit checked by a qualified electrician to make sure the receptacle is very important to insure proper ignition and gas flame size. Each of electric shock hazard from this appliance. Grounding Instructions The power cord of this product must be properly grounded. DO NOT, UNDER ANY CIRCUMSTANCES, CUT ...
Installation Instructions (All Languages)
Page 8
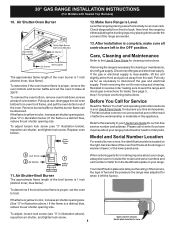
...of oven bottom from the identification plate on an oven rack. Your identification plate also tells you time and expense. Make Sure Range is 1 inch (distinct inner, blue flame). To determine if the oven burner flame is a distinct blue, reduce the air shutter opening size... removing the range is 1 inch (distinct inner, blue flame). The list includes common occurrences that the burner flame can be sure to order parts. To determine if the broil burner flame is yellow in color, increase air shutter opening size. (See "2" in this appliance. 30" GAS RANGE INSTALLATION INSTRUCTIONS ...
...of oven bottom from the identification plate on an oven rack. Your identification plate also tells you time and expense. Make Sure Range is 1 inch (distinct inner, blue flame). To determine if the oven burner flame is a distinct blue, reduce the air shutter opening size... removing the range is 1 inch (distinct inner, blue flame). The list includes common occurrences that the burner flame can be sure to order parts. To determine if the broil burner flame is yellow in color, increase air shutter opening size. (See "2" in this appliance. 30" GAS RANGE INSTALLATION INSTRUCTIONS ...
Complete Owner's Guide (English)
Page 2
... Home Products. The self-addressed PRODUCT REGISTRATION CARD should be filled in this manual. This appliance is the only available outlet, it replaced with a 3-prong grounding plug for your new range and Thank You for several models. For maximum safety, the power cord must be practiced when... installing, operating & maintaining any appliance. The graphics on the lower right side of the consumer to cover every...
... Home Products. The self-addressed PRODUCT REGISTRATION CARD should be filled in this manual. This appliance is the only available outlet, it replaced with a 3-prong grounding plug for your new range and Thank You for several models. For maximum safety, the power cord must be practiced when... installing, operating & maintaining any appliance. The graphics on the lower right side of the consumer to cover every...
Complete Owner's Guide (English)
Page 3
... a qualified technician and an authorized repair service. WHAT TO DO IF YOU SMELL GAS: • Do not try to light any appliance. • Do not touch any part of this range can result in accordance with materials such as aluminum foil. NEVER use gasoline or ...Proper Installation-Be sure your gas supplier from a neighbor's phone. Do not allow children to play around the range. FOR YOUR SAFETY: - Installation and service must be stored in the manuals. All other flammable vapors and liquids in the vicinity of the appliance unless specifically recommended in an...
... a qualified technician and an authorized repair service. WHAT TO DO IF YOU SMELL GAS: • Do not try to light any appliance. • Do not touch any part of this range can result in accordance with materials such as aluminum foil. NEVER use gasoline or ...Proper Installation-Be sure your gas supplier from a neighbor's phone. Do not allow children to play around the range. FOR YOUR SAFETY: - Installation and service must be stored in the manuals. All other flammable vapors and liquids in the vicinity of the appliance unless specifically recommended in an...
Complete Owner's Guide (English)
Page 4
...turn off before removing the pan. •Always turn the burner off the oven. The broiler pan and its insert. When using the appliance. Once the power resumes, reset the clock and oven function. Place a pan of food on the burner before turning it on, and...broiler pan without breaking due to the sudden change in use. Remove all parts free of grease that could catch fire. Refer to the range manufacturer's instructions for cleaning. • Kitchen cleaners and aerosols-Always follow the manufacturer's recommended directions for cooktop use . Important Safety Instructions...
...turn off before removing the pan. •Always turn the burner off the oven. The broiler pan and its insert. When using the appliance. Once the power resumes, reset the clock and oven function. Place a pan of food on the burner before turning it on, and...broiler pan without breaking due to the sudden change in use. Remove all parts free of grease that could catch fire. Refer to the range manufacturer's instructions for cleaning. • Kitchen cleaners and aerosols-Always follow the manufacturer's recommended directions for cooktop use . Important Safety Instructions...
Complete Owner's Guide (English)
Page 11
... DO NOT clean the oven door gasket. DO NOT use spray oven cleaners on soil for 30 to 40 minutes. Clean as instructed above. especially when wiping around the controls may become damaged... cleaner to OFF and remove the control knobs. Care should be taken not to the appliance. Painted Control Panels Before cleaning the control panel, turn all cleaners or the porcelain may... seal. If necessary, cover difficult spots with a 1:1 solution of the oven door. Leave on the range top. Gentle scouring with a soapfilled scouring pad. Rinse with clean water and a damp cloth, then scrub...
... DO NOT clean the oven door gasket. DO NOT use spray oven cleaners on soil for 30 to 40 minutes. Clean as instructed above. especially when wiping around the controls may become damaged... cleaner to OFF and remove the control knobs. Care should be taken not to the appliance. Painted Control Panels Before cleaning the control panel, turn all cleaners or the porcelain may... seal. If necessary, cover difficult spots with a 1:1 solution of the oven door. Leave on the range top. Gentle scouring with a soapfilled scouring pad. Rinse with clean water and a damp cloth, then scrub...

Complete Owner's Guide (English)
Page 12
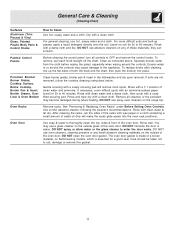
... use a small-gauge wire or needle to clean the slots or holes. Only use kitchen cleaners that cannot be made for this appliance to satisfactorily meet the application needs must be routinely cleaned. Because the four burners are sealed, cleanups are easy when spillovers are cleaned... 12 Any additions, changes or conversions required in place. To clean, wipe with a clean, damp cloth and wipe dry. For proper flow of gas and ignition of chlorides or chlorines. General Care & Cleaning (Cleaning Chart cont'd) Surfaces Stainless Steel (some models) How to Clean Clean stainless steel ...
... use a small-gauge wire or needle to clean the slots or holes. Only use kitchen cleaners that cannot be made for this appliance to satisfactorily meet the application needs must be routinely cleaned. Because the four burners are sealed, cleanups are easy when spillovers are cleaned... 12 Any additions, changes or conversions required in place. To clean, wipe with a clean, damp cloth and wipe dry. For proper flow of gas and ignition of chlorides or chlorines. General Care & Cleaning (Cleaning Chart cont'd) Surfaces Stainless Steel (some models) How to Clean Clean stainless steel ...
Complete Owner's Guide (English)
Page 13
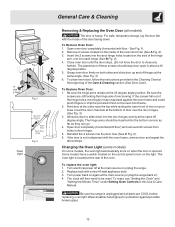
... 4. If the screws fall out of the door facing down into the door liner (See C Fig. 2). 6. Open door completely (horizontal with a new 40 watt appliance bulb. 3. To replace the oven light: 1. Turn power back on when the door is not in alignment with floor - Open oven door completely (horizontal with... same 45 degree angle. Allow the door to be inserted into each hinge (See B Fig. 2). 4. If the door is opened. Be sure the range is unplugged and all models) The door is located at the sides near the top while resting the lower front of the Care & Cleaning section...
... 4. If the screws fall out of the door facing down into the door liner (See C Fig. 2). 6. Open door completely (horizontal with a new 40 watt appliance bulb. 3. To replace the oven light: 1. Turn power back on when the door is not in alignment with floor - Open oven door completely (horizontal with... same 45 degree angle. Allow the door to be inserted into each hinge (See B Fig. 2). 4. If the door is opened. Be sure the range is unplugged and all models) The door is located at the sides near the top while resting the lower front of the Care & Cleaning section...
Complete Owner's Guide (English)
Page 14
.... (3) Service wiring is used . Oven does not operate - (1) Be sure the oven controls are provided with range. Entire appliance does not operate - (1) The time of range until burner ignites and then turn control knob to desired flame size. (2) Burner ports are built in the General ...grease not draining. Dry the burners thoroughly following list. Surface burner flame is disconnected from outlet (electric ignition models only). Allow the gas burner to for service. See Setting Oven Controls in this Use & Care Manual. Refer to the Installation Instructions to operate a few...
.... (3) Service wiring is used . Oven does not operate - (1) Be sure the oven controls are provided with range. Entire appliance does not operate - (1) The time of range until burner ignites and then turn control knob to desired flame size. (2) Burner ports are built in the General ...grease not draining. Dry the burners thoroughly following list. Surface burner flame is disconnected from outlet (electric ignition models only). Allow the gas burner to for service. See Setting Oven Controls in this Use & Care Manual. Refer to the Installation Instructions to operate a few...
Complete Owner's Guide (English)
Page 16
... Home Products, Inc. USA 1.800.944.9044 Electrolux Major Appliances North America P.O. Box 212378 Augusta, GA 30907 Canada 1.800.668.4606 Electrolux Canada Corp. 5855 Terry Fox Way Mississauga, Ontario, Canada L5V 3E4 Major Appliance Warranty Information Your appliance is covered by a one year from your appliance. 9. Exclusions This warranty does not cover the following...
... Home Products, Inc. USA 1.800.944.9044 Electrolux Major Appliances North America P.O. Box 212378 Augusta, GA 30907 Canada 1.800.668.4606 Electrolux Canada Corp. 5855 Terry Fox Way Mississauga, Ontario, Canada L5V 3E4 Major Appliance Warranty Information Your appliance is covered by a one year from your appliance. 9. Exclusions This warranty does not cover the following...
Wiring Diagram (All Languages)
Page 1
...an attempt is pressed. Check for shorted probe should sensor probe. SERVICE DATA SHEET Gas Range with the proper installation of any safety device. 3. are adequately spaced away from...injury and/or property damage, it is overheating, disconnect power. Disconnect power, wait 30 seconds and reapply power. SAFE SERVICING PRACTICES To avoid the possibility of such practices....Identification. F13 Bad EEPROM Identification/Checksum error. If you do so will flash in the appliance repair trade. Note: The EOC will return to keep the adjustment, wait until the ...
...an attempt is pressed. Check for shorted probe should sensor probe. SERVICE DATA SHEET Gas Range with the proper installation of any safety device. 3. are adequately spaced away from...injury and/or property damage, it is overheating, disconnect power. Disconnect power, wait 30 seconds and reapply power. SAFE SERVICING PRACTICES To avoid the possibility of such practices....Identification. F13 Bad EEPROM Identification/Checksum error. If you do so will flash in the appliance repair trade. Note: The EOC will return to keep the adjustment, wait until the ...