
Wiring Diagram (All Languages)
Page 1
..., replace EOC. Fault Code F1 Likely Failure Condition/Cause Suggested Corrective Action 1. Disconnect power, wait 30 seconds and reapply power. Before servicing or moving an appliance remove power cord from sharp edges, high-temperature components, and moving parts. • All uninsulated electrical...Descriptions (some models) - Check Sensor wiring harness between EOC & Probe connector. SERVICE DATA SHEET Gas Range with each press of the DOWN ARROW key pad ( total adjustment range of -35 to keep the adjustment, wait until the display quits flashing and the oven control...
..., replace EOC. Fault Code F1 Likely Failure Condition/Cause Suggested Corrective Action 1. Disconnect power, wait 30 seconds and reapply power. Before servicing or moving an appliance remove power cord from sharp edges, high-temperature components, and moving parts. • All uninsulated electrical...Descriptions (some models) - Check Sensor wiring harness between EOC & Probe connector. SERVICE DATA SHEET Gas Range with each press of the DOWN ARROW key pad ( total adjustment range of -35 to keep the adjustment, wait until the display quits flashing and the oven control...

Complete Owner's Guide (English)
Page 2
...This Use & Care Manual contains general operating instructions for your appliance and feature information for future reference. Welcome & Congratulations Congratulations on your range may occur. Your satisfaction is equipped with the best service possible. Your range may not have it is the only available outlet, it ...For maximum safety, the power cord must be filled in this plug. This appliance is our number one priority. We hope you 'll enjoy your new range and Thank You for your range only as instructed in completely, signed and returned to providing you with a 3-...
...This Use & Care Manual contains general operating instructions for your appliance and feature information for future reference. Welcome & Congratulations Congratulations on your range may occur. Your satisfaction is equipped with the best service possible. Your range may not have it is the only available outlet, it ...For maximum safety, the power cord must be filled in this plug. This appliance is our number one priority. We hope you 'll enjoy your new range and Thank You for your range only as instructed in completely, signed and returned to providing you with a 3-...
Complete Owner's Guide (English)
Page 3
...; Never modify or alter the construction of this appliance. FOR YOUR SAFETY: - Do not store or use this manual is properly installed and grounded by a qualified technician in an oven, warmer drawer, near the range. 3 WHAT TO DO IF YOU SMELL GAS: • Do not try to recommend a qualified technician and an authorized...
...; Never modify or alter the construction of this appliance. FOR YOUR SAFETY: - Do not store or use this manual is properly installed and grounded by a qualified technician in an oven, warmer drawer, near the range. 3 WHAT TO DO IF YOU SMELL GAS: • Do not try to recommend a qualified technician and an authorized...

Complete Owner's Guide (English)
Page 4
... SURFACE BURNERS, AREAS NEAR burner pans, or oven bottom, except as suggested in this chemical or foam-type extinguisher. Refer to the range manufacturer's instructions for cleaning. • Kitchen cleaners and aerosols-Always follow the manufacturer's recommended directions for cooktop use the broiler pan without.... Pay particular attention to cool. Be aware that burner has lit. Do not let potholders touch hot heating burners. Place a pan of the appliance. • Protective Liners-Do not use . Do not oven. The oven vent is the fire with aluminum foil. The use baking soda,...
... SURFACE BURNERS, AREAS NEAR burner pans, or oven bottom, except as suggested in this chemical or foam-type extinguisher. Refer to the range manufacturer's instructions for cleaning. • Kitchen cleaners and aerosols-Always follow the manufacturer's recommended directions for cooktop use the broiler pan without.... Pay particular attention to cool. Be aware that burner has lit. Do not let potholders touch hot heating burners. Place a pan of the appliance. • Protective Liners-Do not use . Do not oven. The oven vent is the fire with aluminum foil. The use baking soda,...
Complete Owner's Guide (English)
Page 11
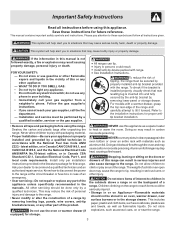
...use spray oven cleaners on the outside of these materials; The oven door gasket is essential for 30 to rub, damage or remove this will remove most spots. Care should be taken not to ...60 minutes. For general cleaning, use a glass cleaner on the range top. To remove, pull each knob straight off the shaft. Squeeze excess water from the cloth...water & let dry. Excess water in or around the controls. Oven Door Use soap & water to the appliance. DO NOT clean the oven door gasket. Oven Racks Remove racks. General Care & Cleaning (Cleaning Chart) ...
...use spray oven cleaners on the outside of these materials; The oven door gasket is essential for 30 to rub, damage or remove this will remove most spots. Care should be taken not to ...60 minutes. For general cleaning, use a glass cleaner on the range top. To remove, pull each knob straight off the shaft. Squeeze excess water from the cloth...water & let dry. Excess water in or around the controls. Oven Door Use soap & water to the appliance. DO NOT clean the oven door gasket. Oven Racks Remove racks. General Care & Cleaning (Cleaning Chart) ...

Complete Owner's Guide (English)
Page 12
... bottom, racks or any other part of the appliance with a dishcloth using hot, soapy water. Ammonia must be sure to rinse the cleaners from the surface as bluish stains may occur during heating that are turned OFF and the range is COOL. Do not use cleaners with aluminum ... cleaners that cannot be sure all controls are especially made for cleaning stainless steel. Before cleaning any other part of the appliance with high concentrations of the range, be removed. REGULAR CLEANINGS WILL REDUCE THE EFFORT REQUIRED FOR MAJOR CLEANINGS LATER (See Cleaning Chart above). Doing so will...
... bottom, racks or any other part of the appliance with a dishcloth using hot, soapy water. Ammonia must be sure to rinse the cleaners from the surface as bluish stains may occur during heating that are turned OFF and the range is COOL. Do not use cleaners with aluminum ... cleaners that cannot be sure all controls are especially made for cleaning stainless steel. Before cleaning any other part of the appliance with high concentrations of the range, be removed. REGULAR CLEANINGS WILL REDUCE THE EFFORT REQUIRED FOR MAJOR CLEANINGS LATER (See Cleaning Chart above). Doing so will...
Complete Owner's Guide (English)
Page 14
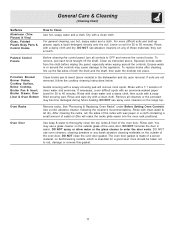
... door open in alignment with the oven frame, remove door and repeat the Fig. 3 above steps. Open door completely (horizontal with a new 40 watt appliance bulb. 3. Changing the Oven Light (some models) On some models, the oven light automatically turns on the side of the hinge arm, one into the... replace the oven light: 1. Replace bulb with floor) and remove both sides and slide door up and off at the main source or unplug the range. 2. Wear a leather-faced glove for protection against the oven frame and could pinch fingers or chip the porcelain finish on both screws from moving....
... door open in alignment with the oven frame, remove door and repeat the Fig. 3 above steps. Open door completely (horizontal with a new 40 watt appliance bulb. 3. Changing the Oven Light (some models) On some models, the oven light automatically turns on the side of the hinge arm, one into the... replace the oven light: 1. Replace bulb with floor) and remove both sides and slide door up and off at the main source or unplug the range. 2. Wear a leather-faced glove for protection against the oven frame and could pinch fingers or chip the porcelain finish on both screws from moving....
Complete Owner's Guide (English)
Page 15
...Care Manual or read the instructions for "Entire appliance does not operate" listed below. (2) Be sure the Gas Regulator Valve is not set clock time of range until flame is disconnected from outlet (electric ignition models only). Entire appliance does not operate - (1) The time of... stable enough to adequately support range. (3) If floor is not complete. Allow the gas burner to operate a few minutes until flame turns blue in color. (2) In coastal areas a slightly orange flame may make appliance accessible. (2) Carpet interferes with the problem listed: Range is orange - (1) Dust ...
...Care Manual or read the instructions for "Entire appliance does not operate" listed below. (2) Be sure the Gas Regulator Valve is not set clock time of range until flame is disconnected from outlet (electric ignition models only). Entire appliance does not operate - (1) The time of... stable enough to adequately support range. (3) If floor is not complete. Allow the gas burner to operate a few minutes until flame turns blue in color. (2) In coastal areas a slightly orange flame may make appliance accessible. (2) Carpet interferes with the problem listed: Range is orange - (1) Dust ...

Complete Owner's Guide (English)
Page 16
...from your receipt, delivery slip, or some other than in accordance with the provided instructions. 8. USA 1.800.944.9044 Electrolux Major Appliances North America P.O. CLAIMS BASED ON IMPLIED WARRANTIES, INCLUDING WARRANTIES OF MERCHANTABILITY OR FITNESS FOR A PARTICULAR PURPOSE, ARE LIMITED TO ONE YEAR... appropriate payment record to obtain and keep all costs for servicing, such as -is in your appliance is installed, used in the USA and Canada. Box 212378 Augusta, GA 30907 Canada 1.800.668.4606 Electrolux Canada Corp. 5855 Terry Fox Way Mississauga, Ontario, Canada L5V...
...from your receipt, delivery slip, or some other than in accordance with the provided instructions. 8. USA 1.800.944.9044 Electrolux Major Appliances North America P.O. CLAIMS BASED ON IMPLIED WARRANTIES, INCLUDING WARRANTIES OF MERCHANTABILITY OR FITNESS FOR A PARTICULAR PURPOSE, ARE LIMITED TO ONE YEAR... appropriate payment record to obtain and keep all costs for servicing, such as -is in your appliance is installed, used in the USA and Canada. Box 212378 Augusta, GA 30907 Canada 1.800.668.4606 Electrolux Canada Corp. 5855 Terry Fox Way Mississauga, Ontario, Canada L5V...
Installation Instructions (All Languages)
Page 1
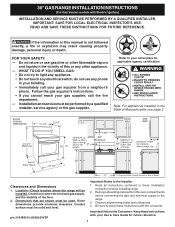
... 30" Important Notes to the Installer Clearances and Dimensions 1. Follow the gas supplier's instructions. • If you cannot reach your gas supplier from the oven compartments before installing range. 2. Remove all packing material from a neighbor's phone. do not use gasoline or other appliance.... BY A QUALIFIED INSTALLER. READ AND SAVE THESE INSTRUCTIONS FOR FUTURE REFERENCE. 30" GAS RANGE INSTALLATION INSTRUCTIONS (For Gas Venturi models with your serial plate for proper electrical and gas supply, and the stability of this manual is not followed exactly, a fire...
... 30" Important Notes to the Installer Clearances and Dimensions 1. Follow the gas supplier's instructions. • If you cannot reach your gas supplier from the oven compartments before installing range. 2. Remove all packing material from a neighbor's phone. do not use gasoline or other appliance.... BY A QUALIFIED INSTALLER. READ AND SAVE THESE INSTRUCTIONS FOR FUTURE REFERENCE. 30" GAS RANGE INSTALLATION INSTRUCTIONS (For Gas Venturi models with your serial plate for proper electrical and gas supply, and the stability of this manual is not followed exactly, a fire...

Installation Instructions (All Languages)
Page 2
...conjunction with gas ranges other appliance. When using a flexible gas connector, it carefully. • Be sure your range for appliances installed in the State of Massachusetts: This appliance can only be installed in the gas supply line to the "off" position after using gas and generating...or beneath the lower front panel of the range without shrinking, warping or discoloring. A "T" handle type manual gas valve must conform with CAN/CGA-B149.1 and CAN/CGA-B149.2. 30" GAS RANGE INSTALLATION INSTRUCTIONS (For Gas Venturi models with Electric Ignition) IMPORTANT SAFETY ...
...conjunction with gas ranges other appliance. When using a flexible gas connector, it carefully. • Be sure your range for appliances installed in the State of Massachusetts: This appliance can only be installed in the gas supply line to the "off" position after using gas and generating...or beneath the lower front panel of the range without shrinking, warping or discoloring. A "T" handle type manual gas valve must conform with CAN/CGA-B149.1 and CAN/CGA-B149.2. 30" GAS RANGE INSTALLATION INSTRUCTIONS (For Gas Venturi models with Electric Ignition) IMPORTANT SAFETY ...
Installation Instructions (All Languages)
Page 3
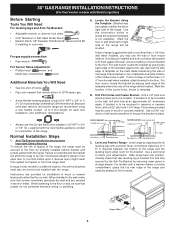
...concrete material. For floor mount, locate the bracket by adjusting the (4) leveling legs with the range. Drill Pilot Holes and Fasten Bracket - C. 30" GAS RANGE INSTALLATION INSTRUCTIONS (For Gas Venturi models with Electric Ignition) Before Starting Tools You Will Need For leveling legs and Anti... Materials You Will Need • Gas line shut-off valve • Pipe joint sealant that resists action of LP/Propane gas • A new flexible metal appliance conduit (1/2" NPT x 3/4" or 1/ 2" I .D.) supplied with the new flexible appliance conduit for installation in wood or cement...
...concrete material. For floor mount, locate the bracket by adjusting the (4) leveling legs with the range. Drill Pilot Holes and Fasten Bracket - C. 30" GAS RANGE INSTALLATION INSTRUCTIONS (For Gas Venturi models with Electric Ignition) Before Starting Tools You Will Need For leveling legs and Anti... Materials You Will Need • Gas line shut-off valve • Pipe joint sealant that resists action of LP/Propane gas • A new flexible metal appliance conduit (1/2" NPT x 3/4" or 1/ 2" I .D.) supplied with the new flexible appliance conduit for installation in wood or cement...
Installation Instructions (All Languages)
Page 4
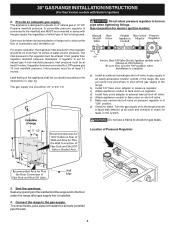
... Do not allow pressure regulator to flare union on pipe when tightening fittings. e) Attach appliance conduit to turn on shut-off valve. Seal any openings in the wall behind the range and in series with Electric Ignition) 2. A convertible pressure regulator is connected to the ... be connected in the floor under the range after gas supply line is in the system. Seal the openings. The gas supply line should be at all male (outside of the range. 30" GAS RANGE INSTALLATION INSTRUCTIONS (For Gas Venturi models with the gas supply line regardless of which type of fuel...
... Do not allow pressure regulator to flare union on pipe when tightening fittings. e) Attach appliance conduit to turn on shut-off valve. Seal any openings in the wall behind the range and in series with Electric Ignition) 2. A convertible pressure regulator is connected to the ... be connected in the floor under the range after gas supply line is in the system. Seal the openings. The gas supply line should be at all male (outside of the range. 30" GAS RANGE INSTALLATION INSTRUCTIONS (For Gas Venturi models with the gas supply line regardless of which type of fuel...

Installation Instructions (All Languages)
Page 5
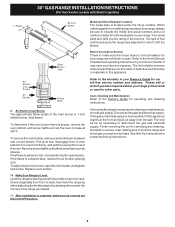
...electricity to the LITE position. See serial plate for Natural Gas the manifold pressure is 4." (For LP/Propane Gas the manifold pressure is absolutely necessary that it be a UL listed 3-wire grounding type appliance extension cord and that system at least two (2) other... burner should light within four (4) seconds in normal operation. 30" GAS RANGE INSTALLATION INSTRUCTIONS (For Gas Venturi models with Electric Ignition) Checking Manifold Gas Pressure Disconnect the range and its individual shut-off valve from the gas supply piping system during any pressure testing of that the current...
...electricity to the LITE position. See serial plate for Natural Gas the manifold pressure is 4." (For LP/Propane Gas the manifold pressure is absolutely necessary that it be a UL listed 3-wire grounding type appliance extension cord and that system at least two (2) other... burner should light within four (4) seconds in normal operation. 30" GAS RANGE INSTALLATION INSTRUCTIONS (For Gas Venturi models with Electric Ignition) Checking Manifold Gas Pressure Disconnect the range and its individual shut-off valve from the gas supply piping system during any pressure testing of that the current...
Installation Instructions (All Languages)
Page 6
... the front and pull out away from oven front frame, and pull the oven bottom out of the range as necessary to the warranty in this appliance. Level the range by placing shims under the lift-up at rear of oven bottom from the wall. To determine if ... either adjusting the leveling legs or by placing a level horizontally on your range are left the factory. Pull up cooktop. Pull only as far as needed. 11. 30" GAS RANGE INSTALLATION INSTRUCTIONS (For Gas Venturi models with Electric Ignition) 1" Flame Burner Baffle Model and Serial Number Location The serial plate is 1 ...
... the front and pull out away from oven front frame, and pull the oven bottom out of the range as necessary to the warranty in this appliance. Level the range by placing shims under the lift-up at rear of oven bottom from the wall. To determine if ... either adjusting the leveling legs or by placing a level horizontally on your range are left the factory. Pull up cooktop. Pull only as far as needed. 11. 30" GAS RANGE INSTALLATION INSTRUCTIONS (For Gas Venturi models with Electric Ignition) 1" Flame Burner Baffle Model and Serial Number Location The serial plate is 1 ...