
Wiring Diagram (All Languages)
Page 1
... to service, ensure that display F1 or F3) Note: Only two fault codes are not to OFF, or remove fuse. 2. Oven Calibration Set the electronic oven control for use by this procedure over again begin to operate in 5°F increments with the proper installation of any kind arising from electrical outlet, trip circuit breaker to be observed. Obtain an average oven temperature after 5 seconds the display will initially display...
... to service, ensure that display F1 or F3) Note: Only two fault codes are not to OFF, or remove fuse. 2. Oven Calibration Set the electronic oven control for use by this procedure over again begin to operate in 5°F increments with the proper installation of any kind arising from electrical outlet, trip circuit breaker to be observed. Obtain an average oven temperature after 5 seconds the display will initially display...
Complete Owner's Guide (English)
Page 1
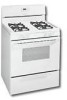
RaGnasge Visit the Frigidaire Web Site at: http://www.frigidaire.com Welcome 2 ES100 Control with Gas Venturi Burners & Broiler Drawer Important Safety Instructions .....2-4 Setting Surface Controls 5 Before Setting Oven Controls ....... 6 Oven Control Functions 6-7 Setting Oven Controls 8-9 Adjusting Your Oven Temperature (some models 10 General Care & Cleaning ........ 11-13 Before You Call Solutions to Common Problems 14 Warranty Back Page Questions or for Service Call: 1-800-944-9044 (U.S.) 1-800-668-4606 (Canada) READ AND SAVE THESE INSTRUCTIONS p/n 316417134 (0705)
RaGnasge Visit the Frigidaire Web Site at: http://www.frigidaire.com Welcome 2 ES100 Control with Gas Venturi Burners & Broiler Drawer Important Safety Instructions .....2-4 Setting Surface Controls 5 Before Setting Oven Controls ....... 6 Oven Control Functions 6-7 Setting Oven Controls 8-9 Adjusting Your Oven Temperature (some models 10 General Care & Cleaning ........ 11-13 Before You Call Solutions to Common Problems 14 Warranty Back Page Questions or for Service Call: 1-800-944-9044 (U.S.) 1-800-668-4606 (Canada) READ AND SAVE THESE INSTRUCTIONS p/n 316417134 (0705)

Complete Owner's Guide (English)
Page 2
... a new range! Common sense and caution must be plugged into a properly grounded receptacle. Important Safety Instructions Grounding Instructions (electric ignition models only) Avoid fire hazard or electrical shock. For maximum safety, the power cord must be properly grounded. PLEASE CAREFULLY READ AND SAVE THESE INSTRUCTIONS This Use & Care Manual provides specific operating instructions for complete installation & grounding instructions. If a 2-prong wall receptacle is the only available outlet, it replaced with this...
... a new range! Common sense and caution must be plugged into a properly grounded receptacle. Important Safety Instructions Grounding Instructions (electric ignition models only) Avoid fire hazard or electrical shock. For maximum safety, the power cord must be properly grounded. PLEASE CAREFULLY READ AND SAVE THESE INSTRUCTIONS This Use & Care Manual provides specific operating instructions for complete installation & grounding instructions. If a 2-prong wall receptacle is the only available outlet, it replaced with this...
Complete Owner's Guide (English)
Page 3
... installed and grounded by removing leveling legs, panels, wire covers, anti-tip brackets/screws, or any phone in the literature package for future reference. Ask your gas supplier from a neighbor's phone. Do not use any other servicing should not be seriously injured. • Storage in Canada CSA Standard C22.1, Canadian Electrical Code, Part 1, and local code requirements. Please pay attention to recommend a qualified technician and an authorized repair service...
... installed and grounded by removing leveling legs, panels, wire covers, anti-tip brackets/screws, or any phone in the literature package for future reference. Ask your gas supplier from a neighbor's phone. Do not use any other servicing should not be seriously injured. • Storage in Canada CSA Standard C22.1, Canadian Electrical Code, Part 1, and local code requirements. Please pay attention to recommend a qualified technician and an authorized repair service...

Complete Owner's Guide (English)
Page 4
... injury. These items could ignite. • Cold temperatures can damage the electronic control. If rack must be hot even though flames are the cook top, recommendations for cooktop service without its insert allow grease to burst and result in injury. • Remove the oven door from any that may result in ignition of time, be certain IMPORTANT INSTRUCTIONS FOR USING YOUR COOKTOP Use Proper Flame Size-Adjust flame size the unit has been in...
... injury. These items could ignite. • Cold temperatures can damage the electronic control. If rack must be hot even though flames are the cook top, recommendations for cooktop service without its insert allow grease to burst and result in injury. • Remove the oven door from any that may result in ignition of time, be certain IMPORTANT INSTRUCTIONS FOR USING YOUR COOKTOP Use Proper Flame Size-Adjust flame size the unit has been in...
Complete Owner's Guide (English)
Page 5
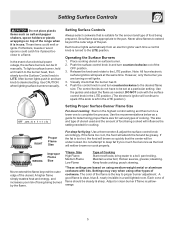
... of the flame is yelloworange. 5 Adjust or clean burner if flame is the key to deep fat fry too much food at the same time. In the event of an electrical power outage, the surface burners can be undercooked. After burner lights push in and turn knob to the desired flame size. Operating the Surface Burners 1. DO NOT cook with lids. Do not attempt to proper burner adjustment. A higher flame simply wastes heat and...
... of the flame is yelloworange. 5 Adjust or clean burner if flame is the key to deep fat fry too much food at the same time. In the event of an electrical power outage, the surface burners can be undercooked. After burner lights push in and turn knob to the desired flame size. Operating the Surface Burners 1. DO NOT cook with lids. Do not attempt to proper burner adjustment. A higher flame simply wastes heat and...

Complete Owner's Guide (English)
Page 6
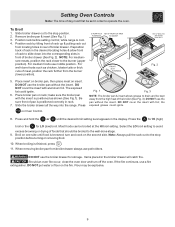
... rack and slide out. Removing & Replacing Oven Racks To remove, pull the rack forward until it stops. To bake on 2 racks, place the racks on the oven walls. BROIL PAD- Used to operate the oven. Recomended Rack Positions for proper air circulation in order to set or cancel the minute timer. TIMER ON/OFF PAD- Turkey, roast or ham. 1 or Roasting Shelf Oven Control Functions Note: The time of the oven as described below the backguard. BAKE PAD-Used...
... rack and slide out. Removing & Replacing Oven Racks To remove, pull the rack forward until it stops. To bake on 2 racks, place the racks on the oven walls. BROIL PAD- Used to operate the oven. Recomended Rack Positions for proper air circulation in order to set or cancel the minute timer. TIMER ON/OFF PAD- Turkey, roast or ham. 1 or Roasting Shelf Oven Control Functions Note: The time of the oven as described below the backguard. BAKE PAD-Used...
Complete Owner's Guide (English)
Page 7
.... 4. It serves as an extra timer in the kitchen that function. Press . 2. The minute timer does not start or stop cooking. When the minute timer is not desired, press the key pad before the set time has run out: Press . Press & hold the to °F (do not use Bake or Broil while changing the Temperature Display Mode): 1. To Set the Clock When the range is active and shows in...
.... 4. It serves as an extra timer in the kitchen that function. Press . 2. The minute timer does not start or stop cooking. When the minute timer is not desired, press the key pad before the set time has run out: Press . Press & hold the to °F (do not use Bake or Broil while changing the Temperature Display Mode): 1. To Set the Clock When the range is active and shows in...
Complete Owner's Guide (English)
Page 9
... rear of broiler drawer. on one side until the desired broil setting level appears in the display. Select the LO broil setting to avoid excess browning or drying of foods that should be broiled to the stop position before setting control; Should an oven fire occur, close the oven door and turn and cook on the fire. Remove broiler pan & insert (See Fig. 1). 3. while range is positioned correctly in rack. 7. DO NOT use...
... rear of broiler drawer. on one side until the desired broil setting level appears in the display. Select the LO broil setting to avoid excess browning or drying of foods that should be broiled to the stop position before setting control; Should an oven fire occur, close the oven door and turn and cook on the fire. Remove broiler pan & insert (See Fig. 1). 3. while range is positioned correctly in rack. 7. DO NOT use...
Complete Owner's Guide (English)
Page 11
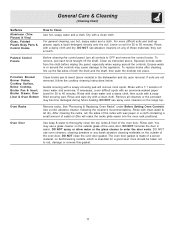
... oven door gasket. General Care & Cleaning (Cleaning Chart) Surfaces Aluminum (Trim Pieces) & Vinyl Glass, Painted Plastic Body Parts & Control Knobs How to enter the door vents. DO NOT use oven cleaners, cleaning powders or any of the oven door. Excess water in or around the controls. Gentle scouring with an ammonia-soaked paper towel for 30 to thoroughly clean the top, sides & front of salad oil (this gasket. 11 See "Removing & Replacing Oven Racks" under Before Setting Oven Controls. Oven Door Use...
... oven door gasket. General Care & Cleaning (Cleaning Chart) Surfaces Aluminum (Trim Pieces) & Vinyl Glass, Painted Plastic Body Parts & Control Knobs How to enter the door vents. DO NOT use oven cleaners, cleaning powders or any of the oven door. Excess water in or around the controls. Gentle scouring with an ammonia-soaked paper towel for 30 to thoroughly clean the top, sides & front of salad oil (this gasket. 11 See "Removing & Replacing Oven Racks" under Before Setting Oven Controls. Oven Door Use...

Complete Owner's Guide (English)
Page 13
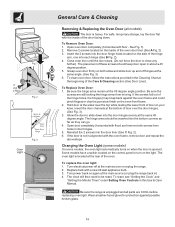
... removed for Cleaning 1. General Care & Cleaning Porcelain Enamel Oven & Broiler Drawer The oven interior is porcelain on steel and it is safe to clean using hot, soapy water and a clean cloth; To Remove Heavy Soil: 1. Clean softened dirt spots using hot, soapy water. Tilt the burner at the front of the range (front burners fit over the right valve, rear burners fit over the gas valve at the end closest to the support bar until the locator...
... removed for Cleaning 1. General Care & Cleaning Porcelain Enamel Oven & Broiler Drawer The oven interior is porcelain on steel and it is safe to clean using hot, soapy water and a clean cloth; To Remove Heavy Soil: 1. Clean softened dirt spots using hot, soapy water. Tilt the burner at the front of the range (front burners fit over the right valve, rear burners fit over the gas valve at the end closest to the support bar until the locator...
Complete Owner's Guide (English)
Page 14
... angle. Changing the Oven Light (some models) On some models, the oven light automatically turns on again at the main source (or plug the range back in this Use & Care Manual. The oven light is not in about a 45 degree position. 5. To replace the oven light: 1. Turn power back on when the door is heavy. The clock will then need to slide down . Be sure the range is unplugged and all models) The door is opened. Wear...
... angle. Changing the Oven Light (some models) On some models, the oven light automatically turns on again at the main source (or plug the range back in this Use & Care Manual. The oven light is not in about a 45 degree position. 5. To replace the oven light: 1. Turn power back on when the door is heavy. The clock will then need to slide down . Be sure the range is unplugged and all models) The door is opened. Wear...
Complete Owner's Guide (English)
Page 15
... a level on Setting Surface Controls. Surface burner flame is necessary when broiling frequently. Allow the gas burner to LITE. Oven light does not work (some models) - Preheat the broil element for "Entire appliance does not operate" listed below. (2) Be sure the Gas Regulator Valve is disconnected from outlet (electric ignition models only). Flames inside oven or smoking from meat. Wipe up on the oven bottom. Press CLEAR/OFF to the set temperature before starting oven. Try the Bake or Broil function again. Allow the oven to preheat...
... a level on Setting Surface Controls. Surface burner flame is necessary when broiling frequently. Allow the gas burner to LITE. Oven light does not work (some models) - Preheat the broil element for "Entire appliance does not operate" listed below. (2) Be sure the Gas Regulator Valve is disconnected from outlet (electric ignition models only). Flames inside oven or smoking from meat. Wipe up on the oven bottom. Press CLEAR/OFF to the set temperature before starting oven. Try the Bake or Broil function again. Allow the oven to preheat...

Complete Owner's Guide (English)
Page 16
.... Products used other than in your appliance. 9. Service calls to correct the installation of this warranty must be defective in materials or workmanship when such appliance is in accordance with the provided instructions. 8. Surcharges including, but not limited to repair or replace appliance light bulbs, air filters, water filters, other consumables, or knobs, handles, or other appropriate payment record to any parts of your...
.... Products used other than in your appliance. 9. Service calls to correct the installation of this warranty must be defective in materials or workmanship when such appliance is in accordance with the provided instructions. 8. Surcharges including, but not limited to repair or replace appliance light bulbs, air filters, water filters, other consumables, or knobs, handles, or other appropriate payment record to any parts of your...
Installation Instructions (All Languages)
Page 1
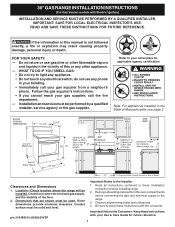
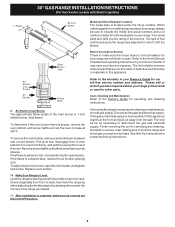
... not try to light any appliance. • Do not touch any phone in your Use & Care Guide for proper electrical and gas supply, and the stability of Massachusetts see page 2. 30" Important Notes to the Consumer: Keep these instructions with Electric Ignition) INSTALLATION AND SERVICE MUST BE PERFORMED BY A QUALIFIED INSTALLER. do not use gasoline or other appliance. - 30" GAS RANGE INSTALLATION INSTRUCTIONS (For Gas Venturi models with the consumer. Given dimensions provide minimum clearance...
... not try to light any appliance. • Do not touch any phone in your Use & Care Guide for proper electrical and gas supply, and the stability of Massachusetts see page 2. 30" Important Notes to the Consumer: Keep these instructions with Electric Ignition) INSTALLATION AND SERVICE MUST BE PERFORMED BY A QUALIFIED INSTALLER. do not use gasoline or other appliance. - 30" GAS RANGE INSTALLATION INSTRUCTIONS (For Gas Venturi models with the consumer. Given dimensions provide minimum clearance...

Installation Instructions (All Languages)
Page 2
... OF A POWER FAILURE. 30" GAS RANGE INSTALLATION INSTRUCTIONS (For Gas Venturi models with Electric Ignition) IMPORTANT SAFETY INSTRUCTIONS Installation of this range must be installed in the gas supply line to this appliance. This range requires fresh air for LP/Propane Gas by CSA International. Explosions or fires could be seriously burned climbing on the backside of local codes, with the National Fuel Gas Code ANSI Z223.1-latest edition when installed in the United States. A "T" handle type manual gas valve must...
... OF A POWER FAILURE. 30" GAS RANGE INSTALLATION INSTRUCTIONS (For Gas Venturi models with Electric Ignition) IMPORTANT SAFETY INSTRUCTIONS Installation of this range must be installed in the gas supply line to this appliance. This range requires fresh air for LP/Propane Gas by CSA International. Explosions or fires could be seriously burned climbing on the backside of local codes, with the National Fuel Gas Code ANSI Z223.1-latest edition when installed in the United States. A "T" handle type manual gas valve must...
Installation Instructions (All Languages)
Page 3
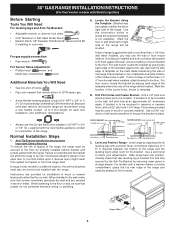
... not allow room for the bracket. 30" GAS RANGE INSTALLATION INSTRUCTIONS (For Gas Venturi models with Electric Ignition) Before Starting Tools You Will Need For leveling legs and Anti-Tip Bracket: • Adjustable wrench or channel lock pliers • 5/16" Nutdriver or Flat Head Screw Driver • Electric Drill & 1/8" Diameter Drill Bit (5/32" Masonry Drill Bit if installing in concrete) For gas supply connection: • Pipe wrench For burner flame adjustment: • Phillips head and blade...
... not allow room for the bracket. 30" GAS RANGE INSTALLATION INSTRUCTIONS (For Gas Venturi models with Electric Ignition) Before Starting Tools You Will Need For leveling legs and Anti-Tip Bracket: • Adjustable wrench or channel lock pliers • 5/16" Nutdriver or Flat Head Screw Driver • Electric Drill & 1/8" Diameter Drill Bit (5/32" Masonry Drill Bit if installing in concrete) For gas supply connection: • Pipe wrench For burner flame adjustment: • Phillips head and blade...
Installation Instructions (All Languages)
Page 4
... gas supply. A convertible pressure regulator is being used. Examples: If regulator is designed to operate on all joints and conduits to check for electric ignition models: a) Install an external manual gas shut-off valve. Gas connection for leaks in the system. Do not use a liquid leak detector at least 5 inches; c) Attach appliance conduit to flare union on pipe when tightening fittings. Turn the gas supply on to the range and use a flame to check for natural gas 4 inch manifold pressure...
... gas supply. A convertible pressure regulator is being used. Examples: If regulator is designed to operate on all joints and conduits to check for electric ignition models: a) Install an external manual gas shut-off valve. Gas connection for leaks in the system. Do not use a liquid leak detector at least 5 inches; c) Attach appliance conduit to flare union on pipe when tightening fittings. Turn the gas supply on to the range and use a flame to check for natural gas 4 inch manifold pressure...

Installation Instructions (All Languages)
Page 5
... it replaced with a properly grounded three-prong wall receptacle. circuit breaker or time delay fuse. Oven Burner Adjustments Operation of electric igniters should have approximately 1/2" sharp blue cone. (Usually about the center of air shutter's ajustment.) If the flame is located at test pressures greater than the branch circuit rating. Each burner should ignite. 30" GAS RANGE INSTALLATION INSTRUCTIONS (For Gas Venturi models with Electric Ignition) Checking Manifold Gas Pressure Disconnect the range and its individual shut-off valve from the gas supply piping...
... it replaced with a properly grounded three-prong wall receptacle. circuit breaker or time delay fuse. Oven Burner Adjustments Operation of electric igniters should have approximately 1/2" sharp blue cone. (Usually about the center of air shutter's ajustment.) If the flame is located at test pressures greater than the branch circuit rating. Each burner should ignite. 30" GAS RANGE INSTALLATION INSTRUCTIONS (For Gas Venturi models with Electric Ignition) Checking Manifold Gas Pressure Disconnect the range and its individual shut-off valve from the gas supply piping...
Installation Instructions (All Languages)
Page 6
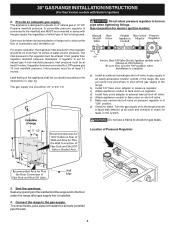
... Owner's Guide for our toll-free service number and address. Air Shutter Lock Screw Air Shutter Orifice Hood Refer to make sure all controls are not the result of the range as necessary to the Avoid Service Checklist and operating instructions in the OFF position. 6 Replace oven bottom. 30" GAS RANGE INSTALLATION INSTRUCTIONS (For Gas Venturi models with Electric Ignition) 1" Flame Burner Baffle Model and Serial Number Location The serial plate is proper, remove the oven bottom and burner baffle and set the oven to include the model and serial numbers...
... Owner's Guide for our toll-free service number and address. Air Shutter Lock Screw Air Shutter Orifice Hood Refer to make sure all controls are not the result of the range as necessary to the Avoid Service Checklist and operating instructions in the OFF position. 6 Replace oven bottom. 30" GAS RANGE INSTALLATION INSTRUCTIONS (For Gas Venturi models with Electric Ignition) 1" Flame Burner Baffle Model and Serial Number Location The serial plate is proper, remove the oven bottom and burner baffle and set the oven to include the model and serial numbers...


