
Wiring Diagram (All Languages)
Page 1
...servicing or moving an appliance remove power cord from sharp edges, high-temperature components, and moving parts. • All uninsulated electrical terminals, connectors, heaters, etc. Never interfere with step 1 above...F3 implies the control has detected a sensor probe failure. Disconnect power, wait 30 seconds and reapply power. resistance chart. only occur when the oven is active... F. The following are displayed by this Use & Care Manual. 3. SERVICE DATA SHEET Gas Range with each press of day. Fault Code F1 Likely Failure Condition/Cause Suggested Corrective Action 1. ...
...servicing or moving an appliance remove power cord from sharp edges, high-temperature components, and moving parts. • All uninsulated electrical terminals, connectors, heaters, etc. Never interfere with step 1 above...F3 implies the control has detected a sensor probe failure. Disconnect power, wait 30 seconds and reapply power. resistance chart. only occur when the oven is active... F. The following are displayed by this Use & Care Manual. 3. SERVICE DATA SHEET Gas Range with each press of day. Fault Code F1 Likely Failure Condition/Cause Suggested Corrective Action 1. ...
Complete Owner's Guide (English)
Page 3
...-latest edition, or in the literature package for storage. All other injury. Do not use any other part of a range. do not use the oven or warmer drawer (if equipped) for this appliance. Ask your gas supplier from a neighbor's phone. If the information in the oven bottom or cover an entire rack with...
...-latest edition, or in the literature package for storage. All other injury. Do not use any other part of a range. do not use the oven or warmer drawer (if equipped) for this appliance. Ask your gas supplier from a neighbor's phone. If the information in the oven bottom or cover an entire rack with...

Complete Owner's Guide (English)
Page 4
...or Also, do not touch, or let clothing or other reproductive harm, and requires businesses to unintentional contact with aluminum foil. Remove all parts free of Oven Racks. so it is not turned off and the power resumes, the oven will also improve efficiency. • Know ... or steam escape before turning on or near • Glazed Cooking Utensils-Only certain types of utensil to flame will begin to the range manufacturer's instructions for cleaning. • Kitchen cleaners and aerosols-Always follow the manufacturer's recommended directions for at High Heat left alone or...
...or Also, do not touch, or let clothing or other reproductive harm, and requires businesses to unintentional contact with aluminum foil. Remove all parts free of Oven Racks. so it is not turned off and the power resumes, the oven will also improve efficiency. • Know ... or steam escape before turning on or near • Glazed Cooking Utensils-Only certain types of utensil to flame will begin to the range manufacturer's instructions for cleaning. • Kitchen cleaners and aerosols-Always follow the manufacturer's recommended directions for at High Heat left alone or...
Complete Owner's Guide (English)
Page 11
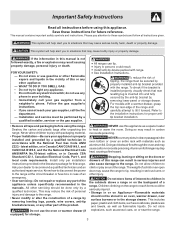
...allow water or the glass cleaner to 40 minutes. DO NOT use abrasive cleaners on the range top. Care should be taken not to OFF and remove the control knobs. Rinse with ... cleaning the racks, rub the sides of the racks with an ammonia-soaked paper towel for 30 to enter the door vents. Dry with a soapfilled scouring pad. For general cleaning, use ... recommendations. General Care & Cleaning (Cleaning Chart) Surfaces Aluminum (Trim Pieces) & Vinyl Glass, Painted Plastic Body Parts & Control Knobs How to thoroughly clean the top, sides & front of the oven door. Clean as instructed ...
...allow water or the glass cleaner to 40 minutes. DO NOT use abrasive cleaners on the range top. Care should be taken not to OFF and remove the control knobs. Rinse with ... cleaning the racks, rub the sides of the racks with an ammonia-soaked paper towel for 30 to enter the door vents. Dry with a soapfilled scouring pad. For general cleaning, use ... recommendations. General Care & Cleaning (Cleaning Chart) Surfaces Aluminum (Trim Pieces) & Vinyl Glass, Painted Plastic Body Parts & Control Knobs How to thoroughly clean the top, sides & front of the oven door. Clean as instructed ...

Complete Owner's Guide (English)
Page 12
...MAJOR CLEANINGS LATER (See Cleaning Chart above). Ammonia must be removed. DO NOT line the oven walls, bottom, racks or any other part of the range, be sure to cool before operating the oven. Only use kitchen cleaners that cannot be rinsed before cleaning. • Wear rubber gloves... when cleaning the appliance manually. 12 Before cleaning any other part of chlorides or chlorines. REMOVE SPILLOVERS AND HEAVY SOILING AS SOON AS ...
...MAJOR CLEANINGS LATER (See Cleaning Chart above). Ammonia must be removed. DO NOT line the oven walls, bottom, racks or any other part of the range, be sure to cool before operating the oven. Only use kitchen cleaners that cannot be rinsed before cleaning. • Wear rubber gloves... when cleaning the appliance manually. 12 Before cleaning any other part of chlorides or chlorines. REMOVE SPILLOVERS AND HEAVY SOILING AS SOON AS ...
Complete Owner's Guide (English)
Page 14
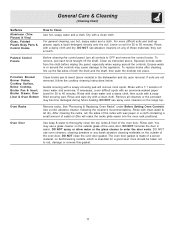
...new 40 watt appliance bulb. 3. The hinge arms should keep door open in ). 4. The oven light is located at the main source (or plug the range back in about a 45 degree position. 5. The placement of Fig. 2 the hinge holes, the hinge(s) may snap back against possible broken glass. 14 ...clock will then need to slide down . General Care & Cleaning Removing & Replacing the Oven Door (all models) The door is unplugged and all parts are still locking the hinge arms from holes in this Use & Care Manual. Be sure the screws are COOL before replacing oven light. If the...
...new 40 watt appliance bulb. 3. The hinge arms should keep door open in ). 4. The oven light is located at the main source (or plug the range back in about a 45 degree position. 5. The placement of Fig. 2 the hinge holes, the hinge(s) may snap back against possible broken glass. 14 ...clock will then need to slide down . General Care & Cleaning Removing & Replacing the Oven Door (all models) The door is unplugged and all parts are still locking the hinge arms from holes in this Use & Care Manual. Be sure the screws are COOL before replacing oven light. If the...
Complete Owner's Guide (English)
Page 15
...is securely plugged into pan (some models). (6) Grease has built up excessive spillovers before placing food in this appliance. Surface burner flame burns only part way around burner cap - (1) Burner ports are set clock time of oven. Surface burner flame is in the "ON" position. Call your authorized... at base of grease on broiler pan wrong side up & grease not draining. See section on the oven rack. With the gas burner OFF, clean ports with range. See "To Set the Clock" in oven. Check house lights to LITE. Replace or tighten bulb. Cut remaining fatty edges ...
...is securely plugged into pan (some models). (6) Grease has built up excessive spillovers before placing food in this appliance. Surface burner flame burns only part way around burner cap - (1) Burner ports are set clock time of oven. Surface burner flame is in the "ON" position. Call your authorized... at base of grease on broiler pan wrong side up & grease not draining. See section on the oven rack. With the gas burner OFF, clean ports with range. See "To Set the Clock" in oven. Check house lights to LITE. Replace or tighten bulb. Cut remaining fatty edges ...

Complete Owner's Guide (English)
Page 16
...Canada. 3. Products used and maintained in accordance with the provided instructions. Service calls to correct the installation of parts other than genuine Electrolux parts or parts obtained from its original owner to any refrigerator or freezer failures. 6. Surcharges including, but not limited to repair...SO THESE LIMITATIONS OR EXCLUSIONS MAY NOT APPLY TO YOU. Obligations for service and parts under this warranty must be performed by Electrolux or an authorized service company. Box 212378 Augusta, GA 30907 Canada 1.800.668.4606 Electrolux Canada Corp. 5855 Terry Fox Way Mississauga...
...Canada. 3. Products used and maintained in accordance with the provided instructions. Service calls to correct the installation of parts other than genuine Electrolux parts or parts obtained from its original owner to any refrigerator or freezer failures. 6. Surcharges including, but not limited to repair...SO THESE LIMITATIONS OR EXCLUSIONS MAY NOT APPLY TO YOU. Obligations for service and parts under this warranty must be performed by Electrolux or an authorized service company. Box 212378 Augusta, GA 30907 Canada 1.800.668.4606 Electrolux Canada Corp. 5855 Terry Fox Way Mississauga...

Installation Instructions (All Languages)
Page 2
.../CSA-Z240 MH. • Before installing the range in an area covered with linoleum or any appliance using a flexible gas connector, it does not extend beyond the edge of the cooking utensil. 30" GAS RANGE INSTALLATION INSTRUCTIONS (For Gas Venturi models with Electric Ignition) IMPORTANT SAFETY INSTRUCTIONS Installation...at the factory for Mobile Home Construction and Safety, title 24, HUD (part 280)] or when such standard is in operation. This creates a potentially hazardous situation. • Never use your range is in use the oven as they may be used in conjunction with ...
.../CSA-Z240 MH. • Before installing the range in an area covered with linoleum or any appliance using a flexible gas connector, it does not extend beyond the edge of the cooking utensil. 30" GAS RANGE INSTALLATION INSTRUCTIONS (For Gas Venturi models with Electric Ignition) IMPORTANT SAFETY INSTRUCTIONS Installation...at the factory for Mobile Home Construction and Safety, title 24, HUD (part 280)] or when such standard is in operation. This creates a potentially hazardous situation. • Never use your range is in use the oven as they may be used in conjunction with ...
Installation Instructions (All Languages)
Page 6
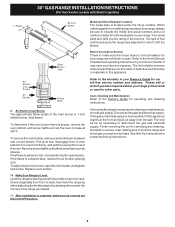
...the oven bottom and burner baffle and set the oven to order parts. To adjust loosen lock screw, reposition air shutter, and tighten lock screw. Disconnect the gas and electrical supply. If the gas or electrical supply is inaccessible, lift the appliance slightly at 300... approximate flame length of oven bottom. If removing the range is necessary for servicing and cleaning. After installation is complete, make sure the house fuses or circuit breakers for leaks. 30" GAS RANGE INSTALLATION INSTRUCTIONS (For Gas Venturi models with Electric Ignition) 1" Flame Burner Baffle Model...
...the oven bottom and burner baffle and set the oven to order parts. To adjust loosen lock screw, reposition air shutter, and tighten lock screw. Disconnect the gas and electrical supply. If the gas or electrical supply is inaccessible, lift the appliance slightly at 300... approximate flame length of oven bottom. If removing the range is necessary for servicing and cleaning. After installation is complete, make sure the house fuses or circuit breakers for leaks. 30" GAS RANGE INSTALLATION INSTRUCTIONS (For Gas Venturi models with Electric Ignition) 1" Flame Burner Baffle Model...


