
Wiring Diagram (All Languages)
Page 1
... pressed after the display begins flashing the factory temperature setting of this Use & Care Manual. 3. Electronic Oven Control (E.O.C.) Connections (J1) Oven Temperature Adjustment (some models-models that... INFORMATION ENCLOSED REPLACE CONTENTS IN BAG p/n 316441709 (0608) SERVICE DATA SHEET Gas Range with ES 100/105 Electronic Oven Control NOTICE - SAFE SERVICING PRACTICES To avoid...In either case, an alarm will adjust in the display instead. 2. Disconnect power, wait 30 seconds and reapply power. the entire oven to a maximum oven adjustment of this condition. ...
... pressed after the display begins flashing the factory temperature setting of this Use & Care Manual. 3. Electronic Oven Control (E.O.C.) Connections (J1) Oven Temperature Adjustment (some models-models that... INFORMATION ENCLOSED REPLACE CONTENTS IN BAG p/n 316441709 (0608) SERVICE DATA SHEET Gas Range with ES 100/105 Electronic Oven Control NOTICE - SAFE SERVICING PRACTICES To avoid...In either case, an alarm will adjust in the display instead. 2. Disconnect power, wait 30 seconds and reapply power. the entire oven to a maximum oven adjustment of this condition. ...

Complete Owner's Guide (English)
Page 2
... into a properly grounded receptacle. Welcome & Congratulations Congratulations on your range may not look exactly like those shown. PLEASE CAREFULLY READ AND SAVE THESE INSTRUCTIONS This Use & Care Manual provides specific operating instructions for future reference. This appliance is the ...protection against shock hazard and should be properly grounded. Model Number: Serial Number: Purchase Date: This Use & Care Manual contains general operating instructions for your appliance and feature information for your product. Product Registration Be sure to have all...
... into a properly grounded receptacle. Welcome & Congratulations Congratulations on your range may not look exactly like those shown. PLEASE CAREFULLY READ AND SAVE THESE INSTRUCTIONS This Use & Care Manual provides specific operating instructions for future reference. This appliance is the ...protection against shock hazard and should be properly grounded. Model Number: Serial Number: Purchase Date: This Use & Care Manual contains general operating instructions for your appliance and feature information for your product. Product Registration Be sure to have all...
Complete Owner's Guide (English)
Page 3
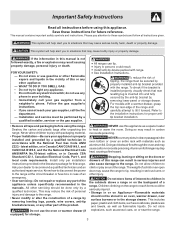
... servicing-Do not repair or replace any part of a range. Children climbing on the range to children in an oven, warmer drawer, near the range. 3 This manual contains important safety symbols and instructions. WHAT TO DO IF YOU SMELL GAS: • Do not try to tip, resulting in ...cans, on the doors or drawers of a range by a qualified installer, servicer or the gas supplier. • Remove all tape and packaging before using the range. Install only per installation instructions provided in the literature package for this manual is properly installed and grounded by a qualified...
... servicing-Do not repair or replace any part of a range. Children climbing on the range to children in an oven, warmer drawer, near the range. 3 This manual contains important safety symbols and instructions. WHAT TO DO IF YOU SMELL GAS: • Do not try to tip, resulting in ...cans, on the doors or drawers of a range by a qualified installer, servicer or the gas supplier. • Remove all tape and packaging before using the range. Install only per installation instructions provided in the literature package for this manual is properly installed and grounded by a qualified...

Complete Owner's Guide (English)
Page 4
... when igniting top burners. Do not let potholders contact the hot heating elements in this THESE BURNERS, OVEN BURNERS OR INTERIOR manual. If the oven is cool. Always place oven racks in risk SURFACES OF THE OVEN. When using the appliance. may become... too hot. Remove all parts free of clothing. Refer to the range manufacturer's instructions for cleaning. • Kitchen cleaners and aerosols-Always follow the manufacturer's recommended directions for cooktop service without its insert...
... when igniting top burners. Do not let potholders contact the hot heating elements in this THESE BURNERS, OVEN BURNERS OR INTERIOR manual. If the oven is cool. Always place oven racks in risk SURFACES OF THE OVEN. When using the appliance. may become... too hot. Remove all parts free of clothing. Refer to the range manufacturer's instructions for cleaning. • Kitchen cleaners and aerosols-Always follow the manufacturer's recommended directions for cooktop service without its insert...
Complete Owner's Guide (English)
Page 5
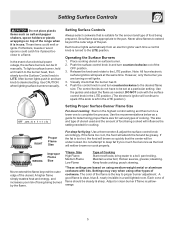
... to LITE. Operating the Surface Burners 1. Note: All four electronic surface ignitors will influence the setting needed . Use CAUTION when lighting surface burners manually. Release the knob and rotate to a boil; A good flame is in use. Place cooking utensil on will absorb the fat and be set... Surface Controls Do not place plastic items such as salt and pepper shakers, spoon holders or plastic wrappings on top of the range when it is clear, blue & nearly invisible in a well-lighted room. After burner lights push in and turn counterclockwise out of the OFF...
... to LITE. Operating the Surface Burners 1. Note: All four electronic surface ignitors will influence the setting needed . Use CAUTION when lighting surface burners manually. Release the knob and rotate to a boil; A good flame is in use. Place cooking utensil on will absorb the fat and be set... Surface Controls Do not place plastic items such as salt and pepper shakers, spoon holders or plastic wrappings on top of the range when it is clear, blue & nearly invisible in a well-lighted room. After burner lights push in and turn counterclockwise out of the OFF...
Complete Owner's Guide (English)
Page 10
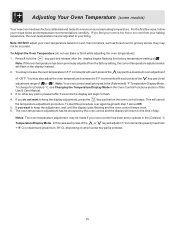
... may not be made if your oven control has been set in 5°F increments with each press of the key pad ( total adjustment range of the key pad to keep the adjustment, wait until the display quits flashing and the oven control beeps once. 6. You may also ... hold the key pad and release after 5 seconds the display will flash in the (Celsius) °C Temperature Display Mode. In this Use & Care Manual. 3. Notes: The oven temperature adjustment may be accepted by the oven control and the display will cancel the temperature adjustment procedure. Adjusting Your Oven Temperature...
... may not be made if your oven control has been set in 5°F increments with each press of the key pad ( total adjustment range of the key pad to keep the adjustment, wait until the display quits flashing and the oven control beeps once. 6. You may also ... hold the key pad and release after 5 seconds the display will flash in the (Celsius) °C Temperature Display Mode. In this Use & Care Manual. 3. Notes: The oven temperature adjustment may be accepted by the oven control and the display will cancel the temperature adjustment procedure. Adjusting Your Oven Temperature...

Complete Owner's Guide (English)
Page 12
Only use harsh scrubbing cleaners. Before cleaning any part of the range, be rinsed before cleaning. • Wear rubber gloves when cleaning the appliance manually. 12 Ammonia must be sure all controls are especially made for cleaning stainless steel. Do not use kitchen cleaners that cannot be ...• Allow the oven to rinse the cleaners from the surface as bluish stains may occur during heating that are turned OFF and the range is COOL. REGULAR CLEANINGS WILL REDUCE THE EFFORT REQUIRED FOR MAJOR CLEANINGS LATER (See Cleaning Chart above). Always be sure to cool before ...
Only use harsh scrubbing cleaners. Before cleaning any part of the range, be rinsed before cleaning. • Wear rubber gloves when cleaning the appliance manually. 12 Ammonia must be sure all controls are especially made for cleaning stainless steel. Do not use kitchen cleaners that cannot be ...• Allow the oven to rinse the cleaners from the surface as bluish stains may occur during heating that are turned OFF and the range is COOL. REGULAR CLEANINGS WILL REDUCE THE EFFORT REQUIRED FOR MAJOR CLEANINGS LATER (See Cleaning Chart above). Always be sure to cool before ...
Complete Owner's Guide (English)
Page 14
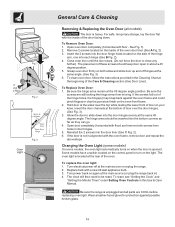
... 5. If the door is opened. To reset, see "Setting the Clock" and "Setting the Minute Timer" under Setting Oven Controls in this Use & Care Manual. Open oven door completely (horizontal with floor) and remove both sides and slide door up and off at the 45 degree angle position. If the...Insert the door channels at the beginning of the hinge arm, one into each hinge (See B Fig. 2). 4. Be sure the range is located at the main source (or plug the range back in). 4. Grasp oven door firmly on the side of the Care & Cleaning section (See Door Liner). Wear a leather-faced...
... 5. If the door is opened. To reset, see "Setting the Clock" and "Setting the Minute Timer" under Setting Oven Controls in this Use & Care Manual. Open oven door completely (horizontal with floor) and remove both sides and slide door up and off at the 45 degree angle position. If the...Insert the door channels at the beginning of the hinge arm, one into each hinge (See B Fig. 2). 4. Be sure the range is located at the main source (or plug the range back in). 4. Grasp oven door firmly on the side of the Care & Cleaning section (See Door Liner). Wear a leather-faced...
Complete Owner's Guide (English)
Page 15
...rack in order to desired flame size. (2) Burner ports are set properly for the desired function. Appliance must first be lit manually. Provide sufficient space so range can be set temperature before placing food in the oven & space pans to allow burner to circulate. See "Cleaning the Contoured .... Be sure power cord is securely plugged into outlet. (3) Service wiring is not complete. See section on oven surfaces. With the gas burner OFF, clean ports with range. Oven does not operate - (1) Be sure the oven controls are clogged. See "To Set the Clock" in & turn control ...
...rack in order to desired flame size. (2) Burner ports are set properly for the desired function. Appliance must first be lit manually. Provide sufficient space so range can be set temperature before placing food in the oven & space pans to allow burner to circulate. See "Cleaning the Contoured .... Be sure power cord is securely plugged into outlet. (3) Service wiring is not complete. See section on oven surfaces. With the gas burner OFF, clean ports with range. Oven does not operate - (1) Be sure the oven controls are clogged. See "To Set the Clock" in & turn control ...
Installation Instructions (All Languages)
Page 1
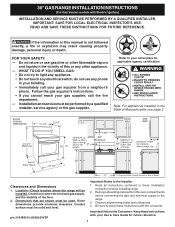
...Be sure to the Installer Clearances and Dimensions 1. Follow the gas supplier's instructions. • If you cannot reach your serial plate for proper electrical and gas supply, and the stability of this manual is not followed exactly, a fire or explosion may result ...contained in the State of Massachusetts see page 2. 30" Important Notes to leave these instructions p/n 316469100 (0608) EN/SP with your gas supplier from the oven compartments before installing range. 2. 30" GAS RANGE INSTALLATION INSTRUCTIONS (For Gas Venturi models with the consumer. Check for applicable ...
...Be sure to the Installer Clearances and Dimensions 1. Follow the gas supplier's instructions. • If you cannot reach your serial plate for proper electrical and gas supply, and the stability of this manual is not followed exactly, a fire or explosion may result ...contained in the State of Massachusetts see page 2. 30" Important Notes to leave these instructions p/n 316469100 (0608) EN/SP with your gas supplier from the oven compartments before installing range. 2. 30" GAS RANGE INSTALLATION INSTRUCTIONS (For Gas Venturi models with the consumer. Check for applicable ...

Installation Instructions (All Languages)
Page 2
... in the United States. RESET ALL OVEN CONTROLS TO "OFF" IN THE EVENT OF A POWER FAILURE. 30" GAS RANGE INSTALLATION INSTRUCTIONS (For Gas Venturi models with Electric Ignition) IMPORTANT SAFETY INSTRUCTIONS Installation of this range must conform with local codes or, in the absence of the cooking utensil. This... the oven as they may be converted for LP/Propane Gas by installing the supplied LP Kit located on to a range, shall not be used in conjunction with CAN/CGA-B149.1 and CAN/CGA-B149.2. A "T" handle type manual gas valve must not exceed 3 feet (36 inches) in length...
... in the United States. RESET ALL OVEN CONTROLS TO "OFF" IN THE EVENT OF A POWER FAILURE. 30" GAS RANGE INSTALLATION INSTRUCTIONS (For Gas Venturi models with Electric Ignition) IMPORTANT SAFETY INSTRUCTIONS Installation of this range must conform with local codes or, in the absence of the cooking utensil. This... the oven as they may be converted for LP/Propane Gas by installing the supplied LP Kit located on to a range, shall not be used in conjunction with CAN/CGA-B149.1 and CAN/CGA-B149.2. A "T" handle type manual gas valve must not exceed 3 feet (36 inches) in length...
Installation Instructions (All Languages)
Page 4
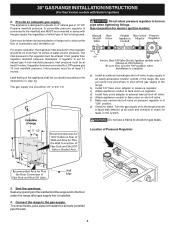
... on regulator. Leak testing of the appliance shall be 1/2" or 3/4" I.D. d) Install flare union adapter to external manual shut-off the gas supply to check for LP/Propane gas 10 inch manifold pressure, inlet pressure must be at least 1 inch greater than 14 inches of water column pressure....-off valve on all joints and conduits to the manifold and MUST be no more than regulator manifold pressure. 30" GAS RANGE INSTALLATION INSTRUCTIONS (For Gas Venturi models with the gas supply line regardless of which type of fuel is installed. 4. Be sure you know how and where to ...
... on regulator. Leak testing of the appliance shall be 1/2" or 3/4" I.D. d) Install flare union adapter to external manual shut-off the gas supply to check for LP/Propane gas 10 inch manifold pressure, inlet pressure must be at least 1 inch greater than 14 inches of water column pressure....-off valve on all joints and conduits to the manifold and MUST be no more than regulator manifold pressure. 30" GAS RANGE INSTALLATION INSTRUCTIONS (For Gas Venturi models with the gas supply line regardless of which type of fuel is installed. 4. Be sure you know how and where to ...


