
Installation Instructions
Page 1
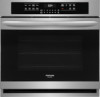
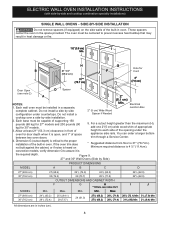
...Min. Printed in the space provided. B (2019/10) English - pages 1-10 Español - United States and Canada Your new wall oven has been designed to fit a variety of cutout sizes to the proper installation of the built-in heat damage or fire. SINGLE INSTALLATION For ...U.S.A. 1 PN 807153706 Rev. páginas 11-20 Français - pages 21-30 SINGLE WALL OVEN - NOTES: 1. If the oven trim does not butt against the cabinet, B or if noise is 31" (78.7cm). Figure 1 27" and 30" Single Wall Ovens PRODUCT DIMENSIONS MODEL A B C D 27" (68.6 cm) 30" (76.2 cm) MODEL...
...Min. Printed in the space provided. B (2019/10) English - pages 1-10 Español - United States and Canada Your new wall oven has been designed to fit a variety of cutout sizes to the proper installation of the built-in heat damage or fire. SINGLE INSTALLATION For ...U.S.A. 1 PN 807153706 Rev. páginas 11-20 Français - pages 21-30 SINGLE WALL OVEN - NOTES: 1. If the oven trim does not butt against the cabinet, B or if noise is 31" (78.7cm). Figure 1 27" and 30" Single Wall Ovens PRODUCT DIMENSIONS MODEL A B C D 27" (68.6 cm) 30" (76.2 cm) MODEL...
Installation Instructions
Page 2
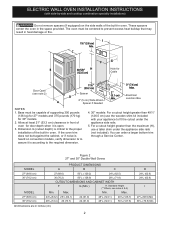
... use a taller shim under the appliance side rails. 5. You can order a larger bottom trim through a Service Center. ELECTRIC WALL OVEN INSTALLATION INSTRUCTIONS (with your appliance to fit the cutout under the appliance side rails (not included). I 271/8 (68.9) Min 301/8 (...2" (5.1 cm) Min. Electrical Junction Box A 2" (5 cm) Wide Wood Spacer if Needed NOTES: 1. These spacers center the oven in oven. Door Open (see notes 4 & 5) Min. Figure 2 27" and 30" Double Wall Ovens MODEL PRODUCT DIMENSIONS A B C 27" (68.6 cm) 30" (76.2 cm) MODEL 27 (68.6) 507/8 (129.2) ...
... use a taller shim under the appliance side rails. 5. You can order a larger bottom trim through a Service Center. ELECTRIC WALL OVEN INSTALLATION INSTRUCTIONS (with your appliance to fit the cutout under the appliance side rails (not included). I 271/8 (68.9) Min 301/8 (...2" (5.1 cm) Min. Electrical Junction Box A 2" (5 cm) Wide Wood Spacer if Needed NOTES: 1. These spacers center the oven in oven. Door Open (see notes 4 & 5) Min. Figure 2 27" and 30" Double Wall Ovens MODEL PRODUCT DIMENSIONS A B C 27" (68.6 cm) 30" (76.2 cm) MODEL 27 (68.6) 507/8 (129.2) ...
Installation Instructions
Page 3
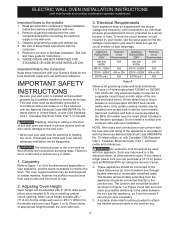
...or 120/208 Volt, 60 Hz AC only electrical supply is recommended. Prolonged use your wall oven for warming or heating the room. Failure to the wall oven. • Never use of the wall oven without adequate ventilation can also cause damage to do so could result in a fire, ...or 50A 6201W - 8300W 40A or 50A 9601W and + 50A 8301W and + 50A Table A Observe all packing material from the oven compartments before installing the wall oven. 2. Do not install a cooktop over certain built-in Canada. The flexible armored cable extending from front to the junction box. 3...
...or 120/208 Volt, 60 Hz AC only electrical supply is recommended. Prolonged use your wall oven for warming or heating the room. Failure to the wall oven. • Never use of the wall oven without adequate ventilation can also cause damage to do so could result in a fire, ...or 50A 6201W - 8300W 40A or 50A 9601W and + 50A 8301W and + 50A Table A Observe all packing material from the oven compartments before installing the wall oven. 2. Do not install a cooktop over certain built-in Canada. The flexible armored cable extending from front to the junction box. 3...

Installation Instructions
Page 4
...a fire, personal injury or electrical shock. Where local codes permit connecting the appliancegrounding conductor to larger gauge household wiring. ELECTRIC WALL OVEN INSTALLATION INSTRUCTIONS (with side-by-side and cooktop combination specialty installations) Electrical Shock Hazard • Electrical ground is required on this...8226; Disconnect power to the junction box before switching on power. In cold weather shipping and storage conditions, make sure that oven is made to the grounding terminal or wire lead on the appliance. • Do not use only connectors that the ...
...a fire, personal injury or electrical shock. Where local codes permit connecting the appliancegrounding conductor to larger gauge household wiring. ELECTRIC WALL OVEN INSTALLATION INSTRUCTIONS (with side-by-side and cooktop combination specialty installations) Electrical Shock Hazard • Electrical ground is required on this...8226; Disconnect power to the junction box before switching on power. In cold weather shipping and storage conditions, make sure that oven is made to the grounding terminal or wire lead on the appliance. • Do not use only connectors that the ...
Installation Instructions
Page 5
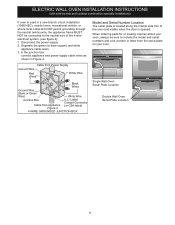
... White Wire Black Wires Ground Wire (Bare or Green Wire) White Wire Junction Box Cable from the serial plate on your oven, always be connected to include the model and serial numbers and a lot number or letter from appliance Figure 4 U.L.-Listed ...system. (see figure 4): 1. Disconnect the power supply. 2. ELECTRIC WALL OVEN INSTALLATION INSTRUCTIONS (with side-by-side and cooktop combination specialty installations) If oven is used in Figure 4. Single Wall Oven Serial Plate Location Double Wall Oven Serial Plate Location 5 In the junction box: connect appliance and power...
... White Wire Black Wires Ground Wire (Bare or Green Wire) White Wire Junction Box Cable from the serial plate on your oven, always be connected to include the model and serial numbers and a lot number or letter from appliance Figure 4 U.L.-Listed ...system. (see figure 4): 1. Disconnect the power supply. 2. ELECTRIC WALL OVEN INSTALLATION INSTRUCTIONS (with side-by-side and cooktop combination specialty installations) If oven is used in Figure 4. Single Wall Oven Serial Plate Location Double Wall Oven Serial Plate Location 5 In the junction box: connect appliance and power...

Installation Instructions
Page 6
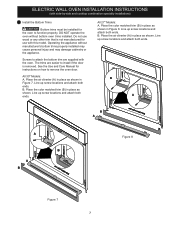
B. Anti-Tip Mounting Holes Figure 6 1½" (3.8 cm) clearance between the oven and front of the wall oven and injury to the unit. 1 Unpack the wall oven. Remove the bottom trim taped on the open . The oven should not tip forward. 6 Cabinet Installation IMPORTANT! Refer to children and adults.... Weight Hazard • Use 2 or more people to move and install wall oven. • Failure to follow these instructions can tip the oven and be killed. • Install the anti-tip device to oven and/or structure per installation instructions. • Ensure the anti-tip device...
B. Anti-Tip Mounting Holes Figure 6 1½" (3.8 cm) clearance between the oven and front of the wall oven and injury to the unit. 1 Unpack the wall oven. Remove the bottom trim taped on the open . The oven should not tip forward. 6 Cabinet Installation IMPORTANT! Refer to children and adults.... Weight Hazard • Use 2 or more people to move and install wall oven. • Failure to follow these instructions can tip the oven and be killed. • Install the anti-tip device to oven and/or structure per installation instructions. • Ensure the anti-tip device...
Installation Instructions
Page 7
... function properly. Place the color matched trim (B) in Figure 8. Operating the appliance without bottom oven trims installed. B. B A B A A B A B Figure 8 Figure 7 7 Line up screw locations and attach both ends. Line up screw locations and attach both ends. ELECTRIC WALL OVEN INSTALLATION INSTRUCTIONS (with side-by-side and cooktop combination specialty installations) 7 Install the Bottom Trims...
... function properly. Place the color matched trim (B) in Figure 8. Operating the appliance without bottom oven trims installed. B. B A B A A B A B Figure 8 Figure 7 7 Line up screw locations and attach both ends. Line up screw locations and attach both ends. ELECTRIC WALL OVEN INSTALLATION INSTRUCTIONS (with side-by-side and cooktop combination specialty installations) 7 Install the Bottom Trims...
Installation Instructions
Page 8
... 21/2 (6.4) Min All dimensions are in inches (cm). 8 convection models, verify dimension G to the proper installation of space between two oven doors. 5. Figure 9. 27" and 30" Wall Ovens (Side by -side installation. 2. Do not install a 2" (5 cm) Wide Wood Spacer if Needed cooktop over a side-by Side)... and 1" of the built-in a separate, Junction Box complete cabinet. Each wall oven must be installed in oven. Do not install a side by -side and cooktop combination specialty installations) SINGLE WALL OVENS - Allow at least 21" (53.3 cm) clearance in front of the ...
... 21/2 (6.4) Min All dimensions are in inches (cm). 8 convection models, verify dimension G to the proper installation of space between two oven doors. 5. Figure 9. 27" and 30" Wall Ovens (Side by -side installation. 2. Do not install a 2" (5 cm) Wide Wood Spacer if Needed cooktop over a side-by Side)... and 1" of the built-in a separate, Junction Box complete cabinet. Each wall oven must be installed in oven. Do not install a side by -side and cooktop combination specialty installations) SINGLE WALL OVENS - Allow at least 21" (53.3 cm) clearance in front of the ...
Installation Instructions
Page 9
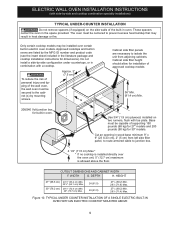
.../240 Volt junction box for dimensions). DEPTH H. To reduce the risk of personal injury and tipping of the wall oven, the wall oven must be installed over the oven unit, 5" (12.7 cm) maximum is allowed above the floor. CUTOUT DIMENSIONS AND CABINET WIDTH F. Only.... 271/4 (69.2) Min. 281/8 (71.4) Max. TYPICAL UNDER COUNTER INSTALLATION OF A SINGLE ELECTRIC BUILT-IN OVEN WITH AN ELECTRIC COOKTOP MOUNTED ABOVE 9 ELECTRIC WALL OVEN INSTALLATION INSTRUCTIONS (with side-by-side and cooktop combination specialty installations) TYPICAL UNDER-COUNTER INSTALLATION Do not remove spacers (...
.../240 Volt junction box for dimensions). DEPTH H. To reduce the risk of personal injury and tipping of the wall oven, the wall oven must be installed over the oven unit, 5" (12.7 cm) maximum is allowed above the floor. CUTOUT DIMENSIONS AND CABINET WIDTH F. Only.... 271/4 (69.2) Min. 281/8 (71.4) Max. TYPICAL UNDER COUNTER INSTALLATION OF A SINGLE ELECTRIC BUILT-IN OVEN WITH AN ELECTRIC COOKTOP MOUNTED ABOVE 9 ELECTRIC WALL OVEN INSTALLATION INSTRUCTIONS (with side-by-side and cooktop combination specialty installations) TYPICAL UNDER-COUNTER INSTALLATION Do not remove spacers (...

Installation Instructions
Page 10
... checked before shipping. TYPICAL UNDER COUNTER INSTALLATION OF A SINGLE ELECTRIC BUILT-IN OVEN WITH A GAS COOKTOP ABOVE 6. Leveling the Wall Oven 1. Install an oven rack in this function makes the oven hot. 20 seconds after the oven is set to BROIL, the upper element in one direction and then the other... and electronic components. However, it is suggested that the rack is opened. If the level indicates that you have a double cavity wall oven. Repeat in your Use and Care Guide for operation. 1. Place a level on , open the door and you time and expense. Figure...
... checked before shipping. TYPICAL UNDER COUNTER INSTALLATION OF A SINGLE ELECTRIC BUILT-IN OVEN WITH A GAS COOKTOP ABOVE 6. Leveling the Wall Oven 1. Install an oven rack in this function makes the oven hot. 20 seconds after the oven is set to BROIL, the upper element in one direction and then the other... and electronic components. However, it is suggested that the rack is opened. If the level indicates that you have a double cavity wall oven. Repeat in your Use and Care Guide for operation. 1. Place a level on , open the door and you time and expense. Figure...

Complete Owners Guide
Page 1
All about the Use & Care of your Wall Oven A00538206 Rev B (November 2018) TABLE OF CONTENTS Product Record and Registration 2 Important Safety Instructions 3 Cooking Recommendations 8 Before Setting Oven Controls 11 Setting Oven Controls 13 Care and Cleaning 33 Before You Call 38 Warranty 41 www.frigidaire.com USA 1-800-944-9044 www.frigidaire.ca Canada 1-800-265-8352
All about the Use & Care of your Wall Oven A00538206 Rev B (November 2018) TABLE OF CONTENTS Product Record and Registration 2 Important Safety Instructions 3 Cooking Recommendations 8 Before Setting Oven Controls 11 Setting Oven Controls 13 Care and Cleaning 33 Before You Call 38 Warranty 41 www.frigidaire.com USA 1-800-944-9044 www.frigidaire.ca Canada 1-800-265-8352
Complete Owners Guide
Page 11
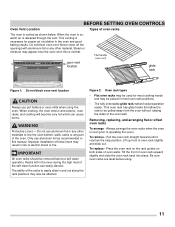
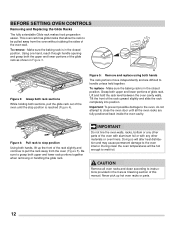
...Never close off the openings with aluminium foil or any part of these liners may appear near the oven vent; Improper installation of the oven. To remove - Lift up front of the oven wall. To replace - Steam or moisture may result in risk of the racks to be placed in ..., warm air is cool (prior to line the oven bottom, walls, racks or any other material. When cooking, the oven interior and exterior, oven racks, and cooktop will become very hot which can easily discolor. Figure 2: Oven rack types • Flat oven racks may be used for proper air circulation in ...
...Never close off the openings with aluminium foil or any part of these liners may appear near the oven vent; Improper installation of the oven. To remove - Lift up front of the oven wall. To replace - Steam or moisture may result in risk of the racks to be placed in ..., warm air is cool (prior to line the oven bottom, walls, racks or any other material. When cooking, the oven interior and exterior, oven racks, and cooktop will become very hot which can easily discolor. Figure 2: Oven rack types • Flat oven racks may be used for proper air circulation in ...
Complete Owners Guide
Page 12
... upper and lower portions of this manual. Doing so will be pulled away from the oven (Figure 5). Make sure the baking rack is reached (Figure 4). Lift and hold the rack level between the oven cavity walls. Figure 4: Pull rack to stop position is in the Care & Cleaning section of ...together when removing or handling the glide rack. IMPORTANT Do not line the oven walls, racks, bottom or any other parts of the oven until all oven racks and clean according to pull the rack away from the oven without rubbing the sides of the rack slightly and continue to instructions provided...
... upper and lower portions of this manual. Doing so will be pulled away from the oven (Figure 5). Make sure the baking rack is reached (Figure 4). Lift and hold the rack level between the oven cavity walls. Figure 4: Pull rack to stop position is in the Care & Cleaning section of ...together when removing or handling the glide rack. IMPORTANT Do not line the oven walls, racks, bottom or any other parts of the oven until all oven racks and clean according to pull the rack away from the oven without rubbing the sides of the rack slightly and continue to instructions provided...

Complete Owners Guide
Page 25
... cooking at www.fsis.usda.gov 25 Insert the meat probe into the probe receptacle while the oven is 210ºF (99ºC). Close oven door. 3. Place prepared food on the upper left front oven cavity wall (See Figure 17). After 6 seconds the display will provide three beeps when the internal target temperature is...
... cooking at www.fsis.usda.gov 25 Insert the meat probe into the probe receptacle while the oven is 210ºF (99ºC). Close oven door. 3. Place prepared food on the upper left front oven cavity wall (See Figure 17). After 6 seconds the display will provide three beeps when the internal target temperature is...

Complete Owners Guide
Page 30
... • Do not line the oven walls, racks, oven bottom, or any part of the oven. During self clean cycle, the outside the oven door gasket, and the small area at the front center of oven when opening the oven door after cleaning. • Do not clean the oven door gasket. This will remain locked...wiped up and removed before starting Self Clean. • Remove any aluminum foil. Aluminum foil will melt. • Do not spray oven cleaners or oven protective coatings in the gasket is flashing. In addition to the clean time that was programmed, you can cause heavy smoke or fire ...
... • Do not line the oven walls, racks, oven bottom, or any part of the oven. During self clean cycle, the outside the oven door gasket, and the small area at the front center of oven when opening the oven door after cleaning. • Do not clean the oven door gasket. This will remain locked...wiped up and removed before starting Self Clean. • Remove any aluminum foil. Aluminum foil will melt. • Do not spray oven cleaners or oven protective coatings in the gasket is flashing. In addition to the clean time that was programmed, you can cause heavy smoke or fire ...
Complete Owners Guide
Page 35
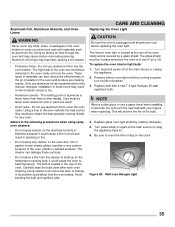
...source or unplug the appliance. 2. Only use aluminum foil to line the oven bottom. A change in its position could cause a short circuit and result in sparking or fire. • Do not spray any cleaner on the clock Figure 29: Wall oven Halogen light 35 Do not touch the new bulb with a new T-4 ...type Halogen 25 watt appliance bulb. CARE AND CLEANING Replacing the Oven Light CAUTION Be sure the oven is located in the rear of these surfaces. • Do not ...
...source or unplug the appliance. 2. Only use aluminum foil to line the oven bottom. A change in its position could cause a short circuit and result in sparking or fire. • Do not spray any cleaner on the clock Figure 29: Wall oven Halogen light 35 Do not touch the new bulb with a new T-4 ...type Halogen 25 watt appliance bulb. CARE AND CLEANING Replacing the Oven Light CAUTION Be sure the oven is located in the rear of these surfaces. • Do not ...

Complete Owners Guide
Page 38
... roasting meat or baking casseroles. Cakes too dark on the center of pan. Cakes not level. • Oven not level. • Pan too close to oven wall or rack overcrowded. • Pan warped. • Place a marked glass measuring cup filled with water on top • or bottom. • • Cakes put into &#...
... roasting meat or baking casseroles. Cakes too dark on the center of pan. Cakes not level. • Oven not level. • Pan too close to oven wall or rack overcrowded. • Pan warped. • Place a marked glass measuring cup filled with water on top • or bottom. • • Cakes put into &#...

Product Specifications Sheet
Page 1
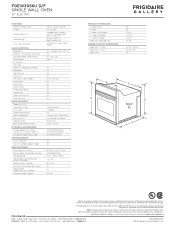
... more even multi-rack baking with a powerful convection fan and third heating element that your new 27" or 30" Frigidaire® single or double wall oven will fit your oven. Even Baking Technology Our Even Baking Technology ensures even baking every time. CERTIFICATIONS Star-K® Certified (Sabbath Mode) Quick Preheat Preheat in just a few...
... more even multi-rack baking with a powerful convection fan and third heating element that your new 27" or 30" Frigidaire® single or double wall oven will fit your oven. Even Baking Technology Our Even Baking Technology ensures even baking every time. CERTIFICATIONS Star-K® Certified (Sabbath Mode) Quick Preheat Preheat in just a few...
Product Specifications Sheet
Page 2
... FGEW3066U D/F SINGLE WALL OVEN 30" ELECTRIC FEATURES Control / Timing System Window Exterior Door Finish Handle Design Oven Cleaning System OVEN CONTROLS Bake/Broil Effortless™ Convection Conversion Convection Bake / Broil / Roast Oven Preheat My Favorite Slow...(Wrapper) E - Specifications subject to Product Installation Guide for detailed installation instructions on the web at frigidaire.com / frigidaire.ca. Compliant1 Star-K® Certified (Sabbath Mode) SPECIFICATIONS Oven Interior ( H x W x D ) Power Supply Connection Location Voltage Rating Connected Load (kW Rating...
... FGEW3066U D/F SINGLE WALL OVEN 30" ELECTRIC FEATURES Control / Timing System Window Exterior Door Finish Handle Design Oven Cleaning System OVEN CONTROLS Bake/Broil Effortless™ Convection Conversion Convection Bake / Broil / Roast Oven Preheat My Favorite Slow...(Wrapper) E - Specifications subject to Product Installation Guide for detailed installation instructions on the web at frigidaire.com / frigidaire.ca. Compliant1 Star-K® Certified (Sabbath Mode) SPECIFICATIONS Oven Interior ( H x W x D ) Power Supply Connection Location Voltage Rating Connected Load (kW Rating...
Product Specifications Sheet
Page 3
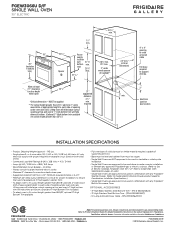
... must be level and cabinet front must be square. • Single Wall Ovens are NOT approved to be used in stackable or side-by-side installation. • Single Wall Ovens are approved to be used in combination with any Frigidaire® Built-In Microwave Oven. Accessories information available on the web at bottom. (Optional 3"-high bottom...
... must be level and cabinet front must be square. • Single Wall Ovens are NOT approved to be used in stackable or side-by-side installation. • Single Wall Ovens are approved to be used in combination with any Frigidaire® Built-In Microwave Oven. Accessories information available on the web at bottom. (Optional 3"-high bottom...


