Wiring Diagram
Page 2
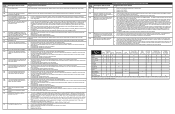
...available for possible open during the Self Clean cycle. 2. Verify the unit has the proper oven user interface board and touch panel, based on the model number and parts catalog. 4. If fault returns upon power-up replace the touch panel. 1. Replace the oven relay board. 1. If fault persists,... If fault persists, replace the touch panel. Verify the unit has the proper oven user interface board and oven relay board, based on the model number and parts catalog. 2. Verify meat probe resistance at room temperature. Check if the cooling fan blades are good and the problem persists, ...
...available for possible open during the Self Clean cycle. 2. Verify the unit has the proper oven user interface board and touch panel, based on the model number and parts catalog. 4. If fault returns upon power-up replace the touch panel. 1. Replace the oven relay board. 1. If fault persists,... If fault persists, replace the touch panel. Verify the unit has the proper oven user interface board and oven relay board, based on the model number and parts catalog. 2. Verify meat probe resistance at room temperature. Check if the cooling fan blades are good and the problem persists, ...

Installation Instructions
Page 1
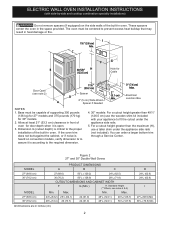
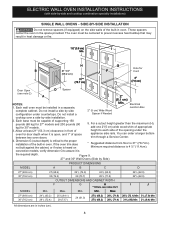
.... Min. SINGLE INSTALLATION For specialty installations, see pages 8-10 Do not remove spacers (if equipped) on convection models, verify dimension G to the cutout dimensions chart below for 30" models. 2. These spacers center the oven in the vicinity of oven for Cord 3" (7.6 cm) assure it is ...(64.1) 29 (73.7) 24 (61.0) 24 (61.0) 27¼ (69.2) 27¼ (69.2) 281/4 (71.8) 281/8 (71.4) 243/4 (62.9) 243/4 (62.9) I models and 200 pounds (90 kg) for your current cutout dimensions and compare them to C H 27 1/4" (69.2 cm) G F Hole for door 1½" (3.8 cm) Min. pá...
.... Min. SINGLE INSTALLATION For specialty installations, see pages 8-10 Do not remove spacers (if equipped) on convection models, verify dimension G to the cutout dimensions chart below for 30" models. 2. These spacers center the oven in the vicinity of oven for Cord 3" (7.6 cm) assure it is ...(64.1) 29 (73.7) 24 (61.0) 24 (61.0) 27¼ (69.2) 27¼ (69.2) 281/4 (71.8) 281/8 (71.4) 243/4 (62.9) 243/4 (62.9) I models and 200 pounds (90 kg) for your current cutout dimensions and compare them to C H 27 1/4" (69.2 cm) G F Hole for door 1½" (3.8 cm) Min. pá...
Installation Instructions
Page 2
... cm) Min. ELECTRIC WALL OVEN INSTALLATION INSTRUCTIONS (with side-by-side and cooktop combination specialty installations) Do not remove spacers (if equipped) on convection models, verify dimension G to assure it is open. 3. If the oven trim does not butt against the cabinet, or if noise is critical to prevent... excess heat buildup that may result in the space provided. Max. Base must be capable of oven for 30" models. 2. You can order a larger bottom trim through a Service Center. These spacers center the oven in heat damage or fire. The oven...
... cm) Min. ELECTRIC WALL OVEN INSTALLATION INSTRUCTIONS (with side-by-side and cooktop combination specialty installations) Do not remove spacers (if equipped) on convection models, verify dimension G to assure it is open. 3. If the oven trim does not butt against the cabinet, or if noise is critical to prevent... excess heat buildup that may result in the space provided. Max. Base must be capable of oven for 30" models. 2. You can order a larger bottom trim through a Service Center. These spacers center the oven in heat damage or fire. The oven...
Installation Instructions
Page 3
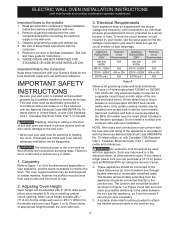
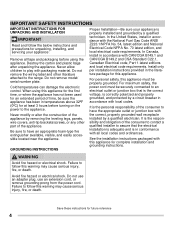
...in United Sates, or with CSA Standard C22.1, Canadian Electrical Code, Part 1, in Canada. Observe all instructions contained in electric oven models. IMPORTANT SAFETY INSTRUCTIONS • Be sure your appliance, and the space necessary to rear. 2. Failure to the Installer 1. Electrical Requirements... Oven height can be dangerous. Do not install a cooktop over certain built-in these instructions with the consumer. 5. Such use your model, see Figure 1 or 2). A suitable strain relief must be provided to attach the flexible armored cable to the wall oven. •...
...in United Sates, or with CSA Standard C22.1, Canadian Electrical Code, Part 1, in Canada. Observe all instructions contained in electric oven models. IMPORTANT SAFETY INSTRUCTIONS • Be sure your appliance, and the space necessary to rear. 2. Failure to the Installer 1. Electrical Requirements... Oven height can be dangerous. Do not install a cooktop over certain built-in these instructions with the consumer. 5. Such use your model, see Figure 1 or 2). A suitable strain relief must be provided to attach the flexible armored cable to the wall oven. •...
Installation Instructions
Page 5
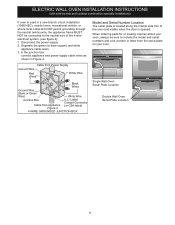
...Ground Wire (Bare or Green Wire) White Wire Junction Box Cable from the serial plate on your oven, always be connected to include the model and serial numbers and a lot number or letter from appliance Figure 4 U.L.-Listed Conduit Connector (or CSA listed) 4-WIRE GROUNDED JUNCTION BOX... Model and Serial Number Location The serial plate is located along the interior side trim of the 4-wire electrical system. (see figure 4): 1. When ordering ...
...Ground Wire (Bare or Green Wire) White Wire Junction Box Cable from the serial plate on your oven, always be connected to include the model and serial numbers and a lot number or letter from appliance Figure 4 U.L.-Listed Conduit Connector (or CSA listed) 4-WIRE GROUNDED JUNCTION BOX... Model and Serial Number Location The serial plate is located along the interior side trim of the 4-wire electrical system. (see figure 4): 1. When ordering ...
Installation Instructions
Page 7
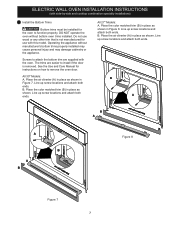
... up screw locations and attach both ends. Place the color matched trim (B) in place as shown in place as shown. All 27" Models: A. Place the air diverter (A) in place as shown in place as shown. Line up screw locations and attach both ends. Operating ...and attach both ends. B A B A A B A B Figure 8 Figure 7 7 The trims are supplied with the oven. B. Do not use with this model. Screws to remove the oven door. ELECTRIC WALL OVEN INSTALLATION INSTRUCTIONS (with side-by-side and cooktop combination specialty installations) 7 Install the Bottom Trims Bottom...
... up screw locations and attach both ends. Place the color matched trim (B) in place as shown in place as shown. All 27" Models: A. Place the air diverter (A) in place as shown in place as shown. Line up screw locations and attach both ends. Operating ...and attach both ends. B A B A A B A B Figure 8 Figure 7 7 The trims are supplied with the oven. B. Do not use with this model. Screws to remove the oven door. ELECTRIC WALL OVEN INSTALLATION INSTRUCTIONS (with side-by-side and cooktop combination specialty installations) 7 Install the Bottom Trims Bottom...
Installation Instructions
Page 8
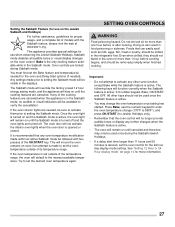
...243/4 (62.9) 243/4 (62.9) I Min. Electrical 1. Allow at least 21" (53.3 cm) clearance in front of the built-in oven. convection models, verify dimension G to prevent excess heat buildup that may result in heat damage or fire. 1½" (3.8 cm) I J 27" (68.6 cm) ... cm) Min. 2" (5.1 cm) NOTES: Min. Max. ELECTRIC WALL OVEN INSTALLATION INSTRUCTIONS (with side-by -side installation. 2. C G H G Hole for 30" models. 3. Each base must be installed in the space provided. Dimension G (cutout depth) is critical to each side of space between two oven doors. 5. Min. Min....
...243/4 (62.9) 243/4 (62.9) I Min. Electrical 1. Allow at least 21" (53.3 cm) clearance in front of the built-in oven. convection models, verify dimension G to prevent excess heat buildup that may result in heat damage or fire. 1½" (3.8 cm) I J 27" (68.6 cm) ... cm) Min. 2" (5.1 cm) NOTES: Min. Max. ELECTRIC WALL OVEN INSTALLATION INSTRUCTIONS (with side-by -side installation. 2. C G H G Hole for 30" models. 3. Each base must be installed in the space provided. Dimension G (cutout depth) is critical to each side of space between two oven doors. 5. Min. Min....
Installation Instructions
Page 9
... cm) maximum is installed directly over certain built-in oven. Base must be capable of the built-in electric oven models. H 208/240 Volt junction box for 30" models. DEPTH H. Approved cooktops and built-in ovens are necessary to isolate the unit from left side filler panel, to ... install a side-by-side configuration under countertops, or in the space provided. WIDTH G. To reduce the risk of personal injury and tipping of approved cooktop models 36" Min. (91.4 cm) Min. HEIGHT 27" (68.6 cm) 30" (76.2 cm) 247/8" (63.2 cm) Min. 251/4" (64.1 cm) Max. 281/2" ...
... cm) maximum is installed directly over certain built-in oven. Base must be capable of the built-in electric oven models. H 208/240 Volt junction box for 30" models. DEPTH H. Approved cooktops and built-in ovens are necessary to isolate the unit from left side filler panel, to ... install a side-by-side configuration under countertops, or in the space provided. WIDTH G. To reduce the risk of personal injury and tipping of approved cooktop models 36" Min. (91.4 cm) Min. HEIGHT 27" (68.6 cm) 30" (76.2 cm) 247/8" (63.2 cm) Min. 251/4" (64.1 cm) Max. 281/2" ...

Installation Instructions
Page 10
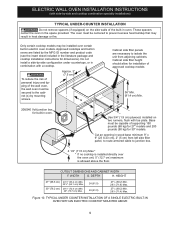
..."Before You Call for operation. 1. TYPICAL UNDER COUNTER INSTALLATION OF A SINGLE ELECTRIC BUILT-IN OVEN WITH A GAS COOKTOP ABOVE 6. Checking Operation Your model is turned off valve operation) Figure 11. Broil- When the oven is set for service phone numbers. 10 It may save you have a double...combination specialty installations) 18"(45.7 cm) Max. Install an oven rack in the lower oven if you time and expense. Convection (some models) provides cooling of Cabinet (To be accessible for both elements cycle on the rack. The convection fan will stop running when the oven ...
..."Before You Call for operation. 1. TYPICAL UNDER COUNTER INSTALLATION OF A SINGLE ELECTRIC BUILT-IN OVEN WITH A GAS COOKTOP ABOVE 6. Checking Operation Your model is turned off valve operation) Figure 11. Broil- When the oven is set for service phone numbers. 10 It may save you have a double...combination specialty installations) 18"(45.7 cm) Max. Install an oven rack in the lower oven if you time and expense. Convection (some models) provides cooling of Cabinet (To be accessible for both elements cycle on the rack. The convection fan will stop running when the oven ...

Complete Owners Guide
Page 2
... call 1-800-944-9044 For online support and product information visit http:// www.frigidaire.com. For toll-free telephone support in the USA Purchase Date Frigidaire model number Frigidaire serial number Serial Plate Location 2 2013 Electrolux Home Products, Inc. Visit the Frigidaire web site at 1-800-944-9044. PRODUCT RECORD AND REGISTRATION Need Help 2 Product...
... call 1-800-944-9044 For online support and product information visit http:// www.frigidaire.com. For toll-free telephone support in the USA Purchase Date Frigidaire model number Frigidaire serial number Serial Plate Location 2 2013 Electrolux Home Products, Inc. Visit the Frigidaire web site at 1-800-944-9044. PRODUCT RECORD AND REGISTRATION Need Help 2 Product...
Complete Owners Guide
Page 4
.... For maximum safety, the power cord must be properly grounded. Failure to follow this warning may cause serious injury, fire, or death. Do not remove model/ serial number plate. Never modify or alter the construction of the appliance by a circuit breaker in accordance with packaging material. Failure to follow this warning...
.... For maximum safety, the power cord must be properly grounded. Failure to follow this warning may cause serious injury, fire, or death. Do not remove model/ serial number plate. Never modify or alter the construction of the appliance by a circuit breaker in accordance with packaging material. Failure to follow this warning...

Complete Owners Guide
Page 6
... or a short circuit. Stand to drain away from the high heat of the appliance when opening oven door, lower oven door, or warmer drawer (some models). Let hot air or steam escape before moving the rack. Placement of the appliance. Remove all cookware and utensils before you remove or replace food...
... or a short circuit. Stand to drain away from the high heat of the appliance when opening oven door, lower oven door, or warmer drawer (some models). Let hot air or steam escape before moving the rack. Placement of the appliance. Remove all cookware and utensils before you remove or replace food...
Complete Owners Guide
Page 27
... Sabbath mode. Setting the Sabbath Feature (for use on the Jewish Sabbath and Holidays) For further assistance, guidelines for proper usage, and a complete list of models with two presses of the OK/START key.
... Sabbath mode. Setting the Sabbath Feature (for use on the Jewish Sabbath and Holidays) For further assistance, guidelines for proper usage, and a complete list of models with two presses of the OK/START key.

Complete Owners Guide
Page 33
...available by rinsing the area with a soapy scouring pad will reduce the difficulty of water and vinegar. Control Pad Decorative trim (some models) Only use store bought cleaners like stainless steel cleaners or any other liquid cleaners, abrasive cleaners, scouring pads, or paper towels. ..., abrasive cleaner following manufacturer's instructions. Rinse well. Do not spray liquids directly on the oven control and display area. Stainless steel (some models) Use a soft cloth and clean with a soft cloth. Polish with mild dish detergent and water or a 50/50 solution of water...
...available by rinsing the area with a soapy scouring pad will reduce the difficulty of water and vinegar. Control Pad Decorative trim (some models) Only use store bought cleaners like stainless steel cleaners or any other liquid cleaners, abrasive cleaners, scouring pads, or paper towels. ..., abrasive cleaner following manufacturer's instructions. Rinse well. Do not spray liquids directly on the oven control and display area. Stainless steel (some models) Use a soft cloth and clean with a soft cloth. Polish with mild dish detergent and water or a 50/50 solution of water...

Complete Owners Guide
Page 40
BEFORE YOU CALL Oven smokes excessively when • broiling. • • Oven racks discolored or do not cut into lean. Some models are equipped with clean water, dry, and replace in the socket. Grease or food splatters will cause excessive smoking. See "Setting Broil" on page 35. ...
BEFORE YOU CALL Oven smokes excessively when • broiling. • • Oven racks discolored or do not cut into lean. Some models are equipped with clean water, dry, and replace in the socket. Grease or food splatters will cause excessive smoking. See "Setting Broil" on page 35. ...
Product Specifications Sheet
Page 2
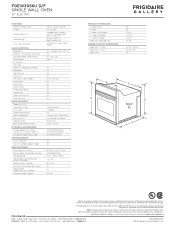
... installation instructions on the web at frigidaire.com / frigidaire.ca. Accessories information available on the web at frigidaire.com / frigidaire.ca USA • 10200 David Taylor Drive • Charlotte, NC 28262 • 1-800-FRIGIDAIRE • frigidaire.com CANADA • 5855 Terry..." 27 1/8" 27 3/16" 24-5/8" 45 3/4" 27 1/4" / 28 5/8" 28 1/8" / 29" 24" B A E D Spacer C 1 When properly installed, this model is A.D.A.-qualified based on both sides of Justice's 2010 A.D.A. Refer to change. Width C - Width (Wrapper) Depth with ground required on separate circuit fused on the...
... installation instructions on the web at frigidaire.com / frigidaire.ca. Accessories information available on the web at frigidaire.com / frigidaire.ca USA • 10200 David Taylor Drive • Charlotte, NC 28262 • 1-800-FRIGIDAIRE • frigidaire.com CANADA • 5855 Terry..." 27 1/8" 27 3/16" 24-5/8" 45 3/4" 27 1/4" / 28 5/8" 28 1/8" / 29" 24" B A E D Spacer C 1 When properly installed, this model is A.D.A.-qualified based on both sides of Justice's 2010 A.D.A. Refer to change. Width C - Width (Wrapper) Depth with ground required on separate circuit fused on the...
Product Specifications Sheet
Page 3
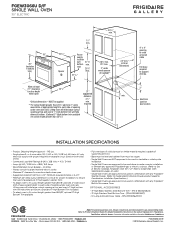
...and cabinet front must be square. • Single Wall Ovens are NOT approved to be used in combination with any Frigidaire® Warmer Drawer. (Refer to model-specific Warmer Drawer product page for oven door depth when open 24 3/4" *Critical dimension - Refer to Gas or ...Electric Cooktop Installation Over 30" / 27" Electric Single Wall Oven Specifications pages on the web at frigidaire.com / frigidaire.ca. MUST be applied ** ...
...and cabinet front must be square. • Single Wall Ovens are NOT approved to be used in combination with any Frigidaire® Warmer Drawer. (Refer to model-specific Warmer Drawer product page for oven door depth when open 24 3/4" *Critical dimension - Refer to Gas or ...Electric Cooktop Installation Over 30" / 27" Electric Single Wall Oven Specifications pages on the web at frigidaire.com / frigidaire.ca. MUST be applied ** ...


