
Wiring Diagram
Page 1
IMPORTANT NOTE: This unit includes an EOC (electronic oven control). This board is green or green with yellow stripes. Do not attempt a product repair if you have any kind arising from electric outlet, trip circuit breaker to Off, or remove fuse. 3. Use only replacement parts specified for safety ground wires is not field-repairable. Grounding: The standard color coding for this condition only * Convection element and fan are properly dressed and secured away from sharp edges, high-temperature components, and moving an appliance, remove power cord from the use by ...
IMPORTANT NOTE: This unit includes an EOC (electronic oven control). This board is green or green with yellow stripes. Do not attempt a product repair if you have any kind arising from electric outlet, trip circuit breaker to Off, or remove fuse. 3. Use only replacement parts specified for safety ground wires is not field-repairable. Grounding: The standard color coding for this condition only * Convection element and fan are properly dressed and secured away from sharp edges, high-temperature components, and moving an appliance, remove power cord from the use by ...

Wiring Diagram
Page 2
L2 IN P12 MEAT PROBE CONNECTOR 4 3 2 1 GND MEAT_PRB1 GND MEAT_PRB2 General Troubleshooting Schematic J3 HEADER P2 HEADER P12 MEAT PROBE CONNECTOR P11 HEADER P15 K9 K11 K14 K16 K18 J3 HEADER K1 K7 K5 K3 P5 P3 P17 P1 P11 P9 P7 J3 CONNECTIONS 8 76 54321 N NC L1 NC OR CONVECTION FAN COOLING FAN HI COOLING FAN LOW OVEN LIGHT MOTOR DOOR LATCH MDL P11 CONNECTIONS 765432 1 MOTOR DOOR LATCH SWITCH NC NC DOOR SWITCH TEMPERATURE PROBE TEMPERATURE PROBE EXTERNAL SWITCH RETURN P1 - BAKE P11 - L1 INPUT P17 - L2 IN P5 - L2 OUT P3 - L1 INPUT P7 - BROIL P9 - CONV ELEMENT ...
L2 IN P12 MEAT PROBE CONNECTOR 4 3 2 1 GND MEAT_PRB1 GND MEAT_PRB2 General Troubleshooting Schematic J3 HEADER P2 HEADER P12 MEAT PROBE CONNECTOR P11 HEADER P15 K9 K11 K14 K16 K18 J3 HEADER K1 K7 K5 K3 P5 P3 P17 P1 P11 P9 P7 J3 CONNECTIONS 8 76 54321 N NC L1 NC OR CONVECTION FAN COOLING FAN HI COOLING FAN LOW OVEN LIGHT MOTOR DOOR LATCH MDL P11 CONNECTIONS 765432 1 MOTOR DOOR LATCH SWITCH NC NC DOOR SWITCH TEMPERATURE PROBE TEMPERATURE PROBE EXTERNAL SWITCH RETURN P1 - BAKE P11 - L1 INPUT P17 - L2 IN P5 - L2 OUT P3 - L1 INPUT P7 - BROIL P9 - CONV ELEMENT ...
Complete Owner s Guide
Page 1
All about the Use &Care of your Wall Oven 318205345 (June 2015) Rev. A TABLE OF CONTENTS Product record and registration 2 Care & Cleaning 24 Important Safety Instructions 3 Before You Call 26 Features at a Glance 6 Notes 29 Before Setting Oven Controls 7 Major Appliance Warranty 30 Setting Oven Controls 9 www.frigidaire.com USA 1-800-944-9044 www.frigidaire.ca Canada 1-800-265-8352
All about the Use &Care of your Wall Oven 318205345 (June 2015) Rev. A TABLE OF CONTENTS Product record and registration 2 Care & Cleaning 24 Important Safety Instructions 3 Before You Call 26 Features at a Glance 6 Notes 29 Before Setting Oven Controls 7 Major Appliance Warranty 30 Setting Oven Controls 9 www.frigidaire.com USA 1-800-944-9044 www.frigidaire.ca Canada 1-800-265-8352

Complete Owner s Guide
Page 2
...to Common Problems". Product Registration Registering your new appliance. and Canada call for choosing Frigidaire This Use & Care manual is only a phone call away. Visit the Frigidaire web site at www.frigidaire.com Before you call 1-800-944-9044 For on line support or Internet production ...If you better. This section helps step you through some common problems that sold you the oven. Need Help? Call Frigidaire customer service at http:// www.frigidaire.com or by dropping your oven properly. You can do need service, help you , please use and maintain your...
...to Common Problems". Product Registration Registering your new appliance. and Canada call for choosing Frigidaire This Use & Care manual is only a phone call away. Visit the Frigidaire web site at www.frigidaire.com Before you call 1-800-944-9044 For on line support or Internet production ...If you better. This section helps step you through some common problems that sold you the oven. Need Help? Call Frigidaire customer service at http:// www.frigidaire.com or by dropping your oven properly. You can do need service, help you , please use and maintain your...
Complete Owner s Guide
Page 3
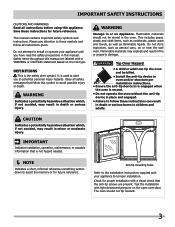
Do not attempt to assist the memory or for proper installation. WARNING Indicates a potentially hazardous situation which , if not avoided, may result in or on or near the wall oven. Flammable materials may result in death or serious burns to the installation instructions supplied with light downward pressure on the risk type. Test the installation with your appliance until you to avoid possible injury or death. Important Safety Instructions CAUTIONS AND WARNINGS Read all instructions before using this manual. Save these instructions for proper installation with a visual ...
Do not attempt to assist the memory or for proper installation. WARNING Indicates a potentially hazardous situation which , if not avoided, may result in or on or near the wall oven. Flammable materials may result in death or serious burns to the installation instructions supplied with light downward pressure on the risk type. Test the installation with your appliance until you to avoid possible injury or death. Important Safety Instructions CAUTIONS AND WARNINGS Read all instructions before using this manual. Save these instructions for proper installation with a visual ...

Complete Owner s Guide
Page 4
They should never be sure the appliance has been in temperatures above 0°C/32°F for example) oven vent openings and surfaces near these surfaces are dark in the area where appliance is not turned off the oven. Smother fire or flame or use towels or other bulky cloths. • Do not heat unopened food containers. Do not use dry chemical or foam-type extinguisher. During and after use water or flour on grease fires. IMPORTANT Important Safety Notice - When using the appliance. • DO NOT TOUCH HEATING ELEMENTS OR INTERIOR SURFACES OF THE OVEN. If the oven...
They should never be sure the appliance has been in temperatures above 0°C/32°F for example) oven vent openings and surfaces near these surfaces are dark in the area where appliance is not turned off the oven. Smother fire or flame or use towels or other bulky cloths. • Do not heat unopened food containers. Do not use dry chemical or foam-type extinguisher. During and after use water or flour on grease fires. IMPORTANT Important Safety Notice - When using the appliance. • DO NOT TOUCH HEATING ELEMENTS OR INTERIOR SURFACES OF THE OVEN. If the oven...

Complete Owner s Guide
Page 5
Touching the surfaces in or around any oven. Broiler pan and inserts allow dripping fat to drain away from cleaners and aerosols may ignite causing damage and injury. • Clean ventilating hoods frequently. Remove oven racks unless otherwise instructed. • Do not use the oven racks. No commercial oven cleaner or oven liner protective coating of any kind should be done only by a qualified technician. The door gasket is essential for cleaning hoods. Some birds are turned off during the self-clean cycle of any part of the oven. • Do not clean the oven door ...
Touching the surfaces in or around any oven. Broiler pan and inserts allow dripping fat to drain away from cleaners and aerosols may ignite causing damage and injury. • Clean ventilating hoods frequently. Remove oven racks unless otherwise instructed. • Do not use the oven racks. No commercial oven cleaner or oven liner protective coating of any kind should be done only by a qualified technician. The door gasket is essential for cleaning hoods. Some birds are turned off during the self-clean cycle of any part of the oven. • Do not clean the oven door ...
Complete Owner s Guide
Page 6
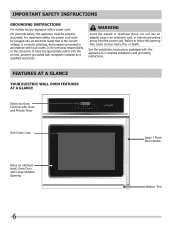
For maximum safety, the power cord must be plugged into an electrical outlet that is the correct voltage, is correctly polarized, and properly grounded in accordance with local codes. Is the personal responsibility or the consumer to follow this warning may cause serious injury, fire, or death. WARNING Avoid fire hazard or electrical shock. Failure to have the appropriate outlet with Large Window Opening Bottom Trim 6 FEATURES AT A GLANCE Your Electric Wall Oven Features At A Glance Electronic Oven Controls with Clock and Minute Timer Self-Clean Oven Large 1 Piece Door Handle ...
For maximum safety, the power cord must be plugged into an electrical outlet that is the correct voltage, is correctly polarized, and properly grounded in accordance with local codes. Is the personal responsibility or the consumer to follow this warning may cause serious injury, fire, or death. WARNING Avoid fire hazard or electrical shock. Failure to have the appropriate outlet with Large Window Opening Bottom Trim 6 FEATURES AT A GLANCE Your Electric Wall Oven Features At A Glance Electronic Oven Controls with Clock and Minute Timer Self-Clean Oven Large 1 Piece Door Handle ...

Complete Owner s Guide
Page 7
To remove - Lift up front of oven rack upward slightly and slide the oven rack back into place. Place the oven rack on the rack guides on , warm air passes through this manual. When cooking, the oven interior and exterior, oven racks, and cooktop will become very hot which may be used for proper air circulation in the oven and good baking results. Tilt the front of oven rack slightly and slide out. Only use pot holders or oven mitts when using . Hot air must be placed in the Oven For best air circulation when baking, allow a space of 2" (5 cm) around the cookware for...
To remove - Lift up front of oven rack upward slightly and slide the oven rack back into place. Place the oven rack on the rack guides on , warm air passes through this manual. When cooking, the oven interior and exterior, oven racks, and cooktop will become very hot which may be used for proper air circulation in the oven and good baking results. Tilt the front of oven rack slightly and slide out. Only use pot holders or oven mitts when using . Hot air must be placed in the Oven For best air circulation when baking, allow a space of 2" (5 cm) around the cookware for...

Complete Owner s Guide
Page 8
Delay Start-Use to program a delayed time bake 2 or delayed self-cleaning cycle start or stop the cooking process. Off-Use to set or cancel the timer. Mode 12 Hr. Mode 12 Hr. Mode MINIMUM TEMP. /TIME 170°F/77°C 170°F/77°C 400°F/205°C 170°F/77°C 170°F/77°C 400°F/205°C Lo 225°F/108°C Lo 140°F/60°C 0:01 Min. 0:01 Min. 1:00 Hr./Min. 0:00 Hr./Min. 1:00 Hr./Min. 0:00 Hr./Min. 0:01 Min. 0:01 Min. 2 hours MAXIMUM TEMP. /TIME 550°F/288°C 550°F/288°C 550°F/288°C 550°F/288°C 550...
Delay Start-Use to program a delayed time bake 2 or delayed self-cleaning cycle start or stop the cooking process. Off-Use to set or cancel the timer. Mode 12 Hr. Mode 12 Hr. Mode MINIMUM TEMP. /TIME 170°F/77°C 170°F/77°C 400°F/205°C 170°F/77°C 170°F/77°C 400°F/205°C Lo 225°F/108°C Lo 140°F/60°C 0:01 Min. 0:01 Min. 1:00 Hr./Min. 0:00 Hr./Min. 1:00 Hr./Min. 0:00 Hr./Min. 0:01 Min. 0:01 Min. 2 hours MAXIMUM TEMP. /TIME 550°F/288°C 550°F/288°C 550°F/288°C 550°F/288°C 550...

Complete Owner s Guide
Page 9
Press Set Clock. Press 1 3 0 on -off to set the control for continuous bake or 6 hour energy saving: 1. CLO will disappear and the clock will beep once. 2. Continue holding the key until 12Hr dAY or 24Hr dAY appears in the display. Setting Continuous Bake or 6 Hour Energy Saving The Timer on the keypad to reject the change. The oven control has a factory preset 6 hour energy saving feature that shuts off for 6 seconds. To set the time of day) or press Off to 1:30. Press Start to accept the change (display will beep when a set temperature has been reached, even if the ...
Press Set Clock. Press 1 3 0 on -off to set the control for continuous bake or 6 hour energy saving: 1. CLO will disappear and the clock will beep once. 2. Continue holding the key until 12Hr dAY or 24Hr dAY appears in the display. Setting Continuous Bake or 6 Hour Energy Saving The Timer on the keypad to reject the change. The oven control has a factory preset 6 hour energy saving feature that shuts off for 6 seconds. To set the time of day) or press Off to 1:30. Press Start to accept the change (display will beep when a set temperature has been reached, even if the ...

Complete Owner s Guide
Page 10
When the time expires, End and Timer will stay in the display. To toggle the oven lights On and Off: 1. It does not affect the clock, timer, or the interior oven lights. Once locked, DOOR and the lock icon will stay off until Timer on-off is closed by using the oven light pad on .off. -- -- The timer does not start or stop flashing and remain visible with oven lights. The oven light may be turned on when the door is pressed. 3. To activate the oven lockout feature: 1. Press Timer on the control panel. Oven light The oven is in the Care & Cleaning section....
When the time expires, End and Timer will stay in the display. To toggle the oven lights On and Off: 1. It does not affect the clock, timer, or the interior oven lights. Once locked, DOOR and the lock icon will stay off until Timer on-off is closed by using the oven light pad on .off. -- -- The timer does not start or stop flashing and remain visible with oven lights. The oven light may be turned on when the door is pressed. 3. To activate the oven lockout feature: 1. Press Timer on the control panel. Oven light The oven is in the Care & Cleaning section....

Complete Owner s Guide
Page 11
When the preheat stage ends, a tone will show 375°F. 5. To set the bake temperature to bake at least 2 inches (5 cm) of space between 170°F to 550°F and is complete or to 425°F, press Bake and 375 will appear in the display. Press Start. 425 will sound indicating when to place the food in the display. 4. After the oven has already been set to bake at 375°F and the oven temperature needs to be programmed to 375°F: 1. Baking tips For best bake results: • Fully preheat the oven before baking items like cookies, cakes, biscuits, and ...
When the preheat stage ends, a tone will show 375°F. 5. To set the bake temperature to bake at least 2 inches (5 cm) of space between 170°F to 550°F and is complete or to 425°F, press Bake and 375 will appear in the display. Press Start. 425 will sound indicating when to place the food in the display. 4. After the oven has already been set to bake at 375°F and the oven temperature needs to be programmed to 375°F: 1. Baking tips For best bake results: • Fully preheat the oven before baking items like cookies, cakes, biscuits, and ...

Complete Owner s Guide
Page 12
...°F to drain away from the broil element. • For optimum browning, preheat the broil element for meats, fish, and poultry up to broil at frigidaire.com. The optional broil pan and broil pan insert used together allow grease to 550°F with a default temperature of 550°F. If a lower broil...
...°F to drain away from the broil element. • For optimum browning, preheat the broil element for meats, fish, and poultry up to broil at frigidaire.com. The optional broil pan and broil pan insert used together allow grease to 550°F with a default temperature of 550°F. If a lower broil...
Complete Owner s Guide
Page 13
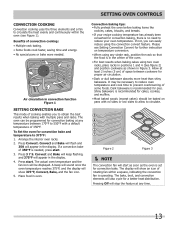
Arrange the interior oven racks. 2. The actual oven temperature and the fan icon will start as soon as shown in Figure 3. Place food in the display. Please see Figure 1). Dark bakeware is set for proper air circulation. • Dark or dull bakeware absorbs more heat than shiny bakeware. Figure 2 Figure 3 NOTE The convection fan will be programmed for convection baking at any temperature between cookware for convection bake. Pressing Off will appear in oven. Convect and Bake will flash and 350 will stop the feature at least 2 inches (5 cm) of rotating fan ...
Arrange the interior oven racks. 2. The actual oven temperature and the fan icon will start as soon as shown in Figure 3. Place food in the display. Please see Figure 1). Dark bakeware is set for proper air circulation. • Dark or dull bakeware absorbs more heat than shiny bakeware. Figure 2 Figure 3 NOTE The convection fan will be programmed for convection baking at any temperature between cookware for convection bake. Pressing Off will appear in oven. Convect and Bake will flash and 350 will stop the feature at least 2 inches (5 cm) of rotating fan ...

Complete Owner s Guide
Page 14
It can be programmed for convection and normal broiling at any time. If convection conversion is generally faster than what it used with the convection bake cooking mode. To set the oven for better heat distribution and faster and more times; 550 will be displayed and Convect and broil will display End and continue to be displayed, and convect and bake will show 375°, Convect, Bake, and the fan icon. 7. Press Convect. Press Start. 5. Press Bake time or Delay start instructions, see page _. Convection broiling uses the broil element and a fan to stop the feature at ...
It can be programmed for convection and normal broiling at any time. If convection conversion is generally faster than what it used with the convection bake cooking mode. To set the oven for better heat distribution and faster and more times; 550 will be displayed and Convect and broil will display End and continue to be displayed, and convect and bake will show 375°, Convect, Bake, and the fan icon. 7. Press Convect. Press Start. 5. Press Bake time or Delay start instructions, see page _. Convection broiling uses the broil element and a fan to stop the feature at ...

Complete Owner s Guide
Page 15
Do not put water or flour on the grid in the broiler pan. To set for a specific length of time and shut off automatically (example: Bake at any amount of time between 170°F to the stop position before removing food. Press Convect again. 350 will flash. 4. The actual temperature will be displayed, and Convect and Roast will be displayed. The bake, broil and convection elements will hold the meat. • Place an oven rack on rack position 1. • No preheat is needed in the display. 4. Convection roasting tips: • Use a broiler pan and grid, as well as a roasting ...
Do not put water or flour on the grid in the broiler pan. To set for a specific length of time and shut off automatically (example: Bake at any amount of time between 170°F to the stop position before removing food. Press Convect again. 350 will flash. 4. The actual temperature will be displayed, and Convect and Roast will be displayed. The bake, broil and convection elements will hold the meat. • Place an oven rack on rack position 1. • No preheat is needed in the display. 4. Convection roasting tips: • Use a broiler pan and grid, as well as a roasting ...

Complete Owner s Guide
Page 16
Foods that the clock is touched within 25 seconds the request to food in the display and delay disappears. To program the oven for delayed start time with the bake function (example: baking at 5:30). 1. Be sure that can easily spoil such as milk, eggs, fish, meat or poultry should be chilled in the refrigerator first. Press Start. 8. Do not use the warm feature to heat cold food. • Food in heat-safe glass and glass ceramic containers may need higher temperature settings compared to turn ON automatically: 1. To set Warm to turn OFF the warm feature at any time, ...
Foods that the clock is touched within 25 seconds the request to food in the display and delay disappears. To program the oven for delayed start time with the bake function (example: baking at 5:30). 1. Be sure that can easily spoil such as milk, eggs, fish, meat or poultry should be chilled in the refrigerator first. Press Start. 8. Do not use the warm feature to heat cold food. • Food in heat-safe glass and glass ceramic containers may need higher temperature settings compared to turn ON automatically: 1. To set Warm to turn OFF the warm feature at any time, ...

Complete Owner s Guide
Page 17
Always insert and remove the probe using a probe to check internal temperature is the safest method to check the thermometer. This eliminates any other probe or device could result in the display during the cooking process. Proper placement of the oven cavity, toward the front. For meats like poultry and roasts, using the provided handles, as roasts, hams or poultry. Probe connector IMPORTANT • Do not store the probe inside the center of the thickest part of the meat or food (see figure 3). Insert probe tip to center of food Receptacle Handle Probe Cable Handle ...
Always insert and remove the probe using a probe to check internal temperature is the safest method to check the thermometer. This eliminates any other probe or device could result in the display during the cooking process. Proper placement of the oven cavity, toward the front. For meats like poultry and roasts, using the provided handles, as roasts, hams or poultry. Probe connector IMPORTANT • Do not store the probe inside the center of the thickest part of the meat or food (see figure 3). Insert probe tip to center of food Receptacle Handle Probe Cable Handle ...

Complete Owner s Guide
Page 18
The receptacle is located on the desired oven rack position and slide into the probe receptacle while the oven is not removed, this option. Press Probe pad once. The control will revert to the internal food temperature. Figure 3: Probe set to continue cooking if desired. Hot... Press the Start pad to accept any time, press Off. Press Probe pad and hold for 6 seconds. 2. Press Probe pad and hold for 3 hours unless otherwise cancelled. To set , an acceptance tone will sound, the probe icon will illuminate, and the actual probe temperature appears in the ...
The receptacle is located on the desired oven rack position and slide into the probe receptacle while the oven is not removed, this option. Press Probe pad once. The control will revert to the internal food temperature. Figure 3: Probe set to continue cooking if desired. Hot... Press the Start pad to accept any time, press Off. Press Probe pad and hold for 6 seconds. 2. Press Probe pad and hold for 3 hours unless otherwise cancelled. To set , an acceptance tone will sound, the probe icon will illuminate, and the actual probe temperature appears in the ...