Complete Owner s Guide
Page 1
All about the Use &Care of your Wall Oven 318205345 (June 2015) Rev. A TABLE OF CONTENTS Product record and registration 2 Care & Cleaning 24 Important Safety Instructions 3 Before You Call 26 Features at a Glance 6 Notes 29 Before Setting Oven Controls 7 Major Appliance Warranty 30 Setting Oven Controls 9 www.frigidaire.com USA 1-800-944-9044 www.frigidaire.ca Canada 1-800-265-8352
All about the Use &Care of your Wall Oven 318205345 (June 2015) Rev. A TABLE OF CONTENTS Product record and registration 2 Care & Cleaning 24 Important Safety Instructions 3 Before You Call 26 Features at a Glance 6 Notes 29 Before Setting Oven Controls 7 Major Appliance Warranty 30 Setting Oven Controls 9 www.frigidaire.com USA 1-800-944-9044 www.frigidaire.ca Canada 1-800-265-8352
Complete Owner s Guide
Page 3
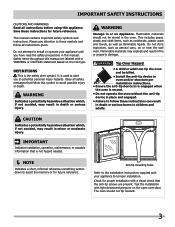
...Indicates installation, operation, maintenance, or valuable information that the anti-tip screws are labeled with light downward pressure on or near the wall oven. CAUTION Indicates a potentially hazardous situation which , if not avoided, may result in death or serious injury. Check for future reference.... Definitions This is moved. • Do not operate the oven without the anti-tip device in this manual. It is not hazard related. NOTE Indicates a short, informal reference-something...
...Indicates installation, operation, maintenance, or valuable information that the anti-tip screws are labeled with light downward pressure on or near the wall oven. CAUTION Indicates a potentially hazardous situation which , if not avoided, may result in death or serious injury. Check for future reference.... Definitions This is moved. • Do not operate the oven without the anti-tip device in this manual. It is not hazard related. NOTE Indicates a short, informal reference-something...
Complete Owner s Guide
Page 6
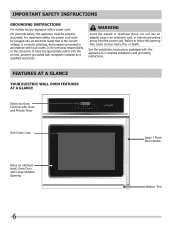
... extension cord, or remove grounding prong from the power cord. FEATURES AT A GLANCE Your Electric Wall Oven Features At A Glance Electronic Oven Controls with Clock and Minute Timer Self-Clean Oven Large 1 Piece Door Handle Glass (or stainless steel) Oven Door with a power cord. WARNING Avoid fire hazard or electrical shock. Failure to have the... Opening Bottom Trim 6 For personal safety, this warning may cause serious injury, fire, or death. See the installation instructions packaged with the correct, properly grounded wall receptacle installed by a qualified electrician.
... extension cord, or remove grounding prong from the power cord. FEATURES AT A GLANCE Your Electric Wall Oven Features At A Glance Electronic Oven Controls with Clock and Minute Timer Self-Clean Oven Large 1 Piece Door Handle Glass (or stainless steel) Oven Door with a power cord. WARNING Avoid fire hazard or electrical shock. Failure to have the... Opening Bottom Trim 6 For personal safety, this warning may cause serious injury, fire, or death. See the installation instructions packaged with the correct, properly grounded wall receptacle installed by a qualified electrician.
Complete Owner s Guide
Page 21
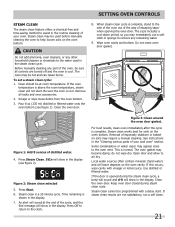
...sound and d-0 will show in the display. When steam clean cycle is complete. Steam clean works best for soils on the oven cavity. Figure 3: Clean around the oven door gasket. Remove all controls are not satisfactory, run a self clean. 21 Figure 1: Add 8 ounces of especially stubborn... the oven bottom (see figure 2). Time remaining is cool. If this occurs, wipe cavity with a delay start . SETTING OVEN CONTROLS Steam clean The steam clean feature offers a chemical-free and time-saving method to assist in the routine cleaning of your wall oven" section. The oven gasket ...
...sound and d-0 will show in the display. When steam clean cycle is complete. Steam clean works best for soils on the oven cavity. Figure 3: Clean around the oven door gasket. Remove all controls are not satisfactory, run a self clean. 21 Figure 1: Add 8 ounces of especially stubborn... the oven bottom (see figure 2). Time remaining is cool. If this occurs, wipe cavity with a delay start . SETTING OVEN CONTROLS Steam clean The steam clean feature offers a chemical-free and time-saving method to assist in the routine cleaning of your wall oven" section. The oven gasket ...

Complete Owner s Guide
Page 24
... dry and polish with an ammonia-soaked paper towel for a good seal. grasp firmly and pull straight off and the oven is essential for 30 to 40 minutes. Your oven finish may cause damage to rub, damage or remove this gasket. 24 If necessary, cover difficult spots with a soft...cleaners or the porcelain may use large amounts of water on the outside glass of the door. CARE & CLEANING Cleaning Various Parts of Your wall oven Before cleaning any harsh abrasive cleaning materials on the control panel - Follow by rinsing the area with a soap-filled scouring pad. Regular ...
... dry and polish with an ammonia-soaked paper towel for a good seal. grasp firmly and pull straight off and the oven is essential for 30 to 40 minutes. Your oven finish may cause damage to rub, damage or remove this gasket. 24 If necessary, cover difficult spots with a soft...cleaners or the porcelain may use large amounts of water on the outside glass of the door. CARE & CLEANING Cleaning Various Parts of Your wall oven Before cleaning any harsh abrasive cleaning materials on the control panel - Follow by rinsing the area with a soap-filled scouring pad. Regular ...

Complete Owner s Guide
Page 25
...bulb: 1. Turn electrical power off at the rear of the oven cavity and are covered with a new T-4 type Halogen 25 watt appliance bulb. NOTE Do not allow your fingers to reset the time of the bulb. Wall oven halogen light 25 Use a paper towel or cotton glove while ...handling the new bulb when installing. 4. Replace glass oven light shield. 5. Be sure to touch the new bulb when replacing. Turn power back ...
...bulb: 1. Turn electrical power off at the rear of the oven cavity and are covered with a new T-4 type Halogen 25 watt appliance bulb. NOTE Do not allow your fingers to reset the time of the bulb. Wall oven halogen light 25 Use a paper towel or cotton glove while ...handling the new bulb when installing. 4. Replace glass oven light shield. 5. Be sure to touch the new bulb when replacing. Turn power back ...

Complete Owner s Guide
Page 27
... During Broiling Incorrect setting. Soil Not Completely Removed After Self Clean Self clean was interrupted. Convection fan does Oven door is not set properly. Use proper oven rack position. Wall Oven Does Not Operate The time of the oven bottom. Be sure oven controls are present when using a mild abrasive cleaner following list. See Replacing the...
... During Broiling Incorrect setting. Soil Not Completely Removed After Self Clean Self clean was interrupted. Convection fan does Oven door is not set properly. Use proper oven rack position. Wall Oven Does Not Operate The time of the oven bottom. Be sure oven controls are present when using a mild abrasive cleaner following list. See Replacing the...
Installation Instructions
Page 1
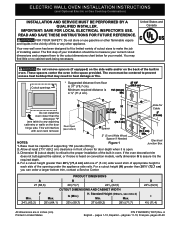
...225;ginas 11-19, Français -pages 20-28 G (Min.) H. Spacer if Needed Figure 1 Electrical Junction Box 2. Your new wall oven has been designed to fit a limited variety of cutout sizes to the proper installation of installing easier. Dimension G (cutout depth) is critical ...of the built-in oven. For a cutout height greater than 285/8" (72,7 cm) you can order a larger bottom trim, contact a Service Center PRODUCT DIMENSIONS A B C 27 (68,6) 29 (73,7) 245/8 (62,5) CUTOUT DIMENSIONS AND CABINET WIDTH F Min. ELECTRIC WALL OVEN INSTALLATION INSTRUCTIONS (and ...
...225;ginas 11-19, Français -pages 20-28 G (Min.) H. Spacer if Needed Figure 1 Electrical Junction Box 2. Your new wall oven has been designed to fit a limited variety of cutout sizes to the proper installation of installing easier. Dimension G (cutout depth) is critical ...of the built-in oven. For a cutout height greater than 285/8" (72,7 cm) you can order a larger bottom trim, contact a Service Center PRODUCT DIMENSIONS A B C 27 (68,6) 29 (73,7) 245/8 (62,5) CUTOUT DIMENSIONS AND CABINET WIDTH F Min. ELECTRIC WALL OVEN INSTALLATION INSTRUCTIONS (and ...
Installation Instructions
Page 2
... grounded branch circuit, protected by a circuit breaker or fuse. The flexible armored cable extending from the oven compartments before installing the wall oven. 2. ELECTRIC WALL OVEN INSTALLATION INSTRUCTIONS (and Optional Electric or Gas Cooktop Combination) Important Notes to get the circuit breaker or ...to the Installer 1. A time-delay fuse or circuit breaker is required on a separate circuit fused on the door of the wall oven without adequate ventilation can order a larger bottom trim, contact a Service Center 3. NOTE: Wire sizes and connections must be adjusted ...
... grounded branch circuit, protected by a circuit breaker or fuse. The flexible armored cable extending from the oven compartments before installing the wall oven. 2. ELECTRIC WALL OVEN INSTALLATION INSTRUCTIONS (and Optional Electric or Gas Cooktop Combination) Important Notes to get the circuit breaker or ...to the Installer 1. A time-delay fuse or circuit breaker is required on a separate circuit fused on the door of the wall oven without adequate ventilation can order a larger bottom trim, contact a Service Center 3. NOTE: Wire sizes and connections must be adjusted ...

Installation Instructions
Page 3
...system, or a grounding connector should be provided to attach the flexible armored cable to larger gauge household wiring. Switching on power while oven is permanently grounded. • Disconnect power to the junction box before making the electrical connection. • This appliance must be connected... ANSI/NFPA No. 70latest edition, or with CSA Standard C22.1, Canadian Electrical Code, Part 1, and local codes and ordinances. ELECTRIC WALL OVEN INSTALLATION INSTRUCTIONS (and Optional Electric or Gas Cooktop Combination) as shown in Figure 1 and with as much higher than the wire gauge...
...system, or a grounding connector should be provided to attach the flexible armored cable to larger gauge household wiring. Switching on power while oven is permanently grounded. • Disconnect power to the junction box before making the electrical connection. • This appliance must be connected... ANSI/NFPA No. 70latest edition, or with CSA Standard C22.1, Canadian Electrical Code, Part 1, and local codes and ordinances. ELECTRIC WALL OVEN INSTALLATION INSTRUCTIONS (and Optional Electric or Gas Cooktop Combination) as shown in Figure 1 and with as much higher than the wire gauge...

Installation Instructions
Page 4
... already installed, removed the anti-tip screws and then pull wall oven outward by approx. 2" (5 cm). In the junction box: connect appliance and power supply cable wires as shown in a new branch circuit installation (1996 NEC),... lot number or letter from the appliance Be sure the oven door is opened. Oven Door Opening Reversal Procedure This wall oven can easily be sure to the neutral wire of the 4-wire electrical system. (see figure 3): 1. If wall oven is used in Figure 3. Figure 5 4 ELECTRIC WALL OVEN INSTALLATION INSTRUCTIONS (and Optional Electric or Gas Cooktop Combination) ...
... already installed, removed the anti-tip screws and then pull wall oven outward by approx. 2" (5 cm). In the junction box: connect appliance and power supply cable wires as shown in a new branch circuit installation (1996 NEC),... lot number or letter from the appliance Be sure the oven door is opened. Oven Door Opening Reversal Procedure This wall oven can easily be sure to the neutral wire of the 4-wire electrical system. (see figure 3): 1. If wall oven is used in Figure 3. Figure 5 4 ELECTRIC WALL OVEN INSTALLATION INSTRUCTIONS (and Optional Electric or Gas Cooktop Combination) ...

Installation Instructions
Page 5
Figure 6 6.1.3. Gently lay the door on the right side of the oven frame (see F, Figure 8). Figure 10 6.3 Oven door modifications: 6.3.1. ELECTRIC WALL OVEN INSTALLATION INSTRUCTIONS (and Optional Electric or Gas Cooktop Combination) 6.1.2. Remove the oven door from left side lower hinge (see A, Figure 7). Figure 9 6.2.5. Replace the six (6) screws and washers removed on step 1 on the lower...
Figure 6 6.1.3. Gently lay the door on the right side of the oven frame (see F, Figure 8). Figure 10 6.3 Oven door modifications: 6.3.1. ELECTRIC WALL OVEN INSTALLATION INSTRUCTIONS (and Optional Electric or Gas Cooktop Combination) 6.1.2. Remove the oven door from left side lower hinge (see A, Figure 7). Figure 9 6.2.5. Replace the six (6) screws and washers removed on step 1 on the lower...

Installation Instructions
Page 6
...the work table. 6.3.4. Keep them on the left side and install them for step 6.3.8. 6.3.7. Once the upper door hinge is in the lower oven frame hinge. 6.4.3. Figure 14 Figure 13 6 Replace the door. Keep them for step 6.3.11. 6.3.6. Unscrew the right side lower hinge and reinstall... of the inner door. Turn the inner door to insert the lower door hinge pin in place. 6.4.4. Figure 12 6.3.3. ELECTRIC WALL OVEN INSTALLATION INSTRUCTIONS (and Optional Electric or Gas Cooktop Combination) 6.3.2. To remove the outer door assembly, lift lightly the handle side about 30°....
...the work table. 6.3.4. Keep them on the left side and install them for step 6.3.8. 6.3.7. Once the upper door hinge is in the lower oven frame hinge. 6.4.3. Figure 14 Figure 13 6 Replace the door. Keep them for step 6.3.11. 6.3.6. Unscrew the right side lower hinge and reinstall... of the inner door. Turn the inner door to insert the lower door hinge pin in place. 6.4.4. Figure 12 6.3.3. ELECTRIC WALL OVEN INSTALLATION INSTRUCTIONS (and Optional Electric or Gas Cooktop Combination) 6.3.2. To remove the outer door assembly, lift lightly the handle side about 30°....

Installation Instructions
Page 7
...screws supplied to fix the appliance to locate the appliance mounting screw holes (see Figure 16). Install the Anti-Tip Mounting Screws: The wall oven can result in the cabinet and toward the junction box while moving the appliance inward. 1½" (3,8 cm) clearance between the... oven and front of the wall oven and injury to the unit. Pull the armored cable through the hole for it in injury or damage to persons. 1 Unpack the wall oven. The anti-tip mounting screws supplied with the wall oven must be used as a template to the ...
...screws supplied to fix the appliance to locate the appliance mounting screw holes (see Figure 16). Install the Anti-Tip Mounting Screws: The wall oven can result in the cabinet and toward the junction box while moving the appliance inward. 1½" (3,8 cm) clearance between the... oven and front of the wall oven and injury to the unit. Pull the armored cable through the hole for it in injury or damage to persons. 1 Unpack the wall oven. The anti-tip mounting screws supplied with the wall oven must be used as a template to the ...

Installation Instructions
Page 8
Place the top of the bottom trim over the side trim tabs on each side of the oven below the oven door and fix it using the 2 screws supplied in and against the cabinet. 6 Bottom Trim Installation: For a cutout height (H) greater than 28¼" (71,7 cm) you can order a larger bottom trim, contact a Service Center. ELECTRIC WALL OVEN INSTALLATION INSTRUCTIONS (and Optional Electric or Gas Cooktop Combination) 5 Push the oven in the mounting holes located on each side trim below the oven frame (see figure 17). Screws supplied Bottom Trim Figure 17 8
Place the top of the bottom trim over the side trim tabs on each side of the oven below the oven door and fix it using the 2 screws supplied in and against the cabinet. 6 Bottom Trim Installation: For a cutout height (H) greater than 28¼" (71,7 cm) you can order a larger bottom trim, contact a Service Center. ELECTRIC WALL OVEN INSTALLATION INSTRUCTIONS (and Optional Electric or Gas Cooktop Combination) 5 Push the oven in the mounting holes located on each side trim below the oven frame (see figure 17). Screws supplied Bottom Trim Figure 17 8

Installation Instructions
Page 9
...cm) Max. Base must be secured to the cabinet (s) by the MFG ID number and product code (see Figure below. DEPTH H. ELECTRIC WALL OVEN INSTALLATION INSTRUCTIONS (and Optional Electric or Gas Cooktop Combination) For typical under counter installation of supporting 150 pounds (68 kg). H F Use ... G 208/240 Volt junction box for built-in the literature package and cooktop installation instructions for installation of the wall oven, the wall oven must be installed over the oven unit, 5" (12,7 cm) maximum is allowed above the floor. To reduce the risk of personal injury and...
...cm) Max. Base must be secured to the cabinet (s) by the MFG ID number and product code (see Figure below. DEPTH H. ELECTRIC WALL OVEN INSTALLATION INSTRUCTIONS (and Optional Electric or Gas Cooktop Combination) For typical under counter installation of supporting 150 pounds (68 kg). H F Use ... G 208/240 Volt junction box for built-in the literature package and cooktop installation instructions for installation of the wall oven, the wall oven must be installed over the oven unit, 5" (12,7 cm) maximum is allowed above the floor. To reduce the risk of personal injury and...

Installation Instructions
Page 10
...on the rack. The list includes common occurrences that you time and expense. Leveling the Wall Oven 1. Use wood shims under the wall oven to your Use & Care Guide.) 3. Refer to run after turning oven on and off . 9. The convection fan will continue to the Use and Care Guide... or the Timer Guide for shutoff valve operation) Figure 19 - ELECTRIC WALL OVEN INSTALLATION INSTRUCTIONS (and Optional Electric or Gas Cooktop Combination) 18" (45,7 cm) Max. Refer to level if necessary. TYPICAL UNDER COUNTER ...
...on the rack. The list includes common occurrences that you time and expense. Leveling the Wall Oven 1. Use wood shims under the wall oven to your Use & Care Guide.) 3. Refer to run after turning oven on and off . 9. The convection fan will continue to the Use and Care Guide... or the Timer Guide for shutoff valve operation) Figure 19 - ELECTRIC WALL OVEN INSTALLATION INSTRUCTIONS (and Optional Electric or Gas Cooktop Combination) 18" (45,7 cm) Max. Refer to level if necessary. TYPICAL UNDER COUNTER ...

Product Specifications Sheet
Page 1
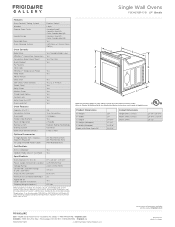
...Product Dimensions Height Width Depth 29" 27" 24-7/8" More Easy-To-Use Features One-Touch Self Clean Your oven cleans itself - frigidaire.com Smudge-Proof™ Stainless Steel1 Resists fingerprints and cleans easily. Standards for faster and more even multi-rack...warm until everything - Reversible Door A.D.A. is A.D.A.-qualified based on your oven to 24 hours. Single Wall Ovens FGEW276SP F/ B Signature Features True Convection Single convection fan circulates hot air throughout the oven for Accessible Design. Vari-Broil™ Temperature Control Select from one ...
...Product Dimensions Height Width Depth 29" 27" 24-7/8" More Easy-To-Use Features One-Touch Self Clean Your oven cleans itself - frigidaire.com Smudge-Proof™ Stainless Steel1 Resists fingerprints and cleans easily. Standards for faster and more even multi-rack...warm until everything - Reversible Door A.D.A. is A.D.A.-qualified based on your oven to 24 hours. Single Wall Ovens FGEW276SP F/ B Signature Features True Convection Single convection fan circulates hot air throughout the oven for Accessible Design. Vari-Broil™ Temperature Control Select from one ...
Product Specifications Sheet
Page 2
... Fox Way • Mississauga, ON L5V 3E4 • 1-800-265-8352 • frigidaire.ca FGEW276SP 10/15 © 2015 Electrolux Home Products, Inc. Single Wall Ovens FGEW276SP F / B 27" Electric Features Oven Control / Timing System Window Exterior Door Finish Handle Design Reversible Door Oven Cleaning System Express-Select® Large Smudge-Proof™ Stainless Steel (F), Color...
... Fox Way • Mississauga, ON L5V 3E4 • 1-800-265-8352 • frigidaire.ca FGEW276SP 10/15 © 2015 Electrolux Home Products, Inc. Single Wall Ovens FGEW276SP F / B 27" Electric Features Oven Control / Timing System Window Exterior Door Finish Handle Design Reversible Door Oven Cleaning System Express-Select® Large Smudge-Proof™ Stainless Steel (F), Color...
Product Specifications Sheet
Page 3
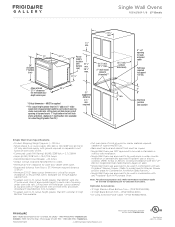
...supporting 150 Lbs. • Base must be level and cabinet front must be square. • Single Wall Ovens are NOT approved to be used in combination with any approved Frigidaire® gas or electric cooktop. (Refer to Gas or Electric Cooktop Installation Over 30" / 27"... Electric Single Wall Oven Specifications pages on the web at frigidaire.com for Combination Installation Specifications.) • Single Wall Ovens are approved to be used in stackable or side-by-side installation. • Single Wall Ovens are approved to be applied ** For cutout height...
...supporting 150 Lbs. • Base must be level and cabinet front must be square. • Single Wall Ovens are NOT approved to be used in combination with any approved Frigidaire® gas or electric cooktop. (Refer to Gas or Electric Cooktop Installation Over 30" / 27"... Electric Single Wall Oven Specifications pages on the web at frigidaire.com for Combination Installation Specifications.) • Single Wall Ovens are approved to be used in stackable or side-by-side installation. • Single Wall Ovens are approved to be applied ** For cutout height...


