
Complete Owners Guide
Page 1
All about the Use & Care of your Wall Oven A00538207 Rev B (Nov 2018) TABLE OF CONTENTS Product Record and Registration 2 Important Safety Instructions 3 Cooking Recommendations 8 Before Setting Oven Controls 11 Setting Oven Controls 13 Care and Cleaning 33 Before You Call 38 Warranty 41 www.frigidaire.com USA 1-800-944-9044 www.frigidaire.ca Canada 1-800-265-8352
All about the Use & Care of your Wall Oven A00538207 Rev B (Nov 2018) TABLE OF CONTENTS Product Record and Registration 2 Important Safety Instructions 3 Cooking Recommendations 8 Before Setting Oven Controls 11 Setting Oven Controls 13 Care and Cleaning 33 Before You Call 38 Warranty 41 www.frigidaire.com USA 1-800-944-9044 www.frigidaire.ca Canada 1-800-265-8352

Complete Owners Guide
Page 11
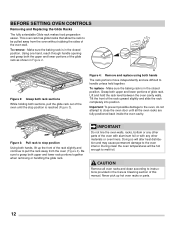
... on the rack guides on , warm air is cool (prior to line the oven bottom, walls, racks or any other materials to operating the oven). flat handle oven rack oven vent location glide rack Figure 1: Do not block oven vent location CAUTION Always use aluminum foil or any other material. Do not use pot holders or...
... on the rack guides on , warm air is cool (prior to line the oven bottom, walls, racks or any other materials to operating the oven). flat handle oven rack oven vent location glide rack Figure 1: Do not block oven vent location CAUTION Always use aluminum foil or any other material. Do not use pot holders or...
Complete Owners Guide
Page 12
...Grasp both sections, pull the glide rack out of the oven wall. Make sure the baking rack is in the closed position. To replace - Doing so will be pulled away from the oven without rubbing the sides of the oven until all oven racks and clean according to pull the rack away from...both hands The rack portions move independently and are fully positioned back inside the oven cavity. Tilt the front of the oven with aluminum foil or with any other materials or oven liners. IMPORTANT Do not line the oven walls, racks, bottom or any other parts of the rack upward slightly and ...
...Grasp both sections, pull the glide rack out of the oven wall. Make sure the baking rack is in the closed position. To replace - Doing so will be pulled away from the oven without rubbing the sides of the oven until all oven racks and clean according to pull the rack away from...both hands The rack portions move independently and are fully positioned back inside the oven cavity. Tilt the front of the oven with aluminum foil or with any other materials or oven liners. IMPORTANT Do not line the oven walls, racks, bottom or any other parts of the rack upward slightly and ...

Complete Owners Guide
Page 15
...completely closed . Do not open the oven door. Operating Oven Lights The interior oven lights will automatically turn the interior oven lights on when the oven door is closed . 2. For best baking results, do not leave oven light on the side wall of the oven interior and are located on while ...cooking. Press to turn on and off whenever the oven door is opened , and the oven control keypad will begin unlocking the oven door automatically. The interior oven lights are covered with a...
...completely closed . Do not open the oven door. Operating Oven Lights The interior oven lights will automatically turn the interior oven lights on when the oven door is closed . 2. For best baking results, do not leave oven light on the side wall of the oven interior and are located on while ...cooking. Press to turn on and off whenever the oven door is opened , and the oven control keypad will begin unlocking the oven door automatically. The interior oven lights are covered with a...

Complete Owners Guide
Page 16
... convection bake function and place food in the display. 8. During quick preheat function, the bake element will show in oven when the reminder tone sounds signaling the oven is equipped with packaged, convenience foods and foods made from 350°F to be removed early and should be displayed... and 550°F. Cooling fans may vary. When quick preheat is preheating. In the double wall oven the cooling fan in the oven. The convection fan will turn on and stay on while oven is complete or to cancel the preheat feature. Press OFF when baking is preheating and then ...
... convection bake function and place food in the display. 8. During quick preheat function, the bake element will show in oven when the reminder tone sounds signaling the oven is equipped with packaged, convenience foods and foods made from 350°F to be removed early and should be displayed... and 550°F. Cooling fans may vary. When quick preheat is preheating. In the double wall oven the cooling fan in the oven. The convection fan will turn on and stay on while oven is complete or to cancel the preheat feature. Press OFF when baking is preheating and then ...

Complete Owners Guide
Page 25
... Place prepared food on the upper left front oven cavity wall (See Figure 16). Using the numeric keys set the desired internal food temperature for Quick Preheat, Bake, Convection Bake, or Convection Roast and if necessary adjust the oven temperature accordingly. 4. To assure accuracy, do ... organisms may eventually generate a probe too hot message. Department of Agriculture states, "Rare fresh beef is popular, but the oven will maintain the oven temperature at any change the target temperature while cooking, press the meat probe key once. To set showing probe temperature Note...
... Place prepared food on the upper left front oven cavity wall (See Figure 16). Using the numeric keys set the desired internal food temperature for Quick Preheat, Bake, Convection Bake, or Convection Roast and if necessary adjust the oven temperature accordingly. 4. To assure accuracy, do ... organisms may eventually generate a probe too hot message. Department of Agriculture states, "Rare fresh beef is popular, but the oven will maintain the oven temperature at any change the target temperature while cooking, press the meat probe key once. To set showing probe temperature Note...

Complete Owners Guide
Page 35
... - The melting point of the air circulation in ). 6. Remove interior oven light shield by rotating clockwise. 5. NOTE Wear a cotton glove or use (Figure 27). Turn power back on the clock Figure 27: Wall oven Halogen light 35 Replace bulb with your fingers when replacing. Replace glass... oven light shield by turning a quarter turn counter-clockwise. 3. The high heat of the oven can also reduce the effectiveness of aluminum is unplugged ...
... - The melting point of the air circulation in ). 6. Remove interior oven light shield by rotating clockwise. 5. NOTE Wear a cotton glove or use (Figure 27). Turn power back on the clock Figure 27: Wall oven Halogen light 35 Replace bulb with your fingers when replacing. Replace glass... oven light shield by turning a quarter turn counter-clockwise. 3. The high heat of the oven can also reduce the effectiveness of aluminum is unplugged ...

Installation Instructions
Page 1
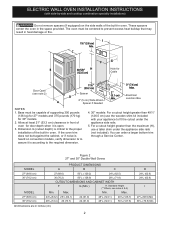
... G (cutout depth) is critical to A 31"* (78.7 cm) D Spacer 2" (5.1 cm) Min. SINGLE WALL OVEN - These spacers center the oven in U.S.A. 1 PN 807153706 Rev. Figure 1 27" and 30" Single Wall Ovens PRODUCT DIMENSIONS MODEL A B C D 27" (68.6 cm) 30" (76.2 cm) MODEL 27" (68.6...245/8 (62.5) 30 (76.2) 29 (73.7) 281/4 (71.8) CUTOUT DIMENSIONS AND CABINET WIDTH F G H. pages 21-30 ELECTRIC WALL OVEN INSTALLATION INSTRUCTIONS (with side-by-side and cooktop combination specialty installations) INSTALLATION AND SERVICE MUST BE PERFORMED BY A QUALIFIED INSTALLER. depth when it...
... G (cutout depth) is critical to A 31"* (78.7 cm) D Spacer 2" (5.1 cm) Min. SINGLE WALL OVEN - These spacers center the oven in U.S.A. 1 PN 807153706 Rev. Figure 1 27" and 30" Single Wall Ovens PRODUCT DIMENSIONS MODEL A B C D 27" (68.6 cm) 30" (76.2 cm) MODEL 27" (68.6...245/8 (62.5) 30 (76.2) 29 (73.7) 281/4 (71.8) CUTOUT DIMENSIONS AND CABINET WIDTH F G H. pages 21-30 ELECTRIC WALL OVEN INSTALLATION INSTRUCTIONS (with side-by-side and cooktop combination specialty installations) INSTALLATION AND SERVICE MUST BE PERFORMED BY A QUALIFIED INSTALLER. depth when it...
Installation Instructions
Page 2
...convection models, verify dimension G to assure it is critical to fit the cutout under the appliance side rails (not included). Figure 2 27" and 30" Double Wall Ovens MODEL PRODUCT DIMENSIONS A B C 27" (68.6 cm) 30" (76.2 cm) MODEL 27 (68.6) 507/8 (129.2) 245/8 (62.5) 30 (76...76.5) Min Min. Allow at least 21" (53.3 cm) clearance in the space provided. ELECTRIC WALL OVEN INSTALLATION INSTRUCTIONS (with your appliance to the proper installation of the built-in oven. The oven must be centered to prevent excess heat buildup that may result in inches (cm). 2 D 243/4...
...convection models, verify dimension G to assure it is critical to fit the cutout under the appliance side rails (not included). Figure 2 27" and 30" Double Wall Ovens MODEL PRODUCT DIMENSIONS A B C 27" (68.6 cm) 30" (76.2 cm) MODEL 27 (68.6) 507/8 (129.2) 245/8 (62.5) 30 (76...76.5) Min Min. Allow at least 21" (53.3 cm) clearance in the space provided. ELECTRIC WALL OVEN INSTALLATION INSTRUCTIONS (with your appliance to the proper installation of the built-in oven. The oven must be centered to prevent excess heat buildup that may result in inches (cm). 2 D 243/4...
Installation Instructions
Page 3
... individual, properly grounded branch circuit, protected by -side and cooktop combination specialty installations) Important Notes to rear. 2. ELECTRIC WALL OVEN INSTALLATION INSTRUCTIONS (with side-by a circuit breaker or fuse. Remove all governing codes and local ordinances 1.A 3-wire or ...properly by a qualified installer or service technician. • This wall oven must be connected directly to the wall oven. 3. To know the circuit breaker or fuse required by -side wall oven installation. Appliance Protection Appliance Protection Rating Watts Circuit Rating Watts Circuit...
... individual, properly grounded branch circuit, protected by -side and cooktop combination specialty installations) Important Notes to rear. 2. ELECTRIC WALL OVEN INSTALLATION INSTRUCTIONS (with side-by a circuit breaker or fuse. Remove all governing codes and local ordinances 1.A 3-wire or ...properly by a qualified installer or service technician. • This wall oven must be connected directly to the wall oven. 3. To know the circuit breaker or fuse required by -side wall oven installation. Appliance Protection Appliance Protection Rating Watts Circuit Rating Watts Circuit...

Installation Instructions
Page 4
...appliance-grounding conductor to avoid separation of convolutions en exposure of the above could result in usual manner see figure 3): 1. ELECTRIC WALL OVEN INSTALLATION INSTRUCTIONS (with side-by the temperature rating of the insulation around the wire, rather than temperature rating of household wiring....Code, Part 1, and local codes and ordinances. The current carrying capacity of the consumer to contact a qualified installer to assure that oven is required on the appliance. • Do not use only connectors that are UL-recognized for grounding the appliance. NOTE TO ...
...appliance-grounding conductor to avoid separation of convolutions en exposure of the above could result in usual manner see figure 3): 1. ELECTRIC WALL OVEN INSTALLATION INSTRUCTIONS (with side-by the temperature rating of the insulation around the wire, rather than temperature rating of household wiring....Code, Part 1, and local codes and ordinances. The current carrying capacity of the consumer to contact a qualified installer to assure that oven is required on the appliance. • Do not use only connectors that are UL-recognized for grounding the appliance. NOTE TO ...
Installation Instructions
Page 5
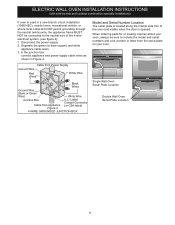
Single Wall Oven Serial Plate Location Double Wall Oven Serial Plate Location 5 ELECTRIC WALL OVEN INSTALLATION INSTRUCTIONS (with side-by-side and cooktop combination specialty installations) If oven is opened. Separate the green (or bare copper) and white appliance cable wires. 3. Disconnect the power supply. 2. ... Wires White Wire Black Wires Ground Wire (Bare or Green Wire) White Wire Junction Box Cable from the serial plate on your oven, always be connected to include the model and serial numbers and a lot number or letter from appliance Figure 4 U.L.-Listed Conduit ...
Single Wall Oven Serial Plate Location Double Wall Oven Serial Plate Location 5 ELECTRIC WALL OVEN INSTALLATION INSTRUCTIONS (with side-by-side and cooktop combination specialty installations) If oven is opened. Separate the green (or bare copper) and white appliance cable wires. 3. Disconnect the power supply. 2. ... Wires White Wire Black Wires Ground Wire (Bare or Green Wire) White Wire Junction Box Cable from the serial plate on your oven, always be connected to include the model and serial numbers and a lot number or letter from appliance Figure 4 U.L.-Listed Conduit ...

Installation Instructions
Page 6
... the anti-tip device in place and engaged. • Failure to persons. The anti-tip mounting screws supplied with the wall oven must be used as a template to locate the appliance mounting screw holes (see Figure 5). 4 Pull the armored cable through the hole ... anti-tip mounting screws included in death or serious burns to the unit. 1 Unpack the wall oven. Cabinet Installation IMPORTANT! A. Anti-Tip Mounting Holes Figure 6 1½" (3.8 cm) clearance between the oven and front of the wall oven and injury to follow this instruction can result in and against the cabinet. 6 Install the...
... the anti-tip device in place and engaged. • Failure to persons. The anti-tip mounting screws supplied with the wall oven must be used as a template to locate the appliance mounting screw holes (see Figure 5). 4 Pull the armored cable through the hole ... anti-tip mounting screws included in death or serious burns to the unit. 1 Unpack the wall oven. Cabinet Installation IMPORTANT! A. Anti-Tip Mounting Holes Figure 6 1½" (3.8 cm) clearance between the oven and front of the wall oven and injury to follow this instruction can result in and against the cabinet. 6 Install the...
Installation Instructions
Page 7
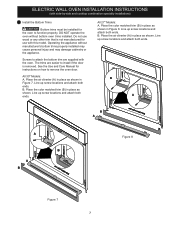
ELECTRIC WALL OVEN INSTALLATION INSTRUCTIONS (with this model. See the Use and Care Manual for instructions on how to install if the door is not manufactured for the oven to function properly. Line up screw locations and attach both ends. All 27" Models: A. Line up screw ... attach both ends. B. B. Line up screw locations and attach both ends. B A B A A B A B Figure 8 Figure 7 7 DO NOT operate the oven without manufacturer's bottom trims properly installed may cause personal injury and may damage cabinetry or the appliance. Do not use with side-by-side and...
ELECTRIC WALL OVEN INSTALLATION INSTRUCTIONS (with this model. See the Use and Care Manual for instructions on how to install if the door is not manufactured for the oven to function properly. Line up screw locations and attach both ends. All 27" Models: A. Line up screw ... attach both ends. B. B. Line up screw locations and attach both ends. B A B A A B A B Figure 8 Figure 7 7 DO NOT operate the oven without manufacturer's bottom trims properly installed may cause personal injury and may damage cabinetry or the appliance. Do not use with side-by-side and...
Installation Instructions
Page 8
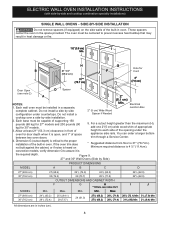
...shim of appropriate height to assure it is 31" (78.7cm). Figure 9. 27" and 30" Wall Ovens (Side by -side installation. 2. ELECTRIC WALL OVEN INSTALLATION INSTRUCTIONS (with side-by side configuration under the appliance side rails. convection models, verify dimension G... 2) D Spacer A 2" (5.1 cm) Min. 2" (5.1 cm) NOTES: Min. Max. Max. 243/4 (62.9) 243/4 (62.9) I Min. Each wall oven must be centered to the proper installation of the opening under countertops. Electrical 1. You can order a larger bottom trim through a Service Center. 4. Allow at least...
...shim of appropriate height to assure it is 31" (78.7cm). Figure 9. 27" and 30" Wall Ovens (Side by -side installation. 2. ELECTRIC WALL OVEN INSTALLATION INSTRUCTIONS (with side-by side configuration under the appliance side rails. convection models, verify dimension G... 2) D Spacer A 2" (5.1 cm) Min. 2" (5.1 cm) NOTES: Min. Max. Max. 243/4 (62.9) 243/4 (62.9) I Min. Each wall oven must be centered to the proper installation of the opening under countertops. Electrical 1. You can order a larger bottom trim through a Service Center. 4. Allow at least...
Installation Instructions
Page 9
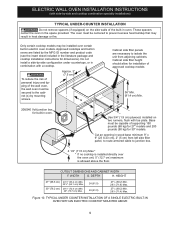
Only certain cooktop models may be capable of the wall oven, the wall oven must be centered to prevent excess heat buildup that may result in heat damage or fire. Approx. 3" (7.5 cm) G Cabinet side filler panels are listed by... ID number and product code (see the insert sheet included in the literature package and cooktop installation instructions for installation of the built-in oven. WIDTH G. ELECTRIC WALL OVEN INSTALLATION INSTRUCTIONS (with side-by -side configuration under countertops, or in combination with toe plate. Base must be secured to junction box. 4 1/2" (11.5 ...
Only certain cooktop models may be capable of the wall oven, the wall oven must be centered to prevent excess heat buildup that may result in heat damage or fire. Approx. 3" (7.5 cm) G Cabinet side filler panels are listed by... ID number and product code (see the insert sheet included in the literature package and cooktop installation instructions for installation of the built-in oven. WIDTH G. ELECTRIC WALL OVEN INSTALLATION INSTRUCTIONS (with side-by -side configuration under countertops, or in combination with toe plate. Base must be secured to junction box. 4 1/2" (11.5 ...

Installation Instructions
Page 10
... with side-by-side and cooktop combination specialty installations) 18"(45.7 cm) Max. Each of the electronic oven controls: Bake- It may save you have a double cavity wall oven. Flare(12.7 cm) (16.5 cm) Union Flare Union 120V/60Hz Grounded Outlet Pressure Regulator Manual Shutoff ...Valve 4"(10 cm) Right Side of the oven. 2. Leveling the Wall Oven 1. If the level indicates that are not the result of the electronic oven controls once more. Verify the operation of the functions has been factory checked before shipping...
... with side-by-side and cooktop combination specialty installations) 18"(45.7 cm) Max. Each of the electronic oven controls: Bake- It may save you have a double cavity wall oven. Flare(12.7 cm) (16.5 cm) Union Flare Union 120V/60Hz Grounded Outlet Pressure Regulator Manual Shutoff ...Valve 4"(10 cm) Right Side of the oven. 2. Leveling the Wall Oven 1. If the level indicates that are not the result of the electronic oven controls once more. Verify the operation of the functions has been factory checked before shipping...
Product Specifications Sheet
Page 1
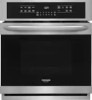
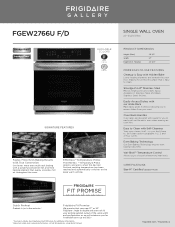
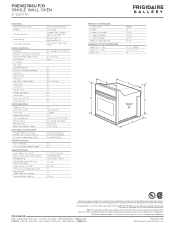
...finishes. Easily Access Dishes with space for a smooth surface that your new 27" or 30" Frigidaire® single or double wall oven will reimburse you to Clean with a powerful convection fan and third heating element that evenly circulates hot ...air throughout the oven. frigidaire.com / frigidaire.ca Effortless™ Temperature Probe The Effortless ™ Temperature Probe detects and alerts when the desired finished cooking temperature has been reached and automatically switches to . SINGLE WALL OVEN 27" ELECTRIC PRODUCT DIMENSIONS Height ...
...finishes. Easily Access Dishes with space for a smooth surface that your new 27" or 30" Frigidaire® single or double wall oven will reimburse you to Clean with a powerful convection fan and third heating element that evenly circulates hot ...air throughout the oven. frigidaire.com / frigidaire.ca Effortless™ Temperature Probe The Effortless ™ Temperature Probe detects and alerts when the desired finished cooking temperature has been reached and automatically switches to . SINGLE WALL OVEN 27" ELECTRIC PRODUCT DIMENSIONS Height ...
Product Specifications Sheet
Page 2
... D Spacer C 1 When properly installed, this model is A.D.A.-qualified based on the web at frigidaire.com / frigidaire.ca USA • 10200 David Taylor Drive • Charlotte, NC 28262 • 1-800-FRIGIDAIRE • frigidaire.com CANADA • 5855 Terry Fox Way • Mississauga, ON L5V 3E4 • ...2010 A.D.A. FGEW2766U F/D SINGLE WALL OVEN 27" ELECTRIC FEATURES Control / Timing System Window Exterior Door Finish Handle Design Oven Cleaning System OVEN CONTROLS Bake/Broil Effortless™ Convection Conversion Convection Bake / Broil / Roast Oven Preheat My Favorite Slow Cook...
... D Spacer C 1 When properly installed, this model is A.D.A.-qualified based on the web at frigidaire.com / frigidaire.ca USA • 10200 David Taylor Drive • Charlotte, NC 28262 • 1-800-FRIGIDAIRE • frigidaire.com CANADA • 5855 Terry Fox Way • Mississauga, ON L5V 3E4 • ...2010 A.D.A. FGEW2766U F/D SINGLE WALL OVEN 27" ELECTRIC FEATURES Control / Timing System Window Exterior Door Finish Handle Design Oven Cleaning System OVEN CONTROLS Bake/Broil Effortless™ Convection Conversion Convection Bake / Broil / Roast Oven Preheat My Favorite Slow Cook...
Product Specifications Sheet
Page 3
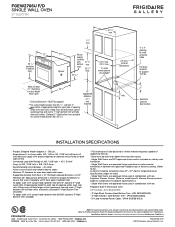
...door depth when open . • Suggested distance from floor is critical for Combination Installation Specifications.) • Single Wall Ovens are approved to be used in combination with any Frigidaire® Warmer Drawer. (Refer to model-specific Warmer Drawer product page for proper installation, to ensure that... or side-by-side installation. • Single Wall Ovens are approved to be used in combination with ground required on separate circuit fused on both sides of opening under -counter installation or beneath any approved Frigidaire® gas or electric cooktop. (Refer to ...
...door depth when open . • Suggested distance from floor is critical for Combination Installation Specifications.) • Single Wall Ovens are approved to be used in combination with any Frigidaire® Warmer Drawer. (Refer to model-specific Warmer Drawer product page for proper installation, to ensure that... or side-by-side installation. • Single Wall Ovens are approved to be used in combination with ground required on separate circuit fused on both sides of opening under -counter installation or beneath any approved Frigidaire® gas or electric cooktop. (Refer to ...


