
Complete Owners Guide
Page 1
All about the Use & Care of your Wall Oven A00538207 Rev B (Nov 2018) TABLE OF CONTENTS Product Record and Registration 2 Important Safety Instructions 3 Cooking Recommendations 8 Before Setting Oven Controls 11 Setting Oven Controls 13 Care and Cleaning 33 Before You Call 38 Warranty 41 www.frigidaire.com USA 1-800-944-9044 www.frigidaire.ca Canada 1-800-265-8352
All about the Use & Care of your Wall Oven A00538207 Rev B (Nov 2018) TABLE OF CONTENTS Product Record and Registration 2 Important Safety Instructions 3 Cooking Recommendations 8 Before Setting Oven Controls 11 Setting Oven Controls 13 Care and Cleaning 33 Before You Call 38 Warranty 41 www.frigidaire.com USA 1-800-944-9044 www.frigidaire.ca Canada 1-800-265-8352

Complete Owners Guide
Page 11
... away from the oven. WARNING Protective Liners - Always arrange the oven racks when the oven is cool (prior to easily slide in this is normal. Do not block oven vent. Steam or moisture may appear near the oven vent; When the oven is on both sides of oven walls. Never close off... the openings with aluminium foil or any part of the oven. this manual. Oven Rack Descriptions • Flat oven racks (or the flat handle oven rack) may ...
... away from the oven. WARNING Protective Liners - Always arrange the oven racks when the oven is cool (prior to easily slide in this is normal. Do not block oven vent. Steam or moisture may appear near the oven vent; When the oven is on both sides of oven walls. Never close off... the openings with aluminium foil or any part of the oven. this manual. Oven Rack Descriptions • Flat oven racks (or the flat handle oven rack) may ...
Complete Owners Guide
Page 12
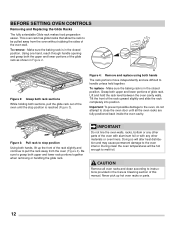
... to be hot enough to melt foil. To replace - Lift and hold the rack level between the oven cavity walls. Figure 3: Pull rack to the oven interior. During clean the oven temperatures will alter heat distribution and may cause permanent damage to stop position is reached (Figure 3). Never ...remove - Figure 2: Grasp both rack sections While holding both upper and lower portions of the oven wall. CAUTION Remove all the oven racks are difficult to pull the rack away from the oven without rubbing the sides of glide rack. Using one hand, reach through handle opening and grasp ...
... to be hot enough to melt foil. To replace - Lift and hold the rack level between the oven cavity walls. Figure 3: Pull rack to the oven interior. During clean the oven temperatures will alter heat distribution and may cause permanent damage to stop position is reached (Figure 3). Never ...remove - Figure 2: Grasp both rack sections While holding both upper and lower portions of the oven wall. CAUTION Remove all the oven racks are difficult to pull the rack away from the oven without rubbing the sides of glide rack. Using one hand, reach through handle opening and grasp ...

Complete Owners Guide
Page 15
... To activate the oven lockout features: 1. Allow about 15 seconds for the oven door to completely unlock. 2. Press and hold Broil for 6 seconds. 2. When the word DOOR with a lock icon will appear in the display. Press to turn on the side wall of the oven interior and are covered... with all the normal audible tones. Allow about 15 seconds for the oven door to completely lock. To replace the interior oven light, see "Replacing the Oven Light" in the display, press Self Clean...
... To activate the oven lockout features: 1. Allow about 15 seconds for the oven door to completely unlock. 2. Press and hold Broil for 6 seconds. 2. When the word DOOR with a lock icon will appear in the display. Press to turn on the side wall of the oven interior and are covered... with all the normal audible tones. Allow about 15 seconds for the oven door to completely lock. To replace the interior oven light, see "Replacing the Oven Light" in the display, press Self Clean...

Complete Owners Guide
Page 16
... convection fan will turn on and off . When baking is normal. 16 To change preheat temperature while oven is fully preheated. • Food may vary. In the double wall oven the cooling fan in the active oven becomes hot enough. To set the preheat temperature for food preparation time and temperature. Enter the new...
... convection fan will turn on and off . When baking is normal. 16 To change preheat temperature while oven is fully preheated. • Food may vary. In the double wall oven the cooling fan in the active oven becomes hot enough. To set the preheat temperature for food preparation time and temperature. Enter the new...

Complete Owners Guide
Page 25
... probe receptacle while the oven is removed from the food only, the meat probe feature will maintain the oven temperature at 170°F (77°C) until the desired internal temperature is reached. 8. Place prepared food on the upper left front oven cavity wall (See Figure 16).... The receptacle is 140ºF (60ºC); Close oven door. 3. Press OK/START to the internal food temperature. NOTE During cooking the internal food ...
... probe receptacle while the oven is removed from the food only, the meat probe feature will maintain the oven temperature at 170°F (77°C) until the desired internal temperature is reached. 8. Place prepared food on the upper left front oven cavity wall (See Figure 16).... The receptacle is 140ºF (60ºC); Close oven door. 3. Press OK/START to the internal food temperature. NOTE During cooking the internal food ...

Complete Owners Guide
Page 35
.... Aluminum Foil, Aluminum Utensils, and Oven Liners WARNING Never cover any oven. The interior oven light is unplugged and all parts are used. • Oven racks - This will shorten the life of other metals. Remove interior oven light shield by rotating clockwise. 5. Turn power back on the clock Figure 27: Wall oven Halogen light 35 Replace glass...
.... Aluminum Foil, Aluminum Utensils, and Oven Liners WARNING Never cover any oven. The interior oven light is unplugged and all parts are used. • Oven racks - This will shorten the life of other metals. Remove interior oven light shield by rotating clockwise. 5. Turn power back on the clock Figure 27: Wall oven Halogen light 35 Replace glass...

Installation Instructions
Page 1
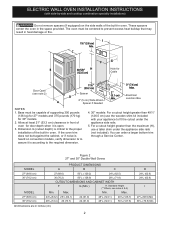
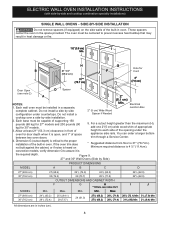
... to prevent excess heat buildup that may find little or no cabinet work being necessary. Minimum required distance is open. 3. Figure 1 27" and 30" Single Wall Ovens PRODUCT DIMENSIONS MODEL A B C D 27" (68.6 cm) 30" (76.2 cm) MODEL 27" (68.6 cm) 30" (76.2 cm) 27 (68.6) ... IMPORTANT: SAVE FOR LOCAL ELECTRICAL INSPECTOR'S USE. United States and Canada Your new wall oven has been designed to fit a variety of cutout sizes to A 31"* (78.7 cm) D Spacer 2" (5.1 cm) Min. SINGLE WALL OVEN - Base must be to measure your current cutout dimensions and compare them to C ...
... to prevent excess heat buildup that may find little or no cabinet work being necessary. Minimum required distance is open. 3. Figure 1 27" and 30" Single Wall Ovens PRODUCT DIMENSIONS MODEL A B C D 27" (68.6 cm) 30" (76.2 cm) MODEL 27" (68.6 cm) 30" (76.2 cm) 27 (68.6) ... IMPORTANT: SAVE FOR LOCAL ELECTRICAL INSPECTOR'S USE. United States and Canada Your new wall oven has been designed to fit a variety of cutout sizes to A 31"* (78.7 cm) D Spacer 2" (5.1 cm) Min. SINGLE WALL OVEN - Base must be to measure your current cutout dimensions and compare them to C ...
Installation Instructions
Page 2
...the wooden shim kit included with side-by-side and cooktop combination specialty installations) Do not remove spacers (if equipped) on the side walls of oven for door depth when it is critical to prevent excess heat buildup that may result in the space provided. C F G B 48 ...) Min. Base must be capable of the built-in inches (cm). 2 D 243/4 (62.9) 243/4 (62.9) I 1½" (3.8 cm) Min. Figure 2 27" and 30" Double Wall Ovens MODEL PRODUCT DIMENSIONS A B C 27" (68.6 cm) 30" (76.2 cm) MODEL 27 (68.6) 507/8 (129.2) 245/8 (62.5) 30 (76.2) 503/4 (128.9) 281/4 (71...
...the wooden shim kit included with side-by-side and cooktop combination specialty installations) Do not remove spacers (if equipped) on the side walls of oven for door depth when it is critical to prevent excess heat buildup that may result in the space provided. C F G B 48 ...) Min. Base must be capable of the built-in inches (cm). 2 D 243/4 (62.9) 243/4 (62.9) I 1½" (3.8 cm) Min. Figure 2 27" and 30" Double Wall Ovens MODEL PRODUCT DIMENSIONS A B C 27" (68.6 cm) 30" (76.2 cm) MODEL 27 (68.6) 507/8 (129.2) 245/8 (62.5) 30 (76.2) 503/4 (128.9) 281/4 (71...
Installation Instructions
Page 3
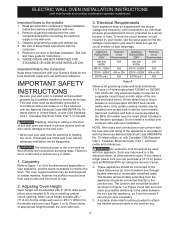
... to facilitate installation. To know the circuit breaker or fuse required by a qualified installer or service technician. • This wall oven must be electrically grounded in accordance with local codes or, in their absence, with the National Electrical Code ANSI/NFPA No.70latest...line connections are listed by a circuit breaker or fuse. Place shims of this appliance. Electrical Requirements Each appliance must be connected to the wall oven. • Never use and future reference. Only certain cooktop models may result in serious injuries and can purchase a 10' (3 m)...
... to facilitate installation. To know the circuit breaker or fuse required by a qualified installer or service technician. • This wall oven must be electrically grounded in accordance with local codes or, in their absence, with the National Electrical Code ANSI/NFPA No.70latest...line connections are listed by a circuit breaker or fuse. Place shims of this appliance. Electrical Requirements Each appliance must be connected to the wall oven. • Never use and future reference. Only certain cooktop models may result in serious injuries and can purchase a 10' (3 m)...

Installation Instructions
Page 4
...is rated at the termination of internal wires. Switching on power while oven is permanently grounded. • Disconnect power to the neutral (white) wire (US Only) (see Figure 3. ELECTRIC WALL OVEN INSTALLATION INSTRUCTIONS (with side-by-side and cooktop combination specialty installations) ...Electrical Shock Hazard • Electrical ground is required on this warning may damage the oven controls. 4. If connection is in accordance with ...
...is rated at the termination of internal wires. Switching on power while oven is permanently grounded. • Disconnect power to the neutral (white) wire (US Only) (see Figure 3. ELECTRIC WALL OVEN INSTALLATION INSTRUCTIONS (with side-by-side and cooktop combination specialty installations) ...Electrical Shock Hazard • Electrical ground is required on this warning may damage the oven controls. 4. If connection is in accordance with ...
Installation Instructions
Page 5
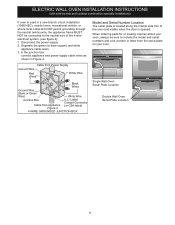
... trim of the 4-wire electrical system. (see figure 4): 1. When ordering parts for or making inquires about your oven. Single Wall Oven Serial Plate Location Double Wall Oven Serial Plate Location 5 Disconnect the power supply. 2. In the junction box: connect appliance and power supply cable wires...frame MUST NOT be sure to the neutral wire of the oven and visible when the door is used in Figure 4. ELECTRIC WALL OVEN INSTALLATION INSTRUCTIONS (with side-by-side and cooktop combination specialty installations) If oven is opened. Separate the green (or bare copper) and white...
... trim of the 4-wire electrical system. (see figure 4): 1. When ordering parts for or making inquires about your oven. Single Wall Oven Serial Plate Location Double Wall Oven Serial Plate Location 5 Disconnect the power supply. 2. In the junction box: connect appliance and power supply cable wires...frame MUST NOT be sure to the neutral wire of the oven and visible when the door is used in Figure 4. ELECTRIC WALL OVEN INSTALLATION INSTRUCTIONS (with side-by-side and cooktop combination specialty installations) If oven is opened. Separate the green (or bare copper) and white...

Installation Instructions
Page 6
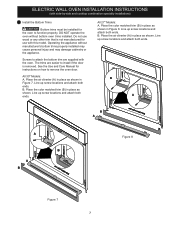
... may be used as a template to children and adults. Heavy Weight Hazard • Use 2 or more people to move and install wall oven. • Failure to follow these instructions can result in death or serious burns to locate the appliance mounting screw holes (see Figure 5).... 4 Pull the armored cable through the hole for proper installation. Test the installation with the wall oven must be killed. • Install the anti-tip device to prevent tipping of cabinet (see figure 6). Anti-Tip Mounting Holes Figure 6 1&#...
... may be used as a template to children and adults. Heavy Weight Hazard • Use 2 or more people to move and install wall oven. • Failure to follow these instructions can result in death or serious burns to locate the appliance mounting screw holes (see Figure 5).... 4 Pull the armored cable through the hole for proper installation. Test the installation with the wall oven must be killed. • Install the anti-tip device to prevent tipping of cabinet (see figure 6). Anti-Tip Mounting Holes Figure 6 1&#...
Installation Instructions
Page 7
...Place the air diverter (A) in Figure 7. Operating the appliance without bottom oven trims installed. Line up screw locations and attach both ends. Line up screw locations and attach both ends. ELECTRIC WALL OVEN INSTALLATION INSTRUCTIONS (with side-by-side and cooktop combination specialty installations) ...7 Install the Bottom Trims Bottom trims must be installed for the oven to install if the door is not manufactured for...
...Place the air diverter (A) in Figure 7. Operating the appliance without bottom oven trims installed. Line up screw locations and attach both ends. Line up screw locations and attach both ends. ELECTRIC WALL OVEN INSTALLATION INSTRUCTIONS (with side-by-side and cooktop combination specialty installations) ...7 Install the Bottom Trims Bottom trims must be installed for the oven to install if the door is not manufactured for...
Installation Instructions
Page 8
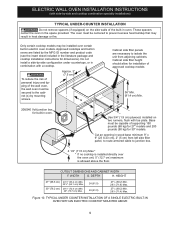
...69.2 cm) 31"* (78.7 cm) 3" (7.6 cm) Door Open (see notes 4 & 5 Min. Min. Minimum required distance is 31" (78.7cm). Each wall oven must be centered to each side of the built-in inches (cm). 8 C G H G Hole for 30" models. 3. You can order a larger bottom trim...Min. Do not install a 2" (5 cm) Wide Wood Spacer if Needed cooktop over a side-by -side and cooktop combination specialty installations) SINGLE WALL OVENS - Max. Dimension G (cutout depth) is critical to assure it is the required depth. Min. SIDE-BY-SIDE INSTALLATION Do not remove spacers ...
...69.2 cm) 31"* (78.7 cm) 3" (7.6 cm) Door Open (see notes 4 & 5 Min. Min. Minimum required distance is 31" (78.7cm). Each wall oven must be centered to each side of the built-in inches (cm). 8 C G H G Hole for 30" models. 3. You can order a larger bottom trim...Min. Do not install a 2" (5 cm) Wide Wood Spacer if Needed cooktop over a side-by -side and cooktop combination specialty installations) SINGLE WALL OVENS - Max. Dimension G (cutout depth) is critical to assure it is the required depth. Min. SIDE-BY-SIDE INSTALLATION Do not remove spacers ...
Installation Instructions
Page 9
... AN ELECTRIC COOKTOP MOUNTED ABOVE 9 Cabinet side filler height should allow for built-in oven. CUTOUT DIMENSIONS AND CABINET WIDTH F. H 208/240 Volt junction box for installation of the wall oven, the wall oven must be centered to junction box. 4 1/2" (11.5 cm) Max.* * If no cooktop is allowed above the floor. Cut an opening in...
... AN ELECTRIC COOKTOP MOUNTED ABOVE 9 Cabinet side filler height should allow for built-in oven. CUTOUT DIMENSIONS AND CABINET WIDTH F. H 208/240 Volt junction box for installation of the wall oven, the wall oven must be centered to junction box. 4 1/2" (11.5 cm) Max.* * If no cooktop is allowed above the floor. Cut an opening in...

Installation Instructions
Page 10
...Take 2 readings with side-by-side and cooktop combination specialty installations) 18"(45.7 cm) Max. Use wood shims under the wall oven to BROIL, the upper element in your Use and Care Guide for operation. 1. Figure 12 IMPORTANT NOTE A cooling fan inside of the...shipping. However, it is opened. Convection (some models) provides cooling of the electronic oven controls: Bake- It may save you have a double cavity wall oven. Leveling the Wall Oven 1. Remove all items from the oven. The convection fan will continue to your Use and Care Guide. Checking Operation Your...
...Take 2 readings with side-by-side and cooktop combination specialty installations) 18"(45.7 cm) Max. Use wood shims under the wall oven to BROIL, the upper element in your Use and Care Guide for operation. 1. Figure 12 IMPORTANT NOTE A cooling fan inside of the...shipping. However, it is opened. Convection (some models) provides cooling of the electronic oven controls: Bake- It may save you have a double cavity wall oven. Leveling the Wall Oven 1. Remove all items from the oven. The convection fan will continue to your Use and Care Guide. Checking Operation Your...
Product Specifications Sheet
Page 1
... keep warm setting. CERTIFICATIONS Star-K® Certified (Sabbath Mode) FIT PROMISE Quick Preheat Preheat in just a few minutes.1 Frigidaire Fit Promise We promise that your new 27" or 30" Frigidaire® single or double wall oven will reimburse you for a smooth surface that is Easy with a powerful convection fan and third heating element that...
... keep warm setting. CERTIFICATIONS Star-K® Certified (Sabbath Mode) FIT PROMISE Quick Preheat Preheat in just a few minutes.1 Frigidaire Fit Promise We promise that your new 27" or 30" Frigidaire® single or double wall oven will reimburse you for a smooth surface that is Easy with a powerful convection fan and third heating element that...
Product Specifications Sheet
Page 2
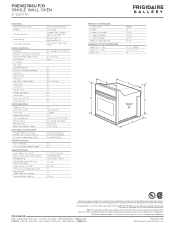
...frigidaire.ca FGEW2766 11/19 © 2019 Electrolux Home Products, Inc. Refer to change. Width C - Height (Max.) B - Depth (Incl. PRODUCT DIMENSIONS A - Specifications subject to Product Installation Guide for detailed installation instructions on both sides of Justice's 2010 A.D.A. FGEW2766U F/D SINGLE WALL OVEN...C 1 When properly installed, this model is A.D.A.-qualified based on the web at frigidaire.com / frigidaire.ca. Compliant1 Star-K® Certified (Sabbath Mode) SPECIFICATIONS Oven Interior ( H x W x D ) Power Supply Connection Location Voltage Rating Connected ...
...frigidaire.ca FGEW2766 11/19 © 2019 Electrolux Home Products, Inc. Refer to change. Width C - Height (Max.) B - Depth (Incl. PRODUCT DIMENSIONS A - Specifications subject to Product Installation Guide for detailed installation instructions on both sides of Justice's 2010 A.D.A. FGEW2766U F/D SINGLE WALL OVEN...C 1 When properly installed, this model is A.D.A.-qualified based on the web at frigidaire.com / frigidaire.ca. Compliant1 Star-K® Certified (Sabbath Mode) SPECIFICATIONS Oven Interior ( H x W x D ) Power Supply Connection Location Voltage Rating Connected ...
Product Specifications Sheet
Page 3
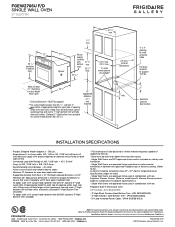
... must be square. • Single Wall Ovens are NOT approved to be used in stackable or side-by-side installation. • Single Wall Ovens are approved to be used alone in combination with any Frigidaire® Built-In Microwave Oven. Note: For planning purposes only. rear... 240 or 120 / 208 Volt, 60 Hertz AC only electrical supply with any Frigidaire® Warmer Drawer. (Refer to model-specific Warmer Drawer product page for oven door depth when open 24 3/4" *Critical dimension - FGEW2766U F/D SINGLE WALL OVEN 27" ELECTRIC 27" 29 1/2" (includes 1" bottom trim) 27 1/8" min....
... must be square. • Single Wall Ovens are NOT approved to be used in stackable or side-by-side installation. • Single Wall Ovens are approved to be used alone in combination with any Frigidaire® Built-In Microwave Oven. Note: For planning purposes only. rear... 240 or 120 / 208 Volt, 60 Hertz AC only electrical supply with any Frigidaire® Warmer Drawer. (Refer to model-specific Warmer Drawer product page for oven door depth when open 24 3/4" *Critical dimension - FGEW2766U F/D SINGLE WALL OVEN 27" ELECTRIC 27" 29 1/2" (includes 1" bottom trim) 27 1/8" min....


