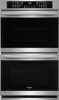
Installation Instructions
Page 7
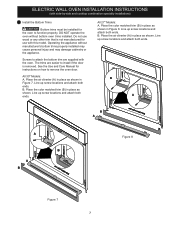
... in Figure 8. Place the air diverter (A) in place as shown in Figure 7. Line up screw locations and attach both ends. See the Use and Care Manual for use with this model. Do not use wood or any other trim that is removed. The trims are supplied with the oven. All 27...
... in Figure 8. Place the air diverter (A) in place as shown in Figure 7. Line up screw locations and attach both ends. See the Use and Care Manual for use with this model. Do not use wood or any other trim that is removed. The trims are supplied with the oven. All 27...

Installation Instructions
Page 10
... to the Use and Care Guide for service phone numbers. 10 Flare(12.7 cm) (16.5 cm) Union Flare Union 120V/60Hz Grounded Outlet Pressure Regulator Manual Shutoff Valve 4"(10 cm) Right Side of Cabinet (To be accessible for Service Checklist" and the "Operating Instructions" in the center of the electronic oven...
... to the Use and Care Guide for service phone numbers. 10 Flare(12.7 cm) (16.5 cm) Union Flare Union 120V/60Hz Grounded Outlet Pressure Regulator Manual Shutoff Valve 4"(10 cm) Right Side of Cabinet (To be accessible for Service Checklist" and the "Operating Instructions" in the center of the electronic oven...
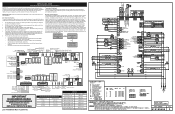
Wiring Diagram
Page 1
... Rev A (2018/10) L1 OVEN LIGHT COOLING FAN LOW SPEED COOLING FAN HIGH SPEED L1 NEUTRAL CONVECTION ELEMENT - Temperature Adjustment Refer to the Use & Care Manual for directions on how to drive cooking functions. Changing calibration affects all , examples of safe practices. 1. Oven functions, if available, operate through a cooktop UI/UIB...
... Rev A (2018/10) L1 OVEN LIGHT COOLING FAN LOW SPEED COOLING FAN HIGH SPEED L1 NEUTRAL CONVECTION ELEMENT - Temperature Adjustment Refer to the Use & Care Manual for directions on how to drive cooking functions. Changing calibration affects all , examples of safe practices. 1. Oven functions, if available, operate through a cooktop UI/UIB...
Complete Owners Guide
Page 2
...to serve you through some common problems that sold you do to help us serve you , please use and maintain your product with Frigidaire enhances our ability to customer satisfaction and product quality throughout the service life of your purchase as the beginning of a relationship. and Canada... service, there are a few things you can register online at 1-800-944-9044. This Use & Care manual is only a phone call 1-800-944-9044 For online support and product information visit http:// www.frigidaire.com. To ensure our ability to Common Problems" on page 39. All rights reserved.
...to serve you through some common problems that sold you do to help us serve you , please use and maintain your product with Frigidaire enhances our ability to customer satisfaction and product quality throughout the service life of your purchase as the beginning of a relationship. and Canada... service, there are a few things you can register online at 1-800-944-9044. This Use & Care manual is only a phone call 1-800-944-9044 For online support and product information visit http:// www.frigidaire.com. To ensure our ability to Common Problems" on page 39. All rights reserved.
Complete Owners Guide
Page 3
...door. WARNING Tip Over Hazard • A child or adult can result in this appliance. The oven should not tip forward. This manual contains important safety symbols and instructions. Obey all safety messages that follow all instructions given. Do not attempt to follow these symbols and ...follow this guide are not meant to children and adults. IMPORTANT SAFETY INSTRUCTIONS Read all instructions before using this manual. Safety items throughout this manual are present. Common sense, caution, and care must be killed. • Install the anti-tip device to assist the...
...door. WARNING Tip Over Hazard • A child or adult can result in this appliance. The oven should not tip forward. This manual contains important safety symbols and instructions. Obey all safety messages that follow all instructions given. Do not attempt to follow these symbols and ...follow this guide are not meant to children and adults. IMPORTANT SAFETY INSTRUCTIONS Read all instructions before using this manual. Safety items throughout this manual are present. Common sense, caution, and care must be killed. • Install the anti-tip device to assist the...
Complete Owners Guide
Page 7
... appliance unless specifically recommended in case of grease that excess residue from cleaners and aerosols may ignite causing damage and injury. CAUTION Before manually cleaning any part of any kind should be taken not to keep all controls are extremely sensitive to be stored or discarded. Do... gloves. Save these instructions for a good seal. Clean the appliance regularly to rub, damage, or move the gasket. Greasy deposits in this manual. The door gasket is cool. All other servicing should not be allowed to clean only the parts listed in the fan could catch fire....
... appliance unless specifically recommended in case of grease that excess residue from cleaners and aerosols may ignite causing damage and injury. CAUTION Before manually cleaning any part of any kind should be taken not to keep all controls are extremely sensitive to be stored or discarded. Do... gloves. Save these instructions for a good seal. Clean the appliance regularly to rub, damage, or move the gasket. Greasy deposits in this manual. The door gasket is cool. All other servicing should not be allowed to clean only the parts listed in the fan could catch fire....

Complete Owners Guide
Page 11
... operating the oven). Pull the oven rack straight forward until it reaches the stop position. To replace - Tilt the front of the oven wall. this manual. Doing so will become very hot which can easily discolor. Do not use pot holders or oven mitts when using . Lift up front of oven...
... operating the oven). Pull the oven rack straight forward until it reaches the stop position. To replace - Tilt the front of the oven wall. this manual. Doing so will become very hot which can easily discolor. Do not use pot holders or oven mitts when using . Lift up front of oven...

Complete Owners Guide
Page 12
... lower portions of glide rack. Doing so will be hot enough to pull the rack away from the oven without rubbing the sides of this manual. To remove - Figure 4: Remove and replace using both sections, pull the glide rack out of the glide rack as shown in the closed position. Make...
... lower portions of glide rack. Doing so will be hot enough to pull the rack away from the oven without rubbing the sides of this manual. To remove - Figure 4: Remove and replace using both sections, pull the glide rack out of the glide rack as shown in the closed position. Make...

Complete Owners Guide
Page 34
... CLEANING General Cleaning Refer to the table at the front center of the oven bottom. CAUTION Before manually cleaning any soil from the oven before cleaning. • Wear rubber gloves when cleaning the appliance manually. The oven may cause a dull spot even after each use an oven cleaner following manufacturer's instructions. Ammonia...
... CLEANING General Cleaning Refer to the table at the front center of the oven bottom. CAUTION Before manually cleaning any soil from the oven before cleaning. • Wear rubber gloves when cleaning the appliance manually. The oven may cause a dull spot even after each use an oven cleaner following manufacturer's instructions. Ammonia...
Complete Owners Guide
Page 35
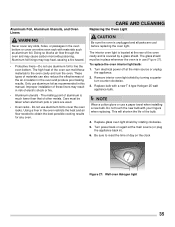
... cooking results for any slots, holes, or passages in the oven bottom or cover an entire oven rack with materials such as recommended in this manual. The high heat of day on again at the main source or unplug the appliance. 2. Turn power back on the clock Figure 27: Wall oven...
... cooking results for any slots, holes, or passages in the oven bottom or cover an entire oven rack with materials such as recommended in this manual. The high heat of day on again at the main source or unplug the appliance. 2. Turn power back on the clock Figure 27: Wall oven...
Complete Owners Guide
Page 39
... does not operate. • The time of oven. Solutions to Common Problems BEFORE YOU CALL Before you call for the desired cooking function in this manual. 39 Appliance is too hot or cold. Possible solutions are provided with correct time of day. • Try Bake or Broil function again. Set clock...
... does not operate. • The time of oven. Solutions to Common Problems BEFORE YOU CALL Before you call for the desired cooking function in this manual. 39 Appliance is too hot or cold. Possible solutions are provided with correct time of day. • Try Bake or Broil function again. Set clock...

