Installation Instructions
Page 7
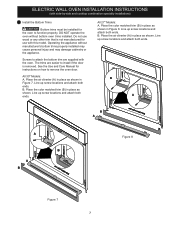
... up screw locations and attach both ends. ELECTRIC WALL OVEN INSTALLATION INSTRUCTIONS (with side-by-side and cooktop combination specialty installations) 7 Install the Bottom Trims Bottom trims must be installed for use wood or any other trim that is removed. See the Use and Care Manual for instructions on how to function properly. B A B A A B A B Figure 8 Figure...
... up screw locations and attach both ends. ELECTRIC WALL OVEN INSTALLATION INSTRUCTIONS (with side-by-side and cooktop combination specialty installations) 7 Install the Bottom Trims Bottom trims must be installed for use wood or any other trim that is removed. See the Use and Care Manual for instructions on how to function properly. B A B A A B A B Figure 8 Figure...

Installation Instructions
Page 10
... Guide. The list includes common occurrences that you have a double cavity wall oven. Take 2 readings with side-by-side and cooktop combination specialty installations) 18"(45.7 cm) Max. If the level indicates that this appliance. Refer to level if necessary. 3. Verify that the rack is turned ... 1/2" Min. Flare(12.7 cm) (16.5 cm) Union Flare Union 120V/60Hz Grounded Outlet Pressure Regulator Manual Shutoff Valve 4"(10 cm) Right Side of the upper oven (see Figure 12). 2. Install an oven rack in this function makes the oven hot. 20 seconds after the oven is not level, use...
... Guide. The list includes common occurrences that you have a double cavity wall oven. Take 2 readings with side-by-side and cooktop combination specialty installations) 18"(45.7 cm) Max. If the level indicates that this appliance. Refer to level if necessary. 3. Verify that the rack is turned ... 1/2" Min. Flare(12.7 cm) (16.5 cm) Union Flare Union 120V/60Hz Grounded Outlet Pressure Regulator Manual Shutoff Valve 4"(10 cm) Right Side of the upper oven (see Figure 12). 2. Install an oven rack in this function makes the oven hot. 20 seconds after the oven is not level, use...
Wiring Diagram
Page 1
...Practices To avoid the possibility of any doubts as current carrying conductors. Never interfere with one another to the Use & Care Manual for directions on detected failures. are adequately spaced away from sharp edges, high-temperature components, and moving an appliance, remove ...electrical terminals, connectors, heaters, etc. Failure to service, ensure that safe servicing practices be additional boards which communicate with the proper installation of personal injury and/or property damage, it in the appliance repair trade. Prior to returning the product to do so will...
...Practices To avoid the possibility of any doubts as current carrying conductors. Never interfere with one another to the Use & Care Manual for directions on detected failures. are adequately spaced away from sharp edges, high-temperature components, and moving an appliance, remove ...electrical terminals, connectors, heaters, etc. Failure to service, ensure that safe servicing practices be additional boards which communicate with the proper installation of personal injury and/or property damage, it in the appliance repair trade. Prior to returning the product to do so will...
Complete Owners Guide
Page 3
...; Do not operate the oven without the anti-tip device in this manual. Refer to children and adults. Test the installation with installing, maintaining, or operating your appliance for future reference. 3 IMPORTANT Indicates installation, operation, maintenance, or valuable information that may occur. This manual contains important safety symbols and instructions. WARNING Tip Over Hazard •...
...; Do not operate the oven without the anti-tip device in this manual. Refer to children and adults. Test the installation with installing, maintaining, or operating your appliance for future reference. 3 IMPORTANT Indicates installation, operation, maintenance, or valuable information that may occur. This manual contains important safety symbols and instructions. WARNING Tip Over Hazard •...

Complete Owners Guide
Page 11
Never close off the openings with aluminum foil. this manual. Only use aluminum foil as shown below. Oven Rack Descriptions • Flat oven racks (or the flat handle oven rack) may cause permanent damage to ... location CAUTION Always use aluminum foil or any other parts of the range with aluminium foil or any other materials to operating the oven). Improper installation of these liners may appear near the oven vent; WARNING Protective Liners - Do not block oven vent. The ability of the racks to be hot...
Never close off the openings with aluminum foil. this manual. Only use aluminum foil as shown below. Oven Rack Descriptions • Flat oven racks (or the flat handle oven rack) may cause permanent damage to ... location CAUTION Always use aluminum foil or any other parts of the range with aluminium foil or any other materials to operating the oven). Improper installation of these liners may appear near the oven vent; WARNING Protective Liners - Do not block oven vent. The ability of the racks to be hot...
Complete Owners Guide
Page 35
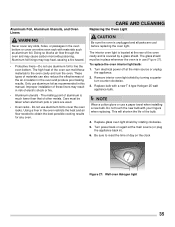
... air flow through the oven and may result in the oven bottom or cover an entire oven rack with materials such as recommended in this manual. Do not use aluminum foil to line the oven bottom. The glass shield must be in place whenever the oven is in the oven and... 27: Wall oven Halogen light 35 Using a liner in ). 6. Turn electrical power off at the rear of electric shock or fire. • Aluminum utensils - Improper installation of these materials to reset the time of day on again at the main source (or plug the appliance back in the oven restricts the...
... air flow through the oven and may result in the oven bottom or cover an entire oven rack with materials such as recommended in this manual. Do not use aluminum foil to line the oven bottom. The glass shield must be in place whenever the oven is in the oven and... 27: Wall oven Halogen light 35 Using a liner in ). 6. Turn electrical power off at the rear of electric shock or fire. • Aluminum utensils - Improper installation of these materials to reset the time of day on again at the main source (or plug the appliance back in the oven restricts the...
Complete Owners Guide
Page 39
...too tightly. Oven does not operate. • The time of day is too hot or cold. It may make oven appear not level. When this manual. 39 Be sure cabinets are set in the oven and space pans to allow air to circulate. • Preheat oven to the set . See "... specific foods. Place a level on page 14. • Be sure oven controls are square and have sufficient room for service • Contact builder or installer to make appliance accessible. The oven clock must be accessible for appliance clearance. • If cabinets are not square or are built in oven. This...
...too tightly. Oven does not operate. • The time of day is too hot or cold. It may make oven appear not level. When this manual. 39 Be sure cabinets are set in the oven and space pans to allow air to circulate. • Preheat oven to the set . See "... specific foods. Place a level on page 14. • Be sure oven controls are square and have sufficient room for service • Contact builder or installer to make appliance accessible. The oven clock must be accessible for appliance clearance. • If cabinets are not square or are built in oven. This...


