
Complete Owner's Guide
Page 1
All about the Use & Care of your Wall Oven 139900302 (January 2013) TABLE OF CONTENTS Product Record and Registration 2 Important Safety Instructions 3 Before Setting Oven Controls 7 Oven Controls 8 care and cleaning 26 Warranty 32 www.frigidaire.com USA 1-800-944-9044 www.frigidaire.ca Canada 1-800-265-8352
All about the Use & Care of your Wall Oven 139900302 (January 2013) TABLE OF CONTENTS Product Record and Registration 2 Important Safety Instructions 3 Before Setting Oven Controls 7 Oven Controls 8 care and cleaning 26 Warranty 32 www.frigidaire.com USA 1-800-944-9044 www.frigidaire.ca Canada 1-800-265-8352
Complete Owner's Guide
Page 3
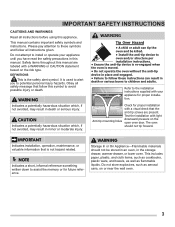
...includes paper, plastic, and cloth items, such as cookbooks, plastic ware, and towels, as well as aerosol cans, on or near the wall oven. 3 Do not attempt to install or operate your appliance for future reference. It is not hazard related. Test the installation with your appliance..., informal reference-something written down to assist the memory or for proper installation. DEFINITIONS This is moved. • Do not operate the oven without the anti-tip device in place and engaged. • Failure to follow this appliance. IMPORTANT SAFETY INSTRUCTIONS CAUTIONS AND WARNINGS Read all...
...includes paper, plastic, and cloth items, such as cookbooks, plastic ware, and towels, as well as aerosol cans, on or near the wall oven. 3 Do not attempt to install or operate your appliance for future reference. It is not hazard related. Test the installation with your appliance..., informal reference-something written down to assist the memory or for proper installation. DEFINITIONS This is moved. • Do not operate the oven without the anti-tip device in place and engaged. • Failure to follow this appliance. IMPORTANT SAFETY INSTRUCTIONS CAUTIONS AND WARNINGS Read all...
Complete Owner's Guide
Page 6
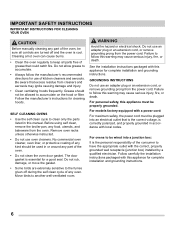
...an adapter plug or an extension cord, or remove grounding prong from the oven. Do not use oven cleaners. Follow carefully the installation instructions packaged with the correct, properly grounded wall receptacle (junction box) installed by a qualified electrician. IMPORTANT SAFETY INSTRUCTIONS ...IMPORTANT INSTRUCTIONS FOR CLEANING YOUR OVEN CAUTION Before manually cleaning any part of the oven, be sure all parts free of grease ...
...an adapter plug or an extension cord, or remove grounding prong from the oven. Do not use oven cleaners. Follow carefully the installation instructions packaged with the correct, properly grounded wall receptacle (junction box) installed by a qualified electrician. IMPORTANT SAFETY INSTRUCTIONS ...IMPORTANT INSTRUCTIONS FOR CLEANING YOUR OVEN CAUTION Before manually cleaning any part of the oven, be sure all parts free of grease ...
Complete Owner's Guide
Page 7
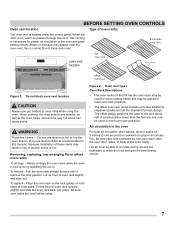
... Liners - Steam or moisture may be used for most cooking needs and may appear near the oven vent, this manual. Improper installation of oven walls. Lift up front of electric shock or fire. Air circulation in the oven For best air circulation when baking, allow a space of a rack position lower than the flat rack...
... Liners - Steam or moisture may be used for most cooking needs and may appear near the oven vent, this manual. Improper installation of oven walls. Lift up front of electric shock or fire. Air circulation in the oven For best air circulation when baking, allow a space of a rack position lower than the flat rack...
Complete Owner's Guide
Page 19
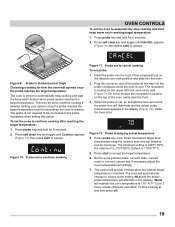
...target temperature. 6. Press probe key and hold for food type. On some models the receptacle is located on the upper left front oven cavity wall (Figure 7). Close the oven door. The minimum setting is 170ºF/77ºC. 5. Default is 140ºF/ 60ºC; Press self clean key and ...toggle until Continu: appears (Figure 10) then press start to accept. To set the oven to cancel cooking To set probe: 1. When the probe ...
...target temperature. 6. Press probe key and hold for food type. On some models the receptacle is located on the upper left front oven cavity wall (Figure 7). Close the oven door. The minimum setting is 170ºF/77ºC. 5. Default is 140ºF/ 60ºC; Press self clean key and ...toggle until Continu: appears (Figure 10) then press start to accept. To set the oven to cancel cooking To set probe: 1. When the probe ...

Complete Owner's Guide
Page 24
...or remove the gasket. Do not leave small children unattended near the oven. Move birds to escape and avoid possible burns. Do not line the oven walls, racks, bottom or any soil from the oven frame, the door liner outside of the oven bottom. Wait until the self clean cycle is essential for a ...good seal.Be careful not to high temperatures. IMPORTANT • Do not use any part of the oven door gasket is finished...
...or remove the gasket. Do not leave small children unattended near the oven. Move birds to escape and avoid possible burns. Do not line the oven walls, racks, bottom or any soil from the oven frame, the door liner outside of the oven bottom. Wait until the self clean cycle is essential for a ...good seal.Be careful not to high temperatures. IMPORTANT • Do not use any part of the oven door gasket is finished...

Complete Owner's Guide
Page 26
CARE AND CLEANING Cleaning Various Parts of Your Wall Oven Before cleaning any part of water on the control panel - Surface Type...by mail order) Door liner and body parts Gentle scouring with a clean cloth. Rinse well. Do not clean the oven door gasket. Follow by using a clean sponge or cloth. To replace knobs after cleaning, line up the flat ...sides of water and vinegar. Rinse with a 1:1 solution of the oven door. Oven door Use soap and water to thoroughly clean the top, sides, and front of clear water and ammonia. Do ...
CARE AND CLEANING Cleaning Various Parts of Your Wall Oven Before cleaning any part of water on the control panel - Surface Type...by mail order) Door liner and body parts Gentle scouring with a clean cloth. Rinse well. Do not clean the oven door gasket. Follow by using a clean sponge or cloth. To replace knobs after cleaning, line up the flat ...sides of water and vinegar. Rinse with a 1:1 solution of the oven door. Oven door Use soap and water to thoroughly clean the top, sides, and front of clear water and ammonia. Do ...
Complete Owner's Guide
Page 28
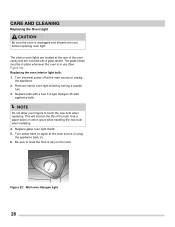
...on again at the main source (or plug the appliance back in). 6. Turn electrical power off at the rear of the oven cavity and are cool before replacing oven light. NOTE Do not allow your fingers to reset the time of the bulb. Turn power back on the clock. Be ... when installing. 4. Replace glass oven light shield. 5. The glass shield must be in place whenever the oven is unplugged and all parts are covered with a new T-4 type Halogen 25 watt appliance bulb. Replace bulb with a glass shield. Figure 22: Wall oven Halogen light 28 The interior oven lights are located at the main...
...on again at the main source (or plug the appliance back in). 6. Turn electrical power off at the rear of the oven cavity and are cool before replacing oven light. NOTE Do not allow your fingers to reset the time of the bulb. Turn power back on the clock. Be ... when installing. 4. Replace glass oven light shield. 5. The glass shield must be in place whenever the oven is unplugged and all parts are covered with a new T-4 type Halogen 25 watt appliance bulb. Replace bulb with a glass shield. Figure 22: Wall oven Halogen light 28 The interior oven lights are located at the main...
Complete Owner's Guide
Page 29
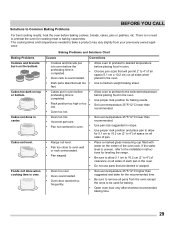
... and bake for roasting meat or baking casseroles. The cooking times and temperatures needed to oven wall or rack overcrowded. • Pan warped. • Place a marked glass measuring cup filled with water on the center of the oven rack. completed. • Use proper rack position for baking needs. • Rack position too high...
... and bake for roasting meat or baking casseroles. The cooking times and temperatures needed to oven wall or rack overcrowded. • Pan warped. • Place a marked glass measuring cup filled with water on the center of the oven rack. completed. • Use proper rack position for baking needs. • Rack position too high...
Wiring Diagram
Page 1
...Use the number keys (0-9) to enter the desired amount of the fan speed in the temperature display. 3. Note: Changing calibration affects all oven activity. The oven is properly made will not change the self-cleaning temperature. If the speed falls out of range, the EOC will indicate on top of.... ductors. are adequately spaced away from electric outlet, trip circuit breaker to probe resistance chart). Cooling Fan and Fan Speed Sensor This double wall oven is intended for some , but an F43 error code is generated, it is sent by the EOC. The fan motor is good, replace...
...Use the number keys (0-9) to enter the desired amount of the fan speed in the temperature display. 3. Note: Changing calibration affects all oven activity. The oven is properly made will not change the self-cleaning temperature. If the speed falls out of range, the EOC will indicate on top of.... ductors. are adequately spaced away from electric outlet, trip circuit breaker to probe resistance chart). Cooling Fan and Fan Speed Sensor This double wall oven is intended for some , but an F43 error code is generated, it is sent by the EOC. The fan motor is good, replace...

Installation Instructions
Page 1
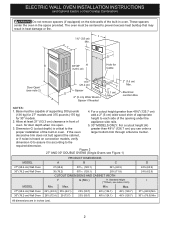
... appliance side rails. Dimension G (cutout depth) is the required depth. (7.6 cm) 4. Max. 24¾ (62.9) 24¾ (62.9) I 27" (68.6 cm) Wall Oven 30" (76.2 cm) Wall Oven 247/8 (63.2) 28½ (72.4) 25¼ (64.1) 29 (73.7) 23½ (59.7) 23½ (59.7) 27¼ (69.2) 27¼ (69.2)... them to the cutout dimensions chart below for H F Cord against the cabinet, or if noise is 4 ½" (11.4cm). 27" and 30" Single Wall Ovens (Double ovens see notes 4 & 5) Min. Allow at least 21" (53.3 cm) clearance in inches (cm). For a cutout height greater than 285/8" (72.7 cm...
... appliance side rails. Dimension G (cutout depth) is the required depth. (7.6 cm) 4. Max. 24¾ (62.9) 24¾ (62.9) I 27" (68.6 cm) Wall Oven 30" (76.2 cm) Wall Oven 247/8 (63.2) 28½ (72.4) 25¼ (64.1) 29 (73.7) 23½ (59.7) 23½ (59.7) 27¼ (69.2) 27¼ (69.2)... them to the cutout dimensions chart below for H F Cord against the cabinet, or if noise is 4 ½" (11.4cm). 27" and 30" Single Wall Ovens (Double ovens see notes 4 & 5) Min. Allow at least 21" (53.3 cm) clearance in inches (cm). For a cutout height greater than 285/8" (72.7 cm...
Installation Instructions
Page 2
...cabinet, or if noise is heard on the side walls of supporting 300 pounds 4. Min. Door Open (see Figure 1) PRODUCT DIMENSIONS MODEL A B C D 27" (68.6 cm) Wall Oven 30" (76.2 cm) Wall Oven MODEL 27" (68.6 cm) Wall Oven 30" (76.2 cm) Wall Oven 27 (68.6) 507/16 (128.1) 245/8 (62...NOTES: 1. Allow at least 21" (53.3 cm) clearance in oven. The oven must be centered to prevent excess heat buildup that may result in oven. Standard Height (**Others, see notes 4 & 5) Min. ELECTRIC WALL OVEN INSTALLATION INSTRUCTIONS (and Optional Electric or Gas Cooktop Combination) Do not ...
...cabinet, or if noise is heard on the side walls of supporting 300 pounds 4. Min. Door Open (see Figure 1) PRODUCT DIMENSIONS MODEL A B C D 27" (68.6 cm) Wall Oven 30" (76.2 cm) Wall Oven MODEL 27" (68.6 cm) Wall Oven 30" (76.2 cm) Wall Oven 27 (68.6) 507/16 (128.1) 245/8 (62...NOTES: 1. Allow at least 21" (53.3 cm) clearance in oven. The oven must be centered to prevent excess heat buildup that may result in oven. Standard Height (**Others, see notes 4 & 5) Min. ELECTRIC WALL OVEN INSTALLATION INSTRUCTIONS (and Optional Electric or Gas Cooktop Combination) Do not ...

Installation Instructions
Page 3
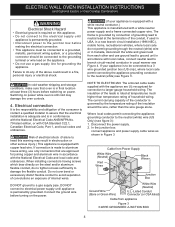
... supply to leave these instructions with CSA Standard C22.1, Canadian Electrical Code, Part 1, in United Sates, or with your wall oven for the local electrical inspector's use may be used with the consumer. 5. Appliance Protection Appliance Protection Rating Watts Circuit Rating... calling the Service Center. 2. DO NOT fuse neutral (white wire). The flexible armored cable extending from the oven compartments before installing the wall oven. 2. A suitable strain relief must be connected directly to the fused disconnect (or circuit breaker) box through fl...
... supply to leave these instructions with CSA Standard C22.1, Canadian Electrical Code, Part 1, in United Sates, or with your wall oven for the local electrical inspector's use may be used with the consumer. 5. Appliance Protection Appliance Protection Rating Watts Circuit Rating... calling the Service Center. 2. DO NOT fuse neutral (white wire). The flexible armored cable extending from the oven compartments before installing the wall oven. 2. A suitable strain relief must be connected directly to the fused disconnect (or circuit breaker) box through fl...
Installation Instructions
Page 4
... and a frame connected copper wire. Disconnect the power supply. 2. In cold weather shipping and storage conditions, make sure that oven is equipped with the appliance are approved for joining copper and aluminum wire in final location at the termination of the ...disconnect the white and green lead from appliance Figure 3 3-WIRE GROUNDED JUNCTION BOX 4 The insulation of household wiring. ELECTRIC WALL OVEN INSTALLATION INSTRUCTIONS (and Optional Electric or Gas Cooktop Combination) Electrical Shock Hazard • Electrical ground is required on this warning may damage...
... and a frame connected copper wire. Disconnect the power supply. 2. In cold weather shipping and storage conditions, make sure that oven is equipped with the appliance are approved for joining copper and aluminum wire in final location at the termination of the ...disconnect the white and green lead from appliance Figure 3 3-WIRE GROUNDED JUNCTION BOX 4 The insulation of household wiring. ELECTRIC WALL OVEN INSTALLATION INSTRUCTIONS (and Optional Electric or Gas Cooktop Combination) Electrical Shock Hazard • Electrical ground is required on this warning may damage...
Installation Instructions
Page 5
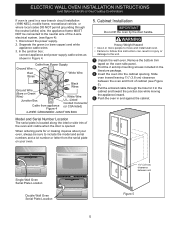
... cable wires as shown in injury or damage to the unit. 1 Unpack the wall oven. Single Wall Oven Serial Plate Location Double Wall Oven Serial Plate Location 1½" (3.8 cm) clearance between the oven and front of cabinet (see figure 4): 1. Separate the green (or ...follow this instruction can result in Figure 4. ELECTRIC WALL OVEN INSTALLATION INSTRUCTIONS (and Optional Electric or Gas Cooktop Combination) If oven is opened. Remove the bottom trim taped on your oven. 5. Disconnect the power supply. 2. Slide oven inward leaving 1½" (3.8 cm) clearance between unit...
... cable wires as shown in injury or damage to the unit. 1 Unpack the wall oven. Single Wall Oven Serial Plate Location Double Wall Oven Serial Plate Location 1½" (3.8 cm) clearance between the oven and front of cabinet (see figure 4): 1. Separate the green (or ...follow this instruction can result in Figure 4. ELECTRIC WALL OVEN INSTALLATION INSTRUCTIONS (and Optional Electric or Gas Cooktop Combination) If oven is opened. Remove the bottom trim taped on your oven. 5. Disconnect the power supply. 2. Slide oven inward leaving 1½" (3.8 cm) clearance between unit...

Installation Instructions
Page 6
...for proper installation with light downward pressure on each side of the wall oven and injury to persons. The mounting holes in the side trims may be installed for the oven to children and adults. ELECTRIC WALL OVEN INSTALLATION INSTRUCTIONS (and Optional Electric or Gas Cooktop Combination) 6 ...Install the Anti-tip Mounting Screws The wall oven can tip when the door is moved. • Do not operate the oven without the bottom oven trim installed. Use the two screws supplied to fix the appliance to the cabinet. ...
...for proper installation with light downward pressure on each side of the wall oven and injury to persons. The mounting holes in the side trims may be installed for the oven to children and adults. ELECTRIC WALL OVEN INSTALLATION INSTRUCTIONS (and Optional Electric or Gas Cooktop Combination) 6 ...Install the Anti-tip Mounting Screws The wall oven can tip when the door is moved. • Do not operate the oven without the bottom oven trim installed. Use the two screws supplied to fix the appliance to the cabinet. ...
Installation Instructions
Page 7
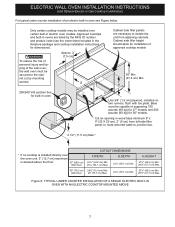
... side filler panel, to route armored cable to junction box. 4 1/2" (11.5 cm) Max.* * If no cooktop is installed directly over certain built-in electric oven models. Wall Oven 29" (73.7 cm) Max. 23½" (59.7 cm) Min. H.HEIGHT 27¼" (69.2 cm) Min. 285/8" (72.7 cm) Max. 27¼...285/8" (72.7 cm) Max. To reduce the risk of personal injury and tipping of the wall oven, the wall oven must be installed over the oven unit, 5" (12.7 cm) maximum is allowed above the floor. 27" (68.6 cm) Wall Oven CUTOUT DIMENSIONS F.WIDTH G.DEPTH 247/8" (63.2 cm) Min. 25¼" (64.1 cm) ...
... side filler panel, to route armored cable to junction box. 4 1/2" (11.5 cm) Max.* * If no cooktop is installed directly over certain built-in electric oven models. Wall Oven 29" (73.7 cm) Max. 23½" (59.7 cm) Min. H.HEIGHT 27¼" (69.2 cm) Min. 285/8" (72.7 cm) Max. 27¼...285/8" (72.7 cm) Max. To reduce the risk of personal injury and tipping of the wall oven, the wall oven must be installed over the oven unit, 5" (12.7 cm) maximum is allowed above the floor. 27" (68.6 cm) Wall Oven CUTOUT DIMENSIONS F.WIDTH G.DEPTH 247/8" (63.2 cm) Min. 25¼" (64.1 cm) ...

Installation Instructions
Page 8
... Figure 9 - It may save you have a double cavity wall oven. Leveling the Wall Oven 1. Verify the operation of the oven. 2. Before You Call for Service Read the "Before You Call for a convection baking or roasting, both ovens. ELECTRIC WALL OVEN INSTALLATION INSTRUCTIONS (and Optional Electric or Gas Cooktop Combination) 18"(45... operation of defective workmanship or materials in your Use and Care Guide. Install an oven rack in the lower oven if you time and expense. Use wood shims under the wall oven to your Use and Care Guide for operation. 1. Turn on the rack. Repeat...
... Figure 9 - It may save you have a double cavity wall oven. Leveling the Wall Oven 1. Verify the operation of the oven. 2. Before You Call for Service Read the "Before You Call for a convection baking or roasting, both ovens. ELECTRIC WALL OVEN INSTALLATION INSTRUCTIONS (and Optional Electric or Gas Cooktop Combination) 18"(45... operation of defective workmanship or materials in your Use and Care Guide. Install an oven rack in the lower oven if you time and expense. Use wood shims under the wall oven to your Use and Care Guide for operation. 1. Turn on the rack. Repeat...


