Complete Owner's Guide
Page 3
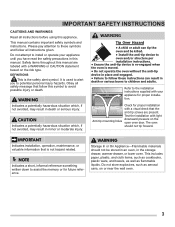
... device is re-engaged when the oven is the safety alert symbol. IMPORTANT Indicates installation, operation, maintenance, or valuable information that follow all instructions given. The oven should not be killed. • Install the anti-tip device to the installation instructions supplied with light downward pressure on or near the wall oven. 3 WARNING Storage In...
... device is re-engaged when the oven is the safety alert symbol. IMPORTANT Indicates installation, operation, maintenance, or valuable information that follow all instructions given. The oven should not be killed. • Install the anti-tip device to the installation instructions supplied with light downward pressure on or near the wall oven. 3 WARNING Storage In...

Complete Owner's Guide
Page 4
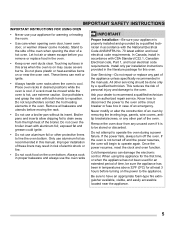
... oven rack with materials, such as the oven door, windows, and the oven vent. Remove all important instructions and precautions for unpacking, installing, and servicing your appliance. Cover the fire with packaging material. 4 Moist or damp potholders on grease fires. IMPORTANT ...SAFETY INSTRUCTIONS WARNING • Do Not Leave Children Alone - During and after unpacking the oven. Never allow children to...
... oven rack with materials, such as the oven door, windows, and the oven vent. Remove all important instructions and precautions for unpacking, installing, and servicing your appliance. Cover the fire with packaging material. 4 Moist or damp potholders on grease fires. IMPORTANT ...SAFETY INSTRUCTIONS WARNING • Do Not Leave Children Alone - During and after unpacking the oven. Never allow children to...
Complete Owner's Guide
Page 5
... covers, antitip brackets/screws, or any unused oven if it is cool. All other servicing should be stored or discarded. Install only per installation instructions provided in the oven. • Keep oven vent ducts clear. Remove the oven door from the high heat of a ...the risk of these liners may cause severe burns. IMPORTANT SAFETY INSTRUCTIONS IMPORTANT INSTRUCTIONS FOR USING OVEN • Never use your dealer to recommend a qualified technician and an authorized repair service. In Canada, install in temperatures above 32ºF (0ºC) for an extended period...
... covers, antitip brackets/screws, or any unused oven if it is cool. All other servicing should be stored or discarded. Install only per installation instructions provided in the oven. • Keep oven vent ducts clear. Remove the oven door from the high heat of a ...the risk of these liners may cause severe burns. IMPORTANT SAFETY INSTRUCTIONS IMPORTANT INSTRUCTIONS FOR USING OVEN • Never use your dealer to recommend a qualified technician and an authorized repair service. In Canada, install in temperatures above 32ºF (0ºC) for an extended period...
Complete Owner's Guide
Page 6
...to clean only the parts listed in this warning may cause serious injury, fire, or death. See the installation instructions packaged with this appliance for complete installation and grounding instructions. Failure to the fumes given off and the oven is correctly polarized, and properly grounded in or around ... safety, the power cord must be wired into an electrical outlet that excess residue from the oven. Follow carefully the installation instructions packaged with this appliance for a good seal. Grease should be plugged into a junction box: It is essential for complete...
...to clean only the parts listed in this warning may cause serious injury, fire, or death. See the installation instructions packaged with this appliance for complete installation and grounding instructions. Failure to the fumes given off and the oven is correctly polarized, and properly grounded in or around ... safety, the power cord must be wired into an electrical outlet that excess residue from the oven. Follow carefully the installation instructions packaged with this appliance for a good seal. Grease should be plugged into a junction box: It is essential for complete...
Complete Owner's Guide
Page 29
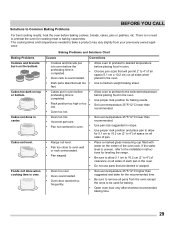
... Problems BEFORE YOU CALL For best cooking results, heat the oven before the preheating time is completed. • Oven rack is uneven, refer to the installation instructions for leveling the range. • Be sure to allow for 5.1 cm to 10.2 cm (2" to 4") of space on all sides of the oven rack. Cakes...
... Problems BEFORE YOU CALL For best cooking results, heat the oven before the preheating time is completed. • Oven rack is uneven, refer to the installation instructions for leveling the range. • Be sure to allow for 5.1 cm to 10.2 cm (2" to 4") of space on all sides of the oven rack. Cakes...
Complete Owner's Guide
Page 30
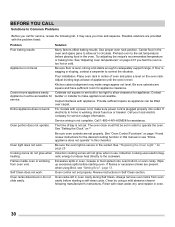
...rack is sagging or sloping, contact a carpenter to correct the situation. Cannot move appliance easily. Induction cooking uses electromag- Review instructions in oven cavity during Self Clean. Oven racks left in Self Clean section. BEFORE YOU CALL Solutions to Common Problems Before you...information. Cabinets not square or are set in too tight to allow air to allow clearance for service. Contact builder or installer to the cookware. For models with the problem listed: Problem Solution Poor baking results Many factors effect baking results. Call ...
...rack is sagging or sloping, contact a carpenter to correct the situation. Cannot move appliance easily. Induction cooking uses electromag- Review instructions in oven cavity during Self Clean. Oven racks left in Self Clean section. BEFORE YOU CALL Solutions to Common Problems Before you...information. Cabinets not square or are set in too tight to allow air to allow clearance for service. Contact builder or installer to the cookware. For models with the problem listed: Problem Solution Poor baking results Many factors effect baking results. Call ...
Complete Owner's Guide
Page 32
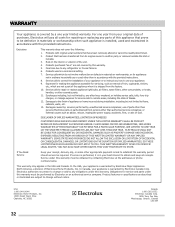
..., shelves, etc., which do not involve malfunction or defects in materials or workmanship, or for appliances not in accordance with the provided instructions. 8. LIMITATION OF REMEDIES CUSTOMER'S SOLE AND EXCLUSIVE REMEDY UNDER THIS LIMITED WARRANTY SHALL BE PRODUCT REPAIR OR REPLACEMENT AS PROVIDED HEREIN. CLAIMS..., such as abuse, misuse, inadequate power supply, accidents, fires, or acts of God. Service calls to correct the installation of your appliance or to instruct you how to remote areas, including the state of Alaska. 12. SOME STATES AND PROVINCES DO NOT ALLOW THE EXCLUSION ...
..., shelves, etc., which do not involve malfunction or defects in materials or workmanship, or for appliances not in accordance with the provided instructions. 8. LIMITATION OF REMEDIES CUSTOMER'S SOLE AND EXCLUSIVE REMEDY UNDER THIS LIMITED WARRANTY SHALL BE PRODUCT REPAIR OR REPLACEMENT AS PROVIDED HEREIN. CLAIMS..., such as abuse, misuse, inadequate power supply, accidents, fires, or acts of God. Service calls to correct the installation of your appliance or to instruct you how to remote areas, including the state of Alaska. 12. SOME STATES AND PROVINCES DO NOT ALLOW THE EXCLUSION ...

Installation Instructions
Page 1
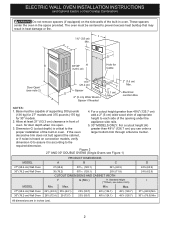
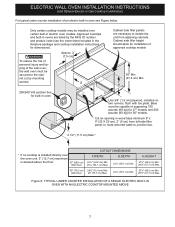
... of the built-in oven. Base must be to measure your current cutout dimensions and compare them to the proper installation of this or any other flammable vapors and liquids in inches (cm). For a cutout height greater than ...¼ (71.8) CUTOUT DIMENSIONS AND CABINET WIDTH F G (Min.) H. ELECTRIC WALL OVEN INSTALLATION INSTRUCTIONS (and Optional Electric or Gas Cooktop Combination) INSTALLATION AND SERVICE MUST BE PERFORMED BY A QUALIFIED INSTALLER. READ AND SAVE THESE INSTRUCTIONS FOR FUTURE REFERENCE. A 5. 30" MODELS ONLY: For a cutout height (H) greater than...
... of the built-in oven. Base must be to measure your current cutout dimensions and compare them to the proper installation of this or any other flammable vapors and liquids in inches (cm). For a cutout height greater than ...¼ (71.8) CUTOUT DIMENSIONS AND CABINET WIDTH F G (Min.) H. ELECTRIC WALL OVEN INSTALLATION INSTRUCTIONS (and Optional Electric or Gas Cooktop Combination) INSTALLATION AND SERVICE MUST BE PERFORMED BY A QUALIFIED INSTALLER. READ AND SAVE THESE INSTRUCTIONS FOR FUTURE REFERENCE. A 5. 30" MODELS ONLY: For a cutout height (H) greater than...
Installation Instructions
Page 2
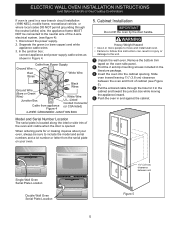
ELECTRIC WALL OVEN INSTALLATION INSTRUCTIONS (and Optional Electric or Gas Cooktop Combination) Do not remove spacers (if equipped) on convection models, verify dimension G to assure it is open. 5. 30" MODELS ... (76.2) 507/16 (128.1) 28¼ (71.8) CUTOUT DIMENSIONS AND CABINET WIDTH F G (Min.) H. For a cutout height greater than 497/8" (126.7 cm) you can order a proper installation of the opening under the 2. Base must be capable of appropriate for 27" models and 375 pounds (170 kg) add a 2" (5 cm) wide wood shim of...
ELECTRIC WALL OVEN INSTALLATION INSTRUCTIONS (and Optional Electric or Gas Cooktop Combination) Do not remove spacers (if equipped) on convection models, verify dimension G to assure it is open. 5. 30" MODELS ... (76.2) 507/16 (128.1) 28¼ (71.8) CUTOUT DIMENSIONS AND CABINET WIDTH F G (Min.) H. For a cutout height greater than 497/8" (126.7 cm) you can order a proper installation of the opening under the 2. Base must be capable of appropriate for 27" models and 375 pounds (170 kg) add a 2" (5 cm) wide wood shim of...

Installation Instructions
Page 3
... Canadian CSA Standard C22.1, Canadian Electrical Code, Part 1, and local codes and ordinances. Carpentry Refer to rear. 2. ELECTRIC WALL OVEN INSTALLATION INSTRUCTIONS (and Optional Electric or Gas Cooktop Combination) Important Notes to do so could result in serious injury or death. 1. The oven support surface may be ...
... Canadian CSA Standard C22.1, Canadian Electrical Code, Part 1, and local codes and ordinances. Carpentry Refer to rear. 2. ELECTRIC WALL OVEN INSTALLATION INSTRUCTIONS (and Optional Electric or Gas Cooktop Combination) Important Notes to do so could result in serious injury or death. 1. The oven support surface may be ...
Installation Instructions
Page 4
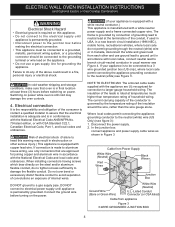
...;exible conduit to a gas supply pipe. If connection is made to aluminum house wiring, use only connectors that the electrical installation is adequate and is in accordance with CSA Standard C22.1, Canadian Electrical Code, Part 1, and local codes and ordinances. If...rating of the insulation around the wire, rather than temperature rating of internal wires. Disconnect the power supply. 2. ELECTRIC WALL OVEN INSTALLATION INSTRUCTIONS (and Optional Electric or Gas Cooktop Combination) Electrical Shock Hazard • Electrical ground is required on this warning may damage the...
...;exible conduit to a gas supply pipe. If connection is made to aluminum house wiring, use only connectors that the electrical installation is adequate and is in accordance with CSA Standard C22.1, Canadian Electrical Code, Part 1, and local codes and ordinances. If...rating of the insulation around the wire, rather than temperature rating of internal wires. Disconnect the power supply. 2. ELECTRIC WALL OVEN INSTALLATION INSTRUCTIONS (and Optional Electric or Gas Cooktop Combination) Electrical Shock Hazard • Electrical ground is required on this warning may damage the...
Installation Instructions
Page 5
... and visible when the door is opened. Remove the bottom trim taped on your oven. 5. ELECTRIC WALL OVEN INSTALLATION INSTRUCTIONS (and Optional Electric or Gas Cooktop Combination) If oven is used in a new branch circuit installation (1996 NEC), mobile home, recreational vehicle, or where local codes DO NOT permit grounding through the hole...
... and visible when the door is opened. Remove the bottom trim taped on your oven. 5. ELECTRIC WALL OVEN INSTALLATION INSTRUCTIONS (and Optional Electric or Gas Cooktop Combination) If oven is used in a new branch circuit installation (1996 NEC), mobile home, recreational vehicle, or where local codes DO NOT permit grounding through the hole...

Installation Instructions
Page 6
...the bottom trim over the side trim tabs on each side of the wall oven and injury to oven and/or structure per installation instructions. • Ensure the anti-tip device is re-engaged when the oven is open oven door. Refer to children and adults.... A. The oven should not tip forward. Test the installation with your appliance for proper installation with the wall oven must be used as a template to function properly. ELECTRIC WALL OVEN INSTALLATION INSTRUCTIONS (and Optional Electric or Gas Cooktop Combination) 6 Install the Anti-tip Mounting Screws The wall oven can tip...
...the bottom trim over the side trim tabs on each side of the wall oven and injury to oven and/or structure per installation instructions. • Ensure the anti-tip device is re-engaged when the oven is open oven door. Refer to children and adults.... A. The oven should not tip forward. Test the installation with your appliance for proper installation with the wall oven must be used as a template to function properly. ELECTRIC WALL OVEN INSTALLATION INSTRUCTIONS (and Optional Electric or Gas Cooktop Combination) 6 Install the Anti-tip Mounting Screws The wall oven can tip...
Installation Instructions
Page 7
..." Min. (91.4 cm) Min. F Use 3/4" (1.9 cm) plywood, installed on two runners, flush with toe plate. Figure 8- ELECTRIC WALL OVEN INSTALLATION INSTRUCTIONS (and Optional Electric or Gas Cooktop Combination) For typical under counter installation of an electric built-in electric oven models. Approx. 3" (7.5 cm) ...Wall Oven 29" (73.7 cm) Max. 23½" (59.7 cm) Min. Cut an opening in the literature package and cooktop installation instructions for built-in ovens are necessary to isolate the unit from left side filler panel, to route armored cable to the cabinet (s)...
..." Min. (91.4 cm) Min. F Use 3/4" (1.9 cm) plywood, installed on two runners, flush with toe plate. Figure 8- ELECTRIC WALL OVEN INSTALLATION INSTRUCTIONS (and Optional Electric or Gas Cooktop Combination) For typical under counter installation of an electric built-in electric oven models. Approx. 3" (7.5 cm) ...Wall Oven 29" (73.7 cm) Max. 23½" (59.7 cm) Min. Cut an opening in the literature package and cooktop installation instructions for built-in ovens are necessary to isolate the unit from left side filler panel, to route armored cable to the cabinet (s)...

Installation Instructions
Page 8
...of the upper oven (see Figure 10). 2. Refer to the Use and Care Guide for a convection baking or roasting, both ovens. ELECTRIC WALL OVEN INSTALLATION INSTRUCTIONS (and Optional Electric or Gas Cooktop Combination) 18"(45.7 cm) Max. Flare(12.7 cm) (16.5 cm) Union Flare Union 120V/60Hz Grounded ...common occurrences that you have a double cavity wall oven. Place a level on , open the door and you time and expense. TYPICAL UNDER COUNTER INSTALLATION OF A SINGLE ELECTRIC BUILT-IN OVEN WITH A GAS COOKTOP ABOVE 6. Use wood shims under the wall oven to BROIL, the upper element in...
...of the upper oven (see Figure 10). 2. Refer to the Use and Care Guide for a convection baking or roasting, both ovens. ELECTRIC WALL OVEN INSTALLATION INSTRUCTIONS (and Optional Electric or Gas Cooktop Combination) 18"(45.7 cm) Max. Flare(12.7 cm) (16.5 cm) Union Flare Union 120V/60Hz Grounded ...common occurrences that you have a double cavity wall oven. Place a level on , open the door and you time and expense. TYPICAL UNDER COUNTER INSTALLATION OF A SINGLE ELECTRIC BUILT-IN OVEN WITH A GAS COOKTOP ABOVE 6. Use wood shims under the wall oven to BROIL, the upper element in...
Parts Catalog
Page 1
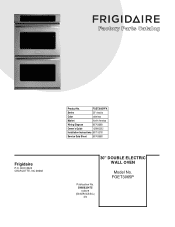
FGET3065P Publication No. 5995633475 13/06/19 (EN/SERVICE/ECL) 374 FGET3065PFA Series 30" electric Color stainless Market North America Wiring Diagram 807436801 Owner's Guide 139900302 Installation Instructions 807153701 Service Data Sheet 807436801 30" DOUBLE ELECTRIC FGET3065PF.jpg CFGET3065PFA.wmf BUFGET3065PFA.wmf FrigDFidGEaTi3r0e65PFA.wmf 807436801.eps BLFGET3065PFA.wWmf ALL OVEN P.O. Product No. BOX 8020 CHARLOTTE, NC 28262 Model No.
FGET3065P Publication No. 5995633475 13/06/19 (EN/SERVICE/ECL) 374 FGET3065PFA Series 30" electric Color stainless Market North America Wiring Diagram 807436801 Owner's Guide 139900302 Installation Instructions 807153701 Service Data Sheet 807436801 30" DOUBLE ELECTRIC FGET3065PF.jpg CFGET3065PFA.wmf BUFGET3065PFA.wmf FrigDFidGEaTi3r0e65PFA.wmf 807436801.eps BLFGET3065PFA.wWmf ALL OVEN P.O. Product No. BOX 8020 CHARLOTTE, NC 28262 Model No.


