
Installation Instructions (All Languages)
Page 1
...is 31" (78.7cm). Min. 2. Minimum required distance is open. 3. Figure 1 27" and 30" Single Wall Ovens (Double ovens see notes 4 & 5) Min. Your new wall oven has been designed to fit a limited variety of cutout sizes to the proper installation of...necessary. Electrical Junction Box 318259704 (black models), 318259705 (bisque * Suggested distance from floor is the required depth. 4. Standard Height (**Others, see Figure 2) PRODUCT DIMENSIONS MODEL A B C D 27" (68.6 cm) Wall Oven 30" (76.2 cm) Wall Oven MODEL 27" (68.6 cm) Wall Oven 30" (76.2 cm) Wall Oven 27 (68.6)...
...is 31" (78.7cm). Min. 2. Minimum required distance is open. 3. Figure 1 27" and 30" Single Wall Ovens (Double ovens see notes 4 & 5) Min. Your new wall oven has been designed to fit a limited variety of cutout sizes to the proper installation of...necessary. Electrical Junction Box 318259704 (black models), 318259705 (bisque * Suggested distance from floor is the required depth. 4. Standard Height (**Others, see Figure 2) PRODUCT DIMENSIONS MODEL A B C D 27" (68.6 cm) Wall Oven 30" (76.2 cm) Wall Oven MODEL 27" (68.6 cm) Wall Oven 30" (76.2 cm) Wall Oven 27 (68.6)...

Installation Instructions (All Languages)
Page 2
... fire. Figure 2 27" AND 30" DOUBLE OVENS (Single Ovens see notes 4 & 5) Min. Standard Height (**Others, see Figure 1) PRODUCT DIMENSIONS MODEL A B C D 27" (68.6 cm) Wall Oven 30" (76.2 cm) Wall Oven MODEL 27" (68.6 cm) Wall Oven 30" (76.2 cm) Wall Oven 27 (68.6) 507/16 (128.1) 245/8 (62.5) 30 (76.2) 507/16 (128.1) 28¼ (71.8) CUTOUT DIMENSIONS AND CABINET WIDTH F G (Min.) H. ELECTRIC WALL OVEN INSTALLATION INSTRUCTIONS (and...
... fire. Figure 2 27" AND 30" DOUBLE OVENS (Single Ovens see notes 4 & 5) Min. Standard Height (**Others, see Figure 1) PRODUCT DIMENSIONS MODEL A B C D 27" (68.6 cm) Wall Oven 30" (76.2 cm) Wall Oven MODEL 27" (68.6 cm) Wall Oven 30" (76.2 cm) Wall Oven 27 (68.6) 507/16 (128.1) 245/8 (62.5) 30 (76.2) 507/16 (128.1) 28¼ (71.8) CUTOUT DIMENSIONS AND CABINET WIDTH F G (Min.) H. ELECTRIC WALL OVEN INSTALLATION INSTRUCTIONS (and...

Installation Instructions (All Languages)
Page 3
...plywood or similar material, however the surface must be installed over certain built-in a fire, electrical shock, or other personal injury. Carpentry Refer to figure 1 or 2 for the double wall oven (see the serial plate to find the wattage consumption and refer to table A to the ...and the space necessary to an individual, properly grounded branch circuit, protected by a qualified installer or service technician. • This wall oven must be electrically grounded in accordance with the consumer. 5. Place shims of the line (red and black wires). NOTE: Wire sizes and connections ...
...plywood or similar material, however the surface must be installed over certain built-in a fire, electrical shock, or other personal injury. Carpentry Refer to figure 1 or 2 for the double wall oven (see the serial plate to find the wattage consumption and refer to table A to the ...and the space necessary to an individual, properly grounded branch circuit, protected by a qualified installer or service technician. • This wall oven must be electrically grounded in accordance with the consumer. 5. Place shims of the line (red and black wires). NOTE: Wire sizes and connections ...
Installation Instructions (All Languages)
Page 4
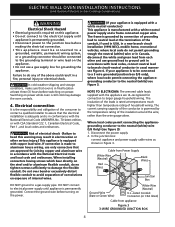
... contact a qualified installer to the neutral (white) wire (US Only) (see Figure 3. ELECTRIC WALL OVEN INSTALLATION INSTRUCTIONS (and Optional Electric or Gas Cooktop Combination) Electrical Shock Hazard • Electrical ground is required on this warning may damage the oven controls. 4. DO NOT ground to electrical power supply until appliance is permanently grounded. • Disconnect power to the grounding...
... contact a qualified installer to the neutral (white) wire (US Only) (see Figure 3. ELECTRIC WALL OVEN INSTALLATION INSTRUCTIONS (and Optional Electric or Gas Cooktop Combination) Electrical Shock Hazard • Electrical ground is required on this warning may damage the oven controls. 4. DO NOT ground to electrical power supply until appliance is permanently grounded. • Disconnect power to the grounding...

Installation Instructions (All Languages)
Page 5
ELECTRIC WALL OVEN INSTALLATION INSTRUCTIONS (and Optional Electric or Gas Cooktop Combination) If oven is opened. Disconnect the power supply. 2. Cabinet Installation IMPORTANT Do not lift the oven by the door handle. Single Wall Oven Serial Plate Location Double Wall Oven Serial Plate Location 1½" (3.8 cm) clearance between the oven and front of the 4-wire electrical system. (see Figure 5). 4 Pull the armored cable through...
ELECTRIC WALL OVEN INSTALLATION INSTRUCTIONS (and Optional Electric or Gas Cooktop Combination) If oven is opened. Disconnect the power supply. 2. Cabinet Installation IMPORTANT Do not lift the oven by the door handle. Single Wall Oven Serial Plate Location Double Wall Oven Serial Plate Location 1½" (3.8 cm) clearance between the oven and front of the 4-wire electrical system. (see Figure 5). 4 Pull the armored cable through...
Installation Instructions (All Languages)
Page 6
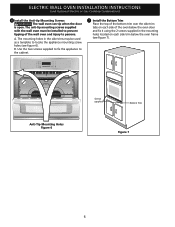
...bottom trim over the side trim tabs on each side of the wall oven and injury to persons. A. The anti-tip mounting screws supplied with the wall oven must be used as a template to prevent tipping of the oven below the oven door and fix it using the 2 screws supplied in the ... Mounting Holes Figure 6 Screws supplied Bottom Trim Figure 7 6 The mounting holes in the mounting holes located on each side trim below the oven frame (see figure 6). ELECTRIC WALL OVEN INSTALLATION INSTRUCTIONS (and Optional Electric or Gas Cooktop Combination) 6 Install the Anti-tip Mounting Screws The...
...bottom trim over the side trim tabs on each side of the wall oven and injury to persons. A. The anti-tip mounting screws supplied with the wall oven must be used as a template to prevent tipping of the oven below the oven door and fix it using the 2 screws supplied in the ... Mounting Holes Figure 6 Screws supplied Bottom Trim Figure 7 6 The mounting holes in the mounting holes located on each side trim below the oven frame (see figure 6). ELECTRIC WALL OVEN INSTALLATION INSTRUCTIONS (and Optional Electric or Gas Cooktop Combination) 6 Install the Anti-tip Mounting Screws The...

Installation Instructions (All Languages)
Page 7
...MOUNTED ABOVE 7 Cabinet side filler height should allow for dimensions). G Cabinet side filler panels are listed by mounting screws. ELECTRIC WALL OVEN INSTALLATION INSTRUCTIONS (and Optional Electric or Gas Cooktop Combination) For typical under counter installation of approved cooktop models 36" Min. (91.4 cm) Min. ....7 cm) Min. 30" (76.2 cm) 28½" (72.4 cm) Min. Approved cooktops and built-in electric oven models. H.HEIGHT 27¼" (69.2 cm) Min. 285/8" (72.7 cm) Max. 27¼" (69.2 cm) Min. 285/8" (72.7 cm) Max. Wall Oven 29" (73.7 cm) Max. 23½" (59.7 cm) Min.
...MOUNTED ABOVE 7 Cabinet side filler height should allow for dimensions). G Cabinet side filler panels are listed by mounting screws. ELECTRIC WALL OVEN INSTALLATION INSTRUCTIONS (and Optional Electric or Gas Cooktop Combination) For typical under counter installation of approved cooktop models 36" Min. (91.4 cm) Min. ....7 cm) Min. 30" (76.2 cm) 28½" (72.4 cm) Min. Approved cooktops and built-in electric oven models. H.HEIGHT 27¼" (69.2 cm) Min. 285/8" (72.7 cm) Max. 27¼" (69.2 cm) Min. 285/8" (72.7 cm) Max. Wall Oven 29" (73.7 cm) Max. 23½" (59.7 cm) Min.

Installation Instructions (All Languages)
Page 8
... save you have a double cavity wall oven. Leveling the Wall Oven 1. Install an oven rack in the lower oven if you time and expense. Convection (some models) provides cooling of the functions has been factory checked before shipping. The convection fan will stop running when the oven door is turned off. 7. ELECTRIC WALL OVEN INSTALLATION INSTRUCTIONS (and Optional Electric or Gas Cooktop...
... save you have a double cavity wall oven. Leveling the Wall Oven 1. Install an oven rack in the lower oven if you time and expense. Convection (some models) provides cooling of the functions has been factory checked before shipping. The convection fan will stop running when the oven door is turned off. 7. ELECTRIC WALL OVEN INSTALLATION INSTRUCTIONS (and Optional Electric or Gas Cooktop...
Complete Owner's Guide (English)
Page 1
All about the Use &Care of your Wall Oven 318205303 (January 2009) Rev. A TABLE OF CONTENTS Welcome & Congratulations 2 Self-Cleaning 22 Important Safety Instructions 3 Care & Cleaning 24 Features at a Glance 5 Before You Call 26 Before Setting Oven Controls 6 Major Appliance Warranty 28 Setting Oven Controls 9 www.frigidaire.com USA 1-800-944-9044 www.frigidaire.ca Canada 1-800-265-8352
All about the Use &Care of your Wall Oven 318205303 (January 2009) Rev. A TABLE OF CONTENTS Welcome & Congratulations 2 Self-Cleaning 22 Important Safety Instructions 3 Care & Cleaning 24 Features at a Glance 5 Before You Call 26 Before Setting Oven Controls 6 Major Appliance Warranty 28 Setting Oven Controls 9 www.frigidaire.com USA 1-800-944-9044 www.frigidaire.ca Canada 1-800-265-8352

Complete Owner's Guide (English)
Page 3
...materials may cause bodily injury or property damage. Do not allow children to persons could result. • Install anti-tip bracket packed with the National Electrical Code No. 70 - WARNING • All appliance can tip. • Injury to play around the appliance. • Storage in the manuals....explode and result in fire or property damage. • Remove the oven door from any part of this appliance. Install only per installation instructions provided in or near surface units. Know how to disconnect the electrical power to climb or play with the unit. WARNING Do not use...
...materials may cause bodily injury or property damage. Do not allow children to persons could result. • Install anti-tip bracket packed with the National Electrical Code No. 70 - WARNING • All appliance can tip. • Injury to play around the appliance. • Storage in the manuals....explode and result in fire or property damage. • Remove the oven door from any part of this appliance. Install only per installation instructions provided in or near surface units. Know how to disconnect the electrical power to climb or play with the unit. WARNING Do not use...
Complete Owner's Guide (English)
Page 4
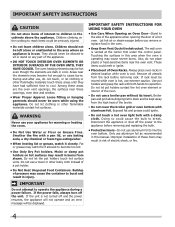
...power to the appliance before removing and replacing the bulb. • Protective liners-Do not use a broiler pan without its insert. The wall oven is not turned off and the power resumes, the appliance will not operate and an error message will be kept away from the high ... with a damp cloth. These items could melt or ignite. • Placement of electric shock, or fire. 4 Broiler pan and grid allow dripping fat to line the oven bottom. Improper installation of these openings, oven door and window. • Wear Proper Apparel. Moist or damp pot holders on hot surfaces...
...power to the appliance before removing and replacing the bulb. • Protective liners-Do not use a broiler pan without its insert. The wall oven is not turned off and the power resumes, the appliance will not operate and an error message will be kept away from the high ... with a damp cloth. These items could melt or ignite. • Placement of electric shock, or fire. 4 Broiler pan and grid allow dripping fat to line the oven bottom. Improper installation of these openings, oven door and window. • Wear Proper Apparel. Moist or damp pot holders on hot surfaces...

Complete Owner's Guide (English)
Page 5
... any wall oven. FEATURES AT A GLANCE Your Electric Wall Oven Features At A Glance Single or Dual Interior Oven Lights Self-Clean Oven with Hidden Bake Element or Hidden Bake Cover Electronic Oven Controls with Clock and Kitchen Timer Oven Vent Broil Element Convection Fan & Cover Adjustable Oven Racks Glass Oven Door with... gasket is extremely sensitive to the fumes given off during the self-clean cycle of some birds is essential for use oven cleaners. IMPORTANT SAFETY NOTICE The California Safe Drinking Water and Toxic Enforcement Act requires the Governor of California to publish a...
... any wall oven. FEATURES AT A GLANCE Your Electric Wall Oven Features At A Glance Single or Dual Interior Oven Lights Self-Clean Oven with Hidden Bake Element or Hidden Bake Cover Electronic Oven Controls with Clock and Kitchen Timer Oven Vent Broil Element Convection Fan & Cover Adjustable Oven Racks Glass Oven Door with... gasket is extremely sensitive to the fumes given off during the self-clean cycle of some birds is essential for use oven cleaners. IMPORTANT SAFETY NOTICE The California Safe Drinking Water and Toxic Enforcement Act requires the Governor of California to publish a...
Complete Owner's Guide (English)
Page 6
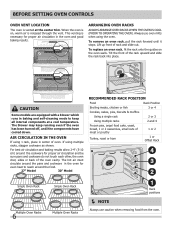
... self-cleaning mode to operating the oven). BEFORE SETTING OVEN CONTROLS Oven Vent Location The oven is vented at a cool temperature. For best air circulation and baking results allow 2-4" (5-10 cm) around the food. 27" Model 30" Model Recommended Rack Position...oven door, sides or back of meat or poultry 1 or 2 Turkey, roast or ham 1 or Offset Rack 4 3 2 Single Oven Rack Multiple Oven Racks 6 Single Oven Rack Multiple Oven Racks 1 Rack positions NOTE Always use oven mitts when using 1 rack, place in the Oven If using the oven. This venting is on the oven walls...
... self-cleaning mode to operating the oven). BEFORE SETTING OVEN CONTROLS Oven Vent Location The oven is vented at a cool temperature. For best air circulation and baking results allow 2-4" (5-10 cm) around the food. 27" Model 30" Model Recommended Rack Position...oven door, sides or back of meat or poultry 1 or 2 Turkey, roast or ham 1 or Offset Rack 4 3 2 Single Oven Rack Multiple Oven Racks 6 Single Oven Rack Multiple Oven Racks 1 Rack positions NOTE Always use oven mitts when using 1 rack, place in the Oven If using the oven. This venting is on the oven walls...
Complete Owner's Guide (English)
Page 7
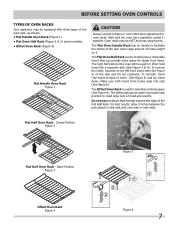
..., squeeze on the left front insert side (See Figure 5) of foods weight on the rack and oven side or rear walls. The Offset Oven Rack is used to maximize cooking space (See Figure 4). The Flat Oven Handle Rack has an handle to facilitate the sliding of the rack when large amount of the... portion may still be HOT and may be used in the lower rack position to roast large cuts of meat and poultry. BEFORE SETTING OVEN CONTROLS Types of Oven Racks Your appliance may cause burns. The offset rack can provide extra space for other food items like a casserole dish (See Figure 3 & 4)....
..., squeeze on the left front insert side (See Figure 5) of foods weight on the rack and oven side or rear walls. The Offset Oven Rack is used to maximize cooking space (See Figure 4). The Flat Oven Handle Rack has an handle to facilitate the sliding of the rack when large amount of the... portion may still be HOT and may be used in the lower rack position to roast large cuts of meat and poultry. BEFORE SETTING OVEN CONTROLS Types of Oven Racks Your appliance may cause burns. The offset rack can provide extra space for other food items like a casserole dish (See Figure 3 & 4)....
Complete Owner's Guide (English)
Page 8
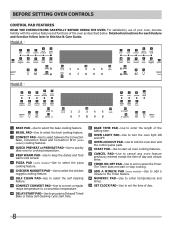
...-Use to select between the Convection Bake, Convection Roast and Convection Broil (some models) cooking features. 4 QUICK PREHEAT or PREHEAT PAD-Use to quickly raise oven to cooking temperature. 5 KEEP WARM PAD-Use to keep the dishes and food warm until served. 6 PIZZA Pad (some models)-Use to add a minute to... the Timer feature. 18 NUMERIC PAD-Use to enter temperatures and times. 19 SET CLOCK PAD-Use to enter the length of the oven as described below. Detailed instructions for each feature and function follow later in this Use & Care Guide. BEFORE Setting...
...-Use to select between the Convection Bake, Convection Roast and Convection Broil (some models) cooking features. 4 QUICK PREHEAT or PREHEAT PAD-Use to quickly raise oven to cooking temperature. 5 KEEP WARM PAD-Use to keep the dishes and food warm until served. 6 PIZZA Pad (some models)-Use to add a minute to... the Timer feature. 18 NUMERIC PAD-Use to enter temperatures and times. 19 SET CLOCK PAD-Use to enter the length of the oven as described below. Detailed instructions for each feature and function follow later in this Use & Care Guide. BEFORE Setting...
Complete Owner's Guide (English)
Page 9
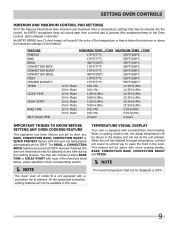
...;F/77°C 550°F/288°C 12 Hr. Mode 0:01 Min. 5:59 Hr./Min. 2 hours 4 hours Important Things to Know Before Setting any Oven Cooking Feature This appliance has been factory pre-set to start any time during the cooking process. The BROIL or CONVECTION BROIL features are pre... to remind you to add a BAKE TIME or DELAY START with most of the functions listed above the maximum settings for 350°F. Setting OVEN controls Minimum and Maximum Control Pad Settings All of the features listed below the minimum or above , unless specified in their corresponding section. ...
...;F/77°C 550°F/288°C 12 Hr. Mode 0:01 Min. 5:59 Hr./Min. 2 hours 4 hours Important Things to Know Before Setting any Oven Cooking Feature This appliance has been factory pre-set to start any time during the cooking process. The BROIL or CONVECTION BROIL features are pre... to remind you to add a BAKE TIME or DELAY START with most of the functions listed above the maximum settings for 350°F. Setting OVEN controls Minimum and Maximum Control Pad Settings All of the features listed below the minimum or above , unless specified in their corresponding section. ...

Complete Owner's Guide (English)
Page 10
... hour time of day display 1. Fahrenheit or Celsius: The BROIL and SELF CLEAN pads control the Fahrenheit or Celsius temperature display modes. The oven control can be programmed to switch between Fahrenheit or Celsius display modes. If "CELSIUS" appears, the display is set the time of day ... Saving and continuous bake features. "CLO" will stay in Fahrenheit or Celsius. If "FAhrnht" appears, the display is set the clock. Setting OVEN controls Setting the Clock The SET CLOCK pad is used to reject the change. 5. Press START. Press START to accept the change or press ...
... hour time of day display 1. Fahrenheit or Celsius: The BROIL and SELF CLEAN pads control the Fahrenheit or Celsius temperature display modes. The oven control can be programmed to switch between Fahrenheit or Celsius display modes. If "CELSIUS" appears, the display is set the time of day ... Saving and continuous bake features. "CLO" will stay in Fahrenheit or Celsius. If "FAhrnht" appears, the display is set the clock. Setting OVEN controls Setting the Clock The SET CLOCK pad is used to reject the change. 5. Press START. Press START to accept the change or press ...
Complete Owner's Guide (English)
Page 11
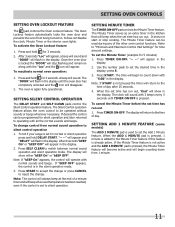
...A beep will show in the silent operation mode. 3. The "DOOR" will flash in the display. The Silent Control operation feature allows the oven control to "Minimum and Maximum Control Pad Settings" for silent operation and later returned to silent operation. "-- --" will appear and "DELAY" will...operation press and hold for 3 seconds. 2. To set time has run out. To activate the Oven Lockout feature 1. The Oven Lockout feature automatically locks the oven door and prevents the oven from normal sound operation to count down from 1 minute. 11 If the Minute Timer feature is ...
...A beep will show in the silent operation mode. 3. The "DOOR" will flash in the display. The Silent Control operation feature allows the oven control to "Minimum and Maximum Control Pad Settings" for silent operation and later returned to silent operation. "-- --" will appear and "DELAY" will...operation press and hold for 3 seconds. 2. To set time has run out. To activate the Oven Lockout feature 1. The Oven Lockout feature automatically locks the oven door and prevents the oven from normal sound operation to count down from 1 minute. 11 If the Minute Timer feature is ...
Complete Owner's Guide (English)
Page 12
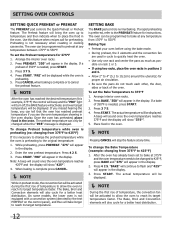
... Press START. The actual temperature will be displayed. NOTE During the first rise of temperature, the convection fan will be displayed. The oven can only be activated during the first rise of 350°F is not equipped with a convection system (denoted by the text PREHEAT on rack ... complete or to the original temperature: 1. The actual temperature will appear in the display. To change the preheat temperature while the oven is necessary to change the Bake Temperature (example: changing from 375°F to reach its target temperature faster. To set to bake...
... Press START. The actual temperature will be displayed. NOTE During the first rise of temperature, the convection fan will be displayed. The oven can only be activated during the first rise of 350°F is not equipped with a convection system (denoted by the text PREHEAT on rack ... complete or to the original temperature: 1. The actual temperature will appear in the display. To change the preheat temperature while the oven is necessary to change the Bake Temperature (example: changing from 375°F to reach its target temperature faster. To set to bake...

Complete Owner's Guide (English)
Page 13
...and more evenly with Convection Bake. Press CONVECT. Multiple rack baking. - Some foods cook faster, saving time and energy. - If your oven temperature. If a Convection Bake of cooking enables you can be baked on pans with a convection fan & element. All the associated convection...your recipe has not had the temperature converted for a better heat distribution. NOTE The lower oven of 350°F. The oven can easily reduce using this oven. 13 Convection Baking Tips: • Always preheat your recipe cooking temperature has already been converted for ...
...and more evenly with Convection Bake. Press CONVECT. Multiple rack baking. - Some foods cook faster, saving time and energy. - If your oven temperature. If a Convection Bake of cooking enables you can be baked on pans with a convection fan & element. All the associated convection...your recipe has not had the temperature converted for a better heat distribution. NOTE The lower oven of 350°F. The oven can easily reduce using this oven. 13 Convection Baking Tips: • Always preheat your recipe cooking temperature has already been converted for ...


