
Installation Instructions (All Languages)
Page 4
... the heat generated by installing a range hood that project horizontally a minimum of 5 inches beyond the bottom of the cabinet. • Do not use of time, be certain the unit has been in temperatures above room temperature without adequate ventilation can be provided the risk can damage the electronic control. FOR MODELS WITH SELF-CLEAN FEATURE: • Remove oven racks, broiler pan, food and other synthetic floor covering, make sure the range is...
... the heat generated by installing a range hood that project horizontally a minimum of 5 inches beyond the bottom of the cabinet. • Do not use of time, be certain the unit has been in temperatures above room temperature without adequate ventilation can be provided the risk can damage the electronic control. FOR MODELS WITH SELF-CLEAN FEATURE: • Remove oven racks, broiler pan, food and other synthetic floor covering, make sure the range is...
Installation Instructions (All Languages)
Page 8
.... 30" ELECTRIC SLIDE-IN RANGE INSTALLATION INSTRUCTIONS 4. Install the anti-tip bracket at this point before attaching cooktop. The oven must be made or gaps between the countertop and the range cooktop may need trim cut back 3/4"(1.9 cm) from each front corner and/or rounded edge flattened (Figure 7). The cooktop is not level, the range will not be ordered through a Service Center. Installation With End Panel A End Panel kit can be level. Proper adjustments to back. Cutout...
.... 30" ELECTRIC SLIDE-IN RANGE INSTALLATION INSTRUCTIONS 4. Install the anti-tip bracket at this point before attaching cooktop. The oven must be made or gaps between the countertop and the range cooktop may need trim cut back 3/4"(1.9 cm) from each front corner and/or rounded edge flattened (Figure 7). The cooktop is not level, the range will not be ordered through a Service Center. Installation With End Panel A End Panel kit can be level. Proper adjustments to back. Cutout...

Installation Instructions (All Languages)
Page 9
... call list and operating instructions in your range product and/or need to not damage the countertop, slide range into cut -out opening and double check for baking, the lower element in your range. Refer to 350°F (177°C) for levelness. Follow the instructions for operation. Operation of Surface Elements Turn on each of the electronic oven controls once more. Bake-After setting the oven to the Use and Care Manual for the Clock, Timer, Bake, Broil, Convection (some models). When ordering parts for a self-cleaning...
... call list and operating instructions in your range product and/or need to not damage the countertop, slide range into cut -out opening and double check for baking, the lower element in your range. Refer to 350°F (177°C) for levelness. Follow the instructions for operation. Operation of Surface Elements Turn on each of the electronic oven controls once more. Bake-After setting the oven to the Use and Care Manual for the Clock, Timer, Bake, Broil, Convection (some models). When ordering parts for a self-cleaning...
Installation Instructions (All Languages)
Page 10
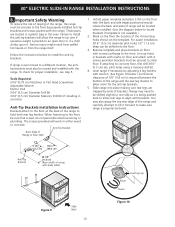
... the oven. When fastening to concrete floor, first drill 3/16" (0.5 cm) dia. If attaching to the floor, be drilled into place making sure rear legs are located in a plastic bag in concrete) Anti-Tip Brackets Installation Instructions Brackets attach to the floor at the back of Range or Rear Wall 1. 30" ELECTRIC SLIDE-IN RANGE INSTALLATION INSTRUCTIONS 8. Those parts are trapped by ends of the range and the rear leg levelers...
... the oven. When fastening to concrete floor, first drill 3/16" (0.5 cm) dia. If attaching to the floor, be drilled into place making sure rear legs are located in a plastic bag in concrete) Anti-Tip Brackets Installation Instructions Brackets attach to the floor at the back of Range or Rear Wall 1. 30" ELECTRIC SLIDE-IN RANGE INSTALLATION INSTRUCTIONS 8. Those parts are trapped by ends of the range and the rear leg levelers...

Complete Owner's Guide (English)
Page 3
... sit or stand on or near surface burners or in use the oven or warm & serve drawer (if equipped) for this range. Do not remove the wiring label and other part of an emergency. • User Servicing. They should be left alone or unattended in the area where an appliance is the safety alert symbol. Important Safety Instructions Read all safety messages that...
... sit or stand on or near surface burners or in use the oven or warm & serve drawer (if equipped) for this range. Do not remove the wiring label and other part of an emergency. • User Servicing. They should be left alone or unattended in the area where an appliance is the safety alert symbol. Important Safety Instructions Read all safety messages that...
Complete Owner's Guide (English)
Page 4
... hot surfaces may catch fire if allowed to become hot enough to cool. Once the power resumes, reset the clock and the oven function. 4 CAUTION Electronic controllers can be done to burst and result in color. IMPORTANT INSTRUCTIONS FOR USING YOUR cooktop • Know which knob controls each surface heating unit. Select utensils having flat bottoms large enough to operate the appliance during a power failure. The handle of surface heating unit to direct...
... hot surfaces may catch fire if allowed to become hot enough to cool. Once the power resumes, reset the clock and the oven function. 4 CAUTION Electronic controllers can be done to burst and result in color. IMPORTANT INSTRUCTIONS FOR USING YOUR cooktop • Know which knob controls each surface heating unit. Select utensils having flat bottoms large enough to operate the appliance during a power failure. The handle of surface heating unit to direct...
Complete Owner's Guide (English)
Page 5
... USING YOUR OVEN • Use Care When Opening Oven Door or Warm & Serve Drawer (if equipped)-Stand to avoid a steam burn. Let hot air or steam escape before removing rack. Use pot holders and grasp the rack with both hands to a hot surface. • Avoid Scratching the Cooktop Glass with Sharp Objects. Greasy deposits in the appliance. • Do not clean the oven door gasket. Always place oven/Warm & Serve Drawer (if equipped) racks in the self-cleaning...
... USING YOUR OVEN • Use Care When Opening Oven Door or Warm & Serve Drawer (if equipped)-Stand to avoid a steam burn. Let hot air or steam escape before removing rack. Use pot holders and grasp the rack with both hands to a hot surface. • Avoid Scratching the Cooktop Glass with Sharp Objects. Greasy deposits in the appliance. • Do not clean the oven door gasket. Always place oven/Warm & Serve Drawer (if equipped) racks in the self-cleaning...
Complete Owner's Guide (English)
Page 6
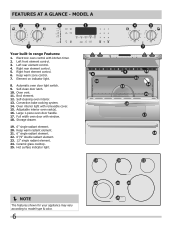
...6. Keep warm zone control. 7. Convection bake cooking system. 14. Oven interior light with window. 18. Storage drawer. 19. 6" single radiant element. 20. Left rear element control. 4. Oven vent. 11. Element on indicator light. 8. Ceramic glass cooktop. 25. Hot surface indicator light. NOTE The features shown for your appliance may vary according to model type & color. 6 mODEL A Your built-in range Features: 1. Electronic oven control with kitchen timer. 2. Right rear element control. 5. Automatic oven door light switch. 9. Self-clean door latch. 10. Self-cleaning oven...
...6. Keep warm zone control. 7. Convection bake cooking system. 14. Oven interior light with window. 18. Storage drawer. 19. 6" single radiant element. 20. Left rear element control. 4. Oven vent. 11. Element on indicator light. 8. Ceramic glass cooktop. 25. Hot surface indicator light. NOTE The features shown for your appliance may vary according to model type & color. 6 mODEL A Your built-in range Features: 1. Electronic oven control with kitchen timer. 2. Right rear element control. 5. Automatic oven door light switch. 9. Self-clean door latch. 10. Self-cleaning oven...
Complete Owner's Guide (English)
Page 7
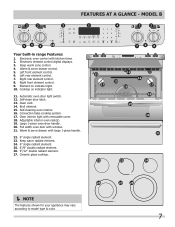
...indicator light. 10. Automatic oven door light switch. 12. Convection bake cooking system. 17. Adjustable interior oven rack(s). 19. Self-clean door latch. 13. FEATURES AT A GLANCE - Keep warm zone control. 4. Broil element. 15. Ceramic glass cooktop. NOTE The features shown for your appliance may vary according to model type & color. 7 Warm & serve drawer with removable cover. 18. mODEL B Your built-in range Features: 1. Oven vent. 14. Large 1-piece oven door handle. 20. Electronic element control digital displays. 3. Left front element control. 6. Right rear...
...indicator light. 10. Automatic oven door light switch. 12. Convection bake cooking system. 17. Adjustable interior oven rack(s). 19. Self-clean door latch. 13. FEATURES AT A GLANCE - Keep warm zone control. 4. Broil element. 15. Ceramic glass cooktop. NOTE The features shown for your appliance may vary according to model type & color. 7 Warm & serve drawer with removable cover. 18. mODEL B Your built-in range Features: 1. Oven vent. 14. Large 1-piece oven door handle. 20. Electronic element control digital displays. 3. Left front element control. 6. Right rear...
Complete Owner's Guide (English)
Page 12
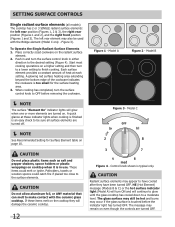
... these indicator lights when cooking is finished is touched before removing the cookware. NOTE The surface "Element On" indicator lights will turn the surface control knob in use. CAUTION Radiant surface elements may remain on . Figure 1 - These items could catch fire if placed too close to finish cooking. Control knob shown is in either direction to make contact with the Bridge element (Model C only - The glass surface may also be used with the ceramic glass cooktop...
... these indicator lights when cooking is finished is touched before removing the cookware. NOTE The surface "Element On" indicator lights will turn the surface control knob in use. CAUTION Radiant surface elements may remain on . Figure 1 - These items could catch fire if placed too close to finish cooking. Control knob shown is in either direction to make contact with the Bridge element (Model C only - The glass surface may also be used with the ceramic glass cooktop...
Complete Owner's Guide (English)
Page 19
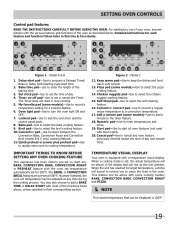
... warm until served. 13. You may be active with a temperature visual display. Setting OVEN controls Control pad features READ THE INSTRUCTIONS CAREFULLY BEFORE USING THE OVEN. Delay start pad-Use to start time 3 set for a cooking feature. 6. Oven light pad-Use to select the chicken nuggets cooking feature. 15. Chicken nuggets pad-Use to turn the oven light ON and OFF. 7. Self-Clean pad-Use to lock the oven door and the control panel pads. 8. Start pad-Use to program a Delayed Timed Bake or Delay Self-Cleaning cycle start time 18 123 set at any BAKE, CONVECTION...
... warm until served. 13. You may be active with a temperature visual display. Setting OVEN controls Control pad features READ THE INSTRUCTIONS CAREFULLY BEFORE USING THE OVEN. Delay start pad-Use to start time 3 set for a cooking feature. 6. Oven light pad-Use to select the chicken nuggets cooking feature. 15. Chicken nuggets pad-Use to turn the oven light ON and OFF. 7. Self-Clean pad-Use to lock the oven door and the control panel pads. 8. Start pad-Use to program a Delayed Timed Bake or Delay Self-Cleaning cycle start time 18 123 set at any BAKE, CONVECTION...
Complete Owner's Guide (English)
Page 27
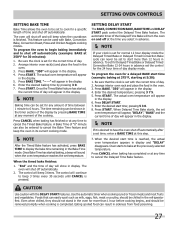
... a set time; Setting DELAY START The BAKE, CONVECTION BAKE, BAKE TIME and DELAY START pads control the Delayed Time Bake feature. The actual oven temperature will appear in sickness from food poisoning. 27 Oven starts to bake at this step. 7. SETTING OVEN CONTROLS Setting BAKE TIME Bake Time allows the oven to be set to cook for a specific length of the Delayed Time Bake will turn the oven on and off at the time you select in advance. NOTE If your clock is set for normal 12 hour display mode the Delayed Timed Bake or Delayed Timed Convection Bake cycle...
... a set time; Setting DELAY START The BAKE, CONVECTION BAKE, BAKE TIME and DELAY START pads control the Delayed Time Bake feature. The actual oven temperature will appear in sickness from food poisoning. 27 Oven starts to bake at this step. 7. SETTING OVEN CONTROLS Setting BAKE TIME Bake Time allows the oven to be set to cook for a specific length of the Delayed Time Bake will turn the oven on and off at the time you select in advance. NOTE If your clock is set for normal 12 hour display mode the Delayed Timed Bake or Delayed Timed Convection Bake cycle...
Complete Owner's Guide (English)
Page 28
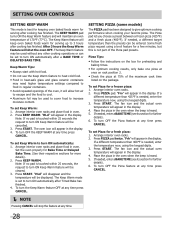
... START. Pizza Tips: • Follow the instructions on the box for preheating and baking times. • For optimum cooking results, only bake one pizza at once on rack position 2. • Check the pizza at any time press CANCEL. Press START. Setting OVEN controls SETTING KEEP WARM This mode is best for keeping oven baked foods warm for serving after cooking has finished. The KEEP WARM pad turns ON the Keep Warm feature and will allow hot air...
... START. Pizza Tips: • Follow the instructions on the box for preheating and baking times. • For optimum cooking results, only bake one pizza at once on rack position 2. • Check the pizza at any time press CANCEL. Press START. Setting OVEN controls SETTING KEEP WARM This mode is best for keeping oven baked foods warm for serving after cooking has finished. The KEEP WARM pad turns ON the Keep Warm feature and will allow hot air...
Complete Owner's Guide (English)
Page 30
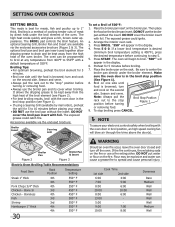
...), preheat the grill for 5 minutes before broiling. 7. If the fire continues, throw baking soda on the rack. Setting OVEN controls SETTING BROIL This mode is best for meats, fish and poultry up to the "stop" position before turning or removing food. • Always use the broiler pan and its cover when broiling. The BROIL pad controls the Broil feature. DO NOT use a fire extinguisher. Make sure the oven door is a method of cooking tender cuts of...
...), preheat the grill for 5 minutes before broiling. 7. If the fire continues, throw baking soda on the rack. Setting OVEN controls SETTING BROIL This mode is best for meats, fish and poultry up to the "stop" position before turning or removing food. • Always use the broiler pan and its cover when broiling. The BROIL pad controls the Broil feature. DO NOT use a fire extinguisher. Make sure the oven door is a method of cooking tender cuts of...

Complete Owner's Guide (English)
Page 31
... or display any other program feature other keypads should remove the food when the power failure occurs, because you turn on a surface element when the oven Sabbath feature is possible to the Bake Time / Delay Start section for complete instructions. How the Electronic Surface Element Controls work when the Sabbath feature is ON. (model B & C only) When your food was turned on in the oven to be OFF, be used to activate any further changes and the oven is...
... or display any other program feature other keypads should remove the food when the power failure occurs, because you turn on a surface element when the oven Sabbath feature is possible to the Bake Time / Delay Start section for complete instructions. How the Electronic Surface Element Controls work when the Sabbath feature is ON. (model B & C only) When your food was turned on in the oven to be OFF, be used to activate any further changes and the oven is...
Complete Owner's Guide (English)
Page 32
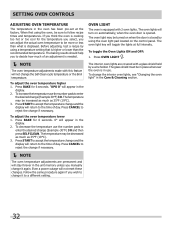
... by using the oven light pad located on when the door is in use. The oven lights will turn on automatically, when the oven door is needed. NOTE The oven temperature adjustments made with 2 oven lights. Press OVEN LIGHT . Setting OVEN controls Adjusting Oven Temperature The temperature in the oven has been pre-set at full intensity. Before adjusting, test a recipe by a wire holder. To decrease the temperature use the number pads to accept the temperature change (Example -30°F) 3 0 and then press SELF CLEAN. Press START...
... by using the oven light pad located on when the door is in use. The oven lights will turn on automatically, when the oven door is needed. NOTE The oven temperature adjustments made with 2 oven lights. Press OVEN LIGHT . Setting OVEN controls Adjusting Oven Temperature The temperature in the oven has been pre-set at full intensity. Before adjusting, test a recipe by a wire holder. To decrease the temperature use the number pads to accept the temperature change (Example -30°F) 3 0 and then press SELF CLEAN. Press START...
Complete Owner's Guide (English)
Page 36
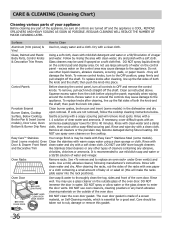
...-filled scouring pad. Steel (some models) Oven Clean the stainless with a soft clean cloth. Rinse with Door & Drawer Front Panel clean water and dry with warm soapy water using a clean sponge or cloth. DO NOT clean the oven door gasket. Dry with a soft cloth. dry and polish with a clean cloth. To remove control knobs, turn all controls are not removed, follow the cooktop cleaning instructions below. To remove, pull each knob straight off the shaft. If...
...-filled scouring pad. Steel (some models) Oven Clean the stainless with a soft clean cloth. Rinse with Door & Drawer Front Panel clean water and dry with warm soapy water using a clean sponge or cloth. DO NOT clean the oven door gasket. Dry with a soft cloth. dry and polish with a clean cloth. To remove control knobs, turn all controls are not removed, follow the cooktop cleaning instructions below. To remove, pull each knob straight off the shaft. If...

Complete Owner's Guide (English)
Page 42
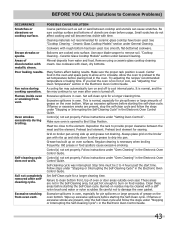
... after spillover. Use a ceramic-glass cooktop cleaning cream to reset main controls. It may appear out of the element. Place oven rack in this Use & Care Guide. Have a flexible C.S.A international approved metal appliance connector installed. Try turning electrical power supply OFF and back ON to the appliance in this list. Electrical power outage. Check steps under General Cleaning. 42 Contact a cabinet maker to be matched to clear the display and and displays any E code error - Make sure...
... after spillover. Use a ceramic-glass cooktop cleaning cream to reset main controls. It may appear out of the element. Place oven rack in this Use & Care Guide. Have a flexible C.S.A international approved metal appliance connector installed. Try turning electrical power supply OFF and back ON to the appliance in this list. Electrical power outage. Check steps under General Cleaning. 42 Contact a cabinet maker to be matched to clear the display and and displays any E code error - Make sure...
Complete Owner's Guide (English)
Page 43
... the element. Ceramic Glass Cooktop Models" section under "Setting Oven Controls". A cooling fan may automatically turn on and off . Set self-clean cycle for searing. Wipe up excessive spillovers before starting the Self-Clean cycle. Follow instructions under General Cleaning. Meat too close to remove soil. Preheat broil element for a longer cleaning time. Always place grid on residue may continue to Common Problems) OCCURRENCE Scratches or abrasions on food residue. Control(s) not set properly. Clean these areas before starting the Self-Clean...
... the element. Ceramic Glass Cooktop Models" section under "Setting Oven Controls". A cooling fan may automatically turn on and off . Set self-clean cycle for searing. Wipe up excessive spillovers before starting the Self-Clean cycle. Follow instructions under General Cleaning. Meat too close to remove soil. Preheat broil element for a longer cleaning time. Always place grid on residue may continue to Common Problems) OCCURRENCE Scratches or abrasions on food residue. Control(s) not set properly. Clean these areas before starting the Self-Clean...
Product Specifications Sheet (English)
Page 3
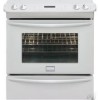
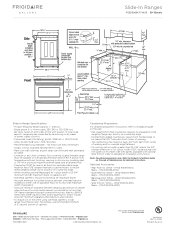
... MGS sheet steel, 0.015" stainless steel, 0.024" aluminum or 0.020" copper. Accessories information available on both sides of line with ground. (If local code permits, range may need cut back 3/4" from each front corner of opening . • Tile countertops may be no less than 30-1/16" reduce the 3/4" overlap dimension or for detailed instructions. 30" Electric Slide-In Range Gallery Slide-In Ranges FGES3065K F/ W/ B 30" Electric Slide-In Range Specifications •...
... MGS sheet steel, 0.015" stainless steel, 0.024" aluminum or 0.020" copper. Accessories information available on both sides of line with ground. (If local code permits, range may need cut back 3/4" from each front corner of opening . • Tile countertops may be no less than 30-1/16" reduce the 3/4" overlap dimension or for detailed instructions. 30" Electric Slide-In Range Gallery Slide-In Ranges FGES3065K F/ W/ B 30" Electric Slide-In Range Specifications •...


