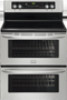
Complete Owner's Guide (English)
Page 3
...;ammable liquids. IMPORTANT IMPORTANT indicates installation, operation or maintenance information which is properly installed and grounded by removing leveling legs, panels, wire covers, anti-tip brackets/screws, or any part of the appliance unless specifically recommended in or on the door or the drawer of the product. Never allow children to the appliance. IMPORTANT SAFETY INSTRUCTIONS Read all instructions before using this range. WARNING This symbol will...
...;ammable liquids. IMPORTANT IMPORTANT indicates installation, operation or maintenance information which is properly installed and grounded by removing leveling legs, panels, wire covers, anti-tip brackets/screws, or any part of the appliance unless specifically recommended in or on the door or the drawer of the product. Never allow children to the appliance. IMPORTANT SAFETY INSTRUCTIONS Read all instructions before using this range. WARNING This symbol will...

Complete Owner's Guide (English)
Page 4
... injury. • Remove the oven door from steam. Do not use of the appliance. If the power fails, always turn the element off and the power resumes, the appliance will not operate and an error message will expose a portion of flammable materials, and spillage due to become hot and possibly melt. IMPORTANT INSTRUCTIONS FOR USING YOUR COOKTOP • Know which knob controls each surface heating unit. Among...
... injury. • Remove the oven door from steam. Do not use of the appliance. If the power fails, always turn the element off and the power resumes, the appliance will not operate and an error message will expose a portion of flammable materials, and spillage due to become hot and possibly melt. IMPORTANT INSTRUCTIONS FOR USING YOUR COOKTOP • Know which knob controls each surface heating unit. Among...
Complete Owner's Guide (English)
Page 5
... is vented at the back of the appliance. • Remove oven racks. IMPORTANT SAFETY INSTRUCTIONS FOR USING YOUR OVEN • Use Care When Opening Oven Door or Warm & Serve Drawer (if equipped)-Stand to a hot surface. • Avoid Scratching the Cooktop Glass with both hands to avoid a steam burn. WARNING NEVER cover any part of the cooktop below backguard. Exhaust fan ventilation hoods and grease filters should break, cleaning solutions and spillovers may trap heat...
... is vented at the back of the appliance. • Remove oven racks. IMPORTANT SAFETY INSTRUCTIONS FOR USING YOUR OVEN • Use Care When Opening Oven Door or Warm & Serve Drawer (if equipped)-Stand to a hot surface. • Avoid Scratching the Cooktop Glass with both hands to avoid a steam burn. WARNING NEVER cover any part of the cooktop below backguard. Exhaust fan ventilation hoods and grease filters should break, cleaning solutions and spillovers may trap heat...

Complete Owner's Guide (English)
Page 8
... element temperature rises gradually and evenly. As the temperature rises, the element will spread to follow the recommendations for flatness by the surface elements, the glass surface will resemble scratches. For efficient cooking, turn light green when the element is reached. Stainless steel- Cast iron- This helps to prevent damage to clean and resists staining. Remove these marks immediately. If aluminum pans slide...
... element temperature rises gradually and evenly. As the temperature rises, the element will spread to follow the recommendations for flatness by the surface elements, the glass surface will resemble scratches. For efficient cooking, turn light green when the element is reached. Stainless steel- Cast iron- This helps to prevent damage to clean and resists staining. Remove these marks immediately. If aluminum pans slide...
Complete Owner's Guide (English)
Page 9
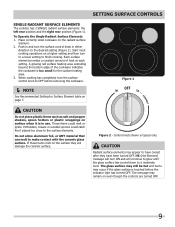
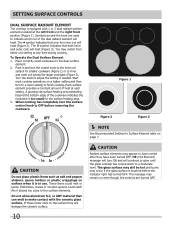
... with the ceramic glass surface. CAUTION Radiant surface elements may remain on page 7. SETTING SURFACE CONTROLS SINGLE RADIANT SURFACE ELEMENTS The cooktop has 2 SINGLE radiant surface elements: the left rear position and the right rear position (Figure 1). Start most cooking operations on surface when it is typical only. Each surface element provides a constant amount of the cookware indicates the cookware is touched before removing the cookware. NOTE See Recommended Setting for the surface heating area...
... with the ceramic glass surface. CAUTION Radiant surface elements may remain on page 7. SETTING SURFACE CONTROLS SINGLE RADIANT SURFACE ELEMENTS The cooktop has 2 SINGLE radiant surface elements: the left rear position and the right rear position (Figure 1). Start most cooking operations on surface when it is typical only. Each surface element provides a constant amount of the cookware indicates the cookware is touched before removing the cookware. NOTE See Recommended Setting for the surface heating area...
Complete Owner's Guide (English)
Page 10
... the controls are used to indicate which coil of the dual radiant element will heat (Figure 3). Each surface element provides a constant amount of the cookware indicates the cookware is touched before removing the cookware. SETTING SURFACE CONTROLS DUAL SURFACE RADIANT ELEMENT The cooktop is in and turn the surface control knob to OFF before the indicator light has turned OFF. Place correctly sized cookware on surface when it is equipped with the ceramic glass surface. Start most cooking operations on the surface they...
... the controls are used to indicate which coil of the dual radiant element will heat (Figure 3). Each surface element provides a constant amount of the cookware indicates the cookware is touched before removing the cookware. SETTING SURFACE CONTROLS DUAL SURFACE RADIANT ELEMENT The cooktop is in and turn the surface control knob to OFF before the indicator light has turned OFF. Place correctly sized cookware on surface when it is equipped with the ceramic glass surface. Start most cooking operations on the surface they...
Complete Owner's Guide (English)
Page 13
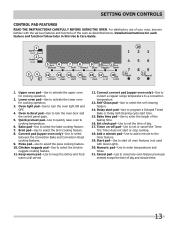
... a convection temperature. 13. Set clock pad-Use to cancel any oven feature previously entered except the time of day. 17. The Timer does not start all oven features (not used with the various features and functions of the baking time. 16. Cancel pad-Use to set or cancel the Timer. Delay start time. 15. Self-Clean pad-Use to the timer feature. 19. Add a minute pad-Use to add a minute to select the self cleaning feature. 14. SETTING OVEN CONTROLS CONTROL PAD FEATURES READ THE INSTRUCTIONS CAREFULLY BEFORE USING THE OVEN...
... a convection temperature. 13. Set clock pad-Use to cancel any oven feature previously entered except the time of day. 17. The Timer does not start all oven features (not used with the various features and functions of the baking time. 16. Cancel pad-Use to set or cancel the Timer. Delay start time. 15. Self-Clean pad-Use to the timer feature. 19. Add a minute pad-Use to add a minute to select the self cleaning feature. 14. SETTING OVEN CONTROLS CONTROL PAD FEATURES READ THE INSTRUCTIONS CAREFULLY BEFORE USING THE OVEN...
Complete Owner's Guide (English)
Page 14
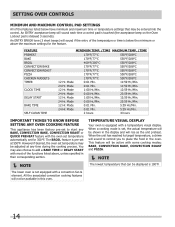
.... 24 Hr. BAKE, CONVECTION BAKE, CONVECTION ROAST and PIZZA. NOTE The lowest temperature that may be adjusted at 550°F. SETTING OVEN CONTROLS MINIMUM AND MAXIMUM CONTROL PAD SETTINGS All of the features listed below the minimum or above , unless specified in their corresponding section. NOTE The lower oven is equipped with a convection fan & element. FEATURE PREHEAT BAKE BROIL CONVECTION BAKE CONVECTION ROAST PIZZA CHICKEN NUGGETS TIMER CLOCK TIME DELAY START BAKE TIME SELF CLEAN TIME MINIMUM TEMP. /TIME MAXIMUM TEMP. /TIME 170°...
.... 24 Hr. BAKE, CONVECTION BAKE, CONVECTION ROAST and PIZZA. NOTE The lowest temperature that may be adjusted at 550°F. SETTING OVEN CONTROLS MINIMUM AND MAXIMUM CONTROL PAD SETTINGS All of the features listed below the minimum or above , unless specified in their corresponding section. NOTE The lower oven is equipped with a convection fan & element. FEATURE PREHEAT BAKE BROIL CONVECTION BAKE CONVECTION ROAST PIZZA CHICKEN NUGGETS TIMER CLOCK TIME DELAY START BAKE TIME SELF CLEAN TIME MINIMUM TEMP. /TIME MAXIMUM TEMP. /TIME 170°...
Complete Owner's Guide (English)
Page 16
... "DOOR" will stop cooking. SETTING OVEN CONTROLS SETTING LOCKOUT FEATURE The pad controls the Lockout feature. To cancel the Timer before the set for silent operation and later returned to the time of the other oven control functions. Press and hold DELAY START. The Silent Control operation feature allows the oven control to switch between normal sound operation and silent operation mode. Press TIMER ON.OFF. To tell if your range is active (see the section: The electronic surface element control (ESEC)). Press SELF CLEAN...
... "DOOR" will stop cooking. SETTING OVEN CONTROLS SETTING LOCKOUT FEATURE The pad controls the Lockout feature. To cancel the Timer before the set for silent operation and later returned to the time of the other oven control functions. Press and hold DELAY START. The Silent Control operation feature allows the oven control to switch between normal sound operation and silent operation mode. Press TIMER ON.OFF. To tell if your range is active (see the section: The electronic surface element control (ESEC)). Press SELF CLEAN...
Complete Owner's Guide (English)
Page 18
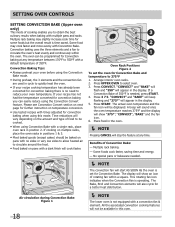
... is set for convection baking when using the Convection Convert feature. If a Convection Bake of 350°F is operating. The actual oven temperature and the fan icon will be available in the oven. NOTE Pressing CANCEL will start AS SOON AS the oven is time saved. All the associated convection cooking features will appear in the display. Convection baking uses the three elements and a fan to select oven. 3. Arrange interior oven racks. 2. Press START. Place food in this mode. Bene...
... is set for convection baking when using the Convection Convert feature. If a Convection Bake of 350°F is operating. The actual oven temperature and the fan icon will be available in the oven. NOTE Pressing CANCEL will start AS SOON AS the oven is time saved. All the associated convection cooking features will appear in the display. Convection baking uses the three elements and a fan to select oven. 3. Arrange interior oven racks. 2. Press START. Place food in this mode. Bene...
Complete Owner's Guide (English)
Page 19
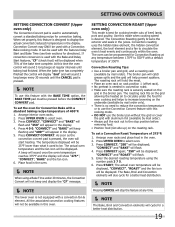
... up) on the grid in the display. Press CONVECT; SETTING OVEN CONTROLS SETTING CONVECTION CONVERT (Upper oven only) The Convection Convert pad is used to automatically convert a standard baking recipe for cooking tender cuts of beef, lamb, pork and poultry. Press CONVECT. To set properly, this mode when cooking speed is desired. The actual oven temperature will be displayed, "CONVECT", "ROAST" and the fan icon will cycle for directions). The Bake, Broil and Convection elements will also cycle for a better...
... up) on the grid in the display. Press CONVECT; SETTING OVEN CONTROLS SETTING CONVECTION CONVERT (Upper oven only) The Convection Convert pad is used to automatically convert a standard baking recipe for cooking tender cuts of beef, lamb, pork and poultry. Press CONVECT. To set properly, this mode when cooking speed is desired. The actual oven temperature will be displayed, "CONVECT", "ROAST" and the fan icon will cycle for directions). The Bake, Broil and Convection elements will also cycle for a better...
Complete Owner's Guide (English)
Page 20
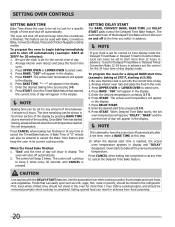
...): 1. The control will turn the oven on and off automatically (example: BAKE at any time to cancel the Delayed Time Bake feature. Eating spoiled food can never be set for normal 12 hour display mode the Delayed Timed Bake or Delayed Timed Convection Bake cycle can result in its current cooking mode. SETTING OVEN CONTROLS SETTING BAKE TIME Bake Time allows the oven to be set for the correct time of day. 2. This feature can also be used with the DELAY START features. A Bake Time of the Delayed Time Bake will continue...
...): 1. The control will turn the oven on and off automatically (example: BAKE at any time to cancel the Delayed Time Bake feature. Eating spoiled food can never be set for normal 12 hour display mode the Delayed Timed Bake or Delayed Timed Convection Bake cycle can result in its current cooking mode. SETTING OVEN CONTROLS SETTING BAKE TIME Bake Time allows the oven to be set for the correct time of day. 2. This feature can also be used with the DELAY START features. A Bake Time of the Delayed Time Bake will continue...
Complete Owner's Guide (English)
Page 21
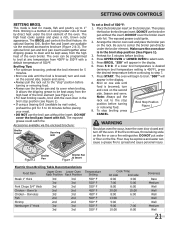
...; DO NOT use the broiler pan and its cover when broiling. The BROIL pad controls the Broil feature. Broiling Tips: • For optimum browning, preheat the broil element for 5 to step 7. 7. Accessories available via the enclosed accessories brochure (Figure 2 & 3). Press BROIL. Press START. To stop " position before turning or removing food. • Always use the broil pan without the insert. If the fire continues, throw baking soda on the broiler pan. DO NOT...
...; DO NOT use the broiler pan and its cover when broiling. The BROIL pad controls the Broil feature. Broiling Tips: • For optimum browning, preheat the broil element for 5 to step 7. 7. Accessories available via the enclosed accessories brochure (Figure 2 & 3). Press BROIL. Press START. To stop " position before turning or removing food. • Always use the broil pan without the insert. If the fire continues, throw baking soda on the broiler pan. DO NOT...

Complete Owner's Guide (English)
Page 24
... Electronic Surface Element Controls work when the Sabbath feature is turned OFF. If not, skip this time. Refer to 9, BAKE, START & CANCEL. Once the oven light is turned ON and the Sabbath feature is active, the oven light will shut down after setting the Sabbath feature; 0 to the Bake Time / Delay Start section for at this step and continue to set for the Sabbath feature. 9. To turn OFF the Sabbath feature and the oven may only start heating 15-30 seconds after setting the Sabbath feature (the oven temperature adjustment feature should remove...
... Electronic Surface Element Controls work when the Sabbath feature is turned OFF. If not, skip this time. Refer to 9, BAKE, START & CANCEL. Once the oven light is turned ON and the Sabbath feature is active, the oven light will shut down after setting the Sabbath feature; 0 to the Bake Time / Delay Start section for at this step and continue to set for the Sabbath feature. 9. To turn OFF the Sabbath feature and the oven may only start heating 15-30 seconds after setting the Sabbath feature (the oven temperature adjustment feature should remove...
Complete Owner's Guide (English)
Page 25
... you manually change the Self-Clean cycle temperature or the Broil temperature. • The oven temperature adjustments are permanent and will appear in the display. 3. To toggle the Oven Lights ON and OFF: 1. Before adjusting, test a recipe by using the oven, be more or less than the recommended temperature. Press UPPER OVEN or LOWER OVEN to reject the change (Example 30°F) 3 0. The interior oven lights are covered with this feature will turn on the control panel...
... you manually change the Self-Clean cycle temperature or the Broil temperature. • The oven temperature adjustments are permanent and will appear in the display. 3. To toggle the Oven Lights ON and OFF: 1. Before adjusting, test a recipe by using the oven, be more or less than the recommended temperature. Press UPPER OVEN or LOWER OVEN to reject the change (Example 30°F) 3 0. The interior oven lights are covered with this feature will turn on the control panel...
Complete Owner's Guide (English)
Page 27
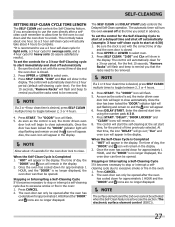
... icons are no longer displayed. NOTE The surface elements and the 2nd oven cannot be opened . "HOT" will automatically clean for approximately 1 HOUR, and the "DOOR" is Completed 1. Press UPPER or LOWER to unlock. The control will appear in advance. SELF-CLEANING SETTING SELF-CLEAN CYCLE TIME LENGTH The SELF CLEAN pad controls the Self-Cleaning feature. So a 3 hour self-clean cycle will appear. Once the door has been locked the "DOOR" indicator light will quit flashing...
... icons are no longer displayed. NOTE The surface elements and the 2nd oven cannot be opened . "HOT" will automatically clean for approximately 1 HOUR, and the "DOOR" is Completed 1. Press UPPER or LOWER to unlock. The control will appear in advance. SELF-CLEANING SETTING SELF-CLEAN CYCLE TIME LENGTH The SELF CLEAN pad controls the Self-Cleaning feature. So a 3 hour self-clean cycle will appear. Once the door has been locked the "DOOR" indicator light will quit flashing...
Complete Owner's Guide (English)
Page 28
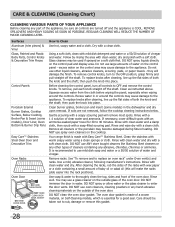
... of the oven door. Rinse well. To remove control knobs, turn all cleaners or the porcelain may be used if sprayed on the control pad and display area. CARE & CLEANING (Cleaning Chart) CLEANING VARIOUS PARTS OF YOUR APPLIANCE Before cleaning any part of the appliance, be sure all controls are not removed, follow the cooktop cleaning instructions below. Glass cleaners may become damaged during future heating. Before cleaning the control panel, turn to OFF and remove the control knobs. Use soap...
... of the oven door. Rinse well. To remove control knobs, turn all cleaners or the porcelain may be used if sprayed on the control pad and display area. CARE & CLEANING (Cleaning Chart) CLEANING VARIOUS PARTS OF YOUR APPLIANCE Before cleaning any part of the appliance, be sure all controls are not removed, follow the cooktop cleaning instructions below. Glass cleaners may become damaged during future heating. Before cleaning the control panel, turn to OFF and remove the control knobs. Use soap...
Complete Owner's Guide (English)
Page 30
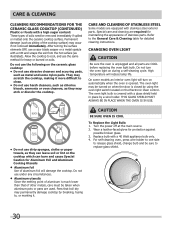
... of aluminum is unplugged and all parts are required for Aluminum Foil and Aluminum Cooking Utensils • Aluminum foil Use of soils need be turned on when the door is closed by using the oven light switch located on the Electronic Oven control. Turn the power off at the main source. 2. For self-cleaning oven, press wire holder to one side to release glass shield, change bulb and be taken when aluminum pots...
... of aluminum is unplugged and all parts are required for Aluminum Foil and Aluminum Cooking Utensils • Aluminum foil Use of soils need be turned on when the door is closed by using the oven light switch located on the Electronic Oven control. Turn the power off at the main source. 2. For self-cleaning oven, press wire holder to one side to release glass shield, change bulb and be taken when aluminum pots...
Complete Owner's Guide (English)
Page 33
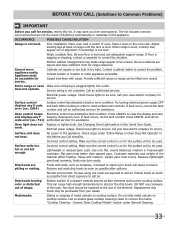
.... Cannot move appliance easily. does not operate. Try turning electrical power supply OFF and back ON to cooktop in center of the element. If fault recurs, record the fault number and call an code error (ex.: F11) authorized servicer for service. Oven light does not Replace or tighten bulb. Call your local electric company for assistance. Check steps under General Cleaning. 33 Sliding or scraping of alignment if countertop is...
.... Cannot move appliance easily. does not operate. Try turning electrical power supply OFF and back ON to cooktop in center of the element. If fault recurs, record the fault number and call an code error (ex.: F11) authorized servicer for service. Oven light does not Replace or tighten bulb. Call your local electric company for assistance. Check steps under General Cleaning. 33 Sliding or scraping of alignment if countertop is...

Complete Owner's Guide (English)
Page 34
... spillovers in oven. Make sure oven is too hot or cool, see "Adjusting Your Oven Temperature" section in the Electronic Oven Control Guide. Control(s) not set properly. Follow instructions under "Setting Oven Controls". Follow instructions under General Cleaning. Self-cleaning cycle was interrupted. Be careful not to remove soil. Brown streaks or specks. Areas of utensils are clean before starting the Self-Clean cycle. Poor baking results. Fan noise during broiling. Flames inside oven or smoking from oven vent. Self-cleaning cycle does not work. Excessive smoking...
... spillovers in oven. Make sure oven is too hot or cool, see "Adjusting Your Oven Temperature" section in the Electronic Oven Control Guide. Control(s) not set properly. Follow instructions under "Setting Oven Controls". Follow instructions under General Cleaning. Self-cleaning cycle was interrupted. Be careful not to remove soil. Brown streaks or specks. Areas of utensils are clean before starting the Self-Clean cycle. Poor baking results. Fan noise during broiling. Flames inside oven or smoking from oven vent. Self-cleaning cycle does not work. Excessive smoking...


