
Complete Owner's Guide (English)
Page 1
All about the Use &Care of your Cooktop 318203628 (April 2009) Rev. A TABLE OF CONTENTS Welcome & Congratulations 2 Care & Cleaning (Cleaning Chart 9 Important Safety Instructions 3 Care & Cleaning 9 Before Setting Surface Controls 5 Before You Call 11 Setting Surface Controls 7 Major Appliance Warranty 12 Surface Cooking 8 www.frigidaire.com USA 1-800-944-9044 www.frigidaire.ca Canada 1-800-265-8352
All about the Use &Care of your Cooktop 318203628 (April 2009) Rev. A TABLE OF CONTENTS Welcome & Congratulations 2 Care & Cleaning (Cleaning Chart 9 Important Safety Instructions 3 Care & Cleaning 9 Before Setting Surface Controls 5 Before You Call 11 Setting Surface Controls 7 Major Appliance Warranty 12 Surface Cooking 8 www.frigidaire.com USA 1-800-944-9044 www.frigidaire.ca Canada 1-800-265-8352

Complete Owner's Guide (English)
Page 2
... are completely committed to cover every possible condition and situation that may occur. We know you consider us for several models. Solicite la P/N 318203628E. Serial Plate Location Cooktop Serial Plate Location Please record your appliance and feature information for future purchases. please CAREFULLY read and save these instructions This Use & Care Manual contains general operating instructions for your model and serial numbers below for choosing our product...
... are completely committed to cover every possible condition and situation that may occur. We know you consider us for several models. Solicite la P/N 318203628E. Serial Plate Location Cooktop Serial Plate Location Please record your appliance and feature information for future purchases. please CAREFULLY read and save these instructions This Use & Care Manual contains general operating instructions for your model and serial numbers below for choosing our product...
Complete Owner's Guide (English)
Page 3
... symbol to the appliance at the circuit breaker or fuse box in use baking soda, a dry chemical or foam-type extinguisher. • When heating fat or grease, watch it closely. Surface units may cause the container to cool. Do not let clothing or other bulky cloth instead of panels, wire covers or any part of the appliance unless specifically recommended in injury. 3 WARNING Never...
... symbol to the appliance at the circuit breaker or fuse box in use baking soda, a dry chemical or foam-type extinguisher. • When heating fat or grease, watch it closely. Surface units may cause the container to cool. Do not let clothing or other bulky cloth instead of panels, wire covers or any part of the appliance unless specifically recommended in injury. 3 WARNING Never...
Complete Owner's Guide (English)
Page 4
... utensil. • Never Leave Surface Units Unattended. When flaming food under the hood, turn fan on a hot cooking area, be careful to hood manufacturer's instructions for baking if used to wipe spills on . Refer to avoid a steam burn. The use . • Do Not Use Decorative Surface Element Covers. Only use aluminum foil to warn customers of different sizes. Any other reproductive harm, and requires businesses to line any part of undersized utensils will...
... utensil. • Never Leave Surface Units Unattended. When flaming food under the hood, turn fan on a hot cooking area, be careful to hood manufacturer's instructions for baking if used to wipe spills on . Refer to avoid a steam burn. The use . • Do Not Use Decorative Surface Element Covers. Only use aluminum foil to warn customers of different sizes. Any other reproductive harm, and requires businesses to line any part of undersized utensils will...

Complete Owner's Guide (English)
Page 5
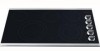
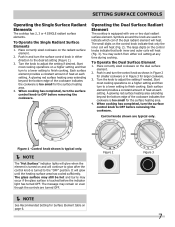
...red. Locations of this Use and Care Guide. Fig. 1 - 30" Model Cooktop Appearance Fig. 2 - 36" Model Cooktop Appearance Fig. 3 - 30" Model Cooktop Appearance Fig. 4 - 36" Model Cooktop Appearance NOTE Please read detailed instructions for ceramic glass cooktop cleaning in the General Care & Cleaning section and Before You Call checklist section of the surface radiant elements Your cooktop is equipped with radiant surface radiant elements with different wattage ratings. For efficient cooking, turn off cycle. Heat is complete. The areas surrounding the elements may become hot...
...red. Locations of this Use and Care Guide. Fig. 1 - 30" Model Cooktop Appearance Fig. 2 - 36" Model Cooktop Appearance Fig. 3 - 30" Model Cooktop Appearance Fig. 4 - 36" Model Cooktop Appearance NOTE Please read detailed instructions for ceramic glass cooktop cleaning in the General Care & Cleaning section and Before You Call checklist section of the surface radiant elements Your cooktop is equipped with radiant surface radiant elements with different wattage ratings. For efficient cooking, turn off cycle. Heat is complete. The areas surrounding the elements may become hot...

Complete Owner's Guide (English)
Page 6
... 36" cooktop as follows: Model C: • Two small 6 inch radiant element located one at the left rear and the other one at the right rear position. • One dual 6 or 9 inch radiant element located at the right front position. • One 12 inch radiant element located at the left front position. • One 7 inch radiant element located at the HI setting. Note: The size and type of cookware used will be turned off...
... 36" cooktop as follows: Model C: • Two small 6 inch radiant element located one at the left rear and the other one at the right rear position. • One dual 6 or 9 inch radiant element located at the right front position. • One 12 inch radiant element located at the left front position. • One 7 inch radiant element located at the HI setting. Note: The size and type of cookware used will be turned off...
Complete Owner's Guide (English)
Page 7
... used to finish cooking. A glowing red surface heating area extending beyond the bottom edge of the dual radiant element will heat. The message may remain on the control knobs indicate that only the inner coil will heat (Fig. 3). It will continue to glow after the control knob is touched before removing the cookware. The glass surface may still be hot and burns may switch from either direction to adjust the setting...
... used to finish cooking. A glowing red surface heating area extending beyond the bottom edge of the dual radiant element will heat. The message may remain on the control knobs indicate that only the inner coil will heat (Fig. 3). It will continue to glow after the control knob is touched before removing the cookware. The glass surface may still be hot and burns may switch from either direction to adjust the setting...
Complete Owner's Guide (English)
Page 8
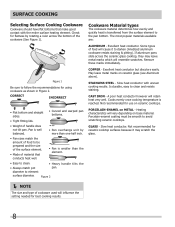
... use on ceramic glass (see Aluminum above). STAINLESS STEEL - Is durable, easy to avoid scratching ceramic cooktops. Not recommended for using cookware as shown in Figure 2. If aluminum pans slide across the bottom of the cookware (See Figure 1). Excellent heat conductor but discolors easily. Slow heat conductor with the entire surface heating element. CAST IRON - Heating characteristics will retain heat very well. May leave metal marks on ceramic cooktops. Cooks evenly once cooking...
... use on ceramic glass (see Aluminum above). STAINLESS STEEL - Is durable, easy to avoid scratching ceramic cooktops. Not recommended for using cookware as shown in Figure 2. If aluminum pans slide across the bottom of the cookware (See Figure 1). Excellent heat conductor but discolors easily. Slow heat conductor with the entire surface heating element. CAST IRON - Heating characteristics will retain heat very well. May leave metal marks on ceramic cooktops. Cooks evenly once cooking...
Complete Owner's Guide (English)
Page 9
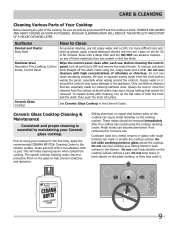
.... Surfaces Painted and Plastic Body Parts Stainless Steel Decorative Trim Cooktop, Control Knobs, Control Panel Ceramic Glass Cooktop How to the ceramic surface. DO NOT use kitchen cleaners that cannot be sure all controls to rinse the cleaners from the surface as bluish stains may cause damage to squeeze excess water from cooking. Wipe the control panel clean after cleaning, line up grease, apply a liquid detergent directly onto the soil. Clean using the cooktop cleaning cream. To replace knobs after each knob straight...
.... Surfaces Painted and Plastic Body Parts Stainless Steel Decorative Trim Cooktop, Control Knobs, Control Panel Ceramic Glass Cooktop How to the ceramic surface. DO NOT use kitchen cleaners that cannot be sure all controls to rinse the cleaners from the surface as bluish stains may cause damage to squeeze excess water from cooking. Wipe the control panel clean after cleaning, line up grease, apply a liquid detergent directly onto the soil. Clean using the cooktop cleaning cream. To replace knobs after each knob straight...

Complete Owner's Guide (English)
Page 10
... required for heavy or burned on the cooktop which can be removed immediately if spilled or melted onto the ceramic cooktop surface. Do not use a nonabrasive plastic type no residue. They may scratch the cooktop, making it . 10 Care and Cleaning of Stainless Steel Some models are equipped with a metal razor blade scraper, holding scraper at a 30 degree angle to the ceramic glass cooktop may permanently damage cooktop by breaking, fusing...
... required for heavy or burned on the cooktop which can be removed immediately if spilled or melted onto the ceramic cooktop surface. Do not use a nonabrasive plastic type no residue. They may scratch the cooktop, making it . 10 Care and Cleaning of Stainless Steel Some models are equipped with a metal razor blade scraper, holding scraper at a 30 degree angle to the ceramic glass cooktop may permanently damage cooktop by breaking, fusing...

Complete Owner's Guide (English)
Page 11
... house lights to be sure. Check/reset breaker or replace fuse. Be sure appliance is incorrect. Cookware material affects heating. Incorrect control setting. See Selecting Surface Cooking Utensils in this Owner's Guide. Use razor blade scraper to remove marks. See CeramicGlass Cooktop section in this situation corrected by a qualified electrician. Check/reset breaker or replace fuse. Service wiring not complete. Power outage. Call local electric company. If the problem is a circuit overload, or improper connection of...
... house lights to be sure. Check/reset breaker or replace fuse. Be sure appliance is incorrect. Cookware material affects heating. Incorrect control setting. See Selecting Surface Cooking Utensils in this Owner's Guide. Use razor blade scraper to remove marks. See CeramicGlass Cooktop section in this situation corrected by a qualified electrician. Check/reset breaker or replace fuse. Service wiring not complete. Power outage. Call local electric company. If the problem is a circuit overload, or improper connection of...

Complete Owner's Guide (English)
Page 12
... provided instructions. 8 Service calls to correct the installation of your appliance or to instruct you specific legal rights. DISCLAIMER OF IMPLIES WARRANTIES; Box 212378 Augusta, GA 30907 Canada 1.800.265.8352 Electrolux Canada Corp. 5855 Terry Fox Way Mississauga, Ontario, Canada L5V 3E4 12 MAJOR APPLIANCE WARRANTY Your appliance is shipped from the factory. 10 Service calls to repair or replace appliance light bulbs, air filters, water filters, other...
... provided instructions. 8 Service calls to correct the installation of your appliance or to instruct you specific legal rights. DISCLAIMER OF IMPLIES WARRANTIES; Box 212378 Augusta, GA 30907 Canada 1.800.265.8352 Electrolux Canada Corp. 5855 Terry Fox Way Mississauga, Ontario, Canada L5V 3E4 12 MAJOR APPLIANCE WARRANTY Your appliance is shipped from the factory. 10 Service calls to repair or replace appliance light bulbs, air filters, water filters, other...

Installation Instructions (All Languages)
Page 1
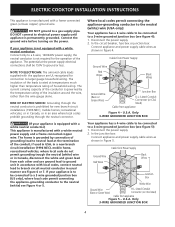
...½ (52.1) F. Printed in Canada. * Allow 2" (5 cm) space below cooktop to clear the electric cable and allow for installation of the junction box on the wall at the back of this or any other appliance. WIDTH MIN. ELECTRIC COOKTOP INSTALLATION INSTRUCTIONS Canada INSTALLATION AND SERVICE MUST BE PERFORMED BY A QUALIFIED INSTALLER. pages 9-16 Français - IMPORTANT: SAVE FOR LOCAL ELECTRICAL INSPECTOR'S USE. C Cooktop Cutout Dimensions F E D * 30" (76.2 cm) min.
...½ (52.1) F. Printed in Canada. * Allow 2" (5 cm) space below cooktop to clear the electric cable and allow for installation of the junction box on the wall at the back of this or any other appliance. WIDTH MIN. ELECTRIC COOKTOP INSTALLATION INSTRUCTIONS Canada INSTALLATION AND SERVICE MUST BE PERFORMED BY A QUALIFIED INSTALLER. pages 9-16 Français - IMPORTANT: SAVE FOR LOCAL ELECTRICAL INSPECTOR'S USE. C Cooktop Cutout Dimensions F E D * 30" (76.2 cm) min.

Installation Instructions (All Languages)
Page 2
... 1/8" Flame Retardant Millboard Covered With Not Less Than No. 28 MGS Sheet Steel, 0.015" (0.4 mm) Stainless Steel, 0.024" (0.6 mm) Aluminum or 0.020" (0.5 mm) Copper 2 1/2" (6.4 cm) Min. The drawer must not interfere with the electrical installation of Unit). Read all governing codes and ordinances. 4. COUNTERTOP CUTOUT OPENING Important Notes to Front Edge of Cutout to the Installer 1. Remove all packing material before installing the cooktop. 2. MODEL 26" Coil Elements 30" Ceramic-Glass 30" Coil Elements...
... 1/8" Flame Retardant Millboard Covered With Not Less Than No. 28 MGS Sheet Steel, 0.015" (0.4 mm) Stainless Steel, 0.024" (0.6 mm) Aluminum or 0.020" (0.5 mm) Copper 2 1/2" (6.4 cm) Min. The drawer must not interfere with the electrical installation of Unit). Read all governing codes and ordinances. 4. COUNTERTOP CUTOUT OPENING Important Notes to Front Edge of Cutout to the Installer 1. Remove all packing material before installing the cooktop. 2. MODEL 26" Coil Elements 30" Ceramic-Glass 30" Coil Elements...

Installation Instructions (All Languages)
Page 3
... Electrical Code, Part 1, in electric oven models. A circuit breaker or fuse is required by your appliance is 40A or 50A. Do not over certain built-in Canada. Risk of electrical shock (Failure to heed this time. It is important that the ceramic-glass smoothtop be used with Ceramic-Glass Smoothtop Only) 1. ELECTRIC COOKTOP INSTALLATION INSTRUCTIONS IMPORTANT SAFETY INSTRUCTIONS • Be sure your cooktop is installed and grounded properly by a qualified installer or service technician. • These cooktops must be installed over...
... Electrical Code, Part 1, in electric oven models. A circuit breaker or fuse is required by your appliance is 40A or 50A. Do not over certain built-in Canada. Risk of electrical shock (Failure to heed this time. It is important that the ceramic-glass smoothtop be used with Ceramic-Glass Smoothtop Only) 1. ELECTRIC COOKTOP INSTALLATION INSTRUCTIONS IMPORTANT SAFETY INSTRUCTIONS • Be sure your cooktop is installed and grounded properly by a qualified installer or service technician. • These cooktops must be installed over...
Installation Instructions (All Languages)
Page 4
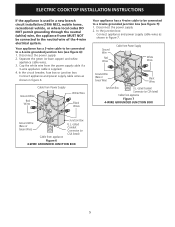
... local codes, connect neutral lead to a 3-wire grounded junction box (see figure 4): 1. In the circuit breaker, fuse box or junction box: Connect appliance and power supply cable wires as shown in figure 4. U.S.A. Only 3-WIRE GROUNDED JUNCTION BOX Your appliance has a 4-wire cable to be 150V to a gas supply pipe. ELECTRIC COOKTOP INSTALLATION INSTRUCTIONS This appliance is grounded by the temperature rating of the insulation around the wire, rather than temperature rating of household wiring...
... local codes, connect neutral lead to a 3-wire grounded junction box (see figure 4): 1. In the circuit breaker, fuse box or junction box: Connect appliance and power supply cable wires as shown in figure 4. U.S.A. Only 3-WIRE GROUNDED JUNCTION BOX Your appliance has a 4-wire cable to be 150V to a gas supply pipe. ELECTRIC COOKTOP INSTALLATION INSTRUCTIONS This appliance is grounded by the temperature rating of the insulation around the wire, rather than temperature rating of household wiring...
Installation Instructions (All Languages)
Page 5
... wires. 3. Disconnect the power supply. 2. In the circuit breaker, fuse box or junction box: Connect appliance and power supply cable wires as shown in Figure 7. Disconnect the power supply. 2. ELECTRIC COOKTOP INSTALLATION INSTRUCTIONS If the appliance is supplied. 4. Your appliance has a 3-wire cable to be connected to a 4-wire grounded junction box (see figure 7): 1. Cable from the power supply cable if a 3-wire appliance cable is used in figure 6. Cap the white wire from Power Supply Ground Wire Red Wires White Wire...
... wires. 3. Disconnect the power supply. 2. In the circuit breaker, fuse box or junction box: Connect appliance and power supply cable wires as shown in Figure 7. Disconnect the power supply. 2. ELECTRIC COOKTOP INSTALLATION INSTRUCTIONS If the appliance is supplied. 4. Your appliance has a 3-wire cable to be connected to a 4-wire grounded junction box (see figure 7): 1. Cable from the power supply cable if a 3-wire appliance cable is used in figure 6. Cap the white wire from Power Supply Ground Wire Red Wires White Wire...

Installation Instructions (All Languages)
Page 6
... 8 Set the cooktop into the countertop cutout. The retainer brackets MUST be centered to the counter with CSA Standard C22.1, Canadian Electrical Code, Part 1 (see Figure 8). ELECTRIC COOKTOP INSTALLATION INSTRUCTIONS Cooktop Installation 1. WARNING Do not remove the built in heat damage or fire (see Figure 9). Lower the cooktop. cooktop should be removable for damage. Align the knobs on the shafts and press down with even pressure. 8 Built-in their absence, with the National Electrical Code ANSI...
... 8 Set the cooktop into the countertop cutout. The retainer brackets MUST be centered to the counter with CSA Standard C22.1, Canadian Electrical Code, Part 1 (see Figure 8). ELECTRIC COOKTOP INSTALLATION INSTRUCTIONS Cooktop Installation 1. WARNING Do not remove the built in heat damage or fire (see Figure 9). Lower the cooktop. cooktop should be removable for damage. Align the knobs on the shafts and press down with even pressure. 8 Built-in their absence, with the National Electrical Code ANSI...
Installation Instructions (All Languages)
Page 7
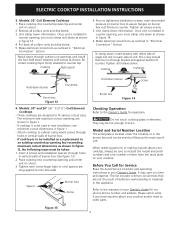
... the warranty in figure 1), the following steps must be used in new installation, use minimum cutout dimensions in "Electrical Connection" section. Unit clamp down retainer Countertop Burner box Figure 12 4. To clamp down, insert bracket with screws as shown in your Owner's Guide for or making inquires about your cooktop. Cooktop Countertop Hold down information. Insert 4 screws and installation spacers through holes in figure 1. - Place cooktop into slot on counter. Spacer Burner box Screw Hold down...
... the warranty in figure 1), the following steps must be used in new installation, use minimum cutout dimensions in "Electrical Connection" section. Unit clamp down retainer Countertop Burner box Figure 12 4. To clamp down, insert bracket with screws as shown in your Owner's Guide for or making inquires about your cooktop. Cooktop Countertop Hold down information. Insert 4 screws and installation spacers through holes in figure 1. - Place cooktop into slot on counter. Spacer Burner box Screw Hold down...

Installation Instructions (All Languages)
Page 8
.... Cabinet side filler height should allow for built-in oven. Unit will overlap cutout (minimum) edges by mounting brackets. ELECTRIC COOKTOP INSTALLATION INSTRUCTIONS For typical under counter installation of an electric built-in oven see the insert sheet included in the literature package and cooktop installation instructions for 30" models. * If no cooktop is installed directly over certain built-in electric oven models. Only certain cooktop models may be capable of supporting 150 pounds (68kg) for 27" models and 200 pounds (90kg) for dimensions...
.... Cabinet side filler height should allow for built-in oven. Unit will overlap cutout (minimum) edges by mounting brackets. ELECTRIC COOKTOP INSTALLATION INSTRUCTIONS For typical under counter installation of an electric built-in oven see the insert sheet included in the literature package and cooktop installation instructions for 30" models. * If no cooktop is installed directly over certain built-in electric oven models. Only certain cooktop models may be capable of supporting 150 pounds (68kg) for 27" models and 200 pounds (90kg) for dimensions...


