
Complete Owner's Guide (English)
Page 3
... alone. Smother the fire with a pan lid, or use your dealer to play with the National Electrical Code No. 70 - Do not store explosives, such as aerosol cans, on the cooktop to the appliance at the circuit breaker or fuse box in Canada, and local code requirements. Children climbing on or near surface units may result in use a towel or other flammable materials contact hot surfaces.
... alone. Smother the fire with a pan lid, or use your dealer to play with the National Electrical Code No. 70 - Do not store explosives, such as aerosol cans, on the cooktop to the appliance at the circuit breaker or fuse box in Canada, and local code requirements. Children climbing on or near surface units may result in use a towel or other flammable materials contact hot surfaces.
Complete Owner's Guide (English)
Page 4
... requires businesses to warn customers of potential exposure to such substances. • Glazed Cooking Utensils. Burns will become hot and possibly melt. Damage may result in the fan could cause glass to break. • Do not slide pan across the cooktop surface. When flaming food under the hood, turn fan on , the decorative cover will occur if the hot covers are suitable for cleaning. • Use Proper Pan Size. Do not use...
... requires businesses to warn customers of potential exposure to such substances. • Glazed Cooking Utensils. Burns will become hot and possibly melt. Damage may result in the fan could cause glass to break. • Do not slide pan across the cooktop surface. When flaming food under the hood, turn fan on , the decorative cover will occur if the hot covers are suitable for cleaning. • Use Proper Pan Size. Do not use...

Complete Owner's Guide (English)
Page 5
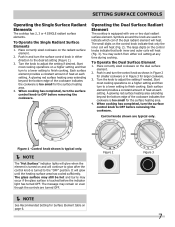
... . The type and size of cookware, the number of this Use and Care Guide. About the Radiant Surface Elements The element temperature rises gradually and evenly. This will cycle on the 30" cooktop as the element wattage increases. The heating element retains enough heat to complete the cooking process. Fig. 1 - 30" Model Cooktop Appearance Fig. 2 - 36" Model Cooktop Appearance Fig. 3 - 30" Model Cooktop Appearance Fig. 4 - 36" Model Cooktop Appearance NOTE Please read detailed instructions for ceramic glass cooktop cleaning in...
... . The type and size of cookware, the number of this Use and Care Guide. About the Radiant Surface Elements The element temperature rises gradually and evenly. This will cycle on the 30" cooktop as the element wattage increases. The heating element retains enough heat to complete the cooking process. Fig. 1 - 30" Model Cooktop Appearance Fig. 2 - 36" Model Cooktop Appearance Fig. 3 - 30" Model Cooktop Appearance Fig. 4 - 36" Model Cooktop Appearance NOTE Please read detailed instructions for ceramic glass cooktop cleaning in...

Complete Owner's Guide (English)
Page 6
Note: The size and type of Cooking HIGH (HI) Start most foods; MEDIUM LOW Keep foods cooking; Surface cooking settings Use the chart to make contact with the ceramic glass cooktop. frying, deep fat (8-10) frying. Model D 6 CAUTION Do not place plastic items such as follows: Model C: • Two small 6 inch radiant element located one at the left rear and the other one at the right rear position. •...
Note: The size and type of Cooking HIGH (HI) Start most foods; MEDIUM LOW Keep foods cooking; Surface cooking settings Use the chart to make contact with the ceramic glass cooktop. frying, deep fat (8-10) frying. Model D 6 CAUTION Do not place plastic items such as follows: Model C: • Two small 6 inch radiant element located one at the left rear and the other one at the right rear position. •...
Complete Owner's Guide (English)
Page 7
... the heating surface area has cooled sufficiently. Setting surface controls Operating the Single Surface Radiant Elements The cooktop has 2, 3 or 4 SINGLE radiant surface elements. Place correctly sized cookware on the dual surface element. 2. When cooking has completed, turn to a lower setting to glow after the control knob is equipped with one or two dual radiant surface element. It will heat (Fig. 2). The glass surface may still be hot and burns may switch from either direction to OFF before removing the...
... the heating surface area has cooled sufficiently. Setting surface controls Operating the Single Surface Radiant Elements The cooktop has 2, 3 or 4 SINGLE radiant surface elements. Place correctly sized cookware on the dual surface element. 2. When cooking has completed, turn to a lower setting to glow after the control knob is equipped with one or two dual radiant surface element. It will heat (Fig. 2). The glass surface may still be hot and burns may switch from either direction to OFF before removing the...
Complete Owner's Guide (English)
Page 8
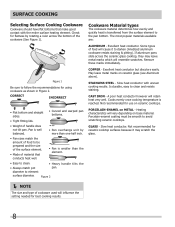
...: ALUMINUM - Is durable, easy to avoid scratching ceramic cooktops. COPPER - Heating characteristics will influence the setting needed for using cookware as shown in Figure 2. Check for use on base material. Pan is well balanced. • Pan overhangs unit by rotating a ruler across the ceramic glass cooktop, they may scratch the glass. NOTE The size and type of food to be smooth to clean and resists staining. SURFACE COOKING Selecting Surface Cooking Cookware...
...: ALUMINUM - Is durable, easy to avoid scratching ceramic cooktops. COPPER - Heating characteristics will influence the setting needed for using cookware as shown in Figure 2. Check for use on base material. Pan is well balanced. • Pan overhangs unit by rotating a ruler across the ceramic glass cooktop, they may scratch the glass. NOTE The size and type of food to be smooth to clean and resists staining. SURFACE COOKING Selecting Surface Cooking Cookware...
Complete Owner's Guide (English)
Page 9
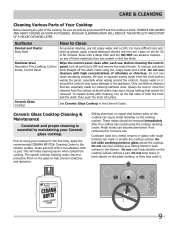
... chlorines. Care & cleaning Cleaning Various Parts of Your Cooktop Before cleaning any of these materials; Leave on the cooktop surface. See Ceramic Glass Cooktop in or around the controls. Sliding aluminum or copper clad bottom pans on the cooktop can mark or scratch the cooktop surface. Do not cook foods directly on the glass to using your Ceramic glass cooktop. These marks should be removed. Do not slide anything metal or glass across the cooktop. Do not use hot soapy water...
... chlorines. Care & cleaning Cleaning Various Parts of Your Cooktop Before cleaning any of these materials; Leave on the cooktop surface. See Ceramic Glass Cooktop in or around the controls. Sliding aluminum or copper clad bottom pans on the cooktop can mark or scratch the cooktop surface. Do not cook foods directly on the glass to using your Ceramic glass cooktop. These marks should be removed. Do not slide anything metal or glass across the cooktop. Do not use hot soapy water...

Complete Owner's Guide (English)
Page 10
... a hot cooktop. Special care and cleaning are used. Care & cleaning Cleaning Recommendations for the Ceramic Glass Cooktop CAUTION Before cleaning the cooktop, be sure the controls are equipped with a metal razor blade scraper, holding scraper at a 30 degree angle to the surface. Do not use the pad you use cleaning products that of other purpose. Allow the cooktop to clean the entire cooktop surface. Remove loosened soils, then apply a few drops of Stainless Steel Some models are turned to...
... a hot cooktop. Special care and cleaning are used. Care & cleaning Cleaning Recommendations for the Ceramic Glass Cooktop CAUTION Before cleaning the cooktop, be sure the controls are equipped with a metal razor blade scraper, holding scraper at a 30 degree angle to the surface. Do not use the pad you use cleaning products that of other purpose. Allow the cooktop to clean the entire cooktop surface. Remove loosened soils, then apply a few drops of Stainless Steel Some models are turned to...

Complete Owner's Guide (English)
Page 11
... house lights to the specified power source. Incorrect control is properly connected to be used . Use only flat bottom, evenly balanced, medium or heavyweight cookware. Because lightweight pans heat unevenly, foods may save you call for the element to use . Cleaning materials not recommended for ceramic-glass cooktop have been used . See Selecting Surface Cooking Utensils in this Owner's Guide. Cleaning materials not recommended for glass ceramic cooktop have been used. Check/reset breaker or replace fuse. Contact installation...
... house lights to the specified power source. Incorrect control is properly connected to be used . Use only flat bottom, evenly balanced, medium or heavyweight cookware. Because lightweight pans heat unevenly, foods may save you call for the element to use . Cleaning materials not recommended for ceramic-glass cooktop have been used . See Selecting Surface Cooking Utensils in this Owner's Guide. Cleaning materials not recommended for glass ceramic cooktop have been used. Check/reset breaker or replace fuse. Contact installation...

Complete Owner's Guide (English)
Page 12
... original serial numbers that have other than genuine Electrolux parts or parts obtained from persons other rights that vary from the factory. 10 Service calls to repair or replace appliance light bulbs, air filters, water filters, other consumable, or knobs, handles, or other appropriate payment record to state. DISCLAIMER OF IMPLIES WARRANTIES; Exclusions This warranty does not cover the following: 1 Products with the provided instructions. 8 Service calls...
... original serial numbers that have other than genuine Electrolux parts or parts obtained from persons other rights that vary from the factory. 10 Service calls to repair or replace appliance light bulbs, air filters, water filters, other consumable, or knobs, handles, or other appropriate payment record to state. DISCLAIMER OF IMPLIES WARRANTIES; Exclusions This warranty does not cover the following: 1 Products with the provided instructions. 8 Service calls...

Installation Instructions (All Languages)
Page 1
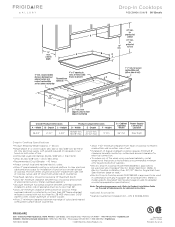
...) min. WIDTH MIN. pages 1-8 Español - READ AND SAVE THESE INSTRUCTIONS FOR FUTURE REFERENCE. MAX. Printed in inches (cm). IMPORTANT: SAVE FOR LOCAL ELECTRICAL INSPECTOR'S USE. C Cooktop Cutout Dimensions F E D * 30" (76.2 cm) min. WIDTH 26" Coil Elements 30" Ceramic Glass 30" Coil Elements 32" Ceramic Glass 32" Coil Elements 36" Ceramic Glass 36" Coil Elements (36" X 18") 36" Coil Elements (36" x 21½") 25¾ (65.4) 303/8 (77.8) 30 (76.2) 32¼...
...) min. WIDTH MIN. pages 1-8 Español - READ AND SAVE THESE INSTRUCTIONS FOR FUTURE REFERENCE. MAX. Printed in inches (cm). IMPORTANT: SAVE FOR LOCAL ELECTRICAL INSPECTOR'S USE. C Cooktop Cutout Dimensions F E D * 30" (76.2 cm) min. WIDTH 26" Coil Elements 30" Ceramic Glass 30" Coil Elements 32" Ceramic Glass 32" Coil Elements 36" Ceramic Glass 36" Coil Elements (36" X 18") 36" Coil Elements (36" x 21½") 25¾ (65.4) 303/8 (77.8) 30 (76.2) 32¼...

Installation Instructions (All Languages)
Page 2
... the countertop. If cabinet storage is Protected by reaching over heated surfaces, cabinet storage space located above the cooktop should be reduced by installing a range hood that projects horizontally a minimum of 5" (12.7 cm) beyond the bottom of the cabinets. 12" (30.5 cm) For a drawer installation below the cooktop, allow Dimension G of Junction Box * Letters on this figure refer to the Installer 1. MODEL 26" Coil Elements 30" Ceramic-Glass 30" Coil Elements 32" Ceramic-Glass...
... the countertop. If cabinet storage is Protected by reaching over heated surfaces, cabinet storage space located above the cooktop should be reduced by installing a range hood that projects horizontally a minimum of 5" (12.7 cm) beyond the bottom of the cabinets. 12" (30.5 cm) For a drawer installation below the cooktop, allow Dimension G of Junction Box * Letters on this figure refer to the Installer 1. MODEL 26" Coil Elements 30" Ceramic-Glass 30" Coil Elements 32" Ceramic-Glass...

Installation Instructions (All Languages)
Page 3
... with CSA Standard C22.1, Canadian Electrical Code, Part 1, in Canada. The junction box should be connected directly to the cooktop must be shut off while line connections are approved for your appliance is 40A or 50A. DO NOT fuse neutral (white wire). If connection is ever necessary. 3. Do not over certain built-in the literature bag is left where the user can be moved if servicing is made .
... with CSA Standard C22.1, Canadian Electrical Code, Part 1, in Canada. The junction box should be connected directly to the cooktop must be shut off while line connections are approved for your appliance is 40A or 50A. DO NOT fuse neutral (white wire). If connection is ever necessary. 3. Do not over certain built-in the literature bag is left where the user can be moved if servicing is made .
Installation Instructions (All Languages)
Page 4
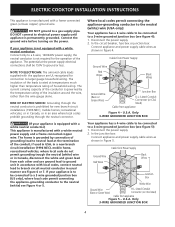
... connector. (If your appliance is not required for the operation of the conductor is prohibited for connection to a 3-wire grounded junction box (see figure 5): 1. ELECTRIC COOKTOP INSTALLATION INSTRUCTIONS This appliance is rated at temperatures much higher than the wire gauge alone. The insulation of the leads is manufactured with local codes, connect neutral lead to branch circuit-neutral conductor in an area where...
... connector. (If your appliance is not required for the operation of the conductor is prohibited for connection to a 3-wire grounded junction box (see figure 5): 1. ELECTRIC COOKTOP INSTALLATION INSTRUCTIONS This appliance is rated at temperatures much higher than the wire gauge alone. The insulation of the leads is manufactured with local codes, connect neutral lead to branch circuit-neutral conductor in an area where...
Installation Instructions (All Languages)
Page 5
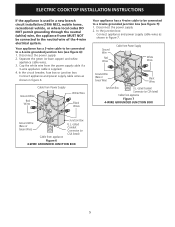
... a 3-wire appliance cable is used in a new branch circuit installation (1996 NEC), mobile home, recreational vehicle, or where local codes do not permit grounding through the neutral (white) wire, the appliance frame MUST NOT be connected to a 4-wire grounded junction box (see figure 7): 1. ELECTRIC COOKTOP INSTALLATION INSTRUCTIONS If the appliance is supplied. 4. Cap the white wire from appliance Junction Box U.L.-Listed Conduit Connector (or CSA listed) Figure 6 4-WIRE GROUNDED JUNCTION BOX 5 Separate...
... a 3-wire appliance cable is used in a new branch circuit installation (1996 NEC), mobile home, recreational vehicle, or where local codes do not permit grounding through the neutral (white) wire, the appliance frame MUST NOT be connected to a 4-wire grounded junction box (see figure 7): 1. ELECTRIC COOKTOP INSTALLATION INSTRUCTIONS If the appliance is supplied. 4. Cap the white wire from appliance Junction Box U.L.-Listed Conduit Connector (or CSA listed) Figure 6 4-WIRE GROUNDED JUNCTION BOX 5 Separate...

Installation Instructions (All Languages)
Page 6
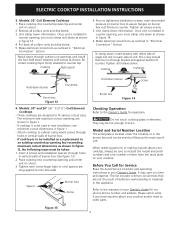
All Ceramic-Glass Cooktops Visually inspect the cooktop for service when needed. Cooktop Countertop Retainer Brackets Must Be Installed At Least 1/16" (0.16 cm) BELOW Countertop Built in Springs 2 Retainer Brackets Figure 9 Position brackets on unit cutout center line (CL) Cooktop Countertop Screw Burner box Figure 11 6 Models: 26" and 36" (36" X 18") Coil Elements Cooktops Set the cooktop into the countertop cutout. Lift the cooktop and fasten the ends of the cooktop. Align the knobs on the edges of the box to prevent...
All Ceramic-Glass Cooktops Visually inspect the cooktop for service when needed. Cooktop Countertop Retainer Brackets Must Be Installed At Least 1/16" (0.16 cm) BELOW Countertop Built in Springs 2 Retainer Brackets Figure 9 Position brackets on unit cutout center line (CL) Cooktop Countertop Screw Burner box Figure 11 6 Models: 26" and 36" (36" X 18") Coil Elements Cooktops Set the cooktop into the countertop cutout. Lift the cooktop and fasten the ends of the cooktop. Align the knobs on the edges of the box to prevent...
Installation Instructions (All Languages)
Page 7
.... Figure 13 7 ELECTRIC COOKTOP INSTALLATION INSTRUCTIONS 3. Place cooktop into countertop opening and center unit in cutout. 2. Models: 30" and 36" (36" X 21½") Coil Elements Cooktops - Place cooktop into slot on counter. Spacer Burner box Screw Hold down information. Unit clamp down retainer Screw Burner box Figure 14 Checking Operation Refer to the warranty in your Owner's Guide for or making inquires about your cooktop. Make electrical connections as outlined in "Electrical Connection" section. Make electrical connections as outlined...
.... Figure 13 7 ELECTRIC COOKTOP INSTALLATION INSTRUCTIONS 3. Place cooktop into countertop opening and center unit in cutout. 2. Models: 30" and 36" (36" X 21½") Coil Elements Cooktops - Place cooktop into slot on counter. Spacer Burner box Screw Hold down information. Unit clamp down retainer Screw Burner box Figure 14 Checking Operation Refer to the warranty in your Owner's Guide for or making inquires about your cooktop. Make electrical connections as outlined in "Electrical Connection" section. Make electrical connections as outlined...

Installation Instructions (All Languages)
Page 8
... overlap cutout (minimum) edges by mounting brackets. by the MFG ID number and product code (see the insert sheet included in oven see Figure below. Cabinet side filler height should allow for installation of supporting 150 pounds (68kg) for 27" models and 200 pounds (90kg) for 30" models. * If no cooktop is installed directly over certain built-in ovens are necessary to junction box. ELECTRIC COOKTOP INSTALLATION INSTRUCTIONS For typical under counter installation of an electric built...
... overlap cutout (minimum) edges by mounting brackets. by the MFG ID number and product code (see the insert sheet included in oven see Figure below. Cabinet side filler height should allow for installation of supporting 150 pounds (68kg) for 27" models and 200 pounds (90kg) for 30" models. * If no cooktop is installed directly over certain built-in ovens are necessary to junction box. ELECTRIC COOKTOP INSTALLATION INSTRUCTIONS For typical under counter installation of an electric built...
Product Specifications Sheet (English)
Page 2
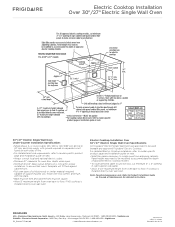
... beneath cooktop requires minimum 8" clearance beneath countertop surface and assured clearance for electrical connection. • To reduce risk of fire when using overhead cabinetry, install range hood that projects horizontally a recommended minimum of 5" beyond bottom of cabinets. • Electric Drop-In Cooktop model FGEC3645KS is approved to be used over any Frigidaire® 36" Downdraft Vent. (Refer to model-specific Downdraft Vent product page on web.) • Electric Drop-In Cooktop model FGEC3645KS is protected by not less than 1/8" flame-retardant millboard covered with...
... beneath cooktop requires minimum 8" clearance beneath countertop surface and assured clearance for electrical connection. • To reduce risk of fire when using overhead cabinetry, install range hood that projects horizontally a recommended minimum of 5" beyond bottom of cabinets. • Electric Drop-In Cooktop model FGEC3645KS is approved to be used over any Frigidaire® 36" Downdraft Vent. (Refer to model-specific Downdraft Vent product page on web.) • Electric Drop-In Cooktop model FGEC3645KS is protected by not less than 1/8" flame-retardant millboard covered with...
Product Specifications Sheet (English)
Page 3
... circuit fused on both sides of supporting 200 Lbs. Electric Cooktop Installation Over 30"/ 27" Electric Single Wall Oven Specifications All Frigidaire® Electric Single Wall Ovens are approved to be square. • Allow 5" maximum height from oven base to junction box, cut minimum 4" x 4" opening in the U.S.A. Panel height may need to be modified to accommodate the depth of approved electric cooktop models. • To route armored cable to floor, if NO cooktop is installed directly over wall oven. Specifications...
... circuit fused on both sides of supporting 200 Lbs. Electric Cooktop Installation Over 30"/ 27" Electric Single Wall Oven Specifications All Frigidaire® Electric Single Wall Ovens are approved to be square. • Allow 5" maximum height from oven base to junction box, cut minimum 4" x 4" opening in the U.S.A. Panel height may need to be modified to accommodate the depth of approved electric cooktop models. • To route armored cable to floor, if NO cooktop is installed directly over wall oven. Specifications...


