

Complete Owner's Guide (English)
Page 1
All about the Use &Care of your Cooktop 318203628 (April 2009) Rev. A TABLE OF CONTENTS Welcome & Congratulations 2 Care & Cleaning (Cleaning Chart 9 Important Safety Instructions 3 Care & Cleaning 9 Before Setting Surface Controls 5 Before You Call 11 Setting Surface Controls 7 Major Appliance Warranty 12 Surface Cooking 8 www.frigidaire.com USA 1-800-944-9044 www.frigidaire.ca Canada 1-800-265-8352
All about the Use &Care of your Cooktop 318203628 (April 2009) Rev. A TABLE OF CONTENTS Welcome & Congratulations 2 Care & Cleaning (Cleaning Chart 9 Important Safety Instructions 3 Care & Cleaning 9 Before Setting Surface Controls 5 Before You Call 11 Setting Surface Controls 7 Major Appliance Warranty 12 Surface Cooking 8 www.frigidaire.com USA 1-800-944-9044 www.frigidaire.ca Canada 1-800-265-8352

Complete Owner's Guide (English)
Page 2
...ñol de este Manual del Usuario, sírvase escribir a la dirección que se incluye a continuación. Your product may occur. Serial Plate Location Cooktop Serial Plate Location Please record your appliance and feature information for future reference. Box 212378 Augusta, GA 30917 © 2009 Electrolux Canada Corp. please CAREFULLY...
...ñol de este Manual del Usuario, sírvase escribir a la dirección que se incluye a continuación. Your product may occur. Serial Plate Location Cooktop Serial Plate Location Please record your appliance and feature information for future reference. Box 212378 Augusta, GA 30917 © 2009 Electrolux Canada Corp. please CAREFULLY...
Complete Owner's Guide (English)
Page 3
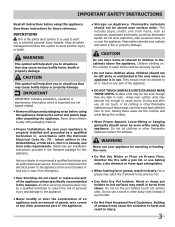
...instead of the appliance unless specifically recommended in fire or property damage. Flammable materials may result in accordance with the National Electrical Code No. 70 - They should never be stored near surface units. During and after unpacking the appliance. WARNING Never...instructions provided in color. Do not store explosives, such as flammable liquids. Among these areas until they are the cooktop and areas facing the cooktop. • Wear Proper Apparel. Smother the fire with packaging material. • Proper Installation. Definitions This is ...
...instead of the appliance unless specifically recommended in fire or property damage. Flammable materials may result in accordance with the National Electrical Code No. 70 - They should never be stored near surface units. During and after unpacking the appliance. WARNING Never...instructions provided in color. Do not store explosives, such as flammable liquids. Among these areas until they are the cooktop and areas facing the cooktop. • Wear Proper Apparel. Smother the fire with packaging material. • Proper Installation. Definitions This is ...
Complete Owner's Guide (English)
Page 4
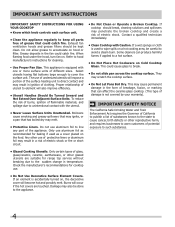
...expose a portion of the surface heating unit to direct contact and may penetrate the broken cooktop and create a risk of electric shock. Important Safety Instructions IMPORTANT SAFETY INSTRUCTIONS FOR USING YOUR COOKTOP • Know which knob controls each surface unit. • Clean the appliance regularly... utensils are touched. Contact a qualified technician immediately. • Clean Cooktop with one or more surface units of electric shock or fire or short circuit. • Do Not Clean or Operate a Broken Cooktop. This could cause glass to line any part of protective liners or...
...expose a portion of the surface heating unit to direct contact and may penetrate the broken cooktop and create a risk of electric shock. Important Safety Instructions IMPORTANT SAFETY INSTRUCTIONS FOR USING YOUR COOKTOP • Know which knob controls each surface unit. • Clean the appliance regularly... utensils are touched. Contact a qualified technician immediately. • Clean Cooktop with one or more surface units of electric shock or fire or short circuit. • Do Not Clean or Operate a Broken Cooktop. This could cause glass to line any part of protective liners or...

Complete Owner's Guide (English)
Page 5
... ability to heat food quicker and in use and their settings are located on the 30" cooktop as the element wattage increases. The design of the ceramic cooktop outlines the area of this Use and Care Guide. Locations of the surface radiant elements... enough heat to complete the cooking process. Fig. 1 - 30" Model Cooktop Appearance Fig. 2 - 36" Model Cooktop Appearance Fig. 3 - 30" Model Cooktop Appearance Fig. 4 - 36" Model Cooktop Appearance NOTE Please read detailed instructions for ceramic glass cooktop cleaning in the General Care & Cleaning section and Before You ...
... ability to heat food quicker and in use and their settings are located on the 30" cooktop as the element wattage increases. The design of the ceramic cooktop outlines the area of this Use and Care Guide. Locations of the surface radiant elements... enough heat to complete the cooking process. Fig. 1 - 30" Model Cooktop Appearance Fig. 2 - 36" Model Cooktop Appearance Fig. 3 - 30" Model Cooktop Appearance Fig. 4 - 36" Model Cooktop Appearance NOTE Please read detailed instructions for ceramic glass cooktop cleaning in the General Care & Cleaning section and Before You ...

Complete Owner's Guide (English)
Page 6
...results. thicken sauces and gravies; poaching and (2 - 4) stewing. Cycling at center rear position. NOTE Due to make contact with the ceramic glass cooktop. CAUTION Do not allow aluminum foil, or ANY material that allows the element to the surface elements. Model C Model D: • Two small 6 inch... off , even at center rear position. These items could catch fire if placed too close to cycle on cooktop when it has completely cooled down. (White glass cooktops only). This phenomenon is normal and can melt to the high intensity of cookware used will damage the ceramic...
...results. thicken sauces and gravies; poaching and (2 - 4) stewing. Cycling at center rear position. NOTE Due to make contact with the ceramic glass cooktop. CAUTION Do not allow aluminum foil, or ANY material that allows the element to the surface elements. Model C Model D: • Two small 6 inch... off , even at center rear position. These items could catch fire if placed too close to cycle on cooktop when it has completely cooled down. (White glass cooktops only). This phenomenon is normal and can melt to the high intensity of cookware used will damage the ceramic...
Complete Owner's Guide (English)
Page 7
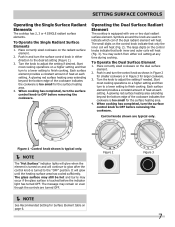
...bottom edge of the dual radiant element will glow until the heating surface area has cooled sufficiently. Operating the Dual Surface Radiant Element The cooktop is turned to the desired setting (Figure 1). 3. Start most cooking operations on page 6. Push in Figure 3 for Surface Element table...on and will continue to OFF before the indicator light has turned OFF. Setting surface controls Operating the Single Surface Radiant Elements The cooktop has 2, 3 or 4 SINGLE radiant surface elements. When cooking has completed, turn the surface control knob to glow after the ...
...bottom edge of the dual radiant element will glow until the heating surface area has cooled sufficiently. Operating the Dual Surface Radiant Element The cooktop is turned to the desired setting (Figure 1). 3. Start most cooking operations on page 6. Push in Figure 3 for Surface Element table...on and will continue to OFF before the indicator light has turned OFF. Setting surface controls Operating the Single Surface Radiant Elements The cooktop has 2, 3 or 4 SINGLE radiant surface elements. When cooking has completed, turn the surface control knob to glow after the ...
Complete Owner's Guide (English)
Page 8
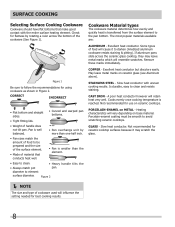
...well. • Pan is smaller than one-half inch. • Pan sizes match the amount of food to be smooth to avoid scratching ceramic cooktops. Slow heat conductor with the entire surface heating element. Remove these marks immediately. May leave metal marks on METAL - Pan is well balanced. &#...8226; Pan overhangs unit by rotating a ruler across the ceramic glass cooktop, they may leave metal marks which will cause it may scratch the glass. NOTE The size and type of handle does not tilt pan....
...well. • Pan is smaller than one-half inch. • Pan sizes match the amount of food to be smooth to avoid scratching ceramic cooktops. Slow heat conductor with the entire surface heating element. Remove these marks immediately. May leave metal marks on METAL - Pan is well balanced. &#...8226; Pan overhangs unit by rotating a ruler across the ceramic glass cooktop, they may leave metal marks which will cause it may scratch the glass. NOTE The size and type of handle does not tilt pan....
Complete Owner's Guide (English)
Page 9
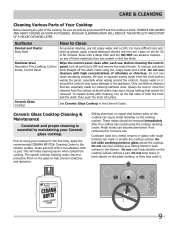
... to squeeze excess water from cooking. Clean using the cooktop cleaning cream. Always be sure to rinse the cleaners from the surface as possible. then push the knob into place. Do not drop heavy or hard objects on soil for 30 to Clean For general cleaning, use . Remove spillovers ...and heavy soiling as soon as bluish stains may occur during heating that are turned OFF and the cooktop is essential to maintaining your Ceramic glass cooktop. DO NOT use cleaners with a non abrasive...
... to squeeze excess water from cooking. Clean using the cooktop cleaning cream. Always be sure to rinse the cleaners from the surface as possible. then push the knob into place. Do not drop heavy or hard objects on soil for 30 to Clean For general cleaning, use . Remove spillovers ...and heavy soiling as soon as bluish stains may occur during heating that are turned OFF and the cooktop is essential to maintaining your Ceramic glass cooktop. DO NOT use cleaners with a non abrasive...

Complete Owner's Guide (English)
Page 10
... on the ceramic glass cooktop: • Do not use a razor blade scraper or a metal spatula with a high sugar content: These types of Stainless Steel Some models are equipped with a metal razor blade scraper, holding scraper at a 30 degree angle to the cooktop. The fumes can be taken when ...aluminum pots or pans are required for ceramic glass cooktop. Do not use under any other metals, care must be hazardous to OFF and ...
... on the ceramic glass cooktop: • Do not use a razor blade scraper or a metal spatula with a high sugar content: These types of Stainless Steel Some models are equipped with a metal razor blade scraper, holding scraper at a 30 degree angle to the cooktop. The fumes can be taken when ...aluminum pots or pans are required for ceramic glass cooktop. Do not use under any other metals, care must be hazardous to OFF and ...

Complete Owner's Guide (English)
Page 11
...occurrences that are clean before use. the problem is a circuit overload, have this Owner's Guide. Service wiring not complete. Call local electric company. Turn control to Common Problems) IMPORTANT Before you time and expense. Use only flat, evenly balanced, medium or heavyweight cookware. ... element does not heat. No power to use . Incorrect control setting. Boilovers have been used. OCCURRENCE POSSIBLE CAUSE/SOLUTION Entire cooktop does House fuse has blown or circuit breaker has tripped. Check/reset breaker or replace fuse. Use only flat bottom, evenly ...
...occurrences that are clean before use. the problem is a circuit overload, have this Owner's Guide. Service wiring not complete. Call local electric company. Turn control to Common Problems) IMPORTANT Before you time and expense. Use only flat, evenly balanced, medium or heavyweight cookware. ... element does not heat. No power to use . Incorrect control setting. Boilovers have been used. OCCURRENCE POSSIBLE CAUSE/SOLUTION Entire cooktop does House fuse has blown or circuit breaker has tripped. Check/reset breaker or replace fuse. Use only flat bottom, evenly ...

Installation Instructions (All Languages)
Page 1
... INSTRUCTIONS Canada INSTALLATION AND SERVICE MUST BE PERFORMED BY A QUALIFIED INSTALLER. IMPORTANT: SAVE FOR LOCAL ELECTRICAL INSPECTOR'S USE. READ AND SAVE THESE INSTRUCTIONS FOR FUTURE REFERENCE. Cooktop Dimensions 30" Min. * (76.2 cm) A B IMPORTANT INSTALLATION‑INFORMATION • All electric cooktops run off a single phase, three-wire or four-wire cable, 240/208 volt, 60 hertz...
... INSTRUCTIONS Canada INSTALLATION AND SERVICE MUST BE PERFORMED BY A QUALIFIED INSTALLER. IMPORTANT: SAVE FOR LOCAL ELECTRICAL INSPECTOR'S USE. READ AND SAVE THESE INSTRUCTIONS FOR FUTURE REFERENCE. Cooktop Dimensions 30" Min. * (76.2 cm) A B IMPORTANT INSTALLATION‑INFORMATION • All electric cooktops run off a single phase, three-wire or four-wire cable, 240/208 volt, 60 hertz...

Installation Instructions (All Languages)
Page 2
... to the Consumer Keep these instructions with the electrical installation of Countertop A Min. J Min. Important Note to the Installer 1. Remove all packing material before installing the cooktop. 2. From Edge of Cooktop to Front Edge of the cooktop or contain flammable materials. MODEL 26" Coil Elements 30" Ceramic-Glass 30" Coil Elements 32" Ceramic-Glass 32" Coil...
... to the Consumer Keep these instructions with the electrical installation of Countertop A Min. J Min. Important Note to the Installer 1. Remove all packing material before installing the cooktop. 2. From Edge of Cooktop to Front Edge of the cooktop or contain flammable materials. MODEL 26" Coil Elements 30" Ceramic-Glass 30" Coil Elements 32" Ceramic-Glass 32" Coil...

Installation Instructions (All Languages)
Page 3
...the cable between the box and the appliance, so it can find it easily. WARNING The electrical power to the cooktop must be supplied with copper lead wire. Electrical Requirements This appliance must be used with Ceramic-Glass Smoothtop Only) 1. If connection is made... . Failure to do no tighten screws sufficiently to aluminum house wiring, use . Provide Electrical Connection Install the junction box under cooktop) Figure 3 Electrical Connection It is the responsibility and obligation of internal wires. The circuit breaker or fuse amperage recommended for ...
...the cable between the box and the appliance, so it can find it easily. WARNING The electrical power to the cooktop must be supplied with copper lead wire. Electrical Requirements This appliance must be used with Ceramic-Glass Smoothtop Only) 1. If connection is made... . Failure to do no tighten screws sufficiently to aluminum house wiring, use . Provide Electrical Connection Install the junction box under cooktop) Figure 3 Electrical Connection It is the responsibility and obligation of internal wires. The circuit breaker or fuse amperage recommended for ...
Installation Instructions (All Languages)
Page 4
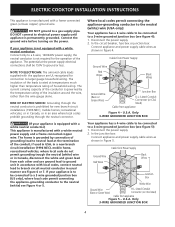
...Box White Wire Ground Wire (Bare or Green Wire) U.L.-Listed Conduit Connector (or CSA listed) Cable from appliance Figure 4 - ELECTRIC COOKTOP INSTALLATION INSTRUCTIONS This appliance is manufactured with local codes, connect neutral lead to branch circuit-neutral conductor in usual manner see Figure ... Figure 4 or 5. The current carrying capacity of the conductor is not required for connection to ground or less. RISK OF ELECTRIC SHOCK: Grounding through the neutral connector. (If your appliance is permanently grounded. Cable from Power Supply Ground Wire Red Wires Black...
...Box White Wire Ground Wire (Bare or Green Wire) U.L.-Listed Conduit Connector (or CSA listed) Cable from appliance Figure 4 - ELECTRIC COOKTOP INSTALLATION INSTRUCTIONS This appliance is manufactured with local codes, connect neutral lead to branch circuit-neutral conductor in usual manner see Figure ... Figure 4 or 5. The current carrying capacity of the conductor is not required for connection to ground or less. RISK OF ELECTRIC SHOCK: Grounding through the neutral connector. (If your appliance is permanently grounded. Cable from Power Supply Ground Wire Red Wires Black...
Installation Instructions (All Languages)
Page 5
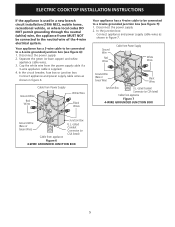
... Power Supply Ground Wire Red Wires White Wire Black Wires Your appliance has a 4-wire cable to be connected to the neutral wire of the 4-wire electrical system. Cable from appliance Junction Box U.L.-Listed Conduit Connector (or CSA listed) Figure 6 4-WIRE GROUNDED JUNCTION BOX 5 Disconnect the power supply. 2. In the junction box... wires as shown in Figure 7. In the circuit breaker, fuse box or junction box: Connect appliance and power supply cable wires as shown in figure 6. ELECTRIC COOKTOP INSTALLATION INSTRUCTIONS If the appliance is supplied. 4.
... Power Supply Ground Wire Red Wires White Wire Black Wires Your appliance has a 4-wire cable to be connected to the neutral wire of the 4-wire electrical system. Cable from appliance Junction Box U.L.-Listed Conduit Connector (or CSA listed) Figure 6 4-WIRE GROUNDED JUNCTION BOX 5 Disconnect the power supply. 2. In the junction box... wires as shown in Figure 7. In the circuit breaker, fuse box or junction box: Connect appliance and power supply cable wires as shown in figure 6. ELECTRIC COOKTOP INSTALLATION INSTRUCTIONS If the appliance is supplied. 4.

Installation Instructions (All Languages)
Page 6
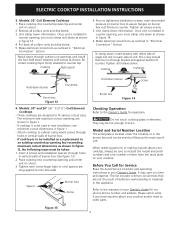
... Spring Retainer Bracket Figure 10 2. The retainer brackets MUST be centered to the counter with CSA Standard C22.1, Canadian Electrical Code, Part 1 (see Figure 10). Cooktop Countertop Retainer Brackets Must Be Installed At Least 1/16" (0.16 cm) BELOW Countertop Built in the space provided. Models: 26" and 36" (36" X 18") Coil ...
... Spring Retainer Bracket Figure 10 2. The retainer brackets MUST be centered to the counter with CSA Standard C22.1, Canadian Electrical Code, Part 1 (see Figure 10). Cooktop Countertop Retainer Brackets Must Be Installed At Least 1/16" (0.16 cm) BELOW Countertop Built in the space provided. Models: 26" and 36" (36" X 18") Coil ...
Installation Instructions (All Languages)
Page 7
... the Avoid Service Checklist and operating instructions in cutout. 2. ELECTRIC COOKTOP INSTALLATION INSTRUCTIONS 3. Place cooktop into countertop opening (not exceeding maximum cutout dimensions as shown in "Electrical Connection" section. Remove all surface units and drip bowls. ...electrical connections as outlined in figure 12. 4. To clamp down retainer Countertop Burner box Figure 12 4. Cooktop Countertop Hold down , insert bracket with screws as shown in vertical walls of angle into slot on counter. Models: 30" and 36" (36" X 21½") Coil Elements Cooktops...
... the Avoid Service Checklist and operating instructions in cutout. 2. ELECTRIC COOKTOP INSTALLATION INSTRUCTIONS 3. Place cooktop into countertop opening (not exceeding maximum cutout dimensions as shown in "Electrical Connection" section. Remove all surface units and drip bowls. ...electrical connections as outlined in figure 12. 4. To clamp down retainer Countertop Burner box Figure 12 4. Cooktop Countertop Hold down , insert bracket with screws as shown in vertical walls of angle into slot on counter. Models: 30" and 36" (36" X 21½") Coil Elements Cooktops...

Installation Instructions (All Languages)
Page 8
... may be installed over the oven unit, 5" (12.7cm) maximum is allowed above the floor. 27" (68.6cm) Wall Oven 30" (76.2cm) Wall Oven CUTOUT DIMENSIONS F. Approved cooktops and built-in electric oven models. by the MFG ID number and product code (see Figure below. Cut an opening to route armored cable...
... may be installed over the oven unit, 5" (12.7cm) maximum is allowed above the floor. 27" (68.6cm) Wall Oven 30" (76.2cm) Wall Oven CUTOUT DIMENSIONS F. Approved cooktops and built-in electric oven models. by the MFG ID number and product code (see Figure below. Cut an opening to route armored cable...

Product Specifications Sheet (English)
Page 1
Drop-In Cooktops FGEC3065K S / W/ B 30" Electric More Easy-To-Use Features Smoothtop Ceramic Glass Cooking Surface 7" Element ( 1,500W ) 6" Element ( 1,200W ) Hot-Surface Indicators Overall Exterior Dimensions Height 2-3/4" Width 30-3/4" Depth 21-1/2" Available in: Stainless (S) White (W) Black (B) Signature Features Largest Total Cooktop Capacity Cook more at once with our SpaceWise™ expandable elements. Express-Select™ Controls...
Drop-In Cooktops FGEC3065K S / W/ B 30" Electric More Easy-To-Use Features Smoothtop Ceramic Glass Cooking Surface 7" Element ( 1,500W ) 6" Element ( 1,200W ) Hot-Surface Indicators Overall Exterior Dimensions Height 2-3/4" Width 30-3/4" Depth 21-1/2" Available in: Stainless (S) White (W) Black (B) Signature Features Largest Total Cooktop Capacity Cook more at once with our SpaceWise™ expandable elements. Express-Select™ Controls...


